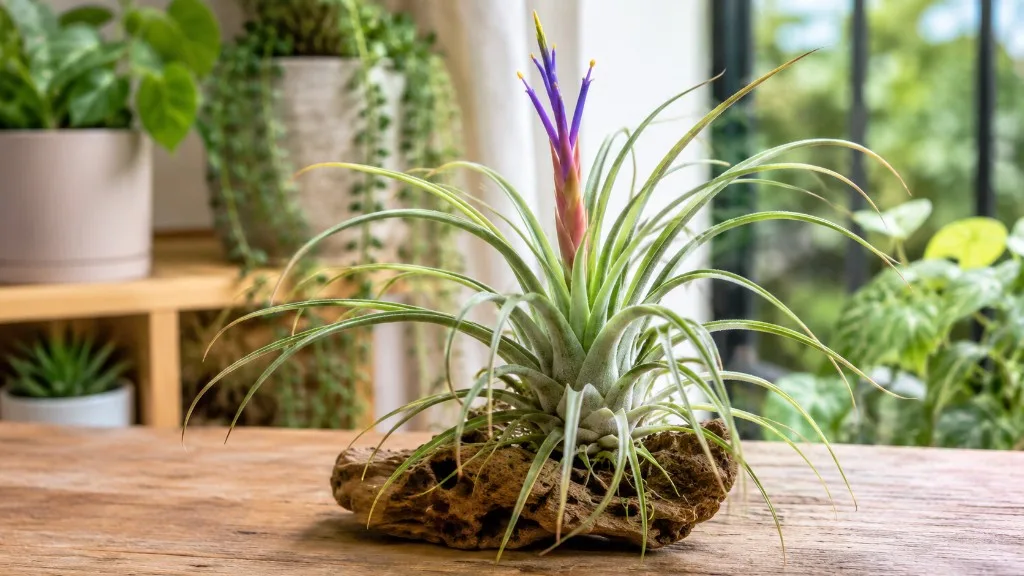
Tillandsia Care Guide: Light, Soaking, Mounting, and Safety
Tillandsia spp.
Tillandsia air plants need bright indirect light and weekly soaking for 20–30 minutes, after which they must dry completely within 4 hours to prevent rot. They need no soil and are non-toxic to pets.
Tillandsia Care Guide: Light, Soaking, Mounting, and Safety
Start with wateringThe most common care mistake for TillandsiaWatering guide →Tillandsia care essentials
Light
bright indirect light, some direct morning sun
Water
Mist 2–3 times per week OR soak in water for 20–30 minutes weekly. After soaking, shake out excess water and allow to fully dry within 4 hours to prevent rot.
Soil
No soil required. Grows attached to wood, cork, wire, or displayed freely.
Humidity
50–70%
Temperature
10–32°C (50–90°F)
Fertilizer
Feed lightly during active growth. Bromeliad or orchid fertilizer at quarter strength, added to soak water and stop if the plant is stressed, newly repotted, or not actively growing.
About Tillandsia
Tillandsia has a upright growth habit.
| Detail | Information |
|---|---|
| Growth habit | Upright |
| Scientific name | Tillandsia spp. |
Tillandsia Care Guide: Light, Soaking, Mounting, and Safety
Tillandsia - the genus behind the common name air plant - is one of the few houseplants that genuinely does not want soil, a drainage hole, or a watering can aimed at roots. These epiphytic bromeliads anchor themselves to tree bark, rock faces, and cliff ledges in the wild, absorbing moisture and nutrients through specialized leaf scales called trichomes rather than through a root system buried in earth. That single biological fact reorganizes everything about how you light, water, mount, and troubleshoot them indoors. Get the soak-and-dry rhythm right, give them Tillandsia light guide, and keep water from pooling at the base, and Tillandsia becomes one of the most adaptable plants for desks, bathrooms, kitchens, and wall displays. Ignore the no-soil rule, skip the drying step, or park one in a dark corner, and even a “low-maintenance” air plant will rot or slowly desiccate within weeks.
For related Tillandsia care, see Yellow Leaves on Tillandsia, Root Rot on Tillandsia.
What Is Tillandsia?
Tillandsia is a large genus in the Bromeliaceae family - the same family that includes pineapples and many tank-forming bromeliads. Botanists recognize about 660 accepted species, ranging from the silvery, drought-hardened Tillandsia tectorum of Ecuador’s arid zones to the greener, smoother-leaved Tillandsia ionantha and Tillandsia capitata found in humid forests from Mexico through Central America and into South America. In cultivation, you will most often encounter compact ionantha clusters, sculptural Tillandsia xerographica rosettes, tentacled Tillandsia caput-medusae, and bulbous Tillandsia bulbosa - but the care principles stay consistent even when the silhouettes look nothing alike.
Air plants are epiphytes, not parasites. They use other surfaces for physical support while making their own food through photosynthesis. Their roots function mainly as anchors - tiny holdfasts that grip bark or stone - not as the primary water uptake system. That is why the care advice written for rooted houseplants in potting mix fails here. Tillandsia is designed to catch rain, dew, and airborne dust on its leaves and pull both water and dissolved minerals through the leaf surface. Treat it like a leafy sculpture that drinks from the outside in, and the rest of indoor care becomes far more intuitive.
Botanical background and the Bromeliaceae family
Bromeliads share a few family traits worth knowing. Most are adapted to environments where water and nutrients arrive irregularly - sudden rain showers, fog, or humid air rather than steady soil moisture. Many use CAM photosynthesis (crassulacean acid metabolism), opening their stomata at night to reduce water loss in bright or dry conditions. Tillandsia does not hold a central water tank like some bromeliads do; instead, the entire leaf surface is the collection system.
Species identification matters more than many sellers admit. Two plants both labeled “air plant” at a garden center may have opposite water tolerances - one a mesic rainforest type that wants weekly soaking, another a xeric desert-edge type that prefers lighter, less frequent moisture and more sun. If your plant came with a tag, keep the botanical name. If it did not, use leaf texture as your first clue: silvery, fuzzy, stiff leaves usually mean xeric; glossy green, smoother leaves usually mean mesic. The care ranges below adjust from that starting point.
Trichomes: how air plants drink without soil
Trichomes are the key to everything. These tiny, scale-like structures cover Tillandsia leaves - most densely on xeric species, sparser on mesic ones - and perform two jobs at once. They absorb water and dissolved nutrients from the leaf surface, and on many xeric types they reflect harsh sunlight while reducing transpiration, giving those plants their characteristic frosted or fuzzy appearance. When you soak or mist an air plant, you are not “watering leaves” in the decorative sense; you are flooding the trichomes so they can pull moisture into the leaf tissue.
Watch a thirsty xeric Tillandsia after a soak and you will often see the leaves relax and unfurl as trichomes rehydrate. Watch an overwatered plant with water trapped in tight leaf bases and you will see the opposite - a dark, soft crown that spreads inward. The practical takeaway is simple: water must reach the trichomes on all leaf surfaces, then leave completely. Standing water anywhere the leaves overlap is the beginning of rot, not hydration.
Why Air Plants Never Need Potting Soil
Tillandsia does not need soil - and should not be planted in it. Potting mix holds moisture against the base of the plant long after the leaves have had enough, which is the most common reason new air plant owners lose their first purchase. Soil also blocks airflow around the base and encourages fungal growth in the crown. Every authoritative bromeliad source, including university extension guidance from Penn State Extension and reference material from the New York Botanical Garden, treats Tillandsia as a soil-free display plant.
If you have seen air plants “in” terrariums with sand or gravel, the substrate is decorative ballast, not a root zone. The plant should sit on top, not buried. Moss can hold moisture against the base - use it sparingly and only if you are confident the plant dries fully between waterings. For most indoor setups, open mounting on cork, wood, wire, or stone is safer and looks better anyway.
Epiphytes in native habitat vs. indoors
In nature, Tillandsia lives in the aerial zone - tree canopies, cliff faces, telephone wires in subtropical regions, even mangrove branches in coastal Florida and the Caribbean. Rain arrives, the plant drinks, wind and sun dry it quickly, and the cycle repeats. Your home removes two of those advantages: airflow is weaker and drying is slower, especially inside glass globes or crowded terrariums.
Indoors, you become the weather. Your job is to supply water on a schedule the species can use, then recreate the drying phase nature provides for free. That is why the upside-down drying step after every soak is non-negotiable. A plant that would dry in an hour on a breezy branch may take four hours on your kitchen counter - and if you return it to a closed globe while still damp, you have recreated a rainforest fog event without the accompanying ventilation. Epiphytes tolerate irregular drought far better than they tolerate constant dampness at the base.
Light Requirements for Tillandsia
Tillandsia needs bright, indirect light indoors for compact growth, strong trichome function, and reliable blooming. Think of the dappled brightness on a tree branch just inside the forest edge - not the dark floor, not the open desert at noon. In most homes, an east-facing window delivers ideal morning sun that dries leaves quickly after watering, while a west-facing window works well if you filter harsh afternoon rays with sheer curtains or place the plant a few feet back from the glass.
South-facing windows can work for xeric species that tolerate some direct sun, but mesic types often bleach or scorch when hot afternoon light hits wet leaves. North windows are usually too dim unless you supplement with a grow light. The symptom of insufficient light is subtle at first: paler foliage, open rather than curled xeric leaves when they should be tight, and stretched, smaller new growth on ionantha clusters. Too much direct sun shows up faster - bleached patches, brown crisping at leaf tips, or a washed-out gray-green tone on mesic plants.
Bright indirect light and window placement
A practical placement test: hold your hand between the plant and the window at midday. If the shadow has a soft, defined edge, you are in the bright indirect range most mesic Tillandsia prefer. If the shadow is sharp and the leaf surface feels hot to the touch within minutes, pull the plant back or diffuse the light. Air plants do especially well in bathrooms and kitchens with frosted windows because they receive bright, reflected light without intense direct beams - provided humidity does not trick you into skipping the soak-and-dry cycle.
Rotate freestanding displays a quarter turn every week or two so all sides receive even light. Mounted plants on vertical wood or wire cannot always be rotated easily; in that case, choose a wall position that receives consistent brightness rather than a single directional blast from one side. If you must use artificial light, full-spectrum LED grow lamps positioned 12 to 18 inches above the plant for roughly 10 to 12 hours daily will support mesic species in otherwise dim rooms. Xeric types benefit from slightly higher light intensity but the same duration cap - they do not want 24-hour grocery-store lighting any more than rooted houseplants do.
Xeric vs. mesic species and sun tolerance
The mesic vs. xeric split is the most useful framework in air plant care. Mesic Tillandsia - smoother, greener leaves, origins in humid forests - want bright filtered light and more frequent water. Examples include many ionantha forms, capitata, brachycaulos, and aeranthos. Keep them out of harsh direct afternoon sun and plan on a weekly 20- to 30-minute soak as your baseline indoors.
Xeric Tillandsia - silvery, fuzzy, often stiffer leaves, origins in drier climates - tolerate more direct sun and need less water. Tillandsia xerographica, Tillandsia tectorum, Tillandsia streptophylla, and Tillandsia duratii fall here. A few hours of direct morning sun is often beneficial. Water with lighter dunks every 7 to 10 days or brief soaks when leaves feel brittle, rather than the heavy weekly bath mesic types prefer. When in doubt, underwatering on Tillandsia a xeric plant is safer than overwatering on Tillandsia it - the trichomes are built for drought, not for soggy crowns.
How to Water Tillandsia: Soak, Mist, and Rinse
Water Tillandsia by soaking, rinsing, or misting the leaves - never the soil, because there is none. For most mesic air plants in average indoor humidity, a weekly soak of 20 to 30 minutes in room-temperature water is the most reliable primary method. Submerge the entire plant, give it a gentle swirl so water reaches inner leaf bases, then remove it and immediately begin the drying protocol. In very dry homes or during winter heating season, add supplemental misting two to three times per week between soaks so trichomes do not stay desiccated for days on end.
Xeric species often do better with a thorough rinse under the faucet or a shorter soak every 10 to 14 days, plus occasional misting when leaves look tightly curled and dull. Neither type should be watered on a calendar without checking the plant. A bathroom mesic Tillandsia in a steamy autumn may need less water than the same species on a sunny desk above a radiator in February. Leaves tell you more than the date: soft, wrinkled, or tightly rolled foliage usually means thirst; a dark, mushy base means too much moisture trapped too long.
Use rainwater, filtered water, or tap water that has sat out 24 hours to off-gas chlorine. Tillandsia lacks soil to buffer mineral salts, so soft, heavily treated, or very hard tap water can leave white deposits on trichomes over time and reduce absorption. If you see crusty mineral spotting, switch water sources and occasionally rinse leaves under running water to flush the scales.
The weekly soak routine
Fill a bowl or sink with room-temperature water deep enough to submerge the plant. Soak 20 to 30 minutes for mesic types; xeric types may need only 10 to 20 minutes. After soaking, shake the plant vigorously to dislodge trapped water from crevices, then place it upside down on a towel or dish rack so water drains away from the crown. According to Penn State Extension, allow at least four hours of drying before returning the plant to a terrarium, globe, or enclosed holder. Overnight drying is even safer for dense rosettes like xerographica.
Never soak a blooming plant with submerged flower spikes if you can avoid it - wet petals deteriorate quickly. Rinse around the bloom instead. Never leave an air plant in water overnight as a shortcut; extended submersion without drying invites base rot in species that are not built for constant immersion.
When misting and rinsing make sense
Misting alone is rarely enough for mesic Tillandsia in heated indoor air. Light misting reaches outer trichomes but often misses the interior leaf axils where mesic types store moisture after rain. Treat misting as a supplement, not a substitute for soaking. Mist until leaves glisten with runoff, usually two to three times weekly in dry conditions.
Rinsing under a faucet twice weekly is an excellent middle path for small collections. Hold each plant under lukewarm running water for 10 to 15 seconds, rotate it, then shake and dry upside down exactly as you would after a soak. This mimics a passing rainstorm - enough water for trichomes to drink, not so much that the plant sits saturated. For office desks where bowls of soaking water are impractical, rinsing in the staff kitchen sink on Monday and Thursday often outperforms a daily cosmetic mist that never fully hydrates the plant.
Humidity, Temperature, and Air Circulation
Tillandsia tolerates a wide temperature band typical of human homes. Penn State Extension recommends nighttime temperatures above 55°F (13°C) and daytime range of 65°F to 90°F (18°C to 32°C). Brief dips below that window rarely kill established plants, but repeated cold drafts from winter windows or hot blasts from heating vents stress them and slow drying after watering.
Humidity matters, but it does not replace soaking. Average indoor humidity of 40% to 60% suits most Tillandsia well. Below 30%, mesic species benefit from grouping plants together, placing them in a brighter bathroom between showers, or running a small humidifier nearby - paired with the soak routine, not instead of it. Above 70% in a closed terrarium without airflow, you must water less and dry longer, because trichomes stay wetter longer in still, humid air.
Air circulation is the overlooked variable. After every watering, moving air pulls moisture from leaf bases before fungi establish. A ceiling fan on low, an open window day, or simply avoiding enclosed glass immediately after soaking does more for long-term health than any specialty fertilizer. Keep plants away from AC vents and radiator tops where rapid desiccation alternates with sudden cold or heat spikes.
Mounting, Displaying, and Styling Air Plants
Because Tillandsia has no soil root zone, mounting and display are part of care, not just decoration. The best mounts expose the base to air and let you remove the plant easily for soaking. Cork bark, driftwood, grapewood, lava rock, seashells with open mouths, and coated wire frames all work well. Attach with plant-safe glue (E6000 and similar craft adhesives are widely used in the air plant community), fishing line, twist ties, or plastic-coated wire at the base - never through live leaf tissue.
Freestanding placement is equally valid. A xerographica on a ceramic dish or an ionantha cluster in a shallow bowl looks clean and makes the weekly soak simple: lift, soak, dry, replace. Avoid pressing the base into deep bowls that collect runoff after misting. Slanted or vertical mounts actually help drainage and mimic the natural downward drip off tree bark.
Terrariums and enclosed glass displays
Glass globes and terrariums are photogenic but risky for beginners. If you use them, choose open-mouthed holders rather than sealed jars, and never put the plant back inside until it is fully dry - four hours minimum, as noted above. Condensation on glass walls is a warning sign that airflow is insufficient. One small Tillandsia per globe usually fares better than crowded arrangements where inner plants never dry.
For open terrariums with gravel or sand, keep the plant on top of the substrate and water by removing the Tillandsia entirely. Do not mist inside a closed globe and call it done; you are creating a humid pocket with no exit path for water trapped at the crown. Wall-mounted vertical gardens need the same discipline: each plant must come off the wall for soaking unless the design allows free drip and you can verify the base dries every time.
Feeding Tillandsia Without Soil
Tillandsia needs modest nutrition because trichomes also capture airborne dust and minerals in the wild. Indoors, where dust is thinner, a light feed during active growth helps color, pup production, and blooming. Use a bromeliad or air plant fertilizer or a balanced water-soluble houseplant formula at one-quarter the label strength. Apply monthly during spring and summer by adding fertilizer to your soak water or misting the diluted solution onto leaves after a regular water rinse.
Do not fertilize a stressed, rotting, or heat-shocked plant. Do not exceed recommended dilution - without soil to buffer salts, fertilizer burn shows up as browned leaf tips and damaged trichomes that no longer absorb water evenly. In winter, when growth slows and drying takes longer in cool dim rooms, skip feeding entirely until new growth resumes.
Blooming Once, Pups, and Propagation
Every Tillandsia species blooms once in its lifetime, producing a flower spike or colorful bracts that can last weeks to months depending on species and conditions. Tillandsia ionantha blushes pink or red before flowering; Tillandsia xerographica sends a tall inflorescence with pale bracts. Bloom is a sign your light and water rhythm has been adequate, not a cue to change care dramatically. Continue soaking and drying as usual, keeping flower parts as dry as practical.
After blooming, the mother plant slowly declines over months while producing pups - offsets at the base. Pups are your propagation path. Leave them attached until they reach roughly one-third the parent’s size, then gently twist or cut them free with clean scissors. Mount pups individually and care for them as mature plants; they will bloom on their own timeline in one to several years depending on species and light intensity.
Do not propagate from a plant with active base rot or heavy mealybug infestation. Pups inherit the parent’s problems, and weak offsets fail at high rates. Fix the environment first, then separate healthy offsets.
Is Tillandsia Safe for Pets?
Tillandsia is generally considered non-toxic to cats and dogs. The ASPCA lists many bromeliad family plants as non-toxic, and Tillandsia is widely treated as pet-safe in horticultural references including the RHS air plants care guide for bromeliads in home settings. That does not mean pets should eat them. Ingesting plant material can still cause mild gastrointestinal upset - vomiting or loose stool - especially in small animals, and stiff leaf tips can pose a choking or mouth irritation hazard.
Practical pet-owner strategy: mount air plants out of batting range, use hanging globes with openings too small for a cat to fish the plant out, or display on high shelves. Non-toxicity protects you from emergency poison-control panic if a curious dog sniffs or nibbles; it does not make Tillandsia a chew toy. If your pet swallows a large piece or shows persistent vomiting, contact your veterinarian - not because Tillandsia is poisonous, but because any foreign plant matter can obstruct digestion.
Common Tillandsia Problems and Fixes
Most Tillandsia failures trace back to three causes: water trapped at the base, insufficient light, or soil mounting that someone told you was “fine for air plants.” Symptoms map cleanly once you know which mistake you made.
Base or crown rot shows as a dark, soft center or blackening at the leaf bases while outer leaves still look green for a while. The plant may pull apart when you tug gently. Causes include skipping upside-down drying, returning damp plants to closed globes, over-soaking xeric species, or misting into tight rosettes without airflow. Prevention is structural: soak, shake, flip, dry four hours. A plant with advanced crown rot rarely recovers; remove healthy pups if present and discard the mother.
Underwatering appears as exaggerated leaf curl, gray-brittle texture on xeric types, or wrinkled, leathery leaves on mesic types. Increase soak frequency slightly, add midweek rinsing, and check whether heating or AC is desiccating the plant faster than you realized. Sunburn bleaches or browns patches on the side facing the window; move the plant back or filter the light. Mealybugs and scale hide in leaf axils; isolate affected plants, rinse manually, and treat with insecticidal soap or 70% isopropyl alcohol applied with a cotton swab, keeping alcohol off stressed, drought-shocked foliage.
Mineral buildup looks like white chalk on trichomes and reduces water uptake. Rinse under running water and switch to rainwater or filtered water for soaks. Fertilizer burn browns tips after feeding; flush with plain water soaks at reduced fertilizer strength next month.
Conclusion
Tillandsia rewards a simple contract: no soil, bright indirect light tuned slightly toward more sun for xeric species, regular leaf watering through soaking or rinsing, and complete drying before display. The trichomes on every leaf are both the irrigation system and the early warning panel - when they can absorb freely and dry fully, the plant stays firm, colorful, and pup-producing; when water pools at the base, rot wins fast. Mount openly on cork or wire, or display freestanding where you can lift the plant for its weekly bath without contorting around glass. Adjust frequency by species type and season, not by habit alone. Do that consistently and Tillandsia becomes one of the most versatile living accents you can keep - compact enough for a desk, sculptural enough for a wall, and generally safe in homes shared with curious cats and dogs, provided you keep both the plant and the pet out of each other’s mouths.
When to use this page vs other Tillandsia guides
- Tillandsia overview - Canonical hub for this species - care topics and problems branch from here.
- Tillandsia problems - Symptom-first path when you already know something is wrong.
Related Tillandsia guides
How to care for Tillandsia?
How much light does Tillandsia need?
bright indirect light, some direct morning sun
- bright indirect light, some direct morning sun - bright indirect light, some direct morning sun.
When should you water Tillandsia?
Mist 2–3 times per week OR soak in water for 20–30 minutes weekly. After soaking, shake out excess water and allow to fully dry within 4 hours to prevent rot.
- Check top 2 inches - Mist 2–3 times per week OR soak in water for 20–30 minutes weekly.
- Drain excess water - After soaking, shake out excess water and allow to fully dry within 4 hours to prevent rot.
What soil works best for Tillandsia?
No soil required. Grows attached to wood, cork, wire, or displayed freely.
- Well-draining mix - Potting mix that lets water flow through quickly instead of staying soggy around the roots.
Grower notes for Tillandsia
What matters most with Tillandsia
Tillandsia is easiest to grow when you judge the whole plant: new growth, root-zone moisture, light exposure, and how quickly the pot dries after watering. In practice, the care checkpoint is simple: bright indirect light, some direct morning sun. Pair that with no soil required. Grows attached to wood, cork, wire, or displayed freely, and avoid changing water, pot size, and placement all at once.
Best placement in a real home
Tillandsia belongs where bright indirect light, some direct morning sun is realistic for most of the day, not only where the pot looks good. Mist 2–3 times per week OR soak in water for 20–30 minutes weekly. After soaking, shake out excess water and allow to fully dry within 4 hours to prevent rot. If the pot stays wet longer than expected, move the plant into better light or reassess the mix before watering again. Humidity target: 50–70%. Temperature comfort zone: 10–32°C (50–90°F).
Before you buy this plant
Choose Tillandsia with firm new growth, clean leaf undersides, and soil that does not smell sour or feel compacted. Be cautious if you see brown-tips, sticky residue, collapsed crowns, or a pot that is wet in poor light. Cosmetic old-leaf damage is less worrying than weak roots or active pests.
First month after bringing it home
Do not repot Tillandsia on day one unless the mix is failing or pests are obvious. Quarantine it, learn how fast the pot dries, and keep care boring while it adjusts. Watch especially for brown-tips, crispy-leaves, and stem-rot. If problems appear, correct the condition first rather than stacking fertilizer, repotting, and pruning together.
Safety note for Tillandsia
Tillandsia is not a plant to keep within reach of pets or children. Treat it as an inaccessible display plant. Use gloves if sap or plant tissue is irritating, and pick a pet-safe alternative for floor pots or low shelves.
How to tell Tillandsia is settling in
If you plan to multiply it later, common methods include Offset (pup) separation. If crispy-leaves shows up early, inspect light, watering, and roots before assuming the plant is permanently weak.
Is it pet safe?
Tillandsia is generally considered pet safe.
Watering Tillandsia
Mist 2–3 times per week OR soak in water for 20–30 minutes weekly. After soaking, shake out excess water and allow to fully dry within 4 hours to prevent rot.
Soil & potting for Tillandsia
No soil required. Grows attached to wood, cork, wire, or displayed freely.
Humidity & temperature for Tillandsia
Tillandsia prefers 50–70%, though normal home humidity is usually fine. Keep temperatures around 10–32°C (50–90°F).
| Detail | Information |
|---|---|
| Humidity | 50–70% - normal home humidity is fine. |
| Ideal temperature | 10–32°C (50–90°F) |
Fertilizer & pruning for Tillandsia
Use feed lightly during active growth. Bromeliad or orchid fertilizer at quarter strength, added to soak water and stop if the plant is stressed, newly repotted, or not actively growing. for Tillandsia.
| Detail | Information |
|---|---|
| Fertilizer type | Feed lightly during active growth. Bromeliad or orchid fertilizer at quarter strength, added to soak water and stop if the plant is stressed, newly repotted, or not actively growing. |
Common problems on Tillandsia
Brown Tips
LowLikely cause: Underwatering or very low humidity
Quick fix: Increase soaking frequency; mist more regularly; trim brown tips
Full fix guide →Crispy Leaves
MediumLikely cause: Prolonged underwatering causes leaves to curl, crisp, and eventually die
Quick fix: Soak in room-temperature water for 2–3 hours; the plant may partially recover
Full fix guide →Stem Rot
HighLikely cause: Water trapped at the base without drying-most often from not shaking out water after soaking or placing in an enclosed humid space
Quick fix: Always shake excess water from the base after soaking; ensure the plant is fully dry within 4 hours
Full fix guide →No Flowers
LowLikely cause: Most tillandsia bloom only once in their lifetime and then produce pups
Quick fix: Flowering is triggered by maturity; ethylene gas from a ripe apple in a bag with the plant overnight can sometimes trigger blooming
Full fix guide →Mealybugs
MediumLikely cause: Mealybugs nest at the base of leaf clusters
Quick fix: Rinse thoroughly; treat with diluted neem oil or isopropyl alcohol spray
Full fix guide →Yellow Leaves
MediumLikely cause: Common on this plant type; confirm with recent watering, light, and root checks.
Quick fix: Inspect the plant and correct the most likely care stressor before stacking treatments.
Full fix guide →Root Rot
MediumLikely cause: Common on this plant type; confirm with recent watering, light, and root checks.
Quick fix: Inspect the plant and correct the most likely care stressor before stacking treatments.
Full fix guide →Overwatering
MediumLikely cause: Common on this plant type; confirm with recent watering, light, and root checks.
Quick fix: Inspect the plant and correct the most likely care stressor before stacking treatments.
Full fix guide →Underwatering
MediumLikely cause: Common on this plant type; confirm with recent watering, light, and root checks.
Quick fix: Inspect the plant and correct the most likely care stressor before stacking treatments.
Full fix guide →Spider Mites
MediumLikely cause: Common on this plant type; confirm with recent watering, light, and root checks.
Quick fix: Inspect the plant and correct the most likely care stressor before stacking treatments.
Full fix guide →Aphids
MediumLikely cause: Common on this plant type; confirm with recent watering, light, and root checks.
Quick fix: Inspect the plant and correct the most likely care stressor before stacking treatments.
Full fix guide →Leggy Growth
MediumLikely cause: Common on this plant type; confirm with recent watering, light, and root checks.
Quick fix: Inspect the plant and correct the most likely care stressor before stacking treatments.
Full fix guide →Slow Growth
MediumLikely cause: Common on this plant type; confirm with recent watering, light, and root checks.
Quick fix: Inspect the plant and correct the most likely care stressor before stacking treatments.
Full fix guide →Wilting
MediumLikely cause: Common on this plant type; confirm with recent watering, light, and root checks.
Quick fix: Inspect the plant and correct the most likely care stressor before stacking treatments.
Full fix guide →Drooping Leaves
MediumLikely cause: Common on this plant type; confirm with recent watering, light, and root checks.
Quick fix: Inspect the plant and correct the most likely care stressor before stacking treatments.
Full fix guide →Low Humidity
MediumLikely cause: Common on this plant type; confirm with recent watering, light, and root checks.
Quick fix: Inspect the plant and correct the most likely care stressor before stacking treatments.
Full fix guide →Not Enough Light
MediumLikely cause: Common on this plant type; confirm with recent watering, light, and root checks.
Quick fix: Inspect the plant and correct the most likely care stressor before stacking treatments.
Full fix guide →Fungus Gnats
MediumLikely cause: Common on this plant type; confirm with recent watering, light, and root checks.
Quick fix: Inspect the plant and correct the most likely care stressor before stacking treatments.
Full fix guide →Mold on Soil
MediumLikely cause: Common on this plant type; confirm with recent watering, light, and root checks.
Quick fix: Inspect the plant and correct the most likely care stressor before stacking treatments.
Full fix guide →