Tillandsia Soil Guide: Mounting Without Soil
Tillandsia Soil Guide: Mounting Without Soil
Tillandsia Soil Guide: Mounting Without Soil
If you searched for Tillandsia soil, you are probably looking for a potting mix recipe. Here is the direct answer: air plants do not use soil at all, and planting them in dirt, peat, or standard houseplant mix is one of the fastest ways to lose them. Tillandsia species are epiphytic members of the Bromeliaceae family. In the wild they grow attached to tree branches, rock outcrops, and cliff faces across the Americas - from humid cloud forests to dry scrub - without ever sending roots into earth. At home, your job is not to find the right soil. It is to give the plant 360-degree airflow, a way to soak and fully dry, and optionally a decorative mount that mimics the surfaces they cling to in nature.
That reframing matters because most houseplant advice assumes roots absorb water and nutrients from a potting medium. Tillandsia breaks that model entirely. The leaves do the drinking. The roots do the clinging. Anything that traps moisture against the base - soil, wet moss, sand packed around the crown, a closed glass bubble - works against the plant’s design. This guide explains why soil fails, how to mount on wood, cork, or wire, when an open terrarium substrate is acceptable for display only, and how to avoid the crown rot that kills buried air plants.
Why Air Plants Are Epiphytes Built for Life Without Soil
An epiphyte is a plant that grows on another surface without taking nutrients from its host. Tillandsia is not a parasite. It does not drill into bark or steal resources from the tree it sits on. UF/IFAS Gardening Solutions explains that epiphytic tillandsias attach to other plants for support but do not harm them, unlike parasitic mistletoe. It simply uses the branch as a perch - a stable, elevated platform with better light and airflow than the forest floor. That perch is the model for every good indoor display: open exposure, quick drying, nothing suffocating the base.
The “air plant” nickname is slightly misleading. Tillandsia does not live on air alone. It needs water, light, and occasional nutrients like any plant. What it does not need is a root zone surrounded by organic matter holding moisture for days. Standard potting mixes are engineered to retain water around roots. Tillandsia roots are not built to function in that environment. They are short, wiry, and specialized for grip - not for mining a substrate.
This is why the soil question keeps confusing new growers. Tillandsia arrives at the garden center looking like a houseplant. It may even sit in a decorative pot filled with gravel or moss. Retail display is not botanical instruction. The plant survived despite the staging, not because of it. Once you understand epiphyte logic, every care decision - watering, mounting, terrarium design - becomes simpler.
Trichomes, Roots, and How Tillandsia Actually Feed
Trichomes are the key. These tiny scale-like structures cover Tillandsia leaves - densely on silvery xeric species like Tillandsia xerographica, more sparsely on greener mesic types like Tillandsia ionantha. UF/IFAS Gardening Solutions describes bromeliad trichomes as disc-shaped leaf hairs that collect water using the leaf surface. Foliar feeding is the primary hydration pathway. When you soak an air plant or mist it thoroughly, you are watering the leaves, not the roots.
The roots tell the same story. Air plant roots are anchor roots. In habitat they latch onto rough bark and hold the plant steady through wind and rain. They can attach to wood, cork, stone, or wire indoors with the same purpose. They are not feeder roots in the sense of a pothos or fern in a pot. Some growers trim dried roots for aesthetics; that does not harm the plant because the roots are not its main lifeline. What you must never bury is the base or crown - the central growing point where new leaves emerge. That tissue needs to stay dry between waterings. Soil, damp moss, or any fine substrate packed against it creates the anaerobic conditions rot needs.
Nutrient uptake also happens largely through the leaf surface. Tillandsia in nature collects dust, organic debris, and dissolved minerals from water running over the leaves. Indoors, a diluted bromeliad or air plant fertilizer in soak water a few times during the growing season replaces that input. None of this requires soil. In fact, soil blocks airflow to the base and holds bacteria and fungi right where the plant is most vulnerable.
What Happens When You Plant Tillandsia in Soil
Planting Tillandsia in potting mix, orchid bark, sphagnum, or garden soil does not give it a “better foundation.” It buries the one part of the plant that must breathe. Michigan State University Extension warns that putting tillandsias in soil can potentially kill them. Within days to weeks, the base softens, leaves loosen at the center, and the plant pulls out of the mix with a black, mushy core. That is crown rot - and by the time you see it, recovery is unlikely.
The failure sequence is predictable. You pot the plant because every other houseplant lives in soil. You water when the mix surface looks dry, or worse, you keep the mix lightly moist because that is standard advice. Water wicks into the leaf bases and sits there. Fine roots that might have gripped a mount instead suffocate in wet organic matter. Fungal spores common in all potting media colonize the crown. Outer leaves may still look green for a while, masking collapse at the center. Then the plant falls apart when touched.
Some sellers pot air plants in decorative containers for shelf appeal. Others nest them in damp sheet moss or Spanish moss that stays wet too long indoors. The result is the same as soil burial: moisture trapped at the base with insufficient airflow. If you purchased a potted Tillandsia, remove it immediately. Brush away any substrate clinging to the base, let the plant dry fully, and remount or display it openly. Do not “transition” it to soil gradually. There is no safe soil acclimation for an epiphyte.
Crown Rot and the Anatomy That Fails Underground
The crown is the growing meristem - the tight center where new leaves unfold. Unlike a stem buried in soil on a terrestrial plant, Tillandsia’s crown sits at or above the attachment point. In nature, rain hits the leaves and runs off; the base stays exposed to moving air. Soil or moss reverses that geometry. You bury the crown while leaving leaves above the surface, and every watering pushes moisture into the rot zone.
Early crown rot signs include leaves that shift or pull out easily from the center, a sour smell at the base, darkening tissue where leaves meet the core, and sudden leaf drop from the middle rather than the oldest outer leaves. Outer leaf tip browning is often a separate watering or humidity issue. Base blackening with structural collapse is rot. Once the meristem dies, the plant cannot produce new growth. Individual leaves cannot regenerate a dead center.
If you catch rot early on one outer leaf base, you can sometimes remove the affected tissue with a sterile blade and dry the plant aggressively. If the center is mushy, discard the plant and sanitize anything it touched. Prevention is the only reliable strategy: no soil, no buried base, full dry within a few hours after every soak, and airflow on all sides.
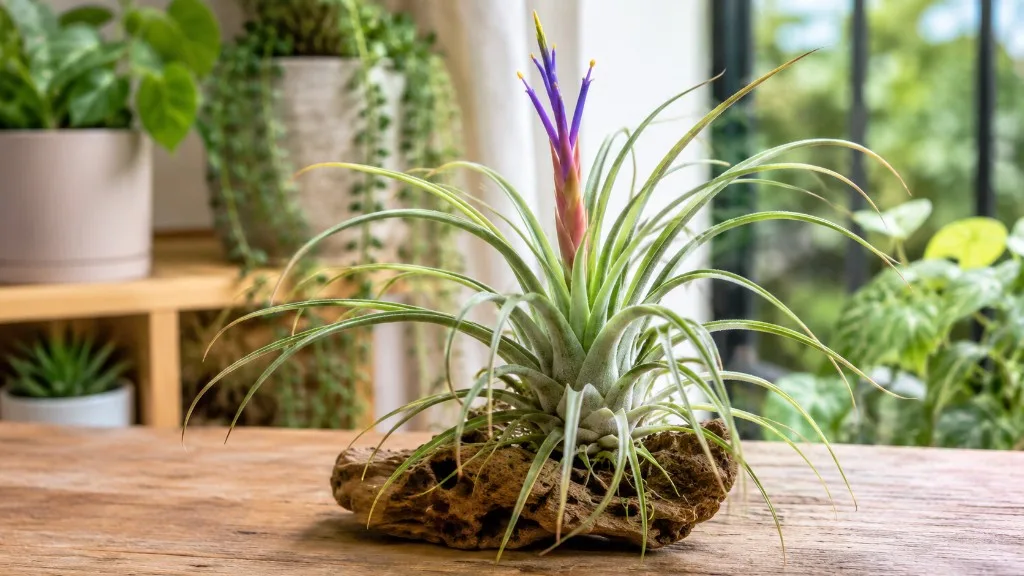
Mounting Tillandsia on Wood, Cork, and Natural Surfaces
Mounting is the most natural way to display Tillandsia indoors. Wood and cork mimic the bark and branch surfaces these plants colonize in habitat. A good mount provides a rough contact point for roots to grip, holds the plant at a slight angle so water runs off the leaves rather than pooling at the base, and allows you to move the entire display to a sink or bowl for soaking.
Driftwood is the classic choice - lightweight, sculptural, and full of crevices where a plant base can nestle securely. Grapewood offers similar character with dense, twisted vine shapes and natural knots. Cork bark flats or tubes, often sold for reptile and aquarium decor, provide soft enough texture to press a base into a pocket or indentation. All three work well as long as the wood is clean, fully dry before attachment, and not treated with preservatives or pesticides.
Position matters as much as material. Place the plant so its base sits in a shallow depression or against a raised ridge - not in a deep hole that collects water. Angle the Tillandsia so the leaves fan outward and the base is visible from at least one side. That visibility is your early warning system: if the base looks dark or wet days after a soak, airflow or drainage needs fixing before rot sets in.
Driftwood, Grapewood, and Cork Bark Compared
Driftwood suits single-specimen displays and wall art - lightweight, sculptural, and complementary to xeric Tillandsia. Soak the wood once and let it dry before attaching; avoid deep water-trapping cups unless plants sit above them. Grapewood is denser with angular knots, ideal for multi-plant clusters on one piece. Cork bark excels for beginners: press a pocket with a screwdriver, mount several plants on one vertical flat, and hang easily. All three work when the base stays exposed and angled for runoff.
Wire, Line, and Non-Toxic Fasteners for Air Plants
Wire mounting is the most flexible method for home growers who soak their plants regularly. Wire lets you remove the Tillandsia for a full dunk, inspect the base, and reattach without damaging tissue. It also avoids adhesive entirely - useful if you change displays often or propagate pups that need remounting.
Use aluminum, stainless steel, or nickel craft wire in a medium gauge - roughly 18 to 22 gauge for small plants, heavier for large specimens like T. xerographica. Shape a loose loop around the base, threading between the lowest leaves without crushing them. Wrap two or three times for grip, then twist the wire tail down the back of the mount and twist secure out of sight. The plant should sit firmly but not be strangled; you should be able to slide the loop slightly with gentle pressure.
Fishing line (30 lb test or heavier so it does not cut into leaves), hemp twine, and floral wire (non-copper) work the same way for wreaths, shells, and hanging globes. Clear line creates floating displays when suspended from a ceiling hook. Twine suits rustic driftwood mounts. The principle is identical: support the base, leave the crown exposed, allow full removal for soaking.
Wire-mounted plants on non-waterproof wood should always be taken off the mount for soaking. Dripping wet wood promotes mold on the display and slows your plant’s dry-down if water runs into crevices and sits against the base.
Why Copper Wire Is Dangerous for Tillandsia
Copper wire is toxic to air plants and should never contact Tillandsia tissue. Copper oxidizes when exposed to moisture - exactly the conditions created during soaking and misting. Bromeliad Society of New Zealand notes that bromeliads are copper-sensitive and that copper-based timber treatments are fatal to them. Oxidized copper ions damage leaf tissue at the contact point, causing chlorosis, browning, and base dieback that can be mistaken for rot. The damage progresses even after you remove the wire because copper residue remains on the plant surface.
This rule extends to copper fixtures, copper-colored craft wire that is actually copper-plated, and decorative copper baskets. If you want a metallic look, use stainless steel or aluminum. Specialist air plant retailers consistently flag copper as one of the few hard material bans in mounting - alongside soil and closed containers. When in doubt, test with a magnet and product label, or choose a known safe alternative.
Glue Mounting With E6000 and Plant-Safe Adhesives
Glue mounting creates a permanent, polished display where the plant appears to grow directly from wood or stone. The industry-standard adhesive is E6000 - a waterproof, flexible, clear-drying craft adhesive widely used by air plant suppliers. Applied correctly, it bonds the base to the mount without encasing leaves or sealing the crown.
Work only on a fully dry plant. Apply a pea-sized dab of E6000 to the base of the Tillandsia - the bottom quarter-inch where roots emerge - not to the leaves. Press the base into a dry, stable spot on the mount and hold for thirty to sixty seconds. Do not get adhesive on leaf tissue; glue blocks trichome function and can burn tissue on contact. Let the bond cure twenty-four hours before the first soak. Cure in a ventilated area; E6000 fumes are strong.
Glued mounts trade convenience for maintenance access. You can still soak a glued plant by submerging the entire piece if the mount material tolerates water - cork and sealed driftwood usually do. For porous or framed wood you do not want saturated, mist heavily and shower-rinse instead of prolonged submersion, or use wire on those pieces instead. Some growers prefer glue for permanent wall art and wire for plants they soak weekly in a bowl.
Hot glue is controversial. Some retailers report leaf damage from hot glue application; others use it sparingly in a pinch. It is not waterproof, weakens over time, and risks heat injury to tissue if applied carelessly. E6000 or wire are safer defaults. If you already glued with hot glue and the plant is healthy, leave it - but switch methods on your next mount.
Displaying Air Plants Freely Without Any Mount
Tillandsia does not need to be attached to anything to survive. Freestanding display is valid, common, and often the lowest-risk option for beginners. Set the plant in a shallow bowl, on a shelf, in a wire stand, or inside a wide dish with no substrate at all. The plant simply rests on the surface, base exposed to air on every side.
Freestanding display simplifies the soak-and-dry cycle: submerge twenty to thirty minutes, shake off excess water, dry on a towel two to four hours, return to its spot. No mount to wet, no glue to worry about. The tradeoff is stability - round species sit securely; tall types may tip, and pets can knock plants off shelves. A wire ring or ceramic cradle supports without enclosing. Freestanding is also the best recovery method after removing a plant from soil or a bad terrarium setup.
Open Terrarium Substrates for Display Only
An open terrarium - a bowl, dish, or glass container without a lid - can showcase Tillandsia alongside decorative materials. The critical rule: substrate in an air plant terrarium is for display, not for planting. The Tillandsia sits on top of the layers, never buried in them. Think of the gravel, sand, or stones as a stage floor, not a root zone.
This distinction trips up many buyers who assemble beautiful layered terrariums and then nest the air plant into damp moss “so it looks natural.” A plant resting on dry decorative gravel with its base fully in open air is fine. A plant sunk into wet moss with only leaf tips showing is a rot setup identical to soil potting. The substrate must not hold water against the base.
Choose open containers with wide mouths so air reaches the plant from above and sides. Sloped sides help water run off if you mist inside the dish. Avoid deep narrow vases that create a humidity chimney with stagnant air at the bottom. If you use glass globes, pick ones with large openings or hang them tilted - sealed hanging orbs with small holes are risky unless you monitor humidity and drying obsessively.
Gravel, Sand, and Decorative Layers That Stay Dry
Safe display substrates include coarse decorative gravel, aquarium stones, coarse sand (not fine play sand that packs wet), glass gems, river pebbles, and dried lichen or bark chips used sparingly as scatter - not as packing material around the base. Layer them dry in a shallow dish one to two inches deep for visual weight, then place the Tillandsia on the surface. You can nest the plant in a slight depression between two stones so it does not roll, as long as the depression does not cup water.
Preserved moss and living sheet moss are popular in styled terrarium photos but dangerous when pushed against the plant base indoors. Moss holds moisture for days in a dish with limited airflow. If you use moss for color, keep it several inches away from the Tillandsia base, or use it only in open wall mounts where the air plant itself is wired above the moss layer and never touching it. Live moss in a closed or semi-closed setup is one of the most common causes of air plant death sold as “easy terrarium kits.”
Before placing any substrate, ask one question: will this layer stay dry at the point where the plant base contacts it? If the answer is no - skip it or change the design.
Why Closed Terrariums and Damp Moss Are Risky
A closed terrarium - lidded jar, narrow-neck bottle, or tight glass cloche - conflicts with Tillandsia’s core needs. Closed containers trap humidity, reduce airflow, and extend drying time after misting. Even xeric species cannot tolerate a perpetually humid, stagnant microclimate around the crown. Mesic species like T. ionantha fail faster. Open dishes outperform closed jars for every skill level.
Damp moss at the plant base produces the same outcome: constant moisture where rot starts. Kit terrariums that include a glued air plant, a lid, and a moss carpet are triple failures - adhesive complicates soaking, the lid blocks airflow, and the moss wicks water to the crown. High humidity alone is not the enemy - many Tillandsia appreciate fifty to seventy percent humidity. The enemy is humidity plus poor evaporation at the base.
How Mounting Choice Affects Watering and Drying
Your display method directly controls how safely you can water Tillandsia. Wire-mounted and freestanding plants get the cleanest soak-and-dry cycle: full submersion, aggressive shake, upside-down dry, no hidden wet pockets. Cork and sealed wood mounts usually tolerate full soaking with the plant attached. Raw driftwood with deep cracks may hold water against the base if you soak in place - remove the plant or switch to mist-and-shower for those pieces.
Glued plants on water-sensitive mounts need surface watering - heavy misting, a shower rinse, or brief dunking with immediate upside-down drying - rather than hour-long soaks with the wood submerged. The mount choice is therefore a watering choice. Pick wire or freestanding if you want the simplest, most forgiving soak routine. Pick glue on cork for permanent art if you accept more careful watering technique.
Drying speed also varies by display. Plants in open bowls dry fastest. Wall-mounted clusters need you to verify each base dries within four hours after watering - the guideline most specialist growers cite for rot prevention. If one plant in a group stays wet, remove it to dry separately. Mount density matters: crowding ten plants on one cork flat looks lush but blocks airflow between bases.
Seasonal shifts apply regardless of mount. Winter homes with heaters drop humidity and slow drying - reduce soak frequency and verify dry bases before the next water. Summer bright windows speed drying - you may soak more often. The mount does not change the plant’s biology; it changes how easily you can inspect and dry the base.
Choosing the Right Display for Your Tillandsia Species
Not all Tillandsia share identical humidity preferences, but all reject soil. Xeric types - silvery, stiff-leaved plants like T. xerographica and T. tectorum - tolerate drier air and excel on open driftwood or freestanding bowls. Mesic types - greener species like T. ionantha and T. bulbosa - prefer more frequent watering but still die in soil. Match mount size to mature scale: small pups suit cork pockets; large xerographica need sturdy grapewood or wire reinforcement. Space multi-plant displays so each base has independent airflow and can be removed for soaking.
Step-by-Step Mounting Workflow for Beginners
If you are mounting your first Tillandsia, follow this sequence to avoid the soil-instinct trap entirely. Inspect and dry the plant first - remove any retail moss, gravel, or potting debris from the base and let it dry twenty-four hours after your last soak. Choose your mount and method: cork with wire for easy removability, or driftwood with E6000 for a fixed sculptural look. Position dry before attaching, checking angle and stability where the base contacts the surface.
Attach at the base only. Wire: loop between lowest leaves, twist secure, hide tail. Glue: pea-sized E6000 on base, press, hold one minute, cure twenty-four hours. First water after mount - light mist or brief soak, then dry upside down to confirm no water pools at the attachment point. Place in Tillandsia light guide and observe the base for one week. Firm leaves and a dry base mean success; a soft center or dark base means remount more openly and skip the next soak. You do not need soil, drainage pots, or peat mixes.
Common Soil and Substrate Mistakes That Kill Air Plants
The mistakes repeat because Tillandsia looks like it should behave like a potted plant. Here are the failures to avoid, stated plainly.
Planting in potting soil or orchid mix - buries the crown and guarantees rot. There is no amended recipe that fixes epiphyte anatomy. Packing the base in sphagnum or sheet moss - wicks water inward and mimics soil burial, especially in low-airflow rooms. Using copper wire or copper fixtures - causes chemical damage at the contact zone that weakens the plant before rot even starts. Closed lidded terrariums - trap humidity and prevent base drying. Soaking without upside-down drying - water sits in leaf axils and runs to the base; always shake and dry. Gluing leaves instead of the base - blocks trichomes and damages tissue. Leaving a store-bought potted air plant in its container - remove substrate the day you bring it home. Fine sand packed around the plant - acts like soil when wet, cementing against the base.
If you already made one of these mistakes, act fast. Remove all substrate, unwire or carefully break glue bond if needed, trim mushy tissue with a sterile blade if rot is localized, dry aggressively for forty-eight hours, and display openly until you see new center growth. Discard plants with a fully mushy core - they will not recover.
Quick Decision Guide: Mount, Display, or Terrarium
Use this framework when choosing a home for your Tillandsia. If you soak weekly and want easy maintenance, choose freestanding or wire on cork - maximum access, minimum rot risk. If you want permanent wall art and can mist or shower carefully, choose E6000 on driftwood or cork. If you want a styled tabletop look, choose an open dish with dry gravel and the plant resting on top - never nested in moss. If you are tempted to use soil because it feels wrong without it, stop - that instinct is the mistake. Tillandsia is complete without a root zone medium.
When someone asks what “soil” Tillandsia needs, the honest answer is none. The better question is what display supports airflow, soaking, and full drying - and that answer is wood, cork, wire, open stone, or nothing at all.
Conclusion
Tillandsia does not use soil, and no potting mix - gritty, chunky, orchid, or otherwise - replaces the open-air geometry these epiphytes require. They drink through trichomes on their leaves, grip surfaces with anchor roots, and die when the crown stays wet against organic matter. Your role as a grower is to mount or display them accordingly: on driftwood, cork, or wire; freestanding in a bowl; or atop dry decorative layers in an open terrarium where substrate is scenery, not a planting medium.
Choose E6000 or non-copper wire for attachment, never copper, never buried moss, and never a closed jar. Match your mount to your watering habits so every soak ends with a fully dry base within a few hours. Avoid the soil aisle entirely - it was never meant for air plants. Get the display right, and Tillandsia becomes one of the simplest plants in the room: no Tillandsia repotting guide, no mix recipes, just light, water, airflow, and a surface to call home.
When to use this page vs other Tillandsia guides
- Tillandsia overview - Start here for whole-plant context before deep-diving this topic.
- Tillandsia problems hub - Jump to symptom-specific fix guides when this care topic does not resolve the issue.
- Root Rot on Tillandsia - Escalate here when soil adjustments are not enough.
- Mold on Soil on Tillandsia - Escalate here when soil adjustments are not enough.