Tillandsia Watering: Soak, Dry Upside Down, and Mist Guide
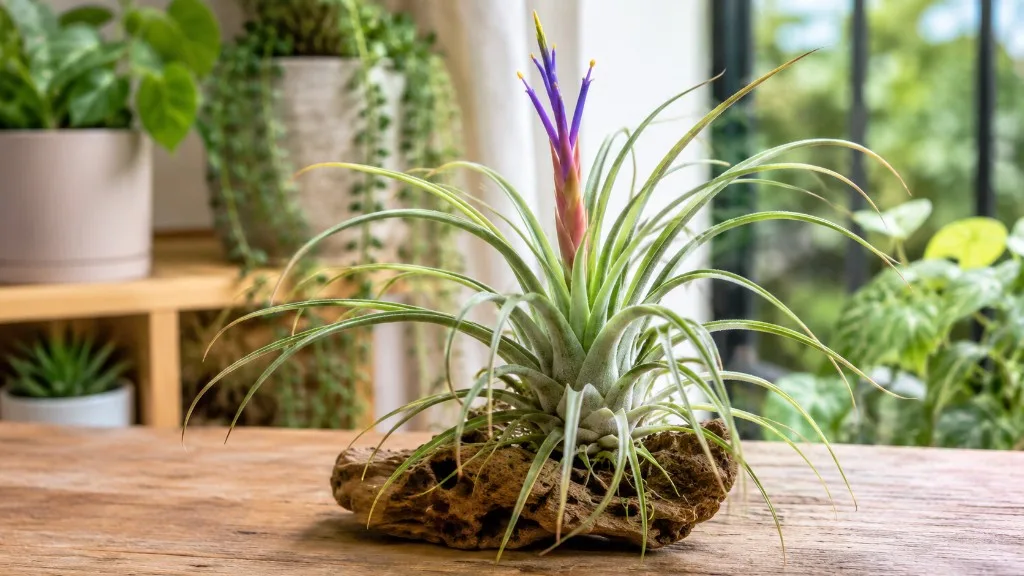
Tillandsia Watering: Soak, Dry Upside Down, and Mist Guide
Tillandsia Watering: Soak, Dry Upside Down, and Mist Guide
How Tillandsia Gets Water Without Soil
Tillandsia - the genus behind most plants sold as air plants - is an epiphytic member of the Bromeliaceae family. In the wild, these plants grow attached to tree bark, rocks, and other surfaces across the Americas, from humid cloud forests to sun-baked highland cliffs. They do not pull moisture from soil because they were never designed to. Instead, every drink enters through the leaves via thousands of microscopic structures called trichomes. If you treat a tillandsia like a potted fern and water the base of the plant as though it had functional roots in mix, you are working against its biology. The entire watering routine for tillandsia revolves around leaf absorption, full submersion soaks, aggressive drying, and supplemental misting - never soil.
That distinction matters because most houseplant advice assumes roots in potting mix. Tillandsia breaks that model completely. Its adventitious roots exist to grip cork, wire, driftwood, or a display mount. They are not the primary intake system. When you understand that, the soak-and-dry method stops feeling like a quirky hobbyist trick and starts reading as the only logical way to hydrate a leaf-drinking epiphyte indoors.
Trichomes and Leaf-Absorbed Moisture
The silvery or fuzzy sheen on many tillandsia leaves is trichome cover, not dust. Each trichome is a tiny, nail-shaped structure with a hollow shield that sits on the leaf surface and connects to internal leaf tissue below. When moisture contacts the shield - from rain, fog, dew, or your soaking bowl - the trichome swells, flattens against the leaf, and creates a thin film that draws water inward through the stem cells and into the mesophyll. Research on Tillandsia trichome development confirms this pathway: environmental water enters the head cells and moves in one direction only, down into the leaf, never back out through the same route during absorption. UF/IFAS Gardening Solutions describes bromeliad trichomes as disc-shaped leaf hairs adapted for absorption.
The practical takeaway is straightforward. A light spritz that barely wets the surface may freshen the plant cosmetically, but it often fails to fully charge the trichomes the way a proper soak does. That is why experienced growers treat submersion as the primary hydration event and misting as a bridge between soaks. The trichomes need sustained contact with water to pull in enough moisture for a plant that has no soil reservoir to fall back on. In a dry apartment with forced-air heating, that reservoir gap shows up fast as inward leaf curling and a pale, wrinkled look.
Species with heavy trichome cover - think Tillandsia tectorum or Tillandsia xerographica - evolved in drier, brighter habitats and can tolerate longer intervals between drinks. Smoother, greener species like Tillandsia bulbosa come from more humid forests and generally want more frequent hydration. The soak method works for both groups, but the calendar between soaks shifts. Fuzzy leaves usually mean “I can wait a bit longer.” Smooth green leaves usually mean “do not stretch me to ten days in a dry room.”
Why Roots Are Anchors, Not Straws
Tillandsia roots are gripping tools. In nature they wrap around branches and rock crevices to hold the plant in place while wind, rain, and debris supply nutrients. UF/IFAS Extension describes epiphytic Tillandsia species as plants that pull nutrients from moisture and particulate matter in the surrounding air rather than from a soil profile. Indoors, those roots may look brown, wiry, and unimpressive compared to a philodendron’s white feeder roots. That appearance is normal. Trim dead roots if you like, but do not interpret them as a sign the plant wants to be potted.
Because roots are not the intake system, burying a tillandsia in moss, gravel, or decorative sand and then watering that substrate is one of the fastest paths to failure. The base of the plant sits in damp material, water wicks upward into the leaf crown, airflow drops, and rot begins from the center outward. The plant looks like it is “in a pot” the way other houseplants are, but functionally you have created a wet pocket around the one part of the anatomy that must stay dry between soaks. No soil watering. No substrate watering. No “just a little moisture at the base.” Hydrate the leaves through soaking and misting, then let the plant dry completely before it goes back on display.
The Weekly Soak Method That Actually Works
For most tillandsias kept indoors, a full submersion soak of 20 to 30 minutes once per week is the baseline that keeps trichomes charged without pushing the plant into constant wetness. In drier homes - heated winter air, air conditioning, desert climates, or plants sitting directly under a vent - stretch that to twice weekly. In consistently humid environments with good airflow, every 10 to 14 days may be enough for species with moderate trichome cover. The soak is not a quick rinse. It is a timed bath that lets water penetrate every leaf surface, including the undersides and the tight spaces where leaves overlap at the base.
Remove the plant from its holder, terrarium, shell, or wire frame before soaking. Anything that traps water against the base during or after the bath defeats the purpose. Fill a bowl, basin, or clean sink with room-temperature water deep enough to fully submerge the plant. Place the tillandsia in the water and let it float or sink - either works as long as all leaf surfaces contact water. Set a timer for 20 to 30 minutes. When the timer ends, the leaves often look slightly darker or more saturated in color. That shift is normal and usually reverses as the plant dries.
Step-by-Step Soaking Instructions
Start by gathering every tillandsia you plan to water and taking each one off its mount. Check for debris, dead leaf bases, or stuck-on label glue at the bottom, because those spots hold water later. Fill your container with room-temperature water - cold water shocks leaf tissue, and hot water damages it. Rainwater, filtered water, or tap water that has sat out for 24 hours are all acceptable for most plants. Avoid artificially softened water, which carries salts that clog trichomes over time, and avoid distilled water for routine soaks because it lacks the minerals these plants encounter in nature.
Lower the plant into the water so it is fully underwater. If you have several tillandsias, you can soak them together, but give each one space so water reaches all sides. For larger specimens like a mature Tillandsia xerographica, rotate the plant once or twice mid-soak so no dry pockets remain in the inner rosette. When 20 to 30 minutes have passed, lift the plant out and immediately move to the drying step - do not skip straight to the display shelf. The sequence is always soak, shake, flip, dry, then display. Treating soaking as the entire job is how healthy-looking plants develop hidden crown rot three days later.
If a plant arrives severely dehydrated - tight inward curling, gray-green color, leaves that feel papery - one longer soak of up to an hour can help as a rescue, followed by the normal weekly rhythm once the plant rehydrates. Do not make extended soaks your default. Routine care is the short weekly bath, not an hours-long submersion that keeps tissue wet long after trichomes have finished drinking.
Weekly vs Biweekly Frequency
Weekly soaking suits the majority of indoor tillandsias in average home humidity, especially mesic species with greener leaves and moderate trichome cover. Biweekly soaking - every 10 to 14 days - can work for xeric species with heavy silver trichomes, plants in humid bathrooms with strong airflow, or collections kept in bright rooms where the leaves dry quickly after each bath. The decision is not philosophical. It is environmental.
Use three checks to pick your interval. First, how fast does the plant dry after a soak? If it is still damp at the base 6 hours later, you are either not drying upside down aggressively enough or your display location lacks airflow - fix drying before you change soak frequency. Second, how does the leaf texture feel mid-cycle? Firm, open leaves with normal color mean the interval works. Inward curling, wrinkling, or a dull flat gray tone mean shorten the gap. Third, what is your room doing seasonally? Winter heat dries air and pulls moisture from leaves faster; summer humidity in many regions slows dry-down and may let you stretch slightly. A calendar label on the fridge - “Soak Sundays” - is a useful reminder to check the plant, not a command to submerge a still-hydrated tillandsia on schedule regardless of condition.
Using Misting as a Supplement, Not a Replacement
Misting two to three times per week fills the gap between soaks in dry indoor air. It is a supplement, not a substitute for soaking. Light misting wetting only the outer leaf tips does not replicate the deep trichome charge that a 20-minute submersion provides. Think of misting as humidity support and a mid-week top-up, especially for mounted displays you cannot easily remove for a full bath, or for smaller Tillandsia ionantha clusters that dry out quickly on an open shelf.
Mist heavily enough that water runs lightly over the leaf surfaces, including the undersides when you can reach them. Morning misting gives the plant the rest of the day to evaporate surface moisture in Tillandsia light guide. Evening misting in a cool, stagnant corner is less ideal because droplets sit longer in the leaf base overnight. If you mist, you still owe the plant the same drying discipline: no misting into a closed glass globe where water runs down into the crown and stays there.
For displays glued to wood or wedged into a terrarium, misting and occasional gentle rinsing under a faucet may be the only practical option. In those cases, increase mist frequency, improve airflow around the display, and accept that mounted plants often need more attentive drying than freestanding ones you can flip upside down after every soak. When mist-only routines fail, the plant usually shows chronic underwatering on Tillandsia - tight curling, stalled growth - even though the owner sprays regularly. That pattern is a signal to prioritize soak access over more misting volume.
Shake, Flip, and Dry: The Step Most People Skip
Soaking hydrates. Drying saves the plant. The single most important action after every soak - and after heavy misting or rinsing - is to shake out trapped water and dry the tillandsia upside down in bright light with good airflow until every crevice at the leaf base is dry. Skip this step and you are not “being gentle” with the plant. You are leaving a pool of water in the crown, which is exactly where crown rot starts.
Hold the plant at the base with a secure but gentle grip, turn it upside down, and give it several firm shakes. You should see droplets fly from between the leaves. Some growers tap the base lightly against a towel. If the plant has a natural hook shape at the bottom, hang it inverted from a dish drainer or drying rack so gravity pulls water away from the center. A plain kitchen towel works too - lay the plant on its side or base-up, not upright in a cup.
Why Upside-Down Drying Matters
Tillandsia leaves grow in overlapping rosettes. Water naturally runs downward into the tight junction where leaves meet at the base - the crown. In nature, wind, sun, and gravity clear that pocket within hours after rain. On your desk, inside a shell, or upright in a terrarium, the same water has nowhere to go. It sits against tissue that epiphytes expect to breathe. Fungal and bacterial growth follows. The outer leaves can look fine while the core softens. By the time the plant “falls apart” in your hand, damage is often advanced.
Upside-down drying reverses the flow. Water exits the crown instead of pooling in it. This is not an optional flourish for meticulous growers. It is the mechanical fix for a plant whose anatomy traps moisture by default. Any care guide that mentions soaking without emphasizing inverted drying is giving you half the instruction set.
The Four-Hour Rule
Aim to have the tillandsia fully dry within about four hours of leaving the soak bath. Surface moisture should be gone, the base should feel dry to the touch, and the plant should no longer cool your fingers with evaporation. Bright indirect light and a fan on low speed both accelerate safe dry-down. A closed, humid bathroom with no air movement is a poor drying room even if the plant is upside down.
If you cannot return the plant to its display within four hours, that is fine - drying comes first, aesthetics second. Returning a damp tillandsia to a glass globe, a tight wire holder, or a vertical wall mount before the base is dry repeats the crown-pooling problem. When in doubt, leave it inverted on the drainer another hour. An extra hour of drying never killed a tillandsia. A wet crown overnight has ended countless collections.
Crown Rot From Trapped Water
Crown rot is tissue death at the center of the rosette caused by water trapped between leaves at the base. It is the leading cause of tillandsia loss indoors, and it is almost always preventable. University of Minnesota Extension notes that Tillandsia crowns rot if water is not well-drained after watering. Rot is not caused by soaking itself - a 30-minute bath is well within what healthy trichomes handle. Rot is caused by what happens after the bath: water left sitting in the crown, poor airflow, enclosed displays, or misting into stagnant containers where droplets never evaporate.
The disease pattern is consistent. Water pools at the base. Tissue softens. Inner leaves darken to purple, brown, or black. A foul smell may appear. Outer leaves can remain green for days, masking the collapse at the center. Eventually the plant pulls apart when touched because the structural core has dissolved. Extension specialists and experienced growers agree: once inner crown tissue is mushy, recovery is unlikely. Prevention through drying discipline is the only reliable strategy.
What Rot Looks Like and When It Is Too Late
Early warning signs include a darkening base that spreads upward, leaves that tug out easily from the center, and a soft, spongy feel at the bottom of the rosette contrasting with the firm texture you expect on a hydrated plant. A healthy tillandsia base is firm and pale green or silvery. A rotting base is soft, dark, and sometimes slimy. Do not confuse natural dried leaf sheaths at the bottom - papery brown scales that protect the base - with active rot. Rot is mush, not paper.
If you catch slight softness on outer lower leaves only, remove those leaves, improve drying immediately, and watch the core. Some growers dust the exposed base with cinnamon as a mild antifungal after removing damaged tissue. That may help at the margin, but it does not reverse advanced inner rot. If the center leaves pull out with no resistance and the base smells off, the plant is likely lost. Check for pups - offsets at the base - which may still be healthy even when the mother plant fails. A pup with a firm base can be separated and cared for on its own with strict soak-and-dry protocol going forward.
Never Water Tillandsia Through Soil
This bears repeating because the impulse is strong: do not water tillandsia through soil, moss, sand, or any substrate. Do not “plant” an air plant in a pot and pour water on the mix the way you would for a pothos. Michigan State University Extension states that putting tillandsias in soil can potentially kill them because they do not need soil to survive. Substrate holds moisture against the leaf base, blocks airflow, and mimics the exact conditions crown rot needs. Tillandsia is not a root feeder. Putting it in damp moss because “it looks better in a planter” creates a wet collar around the stem that the plant cannot escape.
Displays that use decorative gravel, glass beads, or sand should keep the tillandsia sitting on top, not buried. If water collects in the bottom of a glass container, empty it. If you use a small bed of moss for aesthetics, keep the plant’s base above the moist layer and never water the moss with the plant in place. The correct hydration path is always leaf contact with water during a soak or mist, followed by complete drying before the plant returns to any display. Soil watering is for terrestrial roots. Tillandsia does not have them in any meaningful sense.
What Water to Use on Tillandsia
Rainwater is the gold standard because it matches what epiphytes encounter in nature - soft, slightly acidic, and free of treatment chemicals. Filtered tap water and spring water are excellent everyday choices. Plain tap water is usually acceptable if you let it sit uncovered for 24 hours so chlorine dissipates. Heavily chlorinated municipal water may still stress sensitive species over time; if leaf tips brown despite good drying technique, switch to filtered or rain water and see if the plant responds.
Avoid distilled water for routine soaks. It lacks minerals and can, over repeated use, leach nutrients from leaf tissue in ways that leave plants looking washed out. Avoid softened water entirely - the sodium and potassium salts used in home softeners damage trichomes and accumulate on leaf surfaces. If your household runs a water softener, draw soak water from a hard-water tap, a filter bypass line, or an outdoor rain barrel. Temperature matters too: room-temperature water only. Cold shocks the tissue; hot water cooks it.
Signs You Are overwatering on Tillandsia Tillandsia
Overwatering tillandsia rarely looks like “too lush.” It looks like rot, odor, and collapse. Watch for a soft, dark base, black or purple tissue creeping up from the bottom, inner leaves that fall out when touched, and a sour or musty smell at the crown. Leaves may turn translucent or yellow-green before the plant fails entirely. Plants kept in enclosed terrariums, over-misted in stagnant air, or returned to displays while still wet show these signs fastest.
Less obvious overwatering happens when someone soaks on a rigid schedule without checking whether the previous cycle fully dried. Two soaks in three days because “Wednesday is water day” can keep the base perpetually damp even if each individual soak is only 20 minutes. Overwatering is a duration-in-wetness problem, not just a volume problem. If your plant shows rot symptoms, stop soaking immediately, remove affected tissue if it is outer and limited, dry the plant aggressively in bright airflow, and do not resubmerge until the base is firm and you have fixed the drying step that failed.
Signs Your Tillandsia Needs More Water
Underwatered tillandsias tell a different story. Leaves curl inward along their length, sometimes dramatically enough that the plant looks like a closed fist. Color shifts to gray-green or dull silver, losing the plump saturation of a well-hydrated specimen. Leaf tips may brown and crisp. The whole plant feels lighter and less turgid. On Tillandsia ionantha, the graceful outward curve tightens into a narrow tube. On Tillandsia xerographica, the wide leaves narrow and twist.
These signs mean shorten the interval between soaks, not switch to soil watering or longer misting alone. Give the plant a full 20-to-30-minute soak, dry it upside down, and reassess in 24 hours. Most dehydrated tillandsias rebound visibly once trichomes recharge. Chronic underwatering in a dry home sometimes means moving from biweekly to weekly soaks, adding two mist sessions mid-week, or placing the collection nearer a humidifier - not increasing soak length beyond 30 minutes as a daily habit.
Adjusting Water for Season, Climate, and Species
Seasonal shifts change how fast tillandsias lose internal moisture even when your soak method stays constant. Winter brings dry heated air and shorter daylight in many regions, which can desiccate leaves faster and warrant weekly soaks where biweekly worked in fall. Summer may raise indoor humidity or, conversely, blast air-conditioned dry air - adjust by watching the plant, not the calendar alone. Bright light increases metabolic water use; a tillandsia moved closer to a south window may need more frequent hydration. Dark, cool rooms slow water loss and may allow longer intervals if drying remains thorough.
Species matter. Xeric tillandsias - silvery, fuzzy, stiff-leaved types from arid habitats - tolerate longer dry windows and shorter soaks. Mesic tillandsias - greener, smoother leaves from humid forests - want more frequent drinks and stricter attention to drying in stagnant air. When you buy a new species, start with weekly 20-minute soaks and the full upside-down dry, then lengthen or shorten the interval based on leaf response over two to three cycles. One uniform schedule across a mixed collection is a reasonable starting point, but fine-tuning by species prevents the xeric plant from staying wet too long and the mesic plant from chronically curling.
Common Tillandsia Watering Mistakes to Avoid
The mistakes repeat across almost every failed collection. Soaking without inverted drying is first. Misting into closed terrariums is second. Watering moss, soil, or substrate around the base is third. Using softened or distilled water for every soak degrades plants slowly. Leaving plants submerged for hours as a default routine keeps tissue wet beyond what trichomes need. Returning damp plants to vertical wall mounts or tight holders traps water at the base. Mist-only care in dry apartments undercharges trichomes. Ignoring species differences applies desert timing to forest species and vice versa.
Fix the workflow before you buy replacements. Soak 20 to 30 minutes. Shake hard. Dry upside down until the base is dry - within four hours. Mist two to three times weekly only as a supplement between soaks. Never hydrate through soil. Read the base: firm and pale means healthy hydration or slight underwatering; soft and dark means rot. That diagnostic alone resolves most “what did I do wrong?” moments.
Conclusion
Tillandsia watering is not complicated, but it is specific. These are leaf-drinking epiphytes, not potted terrestrials. Give them a 20-to-30-minute soak weekly or biweekly depending on your humidity, species, and season. Shake out every drop, dry them upside down in bright airflow within four hours, and use misting two to three times a week only as a supplement when the air is dry or the plant cannot be removed from its mount. Never water through soil or substrate. Crown rot from trapped water at the leaf base - not underwatering - is the mistake that kills most collections. Master soak, shake, flip, and dry, and tillandsias become some of the lowest-maintenance plants in the room. Skip the drying step, and no amount of careful soaking will save them.
When to use this page vs other Tillandsia guides
- Tillandsia overview - Start here for whole-plant context before deep-diving this topic.
- Tillandsia problems hub - Jump to symptom-specific fix guides when this care topic does not resolve the issue.
- Overwatering on Tillandsia - Escalate here when watering adjustments are not enough.
- Underwatering on Tillandsia - Escalate here when watering adjustments are not enough.
- Root Rot on Tillandsia - Escalate here when watering adjustments are not enough.