Crown and Base Rot on Tillandsia: Causes, Checks & Fixes
Quick answer
Crown or base rot on Tillandsia is tissue death where overlapping leaves meet at the rosette center-usually from water trapped after soaking, misting into closed displays, or returning a damp plant upright before it dries. First step: stop all water, shake the plant upside down, and let the base dry in bright airflow for at least four hours before you assess or trim anything.
Crown and Base Rot on Tillandsia: Causes, Checks & Fixes
This guide covers stem rot on Tillandsia. See also the general Stem Rot guide, watering, and light pages for this plant.
Crown and Base Rot on Tillandsia: Causes, Checks & Fixes
Quick answer
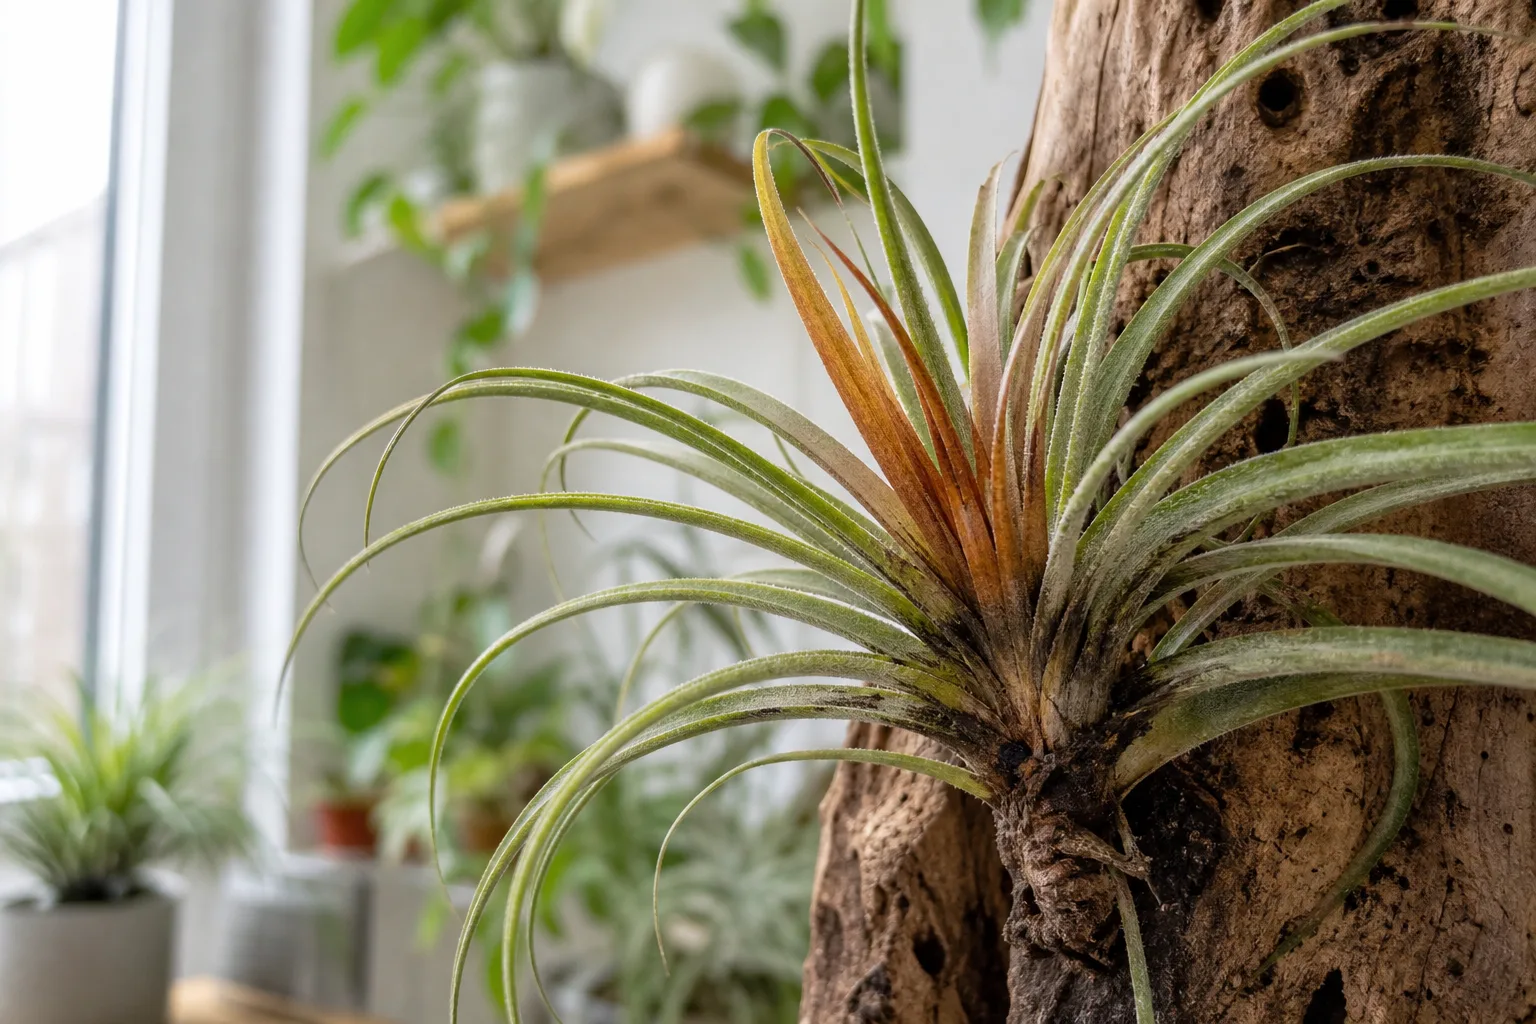
If you searched “stem rot on Tillandsia,” you are almost always dealing with crown rot or base rot-tissue death at the center of the rosette where overlapping leaves trap moisture. Tillandsia are epiphytic bromeliads with no functional stem or soil root zone. Water that should evaporate from leaf trichomes instead pools in the crown after soaking, misting, or display in a closed globe.
First step: stop all water immediately, hold the plant upside down, shake out trapped droplets, and place it in bright indirect light with good airflow until the base feels completely dry-aim for full dryness within about four hours. Do not re-soak, fertilize, or return the plant to its holder while the base is still cool or damp to the touch.
Once dry, pinch the lowest leaf bases. If tissue is firm, improve your drying routine going forward (see the Tillandsia watering guide). If tissue is soft or black, move to trim-and-salvage steps below. Judge recovery by firm new growth, not by expecting damaged leaves to look perfect again.
Why Tillandsia rots at the crown-not a true stem
Houseplant rot articles assume a stem and root ball in potting mix. Tillandsia breaks that model entirely. These plants absorb water through trichomes on the leaves, anchor with wiry adventitious roots, and grow in overlapping rosettes that naturally funnel rainwater toward the base. UF/IFAS Gardening Solutions describes air plants as epiphytes that need light, air circulation, and periodic misting-conditions that fail when water sits in the leaf junctions instead of drying.
In nature, wind and sun clear that pocket within hours. Indoors, common setups reverse the flow:
- Soaking without upside-down drying - water runs into the crown when the plant is set upright too soon.
- Closed terrariums and glass globes - humidity stays high and evaporation at the base stalls.
- Misting into enclosures - droplets slide down inner leaves and collect at the core overnight.
- Wet moss or soil around the base - substrate wicks moisture into the crown (see mold on moss around Tillandsia).
- Vertical wall mounts returned while damp - the base contacts a surface that traps water.
Rot is rarely caused by the soak itself-a 20–30 minute weekly submersion is standard care. Rot follows what happens after the bath when drying discipline fails. University of Minnesota Extension notes that Tillandsia crowns rot when water is not well drained after watering.
Xeric vs. mesic drying differences
Xeric species (Tillandsia xerographica, T. tectorum) with heavy silver trichomes tolerate longer dry windows but still cannot sit wet at the crown. Mesic species (Tillandsia bulbosa, T. fasciculata) with smoother green leaves need faster dry-down in stagnant air. The rot mechanism is the same; mesic types in humid bathrooms may hide wetness longer, while xeric types in dry rooms sometimes recover faster once airflow improves-but no Tillandsia tolerates a perpetually damp crown.
What crown and base rot look like on Tillandsia
Learn this checklist before you treat shipping stress or underwatering on Tillandsia by mistake.
Stem Rot symptoms on Tillandsia - compare with healthy tissue on the same plant.
Early and active rot signs
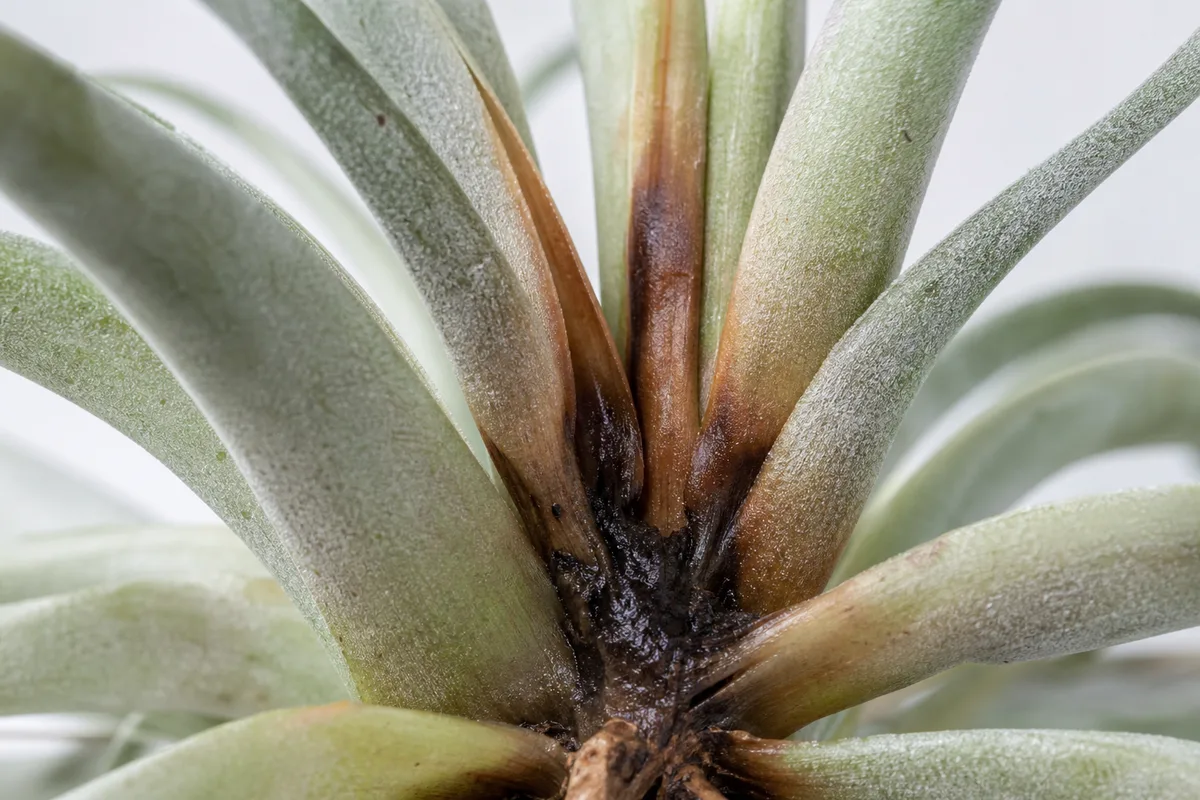
- Soft, spongy, or slimy tissue at the lowest leaf bases-contrasts with the firm feel of a healthy hydrated plant
- Darkening color - brown, purple, or black spreading upward from the base
- Inner leaves pull out easily with a gentle tug while outer leaves still look green
- Sour, musty, or off smell at the core when you lift the plant
- Loosening rosette - the plant feels wobbly or starts to fall apart from the center outward
- Translucent or yellow-green inner leaves before total collapse
What is not rot
- Papery brown leaf sheaths at the base - dried protective scales; they crumble dry, not mushy
- Natural post-bloom decline - mother plants slowly die after flowering while pups emerge; firm pups with a rotting center are different from normal monocarpic senescence
- Dry brown leaf tips from underwatering - tissue is crisp, not soft; leaves curl inward rather than blacken at the core
- Silvery trichome coating on xeric leaves - even, dry, fixed to the leaf surface
The signature pattern that confuses owners: outer leaves stay green while the base is already dead. Do not wait for the whole plant to brown before you act.
Crown rot vs. lookalike problems
| What you see | Most likely cause | What to check first |
|---|---|---|
| Soft black base, sour smell, inner leaves pull free | Crown/base rot | Stop water; dry upside down; trim mush; check pups |
| Inward leaf curl, gray color, light papery feel | Underwatering | Full soak, aggressive upside-down dry, shorten interval |
| Arrived dry and limp after shipping | Shipping dehydration | Soak 20–30 min, dry inverted; base should firm up in 24–48 h |
| Soft base after plant buried in moss or soil | Wet display setup | Remount openly; see soil guide |
| Brown tips only, firm base, no smell | Low humidity or salt buildup | Adjust soak water; improve light and airflow |
| Mother fading after bloom, firm pups present | Normal post-flowering cycle | Care for pups separately if mother core is still firm |
Overwatering and root rot searches on Tillandsia usually describe this same crown failure-trapped water at the base-not feeder roots in mix. This page focuses on active rot triage; the watering guide covers soak rhythm and prevention in depth.
How to confirm the cause
Work through this order so you do not trim healthy tissue or soak a plant that needs to dry:
- Recent water event - Soak, heavy mist, terrarium misting, or rain exposure in the last 48 hours? Rot follows moisture; dehydration does not soften the core.
- Base firmness - Pinch lowest leaf bases between fingers. Mushy = rot. Firm = look elsewhere.
- Inner leaf tug test - Gently pull an inner leaf. Clean resistance is healthy; effortless pull-out with dark tissue at the attachment point confirms crown damage.
- Smell - Sour or musty at the core supports rot. Neutral or dry scent does not.
- Display setup - Closed globe, wet moss nest, upright drying, or plant returned to holder while damp? Setup explains most cases.
- Outer vs. inner contrast - Green tips with black mush at the core is classic crown rot, not tip burn.
- Pup check - Firm offsets at the base may be salvageable even when the mother center is failing.
First fix for Tillandsia
Stop all water and dry the plant upside down in bright airflow.
Remove the Tillandsia from every holder, terrarium, shell, or moss nest. Hold it inverted, shake vigorously until water stops flying from between leaves, and set it on a towel or dish drainer base-up in bright indirect light. Penn State Extension recommends allowing plants to dry at least four hours after watering before returning them to enclosed displays-after rot suspicion, treat four hours as the minimum, not the goal, before any further handling.
This single step is the first fix-not trimming, not cinnamon, not fungicide. Drying stops active decay from spreading while you assess. If the base is still damp after four hours, extend drying with a fan on low. Do not re-soak “because leaves look thirsty” while the core is soft.
Step-by-step triage after drying
Once the base is dry to the touch:
- Remove only outer mushy leaves - Sterilize scissors; cut away leaves that are black, soft, or slimy at the base. Stop if the center meristem is black and pulls out with no resistance.
- Inspect the core - A firm pale center after removing damaged outer leaves may recover with strict dry-down going forward. A hollow, smelly core is beyond saving.
- Separate firm pups - If offsets at the base are firm and green, gently twist or cut them free. Let cut surfaces air-dry 24 hours before remounting.
- Optional cinnamon dust - Some growers lightly dust exposed base tissue with cinnamon after trimming outer rot. This is a mild antifungal adjunct, not a substitute for drying and airflow. It does not reverse advanced inner rot.
- Skip fungicide unless extension identifies a specific pathogen - Crown rot on air plants is an environmental failure; chemical treatment rarely saves tissue that is already mushy.
- Remount openly - Cork, wire, or freestanding on dry pebbles with the crown exposed. Follow the soil and mounting guide.
- Resume soaking only when base is firm - Next soak: submerge leaves 20–30 minutes, shake inverted, dry fully, then display. One variable change at a time.
Do not stack Tillandsia repotting guide, heavy pruning, fertilizer, and pesticide on the same day-a stressed Tillandsia needs a clear read on what helped.
Can you save pups?
Yes, when pups are firm and the mother core is lost. Tillandsia produce offsets (“pups”) after flowering or during normal growth. A rotting mother can still leave healthy pups at the base.
To salvage:
- Identify pups one-third the size of the mother or larger-they root and hydrate more reliably than tiny offsets.
- Confirm each pup’s base is firm, not black or slimy.
- Separate with clean scissors or a gentle twist; avoid tearing tissue attached to mush.
- Air-dry cut surfaces 24 hours in bright indirect light.
- Mount each pup openly with the same soak-shake-dry protocol from the watering guide.
If every pup base is soft, discard the cluster. Keeping rotting tissue nearby risks spreading decay to healthy collections.
Recovery timeline and when to discard
Caught early - slight softness on one or two outer lower leaves only, firm core after trim: stabilization in one to two soak cycles (one to two weeks) once drying is corrected. New center growth should emerge firm and green.
Moderate rot - several outer leaves removed, core still firm: two to four weeks of open mounting and careful soaks before you trust the plant in a display holder again.
Advanced inner rot - center pulls out, sour smell throughout, plant collapses when touched: usually fatal for the mother plant within days. Salvage pups only; discard the rosette if no firm offsets remain.
Cosmetic damage - trimmed outer leaves do not regenerate to their original shape. Success means stopped spread, firm new growth, and dry base after each soak-not perfect old foliage.
What not to do
- Do not keep soaking because outer leaves look green while the base is soft.
- Do not fertilize a rotting Tillandsia-nutrients do not repair mushy tissue and can stress recovering plants.
- Do not return the plant to a closed terrarium until the base has been firm and dry through at least two full soak-dry cycles.
- Do not mist into a globe without removing the plant to dry afterward.
- Do not bury the base in moss, soil, or sand to “stabilize” a wobbly plant-wet collars accelerate rot.
- Do not confuse this with pet emergency - Tillandsia are non-toxic to cats and dogs; the urgency is saving the plant, not veterinary care.
- Do not apply houseplant fungicide by default - fix airflow and drying first.
How to prevent crown rot next time
Prevention is the only reliable strategy; advanced crown rot rarely reverses.
- Soak leaves, not the mount - Remove from holders before every bath; follow 20–30 minute weekly soaks adjusted to your humidity and species.
- Shake and dry upside down - Non-negotiable after every soak and heavy mist. Gravity must pull water out of the crown.
- Four-hour dry benchmark - Base fully dry before any enclosed or vertical display. Bright filtered light and a fan on low speed both help.
- Open displays beat closed globes - If you use glass, choose wide openings and never mist inside without removing the plant to dry.
- Never hydrate through substrate - Moss, soil, and gravel nests wick water to the crown (soil guide).
- Inspect weekly - Lift the plant and pinch the base during routine care. Early darkening beats sudden collapse.
- Match species to dry-down - Greener mesic types in humid rooms still need inverted drying; silvery xeric types are not immune to crown pooling.
Practical checks
Urgency check
Treat as urgent today if the base is soft and spreading, inner leaves pull out freely, rot smell is present, or the rosette loosens in your hand. Same-week attention fits early outer-leaf darkening with a still-firm core after you have already corrected drying. Discard or pup-salvage only when the meristem is black mush with no firm center.
Best inspection order
Recent soak or mist → base firmness and smell → inner leaf tug → display setup (globe, moss, upright dry) → pup firmness → light and airflow at the drying spot.
Severity note
Use spread of mush and core firmness, not a single brown leaf tip, to decide speed. One softened outer leaf with a firm center is a trim-and-dry case. Effortless center pull-out is a discard-or-pup case.
Conclusion
Crown and base rot on Tillandsia is almost always preventable-and almost always caused by water trapped where overlapping leaves meet, not by soaking itself. Stop water, dry upside down in bright airflow, trim only soft outer tissue, and salvage firm pups when the mother fails. Outer leaves can lie to you; the base tells the truth. Master soak, shake, flip, and dry from the watering guide, mount openly, and skip closed wet displays-and crown rot stops being the reason air plants “mysteriously” die after a normal bath.
When to use this page vs other Tillandsia guides
- Tillandsia watering guide - Use for routine moisture checks before assuming stem rot is the main issue.
- Tillandsia problems hub - Browse all 19 common issues on this species.