Brown Tips on Tillandsia: Causes, Checks & Fixes
Quick answer
Brown tips on tillandsia usually mean dehydration, dry-air tip burn, direct sun scorch, or salt buildup on leaf margins-not one cause alone. First step: feel the crown (firm vs soft), note whether only tips or whole margins are brown and whether damage is even or sun-facing only, then match one fix-rescue soak and upside-down dry for thirst, or move out of direct sun for scorch.
Brown Tips on Tillandsia: Causes, Checks & Fixes
This guide covers brown tips on Tillandsia. See also the general Brown Tips guide, watering, and light pages for this plant.
Brown Tips on Tillandsia: Causes, Checks & Fixes
Quick answer
Brown tips on Tillandsia (Tillandsia spp.) are a localized symptom-not a single disease. The most common indoor triggers are dehydration between soaks, dry-air tip burn beside heat vents, direct sun scorch through a window, and salt or mineral buildup from tap or softened water. Crown rot from trapped moisture can look like wilted leaves but feels soft and dark at the base-the opposite of drought.
First step: feel the crown where leaves overlap at the base. A firm, dry crown with dry tan or papery tips points to thirst, scorch, salt, or humidity stress. A soft, dark, sometimes smelly crown points to overwatering-crowns rot when water is not well-drained after watering-stop soaking and see the overwatering guide instead of giving a longer bath.
Once the crown is firm, decide which pattern fits-tip-only vs margin burn, even damage vs sun-facing bleaching, white crust on tips-then apply one cause-matched fix. For baseline soak standards, see the Tillandsia watering guide. For humidity-only deep troubleshooting, see low humidity on Tillandsia. For full papery leaf texture across the rosette, see crispy leaves on Tillandsia.
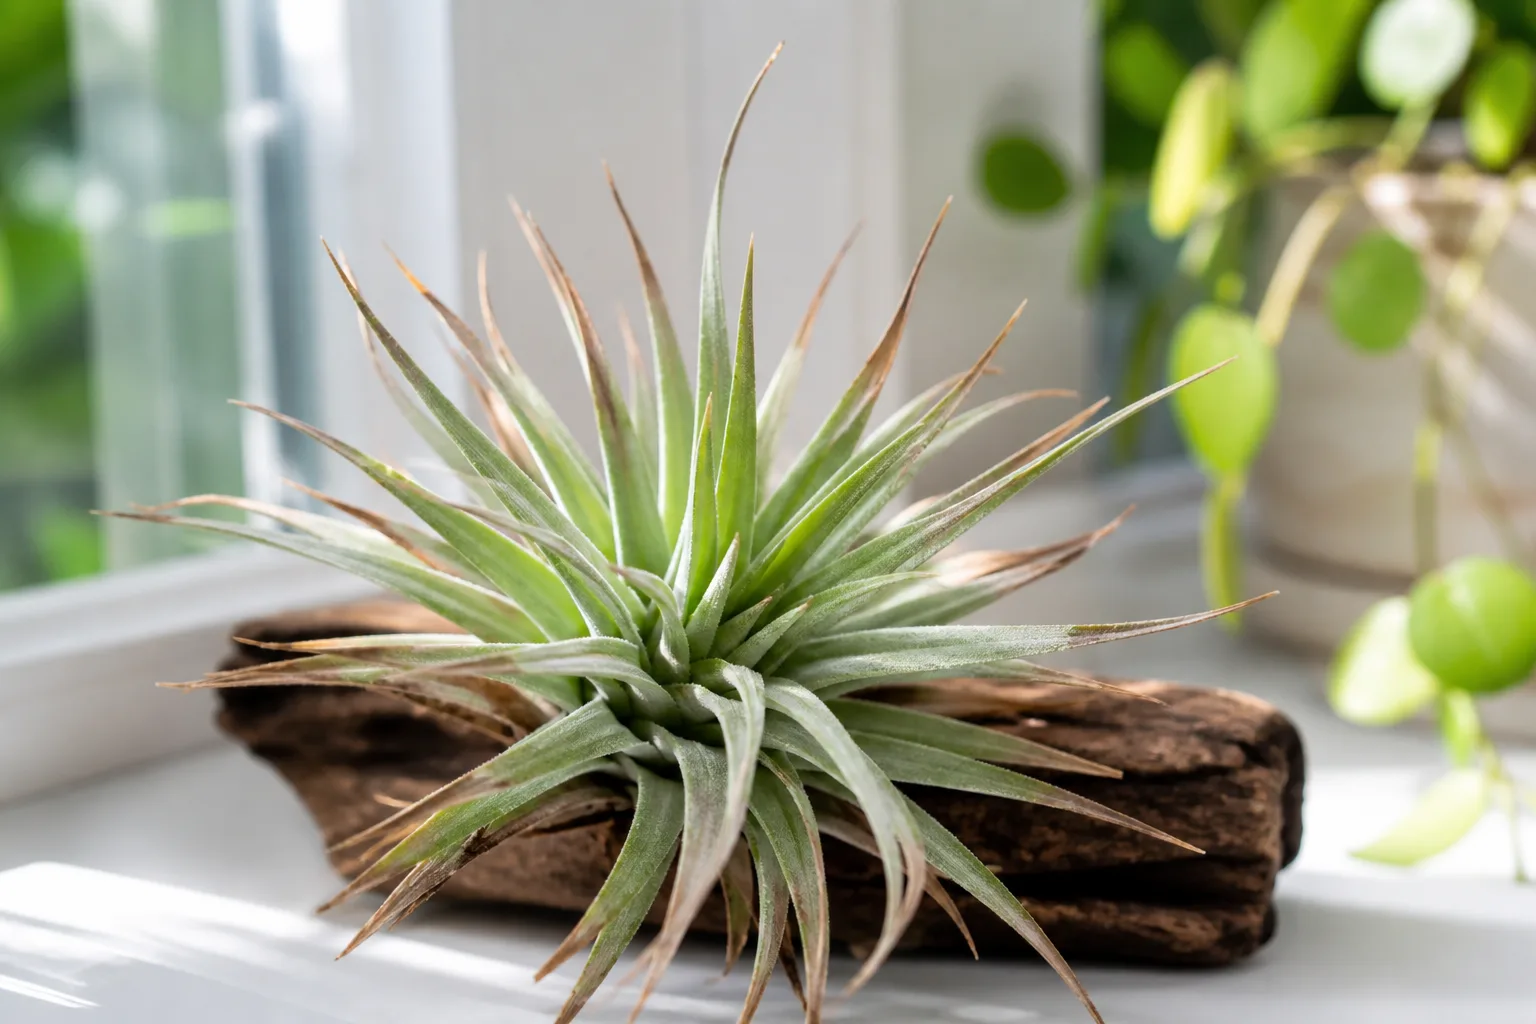
What brown tips look like on Tillandsia
Brown tip damage on air plants has a placement and texture pattern that narrows the cause faster than the word “brown” alone.
Brown Tips symptoms on Tillandsia - compare with healthy tissue on the same plant.
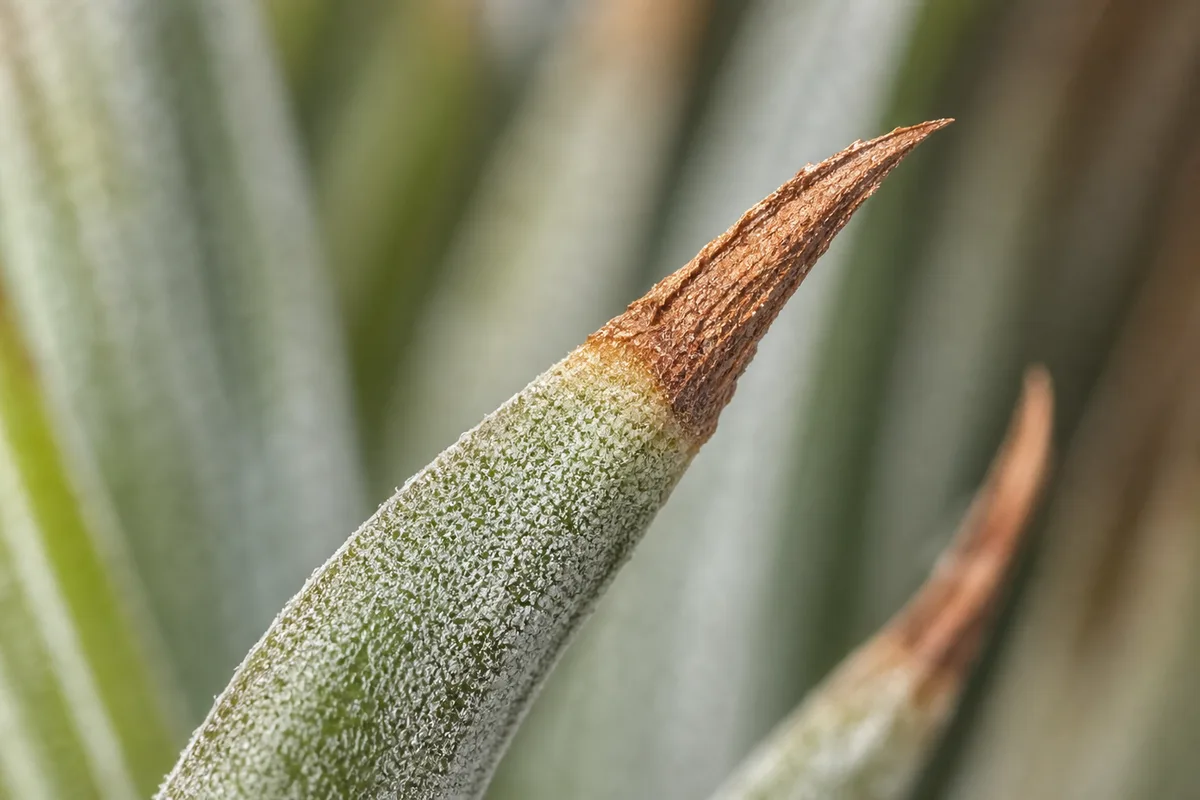
Dehydration tip browning (most common):
- Dry tan to brown necrosis at the leaf apex only-the rest of the blade may still look green or silver
- On Tillandsia ionantha, outer leaf tips crisp first while the center tube stays partially green
- Leaves may feel dull or slightly limp; the rosette can curl inward before the whole leaf goes papery
- Damage is often even around the rosette, not confined to one sun-facing patch
- The crown stays firm and dry when you press overlapping leaf bases
- The plant feels lighter than a well-hydrated neighbor of the same species
Direct sun scorch:
- Bleached, tan, or brown patches on the leaf face that receives the most light-often the side toward a south or west window
- Tips may brown on the sun-exposed margin while the shaded side of the same leaf stays greener
- Tissue feels papery but the crown stays firm-unlike rot
- Damage appears days after moving the plant to hot direct sun or placing it on glass that intensifies afternoon light
- Common on broad-leaved types like Tillandsia xerographica where a margin band browns before the whole leaf crisps
Dry-air and heat-vent tip burn:
- Papery brown tips on mesic types like Tillandsia ionantha, often worst on the leaf pointing toward a register
- Symptoms worsen when heating runs or a desk display sits in a direct HVAC draft
- Crown stays firm and dry; hygrometer near the display often reads below 30% RH
- Overlaps with low humidity but brown-tips captures the tip-only entry symptom readers search before humidity is confirmed
Salt or mineral burn:
- Crisp brown margins with white or chalky crust on leaf tips from repeated tap or softened water
- Damage concentrates at apex and edges where minerals accumulate as water evaporates
- Crown firm; leaves may look otherwise hydrated after soaking
- More common on mounted displays misted frequently with hard water
Normal lookalikes to rule out first:
- Shipping stress - slight tip browning on wispy-leaved types like T. fuchsii gracilis in the first week after arrival; often stabilizes once soak rhythm is established
- Natural base browning on species like T. juncea - older leaf bases darken while tips stay green; not a care failure
- Crown rot - soft dark center, sour smell, inner leaves pulling free; see root rot-not tip drought
Why Tillandsia gets brown tips
Tillandsia is an epiphytic bromeliad that absorbs water through foliar trichomes, not holdfast roots. Leaf tips and margins are the first places water loss outpaces trichome recharge-so multiple environmental stresses show up as tip browning before whole-leaf failure.
No soil reservoir. Potted houseplants buffer drought through mix moisture. Air plants have no root zone cushion. Once trichomes desiccate between soaks, damage concentrates at apexes where evaporation is highest.
Mist-only routines in dry rooms. Light misting wets the surface but often fails to fully charge trichomes the way a timed submersion does. In apartments with forced-air heat, a mist-only owner can spray faithfully while tips slowly crisp. Mounted or glued displays that cannot be submerged accelerate this pattern-see underwatering on Tillandsia for thirst-only deep troubleshooting.
Direct sun through windows. UF/IFAS recommends bright but not direct sunlight for tillandsia. Afternoon sun on glass can bleach and brown leaf faces and margins while the crown stays firm-owners often misread this as underwatering and soak more, which does not fix scorch.
Heat vents and low winter humidity. Penn State Extension warns that heating vents can quickly dry out air plants. Forced-air heat pulls indoor humidity into the low twenties; outer leaf tips on mesic ionantha brown while you still soak weekly. Enclosed glass globes trap stagnant dry air and produce the same tip pattern.
Salt buildup from tap water. Minerals left behind as water evaporates crust on tips and margins. Repeated misting with hard water without occasional rinsing or rain-water soaks produces crisp brown edges that do not respond to longer soaks alone.
Mesic vs xeric tolerance split. Mesic tillandsias from rainforest canopies show papery tip browning first when air is dry. Xeric types with dense trichomes more often curl leaves tight before tips crisp-but margin burn still appears on T. xerographica in direct sun. Treating a xeric type like a thirsty mesic ionantha-soaking more often without fixing light or air moisture-invites crown rot.
Lookalike symptoms to rule out
| Pattern | Brown tips (this page) | Low humidity | Underwatering | Sun scorch | Crown rot |
|---|---|---|---|---|---|
| Damage site | Dry tan apex or margin band | Papery tips near vents; xeric curl | Even tip browning; dull leaves | Bleached patches on sun-facing leaf face | Soft dark center, not just tips |
| Crown feel | Firm and dry | Firm and dry | Firm and dry | Firm and dry | Soft, dark, may smell |
| Key sign | Tip-only or margin crust; multiple causes | RH below 30%; vent proximity | Long gap since full soak | One-sided bleaching | Sour smell; inner leaves pull free |
| First fix | Match cause: soak, move from sun, rinse salt, humidify | Humidifier + supplemental mist | Rescue soak + upside-down dry | Move to bright filtered light | Stop soaking; dry and trim mush |
If the whole leaf is papery and brittle-not just tips-start with the crispy leaves guide. If stippling or webbing appears with dryness, inspect for spider mites before assuming environment alone.
How to confirm the cause
Work through these checks in order:
- Crown firmness - Press overlapping leaf bases. Firm and dry supports dehydration, scorch, salt, or humidity tip burn. Soft and dark means rot-route to overwatering or root rot, not a longer soak.
- Tip-only vs whole-leaf damage - Apex-only tan necrosis with plump green mid-blade suggests tip stress. Full papery curl points to deeper dehydration or scorch-see crispy leaves.
- Sun-side pattern - Rotate the plant. If brown or bleached tissue faces the window and the shaded side stays greener, suspect scorch before thirst.
- Soak history - When did you last do a full submersion soak (not mist only)? A firm crown with dull leaves and a long gap since soaking fits underwatering. A firm crown soaked yesterday with one-sided bleaching fits scorch.
- White crust on tips - Chalky mineral deposits suggest salt burn; switch to rain or filtered water and occasional full rinses.
- Room humidity and vents - Hygrometer below 30% RH with tip browning on the leaf nearest a register? Cross-check the low-humidity guide.
- Display type - Closed globe, glued mount, or mist-only routine? Each raises tip-burn risk even when weekly soaks continue.
Change one variable at a time after you identify the most likely cause. Stacking a longer soak, a humidifier, a window move, and tip trimming on the same day hides which fix actually worked.
First fix for Tillandsia
Your first action depends on the pattern you confirmed-not a default “soak more.”
If dehydration fits (firm crown, dull leaves, long gap since full soak, even tip browning):
Remove the plant from its mount or globe. Give a full submersion soak in room-temperature water for 20 to 30 minutes-or up to one hour for severely dehydrated ionantha tubes with tight curl. Lift the plant out, shake vigorously upside down to expel water from the crown, and dry on a towel in bright indirect light with good airflow until the base is fully dry-within about four hours. Resume your normal weekly or biweekly rhythm from the watering guide.
If sun scorch fits (one-sided bleaching, firm crown, recent window move or hot afternoon sun):
Move the plant to bright filtered light-east or west window with sheer curtain, or several feet back from south glass. Do not soak more as the primary fix; scorch tissue will not heal from water alone. Hold fertilizer until new growth looks clean.
If dry-air tip burn fits (tips near vent, RH below 30%, firm crown, normal soak rhythm):
Relocate off the vent path and raise ambient humidity with a room humidifier or supplemental misting between soaks-not a pebble tray under a cork mount. See the low-humidity guide for hygrometer targets and winter routines.
If salt burn fits (white crust on tips, firm crown):
Rinse with rain or filtered water during your next soak, shake dry upside down, and reduce hard tap misting. Trim fully crusted tips after one clean soak cycle if they remain brittle.
Do not apply fertilizer to browned tips on day one. Do not return a damp plant to a closed globe. Do not confuse a soft dark base with underwatering-that mistake accelerates rot.
How to trim brown tips safely
Once the cause is corrected and the plant is stable, trim for appearance:
- Use clean, sharp scissors-disinfect with rubbing alcohol if you recently cut rot or pest tissue on another plant.
- Snip only fully brown or papery tip tissue at a slight angle, following the natural leaf curve. Do not pull or tear-tearing damages healthy trichomes below the dead zone.
- Leave a thin margin of dead tissue if you are unsure where green begins; a second trim later is safer than cutting into living cells.
- Trimmed tips do not regreen. Cosmetic improvement is immediate; biological recovery shows in new center leaves with clean tips over the next few weeks.
- On clustered ionantha, trim outer leaves first; leave the center growth point untouched unless tissue is fully dead.
Trimming before fixing the cause only tidies a plant that will brown again on the next leaf segment.
Recovery timeline
Expect browning to stop spreading within one to two soak cycles once the correct stressor is removed-often within a few days to two weeks for dehydration, depending on species and severity.
Signs recovery is working:
- New center leaves emerge with clean tips and normal color
- Existing leaves feel plumper and less curled within 24 to 48 hours after a proper rescue soak (dehydration cases)
- No new bleached patches appear after moving out of direct sun
- The crown stays firm and dry between soaks
- Tip damage does not spread to the next leaf segment
Signs the problem is worsening:
- Browning moves from tips down the leaf blade toward the crown
- The center turns soft, dark, or smells sour-see root rot
- After a window move, scorch patches spread across more leaf faces
- Multiple rosettes on the same shelf brown simultaneously without a humidity adjustment
- Mist-only routines continue while tips crisp every week despite surface wetting
Old browned tips remain brown permanently even after the plant recovers. Judge success by new growth, not by repaired outer leaves.
Mistakes to avoid
- Soaking more when the cause is sun scorch - water does not heal bleached tissue; it raises rot risk in a firm but wet crown
- Mist-only escalation - frequent light mist without full submersion fails to recharge trichomes in dry apartments
- Returning a damp plant to a closed globe - crown pooling after soaking kills tillandsia faster than tip browning
- Trimming before fixing the cause - cosmetic cuts on a plant still beside a heat vent or in direct sun
- Confusing soft dark base with drought - underwatering keeps the crown firm; rot keeps it soft and sour
- Using softened or hard tap water for every mist - mineral crust on tips mimics drought and resists soaking alone
- Stacking soak, fertilizer, and window moves on one day - you cannot tell which variable helped
- Ignoring species type - xeric T. tectorum and T. xerographica need gentler water contact and longer dry time than smooth mesic ionantha
When handling trimmed tissue or mounting wire, remember tillandsia is generally listed as non-toxic to cats and dogs-but keep pets away from scissors and small fallen leaf segments during grooming.
Tillandsia care cross-check
While correcting brown tips, keep baseline care steady:
- Light: Bright indirect light with protection from hot direct afternoon sun; see the Tillandsia light guide
- Water: Continue the normal soak 20 to 30 minutes weekly for mesic types or biweekly for heavy xeric trichomes, then shake and dry upside down for at least four hours before remounting
- Humidity: Supplement with misting between soaks when indoor RH drops in heating season-see low humidity
- Display: Open mounting on cork or wire dries faster than sealed globes; leave globes open until the plant is fully dry after every soak
A plant in stable care pushes clean new center leaves faster once the stressor stops. Swinging between drought and over-soaking while chasing tip color makes every symptom harder to read.
How to prevent brown tips next time
- Follow the soak-and-dry rhythm from the watering guide-full submersion, not mist-only survival
- Keep displays in bright filtered light away from hot afternoon glass; rotate mounted plants seasonally
- Run a humidifier or supplemental mist when heating season drops RH below 30%-check a hygrometer in October, not after half a cluster has crisp tips
- Use rain or filtered water for frequent misting to limit salt crust on margins
- Shake dry upside down within four hours after every soak before returning to any holder
- Inspect weekly during normal care-tip browning is easiest to reverse when only one outer leaf is affected
- Quarantine new arrivals for a week; shipping stress often shows as minor tip browning on wispy species before stabilizing
Prevention on tillandsia is mostly about consistent trichome hydration, filtered light, and dry crowns-not sterile conditions. One weekly look at outer leaf tips during your soak routine stops most tip burn before it reaches the center rosette.
When to worry
Most tillandsia survive brown tips if you match the fix to the cause early and keep the crown firm. Consider escalation if:
- The crown turns soft, dark, or smells sour despite firm tips-treat moisture first via overwatering
- An ionantha rosette closes fully with papery leaves throughout and does not reopen after a rescue soak and dry
- Scorch spreads across multiple leaf faces after a window move
- Multiple mounted plants brown simultaneously without a humidity or soak-rhythm review
- Tip browning continues four or more weeks after you corrected light, water, and humidity one at a time
A single trimmed outer leaf with clean new center growth is cosmetic. A plant that stops producing clean new tips for a month may still recover through pup growth-but that outcome is uncommon when action starts at the first dry tan apex.
Conclusion
Brown tips on Tillandsia are an environmental pattern problem more than a mystery disease. Confirm them with firm crown feel, tip placement and sun-side pattern, and soak history-then apply one cause-matched fix: rescue soak and upside-down dry for thirst, filtered light for scorch, humidifier and vent distance for dry-air burn, or rain-water rinses for salt crust. Trim fully dead tips only after the stressor stops; judge recovery by clean new center growth, not regreened old tissue.
Related guides: Tillandsia overview · Watering · Low humidity · Crispy leaves · Underwatering · Not enough light · Overwatering · Root rot
Practical checks
Urgency check
Treat as urgent if the crown softens, rot smell spreads, scorch covers most leaf faces after a window move, or several rosettes fail at once while conditions stay unchanged.
Best inspection order
Crown firmness → tip-only vs whole-leaf pattern → sun-facing side → last full soak date → white crust on tips → hygrometer near display → vent and globe placement.
Severity note
Use spreading crown rot and multi-plant tip failure-not a single blemished outer leaf-to decide how fast to act.
When to use this page vs other Tillandsia guides
- Tillandsia watering guide - Use for routine moisture checks before assuming brown tips is the main issue.
- Tillandsia problems hub - Browse all 19 common issues on this species.
- Low Humidity on Tillandsia - Different entry point when symptoms overlap with brown tips.
- Underwatering on Tillandsia - Different entry point when symptoms overlap with brown tips.
- Overwatering on Tillandsia - Different entry point when symptoms overlap with brown tips.