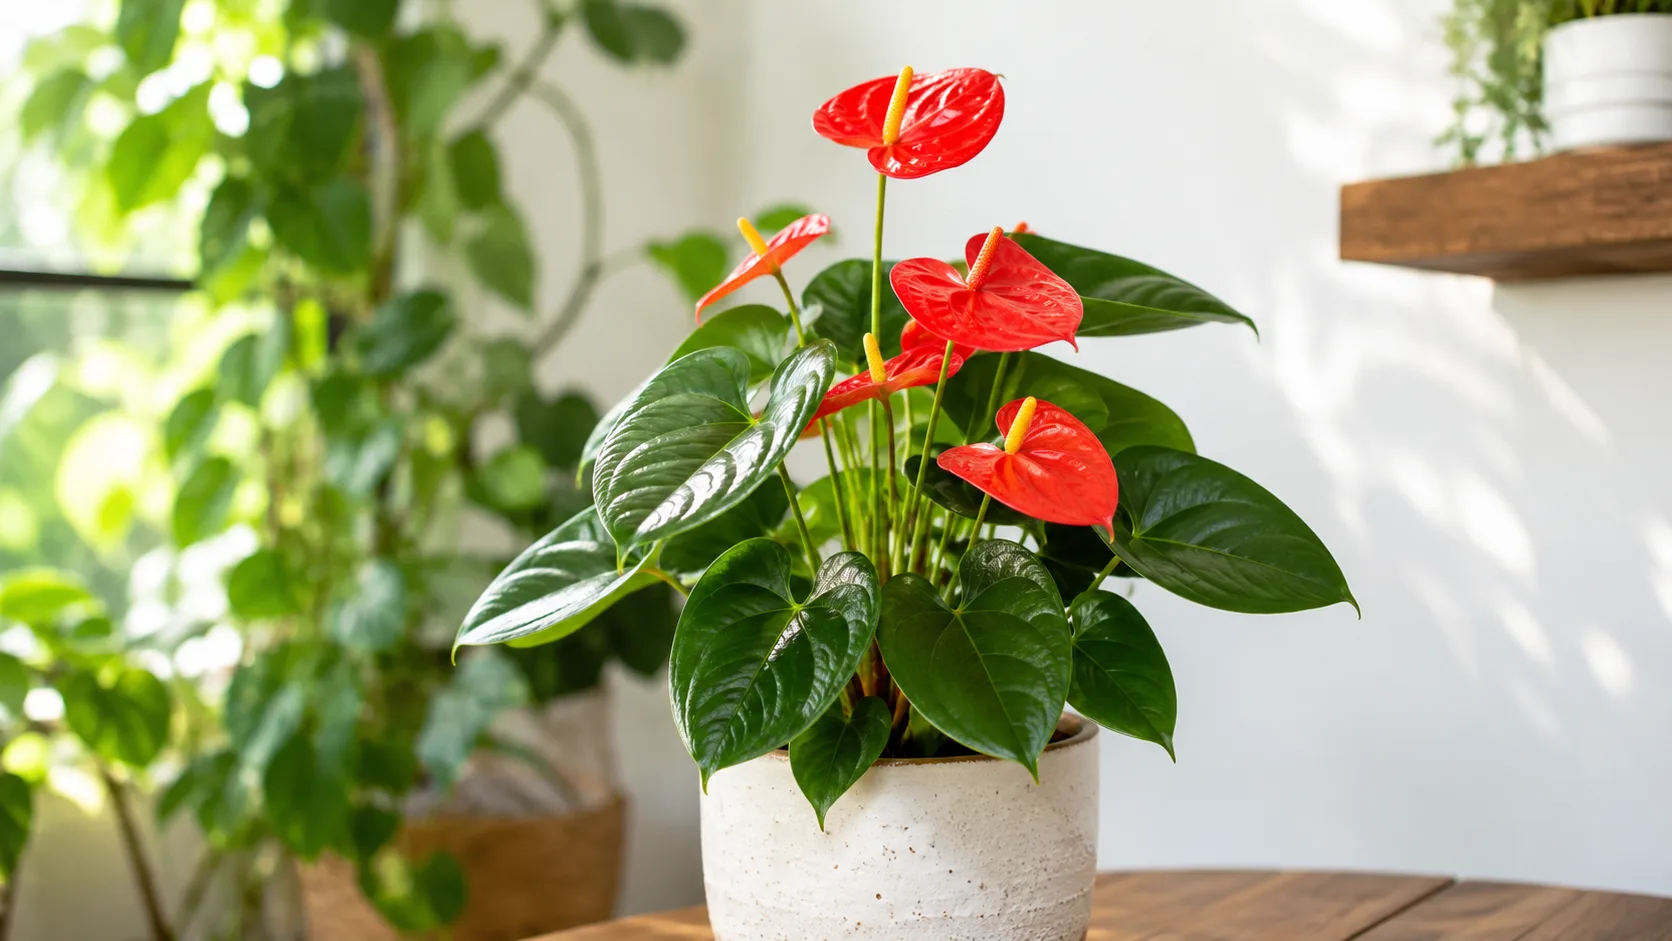
Anthurium Care Guide: Light, Water, Humidity & Blooms
Anthurium andraeanum
Anthurium needs bright indirect light, high humidity (60–80%), and watering when the top inch dries. With consistent warmth and a phosphorus-rich fertilizer, it can bloom almost year-round indoors.
Anthurium Care Guide: Light, Water, Humidity & Blooms
Start with wateringThe most common care mistake for AnthuriumWatering guide →Anthurium care essentials
Light
bright indirect light
Water
Water when the top inch of soil dries. Anthuriums like consistent moisture but cannot tolerate soggy roots.
Soil
Chunky, well-aerated aroid mix-anthuriums are semi-epiphytic.
Humidity
60–80%
Temperature
18–27°C (65–80°F)
Fertilizer
Use phosphorus-rich fertilizer (e. High nitrogen fertilizer causes lush leaves but suppresses flowering.
About Anthurium
Anthurium is native to Colombia and Ecuador (tropical rainforest understory), typically reaches 12–18 inches tall; waxy spathes (flowers) 2–6 inches indoors, with moderate growth. Anthurium has a upright growth habit and part of the Araceae family. It is also known as Flamingo Flower, Laceleaf, Tailflower, and Painter's Palette.
| Detail | Information |
|---|---|
| Also known as | Flamingo Flower, Laceleaf, Tailflower, Painter's Palette |
| Native region | Colombia and Ecuador (tropical rainforest understory) |
| Mature size | 12–18 inches tall; waxy spathes (flowers) 2–6 inches |
| Growth rate | Moderate |
| Growth habit | Upright |
| Scientific name | Anthurium andraeanum |
| Family | Araceae |
Anthurium Care Guide: Light, Water, Humidity & Blooms
What Is an Anthurium and Why Do Indoor Growers Love It?
Anthurium andraeanum, sold almost everywhere as the flamingo flower, flamingo lily, laceleaf, painter’s palette, or tail flower, is a tropical evergreen perennial in the arum family, Araceae. According to the Missouri Botanical Garden, it is native to the rainforests of Colombia and Ecuador, where it grows as an epiphyte clinging to tree branches under a dense canopy. Indoors it stays compact - usually 12 to 18 inches tall - which is part of why it became one of the most popular flowering houseplants on the planet.
What makes anthuriums unusually rewarding is that a healthy plant can keep producing its waxy, heart-shaped spathes for years, not just weeks. The Royal Horticultural Society notes that established cultivars can rebloom repeatedly under the right conditions, and UF/IFAS interiorscape research has recorded continuous bloom cycles of more than 18 months under stable indoor light. The catch is that those conditions are specific: Anthurium light guide, high humidity, an airy mix, and a Anthurium watering guide that never lets the roots sit wet. Get the basics right and the plant largely takes care of itself, and when something does go wrong, the symptoms are usually diagnostic.
The Spathe and the Spadix: What You’re Actually Looking At
The bright red, pink, white, or orange “flower” on an anthurium isn’t a flower at all. It’s a modified leaf called a spathe - a waxy, heart-shaped bract that exists to attract pollinators to the real flowers, which are tiny and densely packed on a slender spike called the spadix. The Missouri Botanical Garden describes the spathe as typically bright red and up to 6 inches across, with a creamy yellow spadix that unfurls from the center.
A few practical consequences follow. Because the spathe is a leaf, leaving old, green spathes on the plant helps it build energy for the next bloom cycle. Once a spathe fades to brown and the spadix shrivels, the plant has no use for it; cut it off at the base of its stem to redirect energy into new growth. Each individual spathe is remarkably long-lasting - usually 6 to 8 weeks - and the plant can push out several per year. A small, brown, or stunted spadix is almost always a light or nutrition issue rather than a disease.
Light: Bright, Indirect, and Steady Wins the Bloom Race
Anthuriums evolved under a rainforest canopy, which means the light reaching them is bright but heavily filtered. The RHS recommends a west- or east-facing window, or a south-facing window shaded by a net curtain or thin blind, as the sweet spot. Direct sun is the most common cause of scorched, papery brown patches on leaves and on the spathe itself.
The target intensity for bloom production is roughly 1,500 to 2,000 foot-candles of indirect light, according to UF/IFAS interiorscape guidelines. In practice that translates to the brightest indirect spot in your home where you can read a book comfortably all afternoon. Six hours of this kind of light per day is the realistic minimum for reliable blooming. North-facing windows can work if the room is bright and the plant sits close to the glass, but most anthuriums grown in dim corners stop flowering after their first or second cycle.
Two practical tips help. Rotate the pot a quarter-turn every week so the plant doesn’t lean toward the window. And if your only option is a low-light room, a small full-spectrum grow light on a 12-hour timer is a more reliable fix than crowding the plant closer to a dark window. Plants that get just enough light to survive but not enough to bloom will produce dark green leaves and a healthy root system with no spathes - a sign the light, not the fertilizer, is the limiting factor.
Watering: How to Keep the Top Inch Dry Without Drowning the Roots
The single most common anthurium killer is overwatering on Anthurium. As an epiphyte, the plant is built to dry out between rain events in the canopy, not to sit in a wet pot on a windowsill. The RHS and the North Carolina State Extension both recommend watering thoroughly only when the top 1 to 2 inches of the growing mix feel dry to the touch - roughly once a week during active summer growth and every 10 to 14 days in winter, though the calendar is far less important than the actual feel of the medium.
To water correctly, soak the mix until water runs freely from the drainage holes, then let the pot drain completely. Anthuriums should never sit in a saucer of standing water for more than a few minutes. The Missouri Botanical Garden specifically warns that keeping the compost “too wet, by watering too often or too liberally, or by leaving the plant sitting in waterlogged compost for long periods, can cause the roots to rot.”
Water quality matters more than most beginner guides admit. Anthuriums prefer slightly acidic conditions and are sensitive to the salts, chlorine, and fluoride common in municipal tap water. The RHS recommends rainwater or filtered water at room temperature to keep the mix from slowly becoming alkaline, and warns that hard-water tap is a frequent culprit behind browning leaf tips and stalled growth. If you see a white crust forming on the surface of the mix or on the rim of the pot, that’s salt buildup. Flush the pot thoroughly with 3 to 4 pot-volumes of plain water to wash the salts out, then resume your normal watering and feeding schedule.
Humidity: Hitting the 60–80% Sweet Spot Indoors
Anthuriums want humidity that most homes don’t naturally provide. The North Carolina State Extension and UF/IFAS both cite a preferred range of 60 to 80% relative humidity, well above the 30 to 45% typical of heated or air-conditioned living rooms. When humidity is too low, the classic symptom is crisp brown leaf edges, and the plant becomes more vulnerable to spider mites, which thrive in dry air.
The cheapest fix is location. A bright bathroom with a shower is genuinely one of the best rooms in a home for anthuriums, and the RHS specifically suggests grouping them there. The next best options, in order of effectiveness, are: a small electric humidifier set to 60% placed within a few feet of the plant, a pebble tray under the pot with the water level below the pot base, and grouping anthuriums with other humidity-loving plants to share a small microclimate. Daily misting is often recommended, but its effect is brief - 10 to 15 minutes of elevated humidity at best - so it works as a supplement, not a substitute, in dry homes. An inexpensive hygrometer next to the plant is the fastest way to know whether your setup is actually working.
Soil: A Chunky, Orchid-Like Mix That Mimics a Rainforest Branch
Standard bagged houseplant soil is almost always too dense for anthuriums. Because the plant is an epiphyte, its roots need air as much as they need water, and a peat-heavy mix compacts over time, suffocating roots and inviting rot. A reliable homemade blend, cited across university extension sources, is:
- 2 parts orchid bark (fir bark, small grade)
- 1 part perlite (for drainage and air pockets)
- 1 part coco coir or peat moss (for slight moisture retention and acidity)
This mix drains quickly, holds enough moisture to go a few days between waterings, and mimics the loose, branch-clinging substrate the plant evolved with. A handful of horticultural charcoal is a useful optional addition because it keeps the mix fresh over time and helps prevent the bacterial and fungal buildup that can accompany an organically rich blend. Whatever you use, make sure the pot has multiple drainage holes - anthurium roots sitting in a sealed container is a fast track to root rot on Anthurium.
Repot only when the plant is genuinely root-bound, usually every 2 to 3 years, sometimes longer. The Missouri Botanical Garden suggests sphagnum moss on the surface of the mix to cover and keep moist any aerial roots that emerge from the stem, which suits a plant that likes to push roots into open air.
Temperature and Airflow: The Quiet Variables That Make or Break Blooms
Temperature is the easiest care factor to get right and the easiest to quietly mess up. Anthuriums grow best between 65 and 85°F (18 to 29°C) and sulk below 60°F (15°C). The North Carolina State Extension specifically warns against cold drafts and sudden temperature changes, both of which can trigger leaf yellowing, bud drop, and a general refusal to bloom.
The two failure modes that catch people off guard are winter windowsills and summer AC vents. A pot pushed against a single-pane window in February can experience root-zone temperatures that drop into the low 50s overnight, even when the room itself reads 68°F. A pot directly under a heating vent or in the path of an AC unit will swing between hot dry air and cold dry air, which both stresses the plant and lowers the local humidity. The fix is positional: keep the plant a few feet back from any window where condensation forms on the glass in winter, and out of any direct airflow from heating or cooling. Light, steady airflow from a ceiling fan or open window is helpful because it reduces fungal disease pressure and replicates the gentle breezes of the rainforest canopy.
Fertilizing: The 3-1-2 to 1-2-2 Switch That Triggers New Spathes
Fertilizer is the variable that separates a leafy anthurium from a blooming one. The two-phase strategy recommended by UF/IFAS Extension and used by commercial growers is straightforward: feed a nitrogen-forward 3-1-2 N-P-K ratio during the active growing season to support leaf and root development, then shift to a phosphorus-forward 1-2-2 ratio (or a typical bloom booster such as 4-15-12) for 6 to 8 weeks to trigger new spathes. The University of the West Indies reports a similar shift, from a balanced 20-20-20 during vegetative growth to a 6-14-7 or 20-30-20 during the flowering phase.
In practical terms, that means a 3-1-2 liquid fertilizer diluted to ¼ strength every two weeks from March through August, a switch to a 1-2-2 or 4-15-12 product at ¼ strength every two weeks from September through October, and no fertilizer at all from November through February. Always water the mix first so roots are moist before fertilizer touches them; concentrated fertilizer on dry roots causes root burn. UF/IFAS also notes that indoor plants do fine on a simpler 20-20-20 water-soluble fertilizer at 50 ppm once a month - a fine choice for beginners. If spathe tips or leaf edges start crisping despite reasonable humidity, salts are the first thing to rule out - flush the pot with plain water once a month during the active feeding period.
Anthurium repotting guide Every 2–3 Years: When and How to Upsize
Anthuriums bloom best when slightly root-bound, so resist the urge to repot on a schedule. The plant will tell you when it’s time: roots circling the surface of the mix, water running straight through the pot without soaking in, and visible roots pushing out of the drainage holes are all reliable signals. So is a top-heavy plant that keeps tipping over.
The North Carolina State Extension and the Missouri Botanical Garden both recommend spring as the ideal repotting window, just as new growth is starting. Choose a new pot only 1 to 2 inches larger in diameter than the current one. A pot that is too large holds more moisture than the roots can absorb, which is a common cause of post-repotting root rot.
To repot, water the plant 24 hours in advance so the root ball is flexible. Slide it out, gently tease apart any circled roots, and settle it into fresh chunky mix at the same depth it was growing before. Water lightly, keep it out of direct sun for a week, and skip fertilizer for 4 to 6 weeks while the roots recover. Expect a brief pause in new growth and possibly a delay in the next bloom cycle - that’s normal.
Propagation: Division and Stem Cuttings
Anthuriums propagate cleanly by division or by stem cuttings, and the right method depends on the plant’s shape. A mature anthurium that has produced multiple crowns or basal offsets is the ideal candidate for division. A leggier plant with a visible stem and aerial roots is a better candidate for a top or node cutting. Both methods work; division is faster, stem cuttings give you more plants from a single session.
For division: water the plant 24 hours ahead, slide it out of the pot, and use your fingers - or a sterilized knife for tightly fused roots - to split the root mass at natural separation points. Each division should have at least two healthy leaves and a substantial root system. Pot each division into a snug container using the chunky mix above, and water lightly. Oversized pots hold too much moisture and rot the new roots.
For stem cuttings: select a healthy stem section 4 to 6 inches long with at least one node (the bump where leaves and aerial roots emerge) and two leaves. Sterilize your blade with rubbing alcohol, make a 45-degree cut just below the node, and let the cut surface callous for 30 to 60 minutes. Root the cutting in lightly damp sphagnum moss or perlite under bright, indirect light with high humidity - a clear plastic bag loosely tented over the pot, vented for an hour a day, is the standard home setup. Keep the medium barely moist, never wet, and expect roots in 4 to 8 weeks. UF/IFAS extension materials specifically emphasize sterilizing tools between cuts, because the bacteria that cause anthurium blight (Xanthomonas) spread easily on contaminated blades.
How to Encourage More Blooms Throughout the Year
Under the right combination of light, water, humidity, soil, and fertilizer, a healthy anthurium can bloom four to six times per year, with each spathe lasting roughly 6 weeks. The limiting factor is almost always one of those core variables, and identifying the weak link is faster than chasing a magic product. The most common reasons an anthurium stops blooming are:
- Insufficient light. A plant in a dim corner will live, leaf out, and refuse to flower. Move it closer to a bright east- or west-facing window, or add a grow light.
- Inconsistent watering. Cycles of bone-dry and waterlogged soil stress the plant and prevent bud set. Stabilize the rhythm.
- Low humidity. Below 50% relative humidity, the plant keeps its leaves but slows bloom production. A small humidifier is the most reliable fix.
- Wrong fertilizer ratio. A nitrogen-heavy product year-round keeps the plant in vegetative mode. The September switch to 1-2-2 or 4-15-12 is the most reliable bloom trigger.
- Root-bound stress or root rot. Either extreme prevents nutrient uptake. Slip the plant out of its pot to check.
If your plant is producing only leaves and no spathes, run through this checklist before changing anything else. In most cases, a one-time adjustment of light and fertilizer ratio is enough to restart blooming within two months.
Common Problems: Brown Tips, Yellow Leaves, Wilting, and Spots
Most anthurium problems are environmental, and most of them announce themselves in the leaves before they reach the spathes. The three symptoms worth learning to recognize:
Brown Leaf Tips and Edges
The single most common anthurium complaint. Almost always one of three causes: low humidity, salt buildup from tap water or fertilizer, or inconsistent watering. Confirm humidity with a hygrometer; if it’s below 50%, raise it. Flush the pot with 3 to 4 volumes of plain rainwater or filtered water to wash out accumulated salts, and switch to that water source going forward. The affected leaf tissue will not turn green again, but new growth should come in clean.
Yellowing Lower Leaves
One or two yellowing bottom leaves on an otherwise healthy plant is natural senescence as the plant drops its oldest foliage to focus on new growth at the crown. No treatment is needed. Yellowing combined with wilting or browning at the margins is a different story and usually points to overwatering, root rot, or both. Check the moisture at the bottom of the pot, and if the mix is damp and the plant is wilting, slide it out and inspect the roots.
Wilting With Damp Soil and Root Rot
This is the classic root rot signature, and it’s frequently misread as underwatering on Anthurium because the visible symptom looks the same. The diagnostic: if the plant is wilting while the soil is still moist, the roots are not functioning, which means they’re rotting. Root rot is usually caused by a dense, slow-draining mix, overwatering, and cool roots - often from a cold windowsill. The first visible signs are wilting despite damp soil, yellowing lower leaves, and a general “the plant looks like it needs water even though I just watered it” appearance. Black, mushy, or foul-smelling roots confirm the diagnosis.
To treat it, slide the plant out of its pot and wash the root mass under lukewarm water. Cut away every black, soft, or hollow root with sterilized scissors, leaving only firm, pale roots. If the rot is severe, save the crown by taking a top cutting just above the damaged tissue, letting the cut callous for an hour, and rerooting in fresh mix. Repot the recovered plant in a clean pot with the chunky mix described above, water lightly, and hold off on fertilizer for 6 to 8 weeks. Prevention is short: a faster-draining mix, less frequent watering, and warmer root-zone temperatures.
Pests: Thrips, Scale, Mealybugs, and Fungus Gnats
Anthuriums are not a pest magnet, but in low-humidity indoor conditions several common houseplant pests will opportunistically move in.
Thrips are the most damaging because they target the spathes themselves. Anthura, a major commercial anthurium breeder, has documented a global rise in thrips pressure, with species like Chaetanaphothrips orchidii and Thrips parvispinus causing cork-like damage at growth points and inhibiting new flower development. Look for silvery streaks, black specks of frass, and distorted new leaves. Isolate the plant, rinse the foliage thoroughly, and apply neem oil or insecticidal soap every 5 to 7 days for at least 3 weeks to break the life cycle. Because thrips pupate in the mix, replacing the top inch of soil and, in severe cases, using beneficial nematodes can help.
Scale insects look like small, hard, oval brown or tan bumps along leaf veins and stems. Wipe them off with a cotton swab dipped in rubbing alcohol, then follow with horticultural oil or neem oil. Mealybugs appear as white, cottony clusters in leaf joints - treat them the same way. Spider mites show up as fine webbing and yellow stippling, especially in dry air; raising humidity to 60%+ often stops an infestation on its own. Fungus gnats hover around the pot when the mix stays too wet - let the top inch dry out, top-dress with coarse sand, and use yellow sticky traps.
In every case, quarantine the affected plant away from your other houseplants before treatment. A small problem in one pot becomes a house-wide problem in a week.
Toxicity: Why Anthuriums and Pets Don’t Mix
Every part of the anthurium - leaves, stems, spathes, spadix, and roots - contains insoluble calcium oxalate crystals, microscopic needle-like structures arranged in bundles called raphides. The ASPCA lists anthurium (Anthurium andraeanum and Anthurium scherzeranum) as toxic to dogs, toxic to cats, and toxic to horses, with clinical signs including oral irritation, pain and swelling of the mouth, tongue, and lips, excessive drooling, vomiting (in dogs and cats, not horses), and difficulty swallowing. In rare cases, severe oral swelling can compromise the airway, which becomes a true emergency.
Pet Poison Helpline describes the mechanism in the same terms: chewing releases the raphides, which physically penetrate the soft tissues of the mouth and throat, causing immediate burning and mechanical irritation. Signs usually resolve within 12 to 24 hours, but a veterinarian should be contacted any time ingestion is suspected, especially if the pet is pawing at its mouth, drooling heavily, refusing food, or having trouble breathing. The ASPCA Animal Poison Control Center can be reached at (888) 426-4435 (a consultation fee may apply).
The same calcium oxalate content makes anthuriums mildly toxic to humans, with the typical effect being a sharp burning sensation in the mouth and throat. Keep the plant well out of reach of toddlers and wash your hands after pruning or repotting. The risk to a pet that ignores the plant entirely is essentially zero; the risk to a curious cat that takes a single bite is real and worth taking seriously.
Anthurium Care Calendar by Season
| Season | Light | Watering | Humidity | Fertilizing | Temperature |
|---|---|---|---|---|---|
| Spring | Move closer to window; clean dusty leaves with a damp cloth | Resume top-1–2-in dry trigger | Begin monitoring; aim for 60%+ | Resume ¼-strength 3-1-2 every 2 weeks | 65–80°F; move away from cold glass |
| Summer | Peak indirect light; 1,500–2,000 FC if possible | More frequent as mix dries faster | Maintain 60–80%; humidifier as needed | Continue 3-1-2 schedule | 70–85°F; avoid AC vents |
| Fall | Maintain bright indirect light | Reduce frequency as growth slows | Maintain 60%+; humidity often drops indoors | Switch to 1-2-2 or 4-15-12 for 6–8 weeks | 65–80°F; watch for heater drafts |
| Winter | Maximize available light; supplement with grow light if needed | Water sparingly; let the top 2 in dry fully | 50–60% is the realistic floor | Stop fertilizing entirely | 65–80°F; keep 1–2 ft from cold windows |
Spring is the only season to repot, propagate, or do major pruning - the plant pushes new roots and leaves fastest in this window. Summer is bloom season; keep the humidity up and expect one or two new spathes per mature plant. Fall is bloom induction season, the right window to switch to the phosphorus-forward fertilizer. Winter is the rest period; resist the urge to feed and let the mix dry out a little more between waterings.
Conclusion
Anthurium care is less demanding than it looks once you anchor the plant to the conditions it evolved for: bright, indirect light for at least 6 hours a day, a chunky orchid-like mix that drains in seconds, water only when the top inch is dry, humidity in the 60–80% range, steady warmth between 65 and 85°F, and a fertilizer strategy that switches from nitrogen-forward in spring to phosphorus-forward in fall. Hold those variables steady and the plant will repay you with four to six spathe cycles a year, each one lasting well over a month.
When something goes wrong, work the checklist in the order it usually fails: light first, then watering rhythm, then humidity, then fertilizer, then pot size and root health. Brown tips point to humidity or salts. Yellowing lower leaves with no wilting is usually natural. Wilting with damp soil is almost always root rot, not thirst. Pests show up most often in dry air, so the humidity routine that keeps the plant happy is also the routine that keeps spider mites and thrips at bay. And on the safety side, keep the plant out of reach of cats, dogs, horses, and small children, and know that the ASPCA Animal Poison Control number is (888) 426-4435 if you ever need it.
A well-grown anthurium is one of the few flowering houseplants that genuinely looks like a florist’s arrangement year-round. The investment is mostly attention at the start - getting the light, the mix, and the watering rhythm right - and the payoff is one of the most reliable, longest-blooming plants you can grow on a windowsill.
When to use this page vs other Anthurium guides
- Anthurium overview - Canonical hub for this species - care topics and problems branch from here.
- Anthurium problems - Symptom-first path when you already know something is wrong.
Related Anthurium guides
How to care for Anthurium?
How much light does Anthurium need?
bright indirect light
- bright indirect light - bright indirect light.
When should you water Anthurium?
Water when the top inch of soil dries. Anthuriums like consistent moisture but cannot tolerate soggy roots.
- Check the top inch of soil; water when just dry - Water when the top inch of soil dries.
- Drain excess water - Water when the top inch of soil dries.
What soil works best for Anthurium?
Chunky, well-aerated aroid mix-anthuriums are semi-epiphytic.
- orchid bark (40%) - Chunky bark pieces that create air pockets and mimic epiphytic growing conditions.
- potting soil (40%)
- perlite (20%) - Light white granules that keep soil airy and help prevent compaction.
Grower notes for Anthurium
What matters most with Anthurium
Anthurium is easiest to grow when you judge the whole plant: new growth, root-zone moisture, light exposure, and how quickly the pot dries after watering. In practice, the care checkpoint is simple: bright indirect light. Pair that with chunky, well-aerated aroid mix-anthuriums are semi-epiphytic, and avoid changing water, pot size, and placement all at once.
Best placement in a real home
Anthurium belongs where bright indirect light is realistic for most of the day, not only where the pot looks good. Water when the top inch of soil dries. Anthuriums like consistent moisture but cannot tolerate soggy roots. If the pot stays wet longer than expected, move the plant into better light or reassess the mix before watering again. Humidity target: 60–80%. Temperature comfort zone: 18–27°C (65–80°F).
Before you buy this plant
Choose Anthurium with firm new growth, clean leaf undersides, and soil that does not smell sour or feel compacted. Be cautious if you see no-flowers, sticky residue, collapsed crowns, or a pot that is wet in poor light. Cosmetic old-leaf damage is less worrying than weak roots or active pests.
First month after bringing it home
Do not repot Anthurium on day one unless the mix is failing or pests are obvious. Quarantine it, learn how fast the pot dries, and keep care boring while it adjusts. Watch especially for no-flowers, yellow-leaves, and root-rot. If problems appear, correct the condition first rather than stacking fertilizer, repotting, and pruning together.
Safety note for Anthurium
Anthurium is not a plant to keep within reach of pets or children. The database flags it for cats and dogs. Use gloves if sap or plant tissue is irritating, and pick a pet-safe alternative for floor pots or low shelves.
How to tell Anthurium is settling in
Also sold as Flamingo Flower, Laceleaf, and Tailflower, this plant should be judged by stable new growth rather than label names alone. If you plan to multiply it later, common methods include Division of clumps and Stem cuttings with aerial roots. Repot only when you see Roots circling the base and plant drying out rapidly. If yellow-leaves shows up early, inspect light, watering, and roots before assuming the plant is permanently weak.
Is it pet safe?
Anthurium is toxic to cats and dogs.
Contains insoluble calcium oxalate crystals. All parts are toxic to cats and dogs-causes oral pain, drooling, vomiting, and difficulty swallowing.
Watering Anthurium
For Anthurium, check the top inch of soil; water when just dry and water every 5–7 days in summer; every 10–14 days in winter. Reduce watering in winter but never allow to fully dry.
| Detail | Information |
|---|---|
| How often | Every 5–7 days in summer; every 10–14 days in winter |
| How to check | Check the top inch of soil; water when just dry |
| Seasonal changes | Reduce watering in winter but never allow to fully dry |
Signs of overwatering
- Yellow leaves
- brown mushy stems
- root rot with foul odour
Signs of underwatering
- Wilting leaves
- dry brown leaf edges
- spathe browning prematurely
Soil & potting for Anthurium
Use a mix of orchid bark (40%), potting soil (40%), perlite (20%) for Anthurium. Excellent drainage; roots need air as much as moisture. Target soil pH around 5.5–6.5. Repot every 2 years or when roots escape the pot, ideally in spring.
| Detail | Information |
|---|---|
| Recommended mix | orchid bark (40%), potting soil (40%), perlite (20%) |
| Drainage | Excellent drainage; roots need air as much as moisture |
| Soil pH | 5.5–6.5 |
| Repotting frequency | Every 2 years or when roots escape the pot |
| Best season to repot | Spring |
Signs it needs repotting
- Roots circling the base
- plant drying out rapidly
- leaf growth slowing despite good conditions
Humidity & temperature for Anthurium
Anthurium prefers 60–80%, though normal home humidity is usually fine. Keep temperatures around 18–27°C (65–80°F).
| Detail | Information |
|---|---|
| Humidity | 60–80% - normal home humidity is fine. |
| Ideal temperature | 18–27°C (65–80°F) |
Fertilizer & pruning for Anthurium
Use use phosphorus-rich fertilizer (e. High nitrogen fertilizer causes lush leaves but suppresses flowering. for Anthurium.
| Detail | Information |
|---|---|
| Fertilizer type | Use phosphorus-rich fertilizer (e. High nitrogen fertilizer causes lush leaves but suppresses flowering. |
Common problems on Anthurium
No Flowers
MediumLikely cause: Insufficient light or too little phosphorus; also caused by low humidity below 50%
Quick fix: Move to brighter indirect light; apply a phosphorus-rich fertilizer; raise humidity
Full fix guide →Yellow Leaves
MediumLikely cause: Overwatering, especially in winter, is the most common cause
Quick fix: Allow soil to partially dry before next watering; check drainage
Full fix guide →Root Rot
HighLikely cause: Dense soil or overwatering suffocates semi-epiphytic roots
Quick fix: Repot in chunky aroid mix with good aeration; trim all brown mushy roots
Full fix guide →Brown Tips
LowLikely cause: Low humidity or inconsistent watering causing tip desiccation
Quick fix: Raise humidity to 60%+; water before soil completely dries
Full fix guide →Spider Mites
MediumLikely cause: Dry air in heated rooms allows mites to proliferate on leaf undersides
Quick fix: Shower leaves; apply neem oil spray; raise humidity
Full fix guide →Overwatering
MediumLikely cause: Common on this plant type; confirm with recent watering, light, and root checks.
Quick fix: Inspect the plant and correct the most likely care stressor before stacking treatments.
Full fix guide →Underwatering
MediumLikely cause: Common on this plant type; confirm with recent watering, light, and root checks.
Quick fix: Inspect the plant and correct the most likely care stressor before stacking treatments.
Full fix guide →Mealybugs
MediumLikely cause: Common on this plant type; confirm with recent watering, light, and root checks.
Quick fix: Inspect the plant and correct the most likely care stressor before stacking treatments.
Full fix guide →Aphids
MediumLikely cause: Common on this plant type; confirm with recent watering, light, and root checks.
Quick fix: Inspect the plant and correct the most likely care stressor before stacking treatments.
Full fix guide →Leggy Growth
MediumLikely cause: Common on this plant type; confirm with recent watering, light, and root checks.
Quick fix: Inspect the plant and correct the most likely care stressor before stacking treatments.
Full fix guide →Slow Growth
MediumLikely cause: Common on this plant type; confirm with recent watering, light, and root checks.
Quick fix: Inspect the plant and correct the most likely care stressor before stacking treatments.
Full fix guide →Wilting
MediumLikely cause: Common on this plant type; confirm with recent watering, light, and root checks.
Quick fix: Inspect the plant and correct the most likely care stressor before stacking treatments.
Full fix guide →Drooping Leaves
MediumLikely cause: Common on this plant type; confirm with recent watering, light, and root checks.
Quick fix: Inspect the plant and correct the most likely care stressor before stacking treatments.
Full fix guide →Low Humidity
MediumLikely cause: Common on this plant type; confirm with recent watering, light, and root checks.
Quick fix: Inspect the plant and correct the most likely care stressor before stacking treatments.
Full fix guide →Not Enough Light
MediumLikely cause: Common on this plant type; confirm with recent watering, light, and root checks.
Quick fix: Inspect the plant and correct the most likely care stressor before stacking treatments.
Full fix guide →Fungus Gnats
MediumLikely cause: Common on this plant type; confirm with recent watering, light, and root checks.
Quick fix: Inspect the plant and correct the most likely care stressor before stacking treatments.
Full fix guide →Mold on Soil
MediumLikely cause: Common on this plant type; confirm with recent watering, light, and root checks.
Quick fix: Inspect the plant and correct the most likely care stressor before stacking treatments.
Full fix guide →Bud Drop
MediumLikely cause: Common on this plant type; confirm with recent watering, light, and root checks.
Quick fix: Inspect the plant and correct the most likely care stressor before stacking treatments.
Full fix guide →Small Flowers
MediumLikely cause: Common on this plant type; confirm with recent watering, light, and root checks.
Quick fix: Inspect the plant and correct the most likely care stressor before stacking treatments.
Full fix guide →Faded Flowers
MediumLikely cause: Common on this plant type; confirm with recent watering, light, and root checks.
Quick fix: Inspect the plant and correct the most likely care stressor before stacking treatments.
Full fix guide →