Burro's Tail Care: Light, Water, Soil, and Propagation
Sedum morganianum
Burro's tail needs bright direct or indirect light, watering only when soil is completely dry (every 14 days summer, 21–28 days winter), sharp-draining succulent soil, and minimal handling to prevent leaf loss.
Burro's Tail Care: Light, Water, Soil, and Propagation
Start with wateringThe most common care mistake for Burro's TailWatering guide →Burro's Tail care essentials
Light
bright indirect light to some direct morning sun, several hours of direct morning sun
Water
Only when soil is completely dry - every 14 days in summer, 21–28 days in winter (or withhold in cool months). Deep water then drain fully.
Soil
Succulent/cactus mix with 30% perlite or coarse sand for very sharp drainage.
Humidity
Low humidity preferred (below 40%)
Temperature
18–27°C (65–80°F)
Fertilizer
Feed lightly during active growth. Diluted succulent fertilizer at quarter strength and stop if the plant is stressed, newly repotted, or not actively growing.
About Burro's Tail
Burro's Tail has a upright growth habit.
| Detail | Information |
|---|---|
| Growth habit | Upright |
| Scientific name | Sedum morganianum |
Burro's Tail Care: Light, Water, Soil, and Propagation
What Burro’s Tail Actually Is (and Why Its Native Habitat Drives Every Care Rule)
Burro’s Tail - also sold as Donkey’s Tail, Horse’s Tail, or Lamb’s Tail - is not a generic trailing houseplant with forgiving roots. It is Sedum morganianum E. Walther, a succulent perennial in the stonecrop family Crassulaceae, the same family that includes jade plants, echeverias, and many other drought-adapted succulents. Some modern taxonomic treatments reclassify it as Hylotelephium morganianum, but the care requirements are identical regardless of which genus name appears on the tag.
The plant’s wild story is more specific than most care guides suggest. Field botanists have confirmed wild populations only in deep ravines around Tenampa in central Veracruz, Mexico, where it grows as a micro-endemic on vertical sandstone cliffs in tropical deciduous forest. Older references often cite “southern Mexico and Honduras,” reflecting nursery-trade history rather than confirmed wild range. What matters for your living room is the habitat logic: this is a cliff-dwelling succulent adapted to sharp drainage, strong light, long dry intervals, and low humidity. Every indoor care rule flows from that.
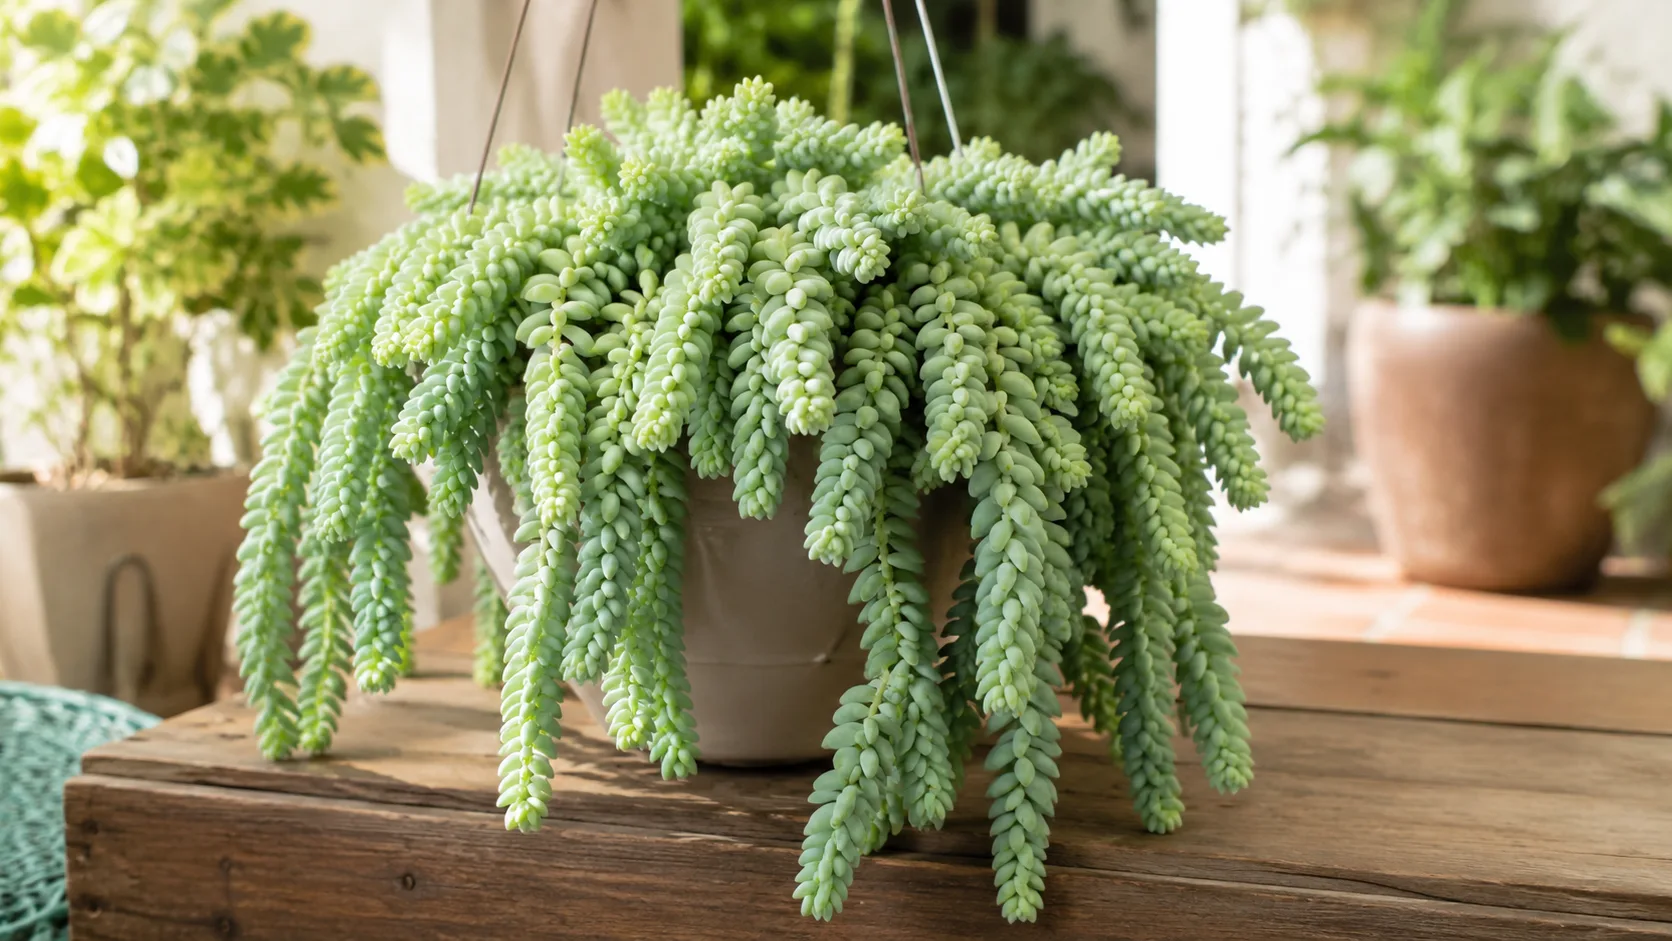
Visually, Burro’s Tail is defined by pendulous stems densely packed with overlapping, teardrop-shaped leaves. Stems start somewhat upright when young, then become heavy and cascade as they lengthen. Mature stems can reach three to four feet (roughly 90–120 cm) in cultivation, though indoor plants often stay shorter. Each leaf is thick, blue-green to gray-green, and often coated with a powdery silvery bloom called farina that rubs off when you handle the plant - which is one reason experienced growers treat Burro’s Tail overview like a “look, don’t touch” plant.
The Royal Horticultural Society awarded Sedum morganianum the Award of Garden Merit in 1993, a useful signal that decades of cultivation experience confirm it as a reliable ornamental when its basic needs are met. It is hardy outdoors only in frost-free climates (USDA zones 10–11); everywhere else it is grown as a houseplant, usually in a hanging basket where the trailing stems can drape freely.
Botanical Background and Common Names
Burro’s Tail and Donkey’s Tail are the same species - Sedum morganianum - not two different plants. The naming overlap confuses beginners because an unrelated hardy perennial, Euphorbia myrsinites, also carries the common name “donkey’s tail” in some gardening circles. Always check the botanical name on the label.
You may also encounter ‘Burrito’ or Baby Burro Tail, which has smaller, rounder, lime-green leaves on shorter stems. Whether this is a distinct species, cultivar, or hybrid is still debated in horticultural literature, but the care is nearly identical: bright light, sharp drainage, infrequent watering. If your plant has plump lance-shaped leaves on long braided-looking stems, you have the classic Burro’s Tail form described by University of Wisconsin Extension as having leaves in a “closely whorled, almost spiraling pattern” that creates a braided appearance along each stem.
Like other Crassulaceae succulents, Burro’s Tail uses CAM photosynthesis - opening stomata at night to reduce water loss during hot, dry conditions. That physiology is why it stores water in its leaves and stems and why it punishes you so quickly when the root zone stays wet. The plant is built to survive drought, not daily moisture.
For related Burro’s Tail care, see Spider Mites on Burro’s Tail, Mealybugs on Burro’s Tail.
Burro’s Tail at a Glance
A quick reference card before the detailed sections:
- Botanical name: Sedum morganianum E. Walther (sometimes listed as Hylotelephium morganianum)
- Family: Crassulaceae (stonecrop family)
- Type: Trailing succulent perennial; evergreen in frost-free conditions
- Mature size: Stems trail 2–4 feet (60–120 cm); individual stems roughly 1 inch thick when well hydrated
- Growth habit: Cascading/trailing; ideal for hanging baskets and elevated shelves
- Light: Bright light to several hours of direct sun daily; morning sun is safest through glass
- Water: Soak-and-dry; allow mix to dry completely between waterings
- Soil: Fast-draining succulent/cactus mix with added perlite or coarse sand
- Temperature: 65–80 °F (18–27 °C) ideal indoors; damaged below ~40 °F (4 °C); minimum around 41–45 °F (5–7 °C)
- Humidity: Low to average indoor humidity; avoid steamy bathrooms long-term
- Fertilizer: Light feeding during active growth only; skip in winter
- Flowers: Terminal clusters of pink to red star-shaped blooms in summer on mature plants; rare indoors
- Toxicity: Non-toxic to dogs, cats, and horses per the ASPCA
- Hardiness outdoors: USDA zones 10–11; houseplant elsewhere
Light: Bright, Direct, and the Difference Between Thriving and Stretching
Burro’s Tail is often described as wanting “bright, indirect light,” and that advice will keep the plant alive. It will not keep it compact, blue-green, and densely leafed. In practice, this species performs best with four to six hours of bright light daily, including some direct sun - especially gentler morning sun through an east-facing window or filtered light at a south- or west-facing sill.
The distinction matters because insufficient light produces etiolation: stems stretch, internodes widen, leaves space out, and the whole plant looks pale and fragile. A Burro’s Tail that is “surviving” in a north-facing room or five feet from a window is usually a Burro’s Tail that is slowly becoming leggy and prone to leaf drop. If new growth is loose and widely spaced, the plant is asking for more photons, not more water.
At the other extreme, harsh afternoon sun through untreated south- or west-facing glass can scorch leaves, especially in summer or in hot climates. Scorch shows up as bleached, papery patches or brown crispy spots on the sun-facing side. The fix is not to move the plant to a dim corner - it is to filter the hottest hours with a sheer curtain, pull it back slightly from the glass, or shift it to an east window where direct exposure is limited to morning.
Acclimate any light increase gradually over one to two weeks. Sudden moves from low light to a blazing sill shock the plant and trigger a cascade of dropped leaves. Rotate the pot occasionally if growth leans toward the window, but handle the pot by its base rather than lifting it by the trailing stems.
If natural light is weak, a full-spectrum grow light on a 12–14 hour timer, positioned 12–18 inches above the canopy, will keep stems tight and colored. Watch leaf temperature near the fixture; Burro’s Tail leaves heat up quickly under close high-intensity lamps.
Watering: The Soak-and-Dry Rhythm That Keeps Roots Alive
Watering is where Burro’s Tail care is won or lost. The plant stores substantial water in every leaf and stem, and its cliff-native roots expect to dry out completely between rain events. Indoors, that translates to a soak-and-dry rhythm: water thoroughly when the mix is fully dry, then do not water again until it is dry again.
A practical starting interval is roughly every 10–14 days during active growth in spring and summer, stretching to every three to four weeks in winter when light and temperature drop. These are reminders to check the pot, not calendar commandments. Pot size, soil composition, room temperature, and light intensity all shift the actual timing. A plant in a bright, warm south window dries faster than the same plant in a cool interior room.
Use at least two checks before every watering. First, push your finger or a dry wooden skewer two inches into the mix; if you feel any coolness or moisture, wait. Second, lift the pot - a well-watered Burro’s Tail container is noticeably heavier than a dry one, and that weight difference becomes intuitive after a few weeks. A third optional cue: gently squeeze a mid-stem leaf. Plump and firm means hydrated; slightly soft or lightly wrinkled means the plant is ready for a drink.
When you do water, soak the mix evenly until a small amount runs from the drainage hole, let the pot drain for 10–15 minutes, and empty the saucer or cachepot so the roots never sit in runoff. Shallow sips every few days are the wrong approach; they keep the upper mix damp while the lower zone stagnates, which is how root rot on Burro’s Tail starts in succulents.
Seasonal Burro’s Tail watering guide
| Season | Plant state | Approximate interval | What to check before watering |
|---|---|---|---|
| Spring (active growth) | New stem tips firm; growth resuming | Every 10–14 days | Mix dry 2 inches down; pot feels light |
| Summer (active growth) | Peak growth; brightest light | Every 10–14 days, sometimes faster in heat | Same; watch for slightly soft leaves |
| Fall (slowing) | Growth tapering; light dropping | Every 2–3 weeks | Mix fully dry; reduce if nights cool |
| Winter (resting) | Minimal growth in cool, dim months | Every 3–4 weeks, sometimes longer | Mix bone dry; withhold if plant is cool and dormant |
If leaves turn yellow, translucent, and mushy and fall off without being touched, suspect overwatering on Burro’s Tail before underwatering on Burro’s Tail. If leaves are wrinkled and thin but the stem is still firm and the pot is light, the plant is thirsty. Two opposite problems, two opposite fixes - and checking the mix prevents you from watering reflexively in the wrong direction.
Soil and Drainage: Build a Mix That Dries Fast
Burro’s Tail roots need air as much as they need occasional moisture. A heavy peat-based potting mix that stays damp for a week is the wrong substrate for a cliff succulent. Start with a commercial cactus and succulent mix and amend it with roughly 30% perlite, pumice, or coarse horticultural sand by volume for very sharp drainage. The finished mix should feel gritty, crumble loosely in your hand, and drain within seconds when you pour water through a sample in a strainer.
The pot must have at least one drainage hole. Decorative cachepots are fine only if you lift the inner pot out to water and drain, then return it without trapped runoff. A layer of gravel at the bottom of a pot does not substitute for a drainage hole; it actually raises the perched water table closer to the roots.
Repot into fresh mix every one to two years, or sooner if the soil compacts, smells sour, or water runs straight down the sides without soaking in. Compacted mix is a slow-motion overwatering trap because it holds moisture longer than the plant can safely use.
Burro’s Tail tolerates a normal houseplant pH range and rarely needs adjustment in hobbyist setups. If white crust builds on the soil surface or leaf tips brown despite good watering, flush the pot with plain water several times during an active growth month to leach accumulated salts, or refresh the mix at the next repot.
Temperature, Humidity, and Where Not to Put It
Indoors, Burro’s Tail is comfortable in the 65–80 °F (18–27 °C) range most homes maintain year-round. Growth slows below about 60 °F (15 °C), and cold damage appears once temperatures approach 40 °F (4 °C). Wikipedia and cultivation references cite a minimum around 41–45 °F (5–7 °C) for this species. Frost is lethal; the water-filled leaf tissue ruptures when ice forms.
Watch for microclimates that seem fine to you but stress the plant: a winter window ledge that drops below room temperature at night, an air-conditioning vent blowing cold dry air directly on the leaves, or a heating radiator that cooks the pot on one side. Each can cause sudden leaf drop or stalled growth without any change to your watering schedule.
Humidity is rarely a limiting factor indoors. Burro’s Tail prefers low to average humidity and does not need misting. In fact, chronically humid rooms - especially bathrooms - can slow soil drying and compound overwatering risk. If you must keep the plant in a humid space, reduce watering frequency and ensure strong airflow. Very dry winter air below ~30% relative humidity can encourage spider mites, so watch leaf undersides in heated homes.
Fertilizer: Lean Feeding in Active Growth Only
Burro’s Tail evolved on mineral, nutrient-poor cliff faces. It does not need heavy feeding, and excess nitrogen produces soft, weak growth that is more vulnerable to rot and leaf drop. Feed only during active growth in spring and summer, using a balanced succulent fertilizer or a water-soluble houseplant formula diluted to one-quarter to one-half the label strength. One or two applications spaced six to eight weeks apart is plenty for most indoor plants.
Skip fertilizer entirely during winter dormancy, immediately after Burro’s Tail repotting guide, while the plant is recovering from root rot, or whenever new growth has stalled due to low light. Fertilizing a plant that cannot use the nutrients adds salt to the mix without benefit.
If your bagged succulent mix includes a starter charge, hold off on supplemental feeding for the first month after potting.
Choosing the Right Pot for a Trailing Succulent
Burro’s Tail is almost always grown in a hanging basket or elevated container so the stems can trail without resting on a shelf where they would be bumped and stripped of leaves. Choose a pot only slightly larger than the root ball - going up one size at repotting, not three. Oversized pots hold excess wet mix that roots cannot colonize quickly, which is a classic post-repot rot scenario for succulents.
Unglazed terracotta is ideal because porous clay wicks moisture from the root zone and gives you margin against overwatering. Glazed ceramic and plastic work but retain moisture longer, so you will water less often and need to be more disciplined about drainage. Shallow wide pots are often better than deep narrow ones for this species because they match the relatively modest root mass that supports very long, heavy stems.
Whatever material you choose, prioritize stability. A top-heavy hanging basket with three feet of water-laden stems can become a wrecking ball in a busy hallway. Mount it high enough that the trails clear shoulders and doorways, but low enough that you can still inspect the soil surface without standing on a chair.
Repotting Without Losing Half Your Leaves
Repot Burro’s Tail every one to two years, or when roots circle drainage holes, water runs through without soaking, or the plant dries out unusually fast. The best timing is early spring as active growth resumes, when roots can reestablish quickly in warm, bright conditions.
The hardest part of repotting this plant is physical, not horticultural. Leaves detach at the slightest pressure. Work slowly. Water lightly a day or two beforehand so roots flex rather than snap, but avoid a soggy root ball that falls apart when lifted. Support the base of the stems with one hand while you tip the pot with the other. If the plant is stuck, run a clean knife around the inside edge rather than yanking stems.
Shake off old mix gently and inspect roots. Healthy roots are pale and firm; rotted roots are dark, mushy, and may smell sour. Trim rot with a sterilized blade and let the plant air-dry for a day if you removed significant tissue. Repot at the same depth as before into fresh gritty mix, move up only one pot size, and wait five to seven days before the first post-repot watering so broken roots can callus.
Expect some leaf loss during repotting. Collect fallen leaves for propagation rather than treating every dropped leaf as a crisis.
Propagation: Leaf Cuttings, Stem Cuttings, and the Leaves You Didn’t Mean to Drop
Burro’s Tail is one of the easiest succulents to propagate - partly because it propagates itself whether you intend to or not. In the wild, dislodged leaves root in cliff crevices; indoors, a leaf knocked onto adjacent dry soil may root without any intervention. That fragility is a reproductive strategy, not a sign your plant is dying.
The two reliable home methods are leaf cuttings and stem cuttings. Leaf cuttings are lower-impact on the parent plant; stem cuttings produce a full trailing specimen faster.
For stem cuttings, snip a healthy stem segment several inches long with clean, sharp scissors. Let the cut end callus in dry shade for three to seven days until the wound looks dry and papery. Then lay the stem on moist gritty mix or insert the callused end shallowly. Keep the setup in Burro’s Tail light guide and water sparingly - a light mist or occasional sip near the base - only after roots form. New growth from stem tips is the sign that rooting succeeded, usually within a few weeks in warm active-season conditions.
Leaf Propagation Step by Step
- Select intact leaves. Choose plump, healthy leaves that fell naturally or twist off cleanly with a gentle sideways motion. Broken or squashed leaves rarely root.
- Callus. Set leaves on a paper towel in dry, bright shade for two to five days until the broken end seals.
- Place on mix. Lay callused leaves on top of barely moist succulent mix, not buried. The base of the leaf should contact the surface.
- Wait with discipline. Mist lightly every few days or water minimally near the base. Do not flood the tray; wet leaves rot before they root.
- Watch for pups. Tiny new rosettes emerge from the leaf base over two to eight weeks, depending on warmth and light. Let the original leaf shrivel before separating the pup into its own small pot.
Do not propagate from a plant actively fighting root rot or a heavy pest infestation. Weak parent tissue produces weak offspring.
Common Problems and How to Read the Symptoms
Most Burro’s Tail problems are environmental: too much water, too little light, or too much handling. The leaves are honest indicators if you read them in context.
Leggy, pale, widely spaced stems mean insufficient light. Move to a brighter location gradually; prune stretched sections only if you are willing to wait for branching from bare stem nodes.
Yellow, translucent, mushy leaves that drop on their own signal overwatering or root rot. Stop watering, unpot, trim black mushy roots, let the plant dry a day, and repot into fresh dry mix. Resume watering only after a week and only when the mix is truly dry.
Wrinkled, thin leaves on a light pot signal underwatering. A deep soak usually rehydrates the plant within 48 hours.
Brown crispy patches on the sun-facing side indicate sunburn. Filter afternoon sun or move the plant back from hot glass.
White cottony clusters in leaf axils are mealybugs. Dab with 70% isopropyl alcohol on a cotton swab and inspect weekly until clear.
Why Leaves Fall Off (Normal vs. Alarming)
Leaf drop is the signature anxiety of Burro’s Tail ownership, and most of it is mechanical. The leaves are only loosely attached. Brushing past the plant, moving the pot, repotting, or even a strong draft can shower dozens of leaves onto the floor. If the fallen leaves are firm and green and the remaining stem looks healthy, you are witnessing normal physics, not disease.
Worry when leaves yellow, soften, or blacken without being touched, especially from the stem base upward. That pattern points to rot or severe overwatering. Also worry if the entire plant looks dehydrated - wrinkled throughout, stems shriveling - which suggests underwatering or dead roots.
Bare patches on stems where leaves detached may eventually branch, producing new side stems. The plant can look uneven for months before filling back in.
Pests on a Fragile Trailing Plant
Spider mites thrive in dry, warm indoor air and often attack leaf undersides first, causing stippling and fine webbing. Mealybugs hide where leaves overlap along stems. Scale appears as brown bumps on stems. Fungus gnats indicate persistently moist surface soil.
Because the plant is fragile, avoid aggressive spraying that blasts leaves off. For spider mites and mealybugs, isolate the plant, use targeted alcohol swabs or insecticidal soap applied with a soft brush, and improve airflow. For fungus gnats, let the soil surface stay dry longer between waterings and consider a thin top-dress of pumice.
Inspect hanging plants from below with a small flashlight every week or two. Pests spread quickly along dense trailing stems because the inner canopy is hard to see from across the room.
Pet and Child Safety: What ASPCA Actually Says
The ASPCA lists Burro’s Tail (Sedum morganianum, family Crassulaceae) as non-toxic to dogs, cats, and horses. That is genuinely good news for pet owners who want trailing greenery without the anxiety that comes with toxic succulents like some euphorbias or kalanchoes.
Non-toxic does not mean edible. Burro’s Tail leaves are fibrous and fleshy; if a cat or dog chews a large quantity, mild gastrointestinal upset - vomiting or diarrhea - is possible from mechanical irritation, not poisoning. The ASPCA still recommends keeping any plant out of reach of persistent chewers, and a hanging basket solves two problems at once: display and pet access.
For households with toddlers, the main risk is pulling the trails and showering leaves, not chemical toxicity. Mount the basket high and secure the hook anchor properly; a falling pot is more dangerous than a nibbled leaf.
If your pet shows persistent vomiting, lethargy, or distress after eating plant material, contact your veterinarian or the ASPCA Animal Poison Control Center regardless of the plant’s listed toxicity status.
Display and Placement in a Real Home
Burro’s Tail rewards placement thinking more than most houseplants because its stems are both the feature and the fragility. The ideal spot has strong light, stable temperature, low traffic, and elevation - a ceiling hook in a bright living room, a high shelf with trails free to drape, or a wall-mounted planter away from door swing paths.
Avoid entries, stair landings, and narrow hallways where backpacks and shoulders pass at stem height. Avoid spots where you will need to move the plant frequently for cleaning or window access. Every move is a leaf-drop event.
If you want the plant on a standard shelf rather than hanging, let the stems rest on a wide surface or a secondary lower shelf so their weight is supported. Stems left dangling in midair without support can kink or shed leaves at the stress points.
Pair Burro’s Tail with other low-humidity succulents in a bright collection, but give each pot its own drainage discipline. A beautiful mixed shelf fails quickly if one neighbor is overwatered and fungus gnats spread between pots.
Mature plants may produce terminal clusters of pink to red star-shaped flowers in summer. Flowering is uncommon indoors and requires age, bright light, and seasonal cues, so treat blooms as a bonus rather than an expectation. The foliage and cascade are the real show.
Conclusion
Burro’s Tail is a cliff succulent dressed up as a hanging sculpture. Treat it like one: bright light, gritty fast-draining soil, complete dry-down between waterings, and minimal handling. Get those four right and the plant becomes a long-lived, pet-safe cascade that quietly fills a basket over years. Get them wrong - especially water before light - and you will watch firm green leaves turn mushy and drop in clusters.
The leaf-drop reputation is real but misunderstood. Most fallen leaves are physics, not pathology, and each healthy leaf is a free propagation start. Hang the plant where it can be admired from a distance, check the pot weight instead of the calendar, and let the trails grow at their own pace. That is how Sedum morganianum has earned its place in succulent collections since well before it became an Instagram staple - not by being easy in the careless sense, but by being honest about what it needs.
When to use this page vs other Burro’s Tail guides
- Burro’s Tail overview - Canonical hub for this species - care topics and problems branch from here.
- Burro’s Tail problems - Symptom-first path when you already know something is wrong.
Related Burro’s Tail guides
How to care for Burro's Tail?
How much light does Burro's Tail need?
bright indirect light to some direct morning sun, several hours of direct morning sun
- bright indirect light to some direct morning sun - bright indirect light to some direct morning sun, several hours of direct morning sun.
- several hours of direct morning sun - bright indirect light to some direct morning sun, several hours of direct morning sun.
When should you water Burro's Tail?
Only when soil is completely dry - every 14 days in summer, 21–28 days in winter (or withhold in cool months). Deep water then drain fully.
- Check top 2 inches - Only when soil is completely dry - every 14 days in summer, 21–28 days in winter (or withhold in cool months).
- Drain excess water - Deep water then drain fully.
What soil works best for Burro's Tail?
Succulent/cactus mix with 30% perlite or coarse sand for very sharp drainage.
- Well-draining mix - Succulent/cactus mix with 30% perlite or coarse sand for very sharp drainage.
Grower notes for Burro's Tail
What matters most with Burro's Tail
Burro's Tail stores water in leaves, stems, roots, or a swollen base, so overcare is usually more dangerous than short dry spells. Strong light and drainage are the safety net. In practice, the care checkpoint is simple: bright indirect light to some direct morning sun, several hours of direct morning sun. Pair that with succulent/cactus mix with 30% perlite or coarse sand for very sharp drainage, and avoid changing water, pot size, and placement all at once.
Best placement in a real home
Burro's Tail belongs where bright indirect light to some direct morning sun, several hours of direct morning sun is realistic for most of the day, not only where the pot looks good. Only when soil is completely dry - every 14 days in summer, 21–28 days in winter (or withhold in cool months). Deep water then drain fully. If the pot stays wet longer than expected, move the plant into better light or reassess the mix before watering again. Humidity target: Low humidity preferred (below 40%). Temperature comfort zone: 18–27°C (65–80°F).
Before you buy this plant
Choose Burro's Tail with firm new growth, clean leaf undersides, and soil that does not smell sour or feel compacted. Be cautious if you see root-rot, sticky residue, collapsed crowns, or a pot that is wet in poor light. Cosmetic old-leaf damage is less worrying than weak roots or active pests.
First month after bringing it home
Do not repot Burro's Tail on day one unless the mix is failing or pests are obvious. Quarantine it, learn how fast the pot dries, and keep care boring while it adjusts. Watch especially for root-rot and leggy-growth. If problems appear, correct the condition first rather than stacking fertilizer, repotting, and pruning together.
Safety note for Burro's Tail
Burro's Tail is not a plant to keep within reach of pets or children. Treat it as an inaccessible display plant. Use gloves if sap or plant tissue is irritating, and pick a pet-safe alternative for floor pots or low shelves.
How to tell Burro's Tail is settling in
If you plan to multiply it later, common methods include Leaf cuttings and Stem cuttings. If leggy-growth shows up early, inspect light, watering, and roots before assuming the plant is permanently weak.
Is it pet safe?
Burro's Tail is generally considered pet safe.
Watering Burro's Tail
Only when soil is completely dry - every 14 days in summer, 21–28 days in winter (or withhold in cool months). Deep water then drain fully.
Soil & potting for Burro's Tail
Succulent/cactus mix with 30% perlite or coarse sand for very sharp drainage.
Humidity & temperature for Burro's Tail
Burro's Tail prefers low humidity preferred (below 40%), though normal home humidity is usually fine. Keep temperatures around 18–27°C (65–80°F).
| Detail | Information |
|---|---|
| Humidity | Low humidity preferred (below 40%) - normal home humidity is fine. |
| Ideal temperature | 18–27°C (65–80°F) |
Fertilizer & pruning for Burro's Tail
Use feed lightly during active growth. Diluted succulent fertilizer at quarter strength and stop if the plant is stressed, newly repotted, or not actively growing. for Burro's Tail.
| Detail | Information |
|---|---|
| Fertilizer type | Feed lightly during active growth. Diluted succulent fertilizer at quarter strength and stop if the plant is stressed, newly repotted, or not actively growing. |
Common problems on Burro's Tail
Root Rot
MediumLikely cause: Overwatering - leaves become mushy, stems soft, soil stays wet.
Quick fix: Withhold all water until soil dries completely. Remove any rotten stems and roots. Repot in fresh succulent mix.
Full fix guide →Leggy Growth
MediumLikely cause: Insufficient light causing sparse, elongated stems with widely spaced leaves.
Quick fix: Move to full sun position - outdoors in a bright, sunny spot is ideal. Very bright south-facing window indoors.
Full fix guide →Yellow Leaves
MediumLikely cause: Common on this plant type; confirm with recent watering, light, and root checks.
Quick fix: Inspect the plant and correct the most likely care stressor before stacking treatments.
Full fix guide →Brown Tips
MediumLikely cause: Common on this plant type; confirm with recent watering, light, and root checks.
Quick fix: Inspect the plant and correct the most likely care stressor before stacking treatments.
Full fix guide →Overwatering
MediumLikely cause: Common on this plant type; confirm with recent watering, light, and root checks.
Quick fix: Inspect the plant and correct the most likely care stressor before stacking treatments.
Full fix guide →Underwatering
MediumLikely cause: Common on this plant type; confirm with recent watering, light, and root checks.
Quick fix: Inspect the plant and correct the most likely care stressor before stacking treatments.
Full fix guide →Spider Mites
MediumLikely cause: Common on this plant type; confirm with recent watering, light, and root checks.
Quick fix: Inspect the plant and correct the most likely care stressor before stacking treatments.
Full fix guide →Mealybugs
MediumLikely cause: Common on this plant type; confirm with recent watering, light, and root checks.
Quick fix: Inspect the plant and correct the most likely care stressor before stacking treatments.
Full fix guide →Aphids
MediumLikely cause: Common on this plant type; confirm with recent watering, light, and root checks.
Quick fix: Inspect the plant and correct the most likely care stressor before stacking treatments.
Full fix guide →Slow Growth
MediumLikely cause: Common on this plant type; confirm with recent watering, light, and root checks.
Quick fix: Inspect the plant and correct the most likely care stressor before stacking treatments.
Full fix guide →Wilting
MediumLikely cause: Common on this plant type; confirm with recent watering, light, and root checks.
Quick fix: Inspect the plant and correct the most likely care stressor before stacking treatments.
Full fix guide →Drooping Leaves
MediumLikely cause: Common on this plant type; confirm with recent watering, light, and root checks.
Quick fix: Inspect the plant and correct the most likely care stressor before stacking treatments.
Full fix guide →Low Humidity
MediumLikely cause: Common on this plant type; confirm with recent watering, light, and root checks.
Quick fix: Inspect the plant and correct the most likely care stressor before stacking treatments.
Full fix guide →Not Enough Light
MediumLikely cause: Common on this plant type; confirm with recent watering, light, and root checks.
Quick fix: Inspect the plant and correct the most likely care stressor before stacking treatments.
Full fix guide →Fungus Gnats
MediumLikely cause: Common on this plant type; confirm with recent watering, light, and root checks.
Quick fix: Inspect the plant and correct the most likely care stressor before stacking treatments.
Full fix guide →Mold on Soil
MediumLikely cause: Common on this plant type; confirm with recent watering, light, and root checks.
Quick fix: Inspect the plant and correct the most likely care stressor before stacking treatments.
Full fix guide →