Drooping Leaves on Burro's Tail: Causes, Checks & Fixes
Quick answer
Mature Burro's Tail stems naturally cascade downward-that is healthy trailing growth, not a problem. Pathological droop shows limp mushy beads on a heavy wet pot, wrinkled deflated beads on a light dry pot, weak stretched stems toward a window, or bead drop after moving the hanging basket. First step: lift the pot and gently squeeze one mid-stem leaf before changing anything.
Drooping Leaves on Burro's Tail: Causes, Checks & Fixes
This guide covers drooping leaves on Burro's Tail. See also the general Drooping Leaves guide, watering, and light pages for this plant.
Drooping Leaves on Burro's Tail: Causes, Checks & Fixes
Quick answer
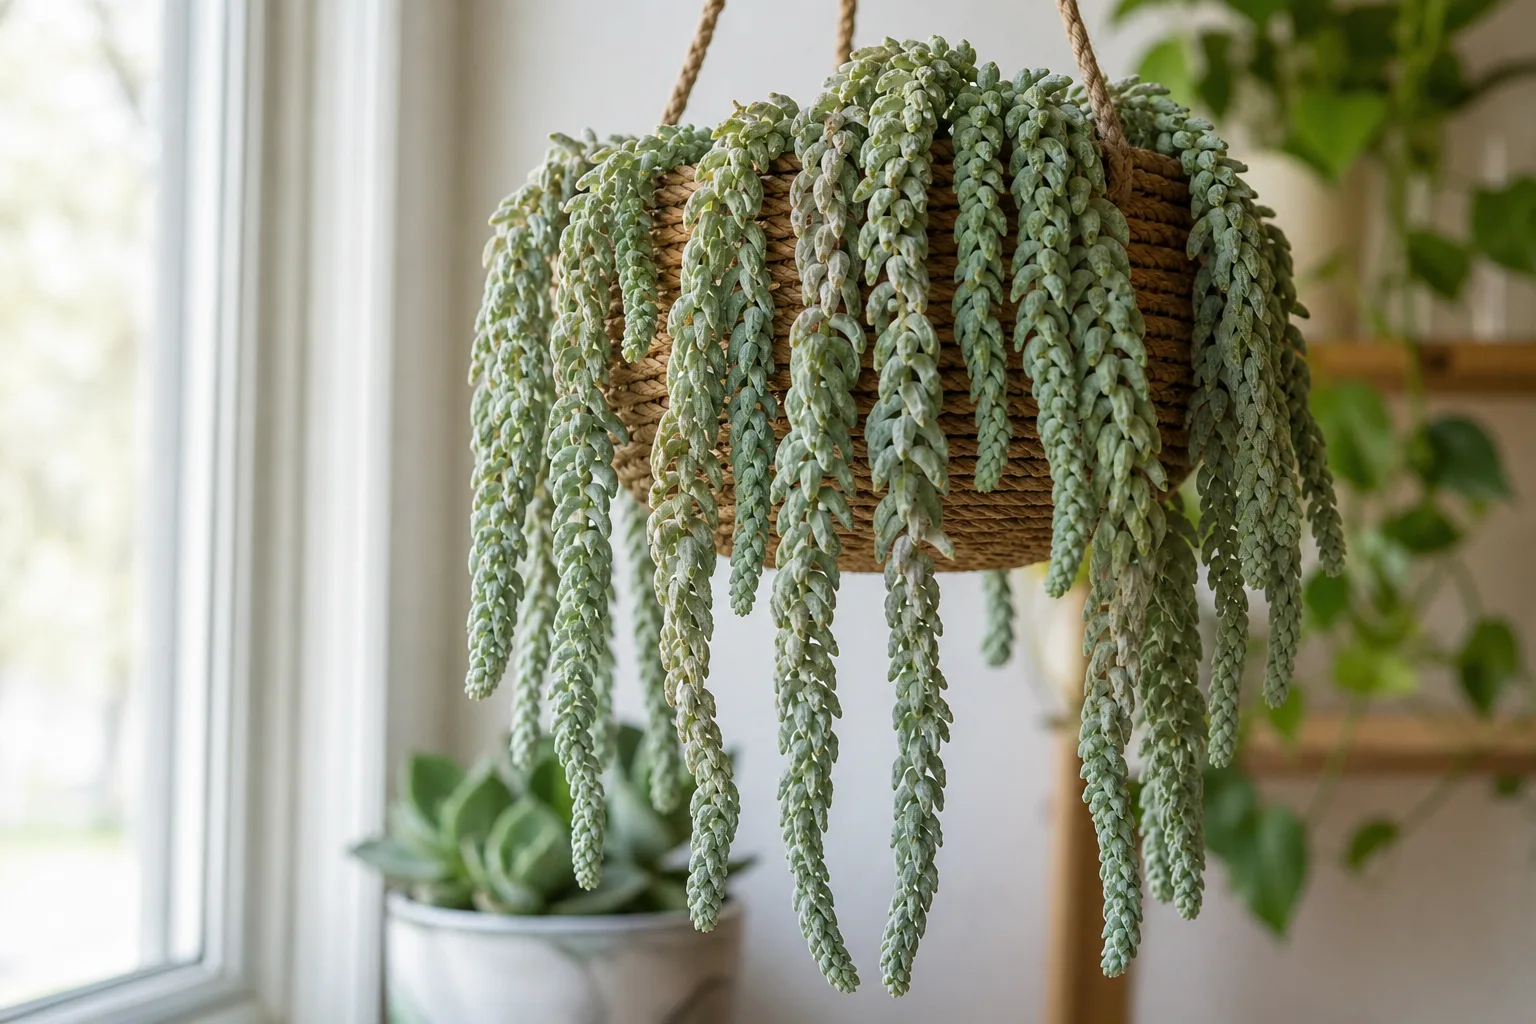
Most Burro’s Tail “drooping” is normal. Sedum morganianum is built to trail-pendulous stems with densely packed leaves that can reach three to four feet in cultivation. Mature stems arch downward under their own weight while leaves stay firm and plump. That cascade is the goal in a hanging basket, not a symptom to fix.
Pathological droop looks different: limp mushy beads on a heavy wet pot, wrinkled deflated beads on a light dry pot, weak stretched stems leaning toward a dim window, beads raining off after you moved the basket, or a soft crown with sour wet mix signaling root rot.
First step: lift the pot and gently squeeze one mid-stem leaf. Heavy + damp + squishy means stop watering. Light + dry + wrinkled means bottom-water once. Firm leaves on a downward cascade in good light means leave it alone. Do not prop trailing stems upright-that stresses the fragile attachments NC State Extension warns break off easily.
What drooping leaves look like on Burro’s Tail
Burro’s Tail stores water in thick overlapping leaves along brittle trailing stems. Because it uses CAM photosynthesis like other Crassulaceae succulents, visible changes in leaf turgor show up quickly once the root zone or light level shifts-faster than on thin-leaved houseplants.
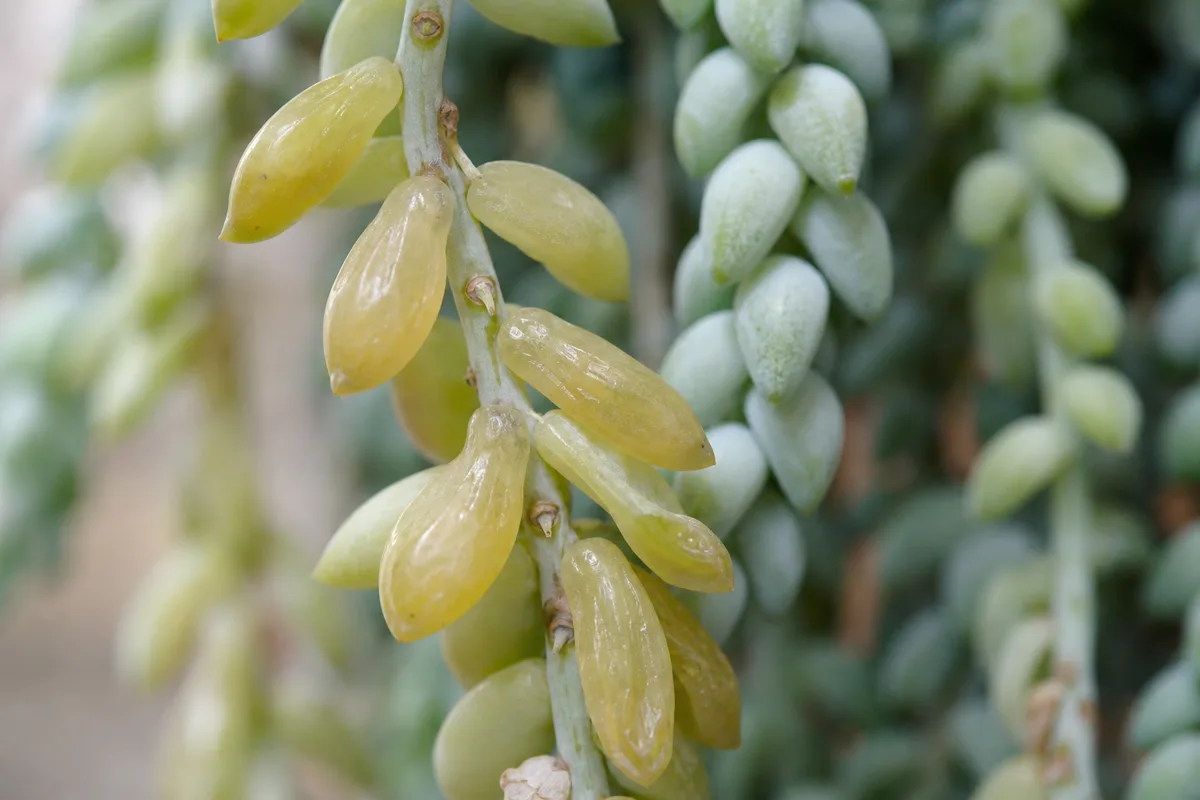
Pathological droop on Burro’s Tail - squishy translucent beads on damp soil, distinct from a healthy downward cascade with firm plump leaves.
Normal trailing cascade (not a problem)
- Stems arch downward from the basket lip in a heavy braid-like rope
- Individual leaves stay blue-green, firm, and plump when you pinch them gently
- Growth continues at stem tips with normally spaced new beads
- Occasional firm green leaves on the floor after a light bump-mechanical drop, not disease
This is what a healthy Burro’s Tail in a hanging basket should look like. Do not tie stems up, stake them vertical, or move the plant because the trail “looks sad.”
Overwatering limpness (heavy wet pot)
- Leaves lose firmness and feel squishy, translucent, or yellowing
- Stems may feel soft rather than merely hanging
- Pot feels noticeably heavy; soil stays damp several inches down
- Lowest leaves drop easily without being touched
- Mix may smell sour near the crown
This is pathological droop-turgidity loss from saturated roots, not gravity. See overwatering and root rot if the crown softens.
Underwatering shrivel (light dry pot)
- Leaves look wrinkled, deflated, or accordion-textured but dry-not mushy
- Stems still hang down but the whole trail looks thinner and duller
- Pot feels very light; soil is dusty dry throughout
- Leaf squeeze test: soft like a deflated balloon, not squishy with moisture
Classic drought droop on a succulent built to swell when watered and shrivel when dry. Full recovery steps live in underwatering.
Low-light stretch (weak sagging stems)
- Stems grow longer between leaf whorls; the braid looks sparse
- Pale green color; new leaves smaller than older ones
- Stems lean toward the brightest window and sag because they lack strength
- Often paired with a plant moved away from summer sun into a dim winter corner
Wisconsin Extension notes that in insufficient light, internodes lengthen and leaves are not as dense on the stems. This is etiolation weakness, not normal cascade weight. See not enough light.
Mechanical bead drop after handling
- Dozens of firm green leaves on the floor immediately after Burro’s Tail repotting guide, relocating, or top-watering
- Remaining stems may look bare in patches where leaves detached
- Soil moisture and leaf texture otherwise normal
- No progressive yellowing or mush spreading up the stem
Burro’s Tail is a “look, don’t touch” plant. Leaves break off if manipulated, so bare patches after a move mimic disease but need time and stable placement-not more water.
Why Burro’s Tail gets drooping leaves
Five causes cover almost every indoor case. Each ties to how this species actually grows.
1. You are misreading normal cascade. New growers often search “drooping” the first time two-foot stems hang over the pot rim. That is expected trailing habit in a species NC State recommends for hanging containers that highlight pendulous stems.
2. Overwatering outpaces CAM succulent drainage. Burro’s Tail cannot tolerate wet roots-especially in winter when growth slows. Saturated mix collapses leaf turgor from the inside out, producing limp beads on stems that still point downward. Iowa State Extension warns that shriveled succulents with wet soil often have damaged roots, which mimics underwatering but needs the opposite fix.
3. Underwatering drains leaf reserves. Bright hanging placement and gritty mix dry pots fast. The plant draws down stored water until beads wrinkle and stems look limp-still trailing, but visibly deflated. This species forgives short drought better than wet feet, but extended dry spells in hot windows still desiccate fine roots.
4. Insufficient light weakens stem structure. Without bright light to several hours of direct sun, stems elongate and cannot support their own weight even when well watered. The droop starts at stretched internodes, not at mushy leaf tissue.
5. Handling shock in hanging baskets. Top-watering, repotting, or brushing past the trail knocks off leaves and leaves bare, droopy-looking sections. Air movement from HVAC vents has the same effect. Bottom watering avoids most of this mechanical damage.
Lookalike symptoms to rule out
| What you see | Likely cause | First check |
|---|---|---|
| Firm beads, stems arching down, bright light | Normal cascade | None-healthy |
| Squishy yellow beads, heavy wet pot | Overwatering / rot | Stop water; smell crown |
| Wrinkled dry beads, light pot | Underwatering | Bottom-soak once |
| Sparse stretched stems toward window | Low light | Move or add grow light |
| Firm beads on floor after bump | Mechanical drop | Stabilize placement |
| Uniform limpness, turgidity loss everywhere | Wilting (turgidity crisis) | See wilting |
| Yellowing from base up, not just posture | Root stress | Yellow leaves |
Drooping vs wilting on this species: Drooping usually describes stem orientation-trailing down or sagging from weakness, stretch, or weight. Wilting describes loss of leaf firmness from water stress, rot, or heat shock even if stems still point outward. Many cases overlap; pot weight and leaf squeeze separate them faster than the label alone.
How to confirm the cause
Run this five-step checklist before changing care:
- Pot weight - Lift the container. Heavy means saturated; very light means dry throughout.
- Soil at depth - Insert a wooden skewer near the pot wall. Dark and moist several inches down = do not add water. Clean and dry = drought likely. Iowa State Extension uses this chopstick check for succulents.
- Leaf squeeze - Pinch one mid-stem bead gently. Firm and plump = healthy or mechanical bare patch only. Wrinkled and dry with light pot = underwatering. Squishy with heavy pot = overwatering.
- Light history - Did the plant move to a dimmer spot or lose summer sun? Sparse internodes plus lean toward glass = etiolation.
- Recent handling - Repot, relocate, or top-water in the last 48 hours? Firm leaves on the floor plus otherwise normal moisture = mechanical, not rot.
Confirmed diagnosis shortcuts:
- Firm plump leaves + downward cascade + appropriate light = no problem
- Light pot + dry skewer + wrinkled leaves = underwatering
- Heavy pot + damp skewer + squishy leaves = overwatering or root stress
- Bare patches + firm fallen beads + recent bump = mechanical
- Stretched sparse stems + dim location = low light
First fix for Burro’s Tail
Match one action to what the pot and leaf test told you-do not stack fixes.
If soil is wet and the pot is heavy
Stop watering immediately. Move the plant to bright light with good airflow, empty any saucer, and do not water again until the mix is fully dry at least two inches down. If the crown feels soft or the mix smells sour, unpot and inspect roots the same day-see root rot. Missouri Botanical Garden notes overwatering wet soil is a common mistake when leaves look tired.
If soil is dry and the pot is light
Bottom-water once until the top of the mix feels lightly moist, then drain fully. Place the pot in a tray of room-temperature water for 15–30 minutes, remove, and let excess run off at least 30 minutes. Do not mist, fertilize, or repot the same day. Resume soak-and-dry checks from the watering guide after the mix dries completely.
If stems are stretched toward a window
Increase light before watering more. Move to an east window with morning sun or within a foot of a south window filtered by sheer curtain. Clemson Extension notes appropriate light supports compact healthy foliage indoors. Water only when dry-extra moisture does not fix etiolation.
If beads dropped after handling
Leave the plant alone in stable bright light. Hook the basket from above; do not lift by the stems. Switch to bottom watering going forward. Expect weeks for new leaves to fill bare patches on slow-growing stems.
If crown is soft with sour wet mix
Treat as urgent root rot. Stop watering, unpot gently, trim mushy roots, let cuts callus one to two days, and repot into dry gritty mix without watering for several days. Take stem cuttings from firm upper growth as backup.
Step-by-step recovery by cause
After underwatering soak: Wait until mix is fully dry before the next drink. Expect visible plumping in 24–48 hours on healthy roots. Older crisp edges stay damaged-watch new firm beads along stems.
After overwatering pause: Let the root zone dry completely. If leaves keep yellowing or the crown softens over 72 hours, unpot and trim rot. Do not “balance” with fertilizer or extra sun on a rotting plant.
After low-light correction: Give four to six hours of bright light daily per the light guide. Optionally trim the most stretched bare sections after new compact growth appears at tips-use cuttings to propagate.
After mechanical drop: Resume normal soak-and-dry rhythm. Bare stem sections may sprout side branches where leaves were missing, but regrowth is slow. Avoid repotting again unless soil failure demands it.
Recovery timeline
24 to 48 hours: Thirst-related droop often shows firmer beads after one thorough bottom soak. Overwatering limpness does not improve until soil dries-adding water makes it worse.
One to two weeks: New tip growth resumes in warm bright conditions. Mechanically stripped stems look sparse but stable. Etiolated stems remain weak until light improves for several weeks.
Three to six weeks: Low-light recovery shows tighter leaf spacing on new growth. Crown rot cases either stabilize with dry repot or require cuttings if the base is lost.
Worsening signs: Squishy crown, spreading black at soil line, or shriveling that continues after two proper soaks on wet soil means rot-not ongoing drought or normal cascade.
What not to do
Do not prop trailing stems upright or tie them to stakes-gravity is normal, and handling stresses attachments. Do not top-water over cascading foliage; expect a leaf shower and possible rot in wet leaf clusters.
Avoid watering on a calendar when the pot still feels heavy. Do not mist limp leaves instead of checking roots. Do not fertilize a stressed plant before you know whether the pot is too wet or too dry.
Do not assume all drooping means underwatering-wet-soil shriveling after root damage needs drying out, not another soak. Do not repot on day one unless root rot or hydrophobic dry soil blocks recovery.
How to prevent drooping leaves on Burro’s Tail
Hang the basket above traffic paths where stems will not get brushed. Use the hanger hook to move it-never grab the trail.
Build a pot-weight habit every five to seven days in summer: light and dry means soak; heavy means wait. Follow the soak-and-dry rhythm Iowa State recommends for indoor succulents-wet the entire root ball when you do water, then let the mix dry completely.
Provide bright light with some direct sun so stems stay compact enough to support their own weight. Refresh gritty succulent mix that repels water, and empty saucers so roots never stand in runoff.
Default to bottom watering to protect fragile beads. Accept that a mature trail will always hang down-that is the display, not a problem to correct.
When to worry
Act the same day if the crown feels soft, mix smells sour, or black mush climbs stems from the soil line-root rot can kill a trailing basket quickly once the base rots.
Escalate within 72 hours if squishy limp beads persist on a heavy wet pot after you stopped watering and soil still will not dry, or if shriveling continues after two proper soaks separated by full dry-down cycles on a light pot-fine root death may need repotting and cuttings.
Simple thirst or mechanical drop rarely threatens a mature plant. Normal cascade with firm leaves never needs emergency care.
Burro’s Tail care cross-check
Use these hub pages once you know which branch fits:
- Overview - trailing habit, CAM physiology, hanging-basket placement
- Watering - seasonal soak-and-dry rhythm
- Underwatering - wrinkled beads on a light dry pot
- Overwatering - mushy beads on a heavy wet pot
- Root rot - soft crown, sour mix
- Wilting - turgidity loss when posture is not the main clue
- Yellow leaves - color change from base up
- Not enough light - stretched sparse stems
Conclusion
Drooping leaves on Burro’s Tail usually means one of two things: healthy cascade or a care mismatch you can diagnose with pot weight and a gentle leaf squeeze. Firm plump beads arching downward in bright light need no fix. Wrinkled beads on a light pot want one bottom soak; squishy beads on a heavy pot want a dry-down; stretched stems toward a window want more light; bare patches after a bump want stable handling-not more water. Judge success by firm new growth along stems in the weeks after one targeted correction, not by forcing trailing stems upright.
When to use this page vs other Burro’s Tail guides
- Burro’s Tail watering guide - Use for routine moisture checks before assuming drooping leaves is the main issue.
- Burro’s Tail problems hub - Browse all 16 common issues on this species.
- Underwatering on Burro’s Tail - Different entry point when symptoms overlap with drooping leaves.
- Overwatering on Burro’s Tail - Different entry point when symptoms overlap with drooping leaves.
- Root Rot on Burro’s Tail - Different entry point when symptoms overlap with drooping leaves.