Root Rot on Burro's Tail: Causes, Checks & Fixes
Quick answer
Root rot on Burro's Tail follows chronically wet mix in a drought-built trailing succulent-plump upper stems can mask a soft, sour stem base until roots fail. First step: stop watering, lift the pot, and check whether the mix is heavy and the stem base at the soil line is firm before you unpot or repot.
Root Rot on Burro's Tail: Causes, Checks & Fixes
This guide covers root rot on Burro's Tail. See also the general Root Rot guide, watering, and light pages for this plant.
Root Rot on Burro's Tail: Causes, Checks & Fixes
Quick answer
Root rot on Burro’s Tail (Sedum morganianum) is almost always a watering and drainage failure, not a mysterious disease. This trailing stonecrop succulent stores water in plump blue-green leaves packed along brittle cascading stems, so limp or translucent leaves on damp soil are the signature trap-growers water again, and rotting roots lose even more function.
First step: stop watering immediately. Lift the pot. If the mix is wet and heavy, press your finger into the top inch near the pot edge. Wet clinging soil plus a soft stem base, sour smell, or translucent lower leaves means treat root rot as likely. Check whether stems feel firm where they meet the soil before you unpot, trim, or repot.
Root rot vs. other Burro’s Tail problems
The wilt-on-wet-soil paradox separates root rot from thirst on Burro’s Tail better than any single leaf symptom. Underwatered Burro’s Tail wilts on a light, dry pot and re-plumps within 24 to 48 hours after a thorough soak. Root rot produces the opposite: collapse on heavy wet mix with no rebound after watering-wilting with moist soil often means roots cannot absorb water because they are decaying.
| Pattern | Pot weight | Soil at top inch | Stem at soil line | What it usually means |
|---|---|---|---|---|
| Root rot | Heavy | Wet, cool, clings to finger | Soft or darkening | Failed roots on saturated mix |
| Underwatering | Light | Dry and crumbly | Firm; leaves slightly wrinkled | Turgor loss from drought |
| Early overwatering | Medium-heavy | Damp for weeks | Still firm | Rot risk; see overwatering guide |
| Handling leaf drop | Normal | Dry on schedule | Firm | Leaves scatter from jostling, not rot |
For the full dry-pot versus wet-pot workflow, see the wilting guide and watering guide.
What root rot looks like on Burro’s Tail
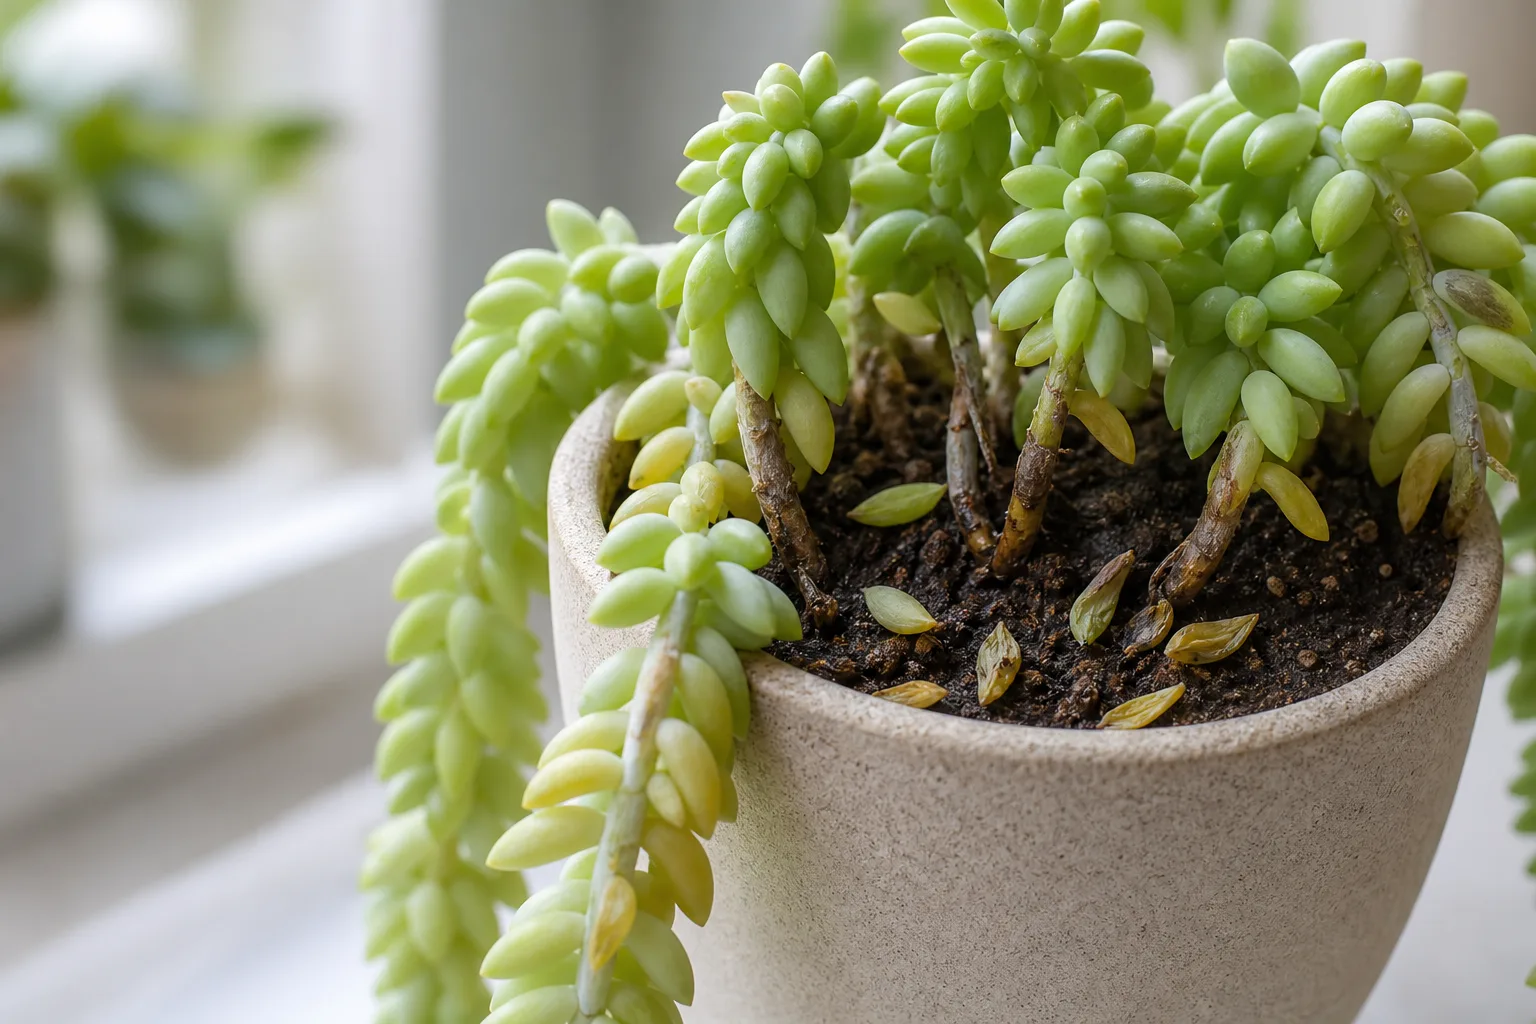
On this trailing succulent, rot rarely announces itself at the stem tips first. Dense overlapping leaves slow how fast growers notice trouble, and the plant can look acceptable while the stem base softens underground.
Root Rot symptoms on Burro’s Tail - compare with healthy tissue on the same plant.
Early signs
- Translucent or mushy lower leaves while the mix stays damp-not the fine wrinkling of a thirsty plant on dry soil
- Yellowing leaves that feel soft and fall off easily when touched
- Sour or rotten smell when you lift the pot or press the surface
- Stem base near soil that feels squishy while upper trailing stems still look plump
- Slowed new leaf growth along stem tips despite moisture in the pot
Advanced signs
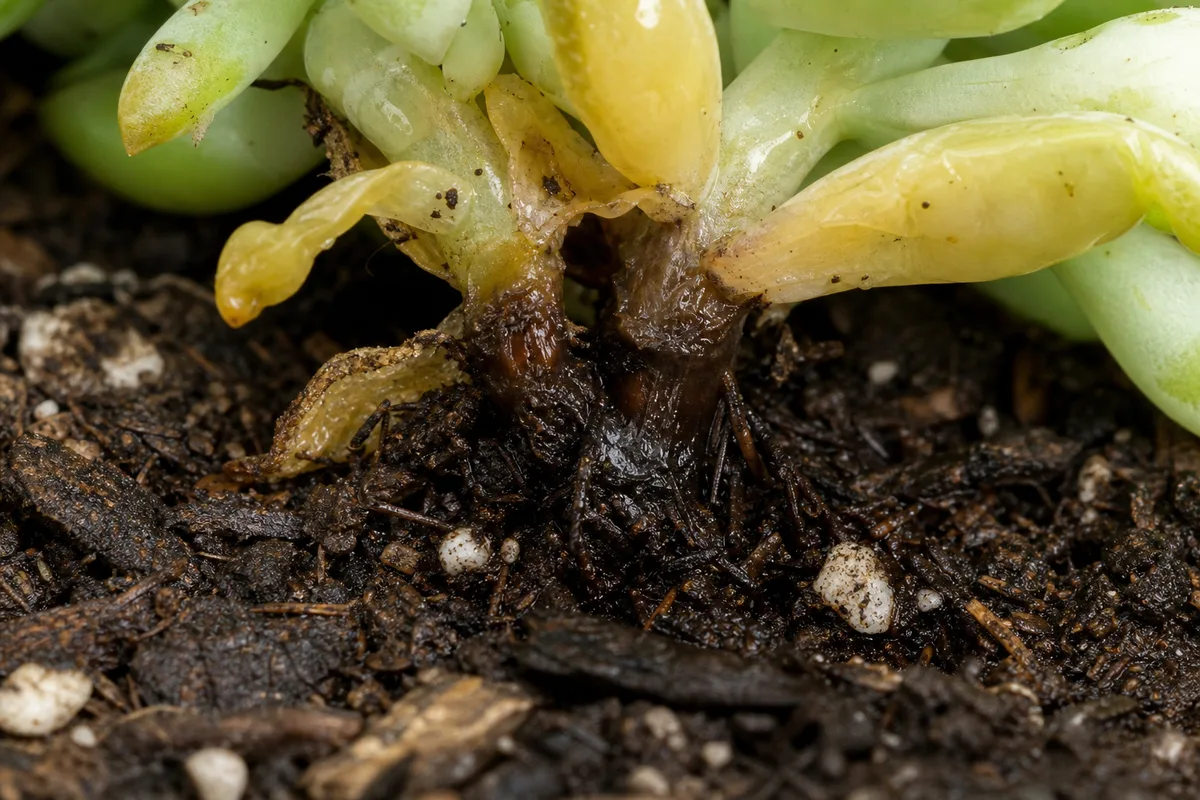
- Soft, dark stems at or just above the soil line-rot climbing the stem is a bad sign
- Stem collapse with leaves turning brown and papery despite wet mix
- Roots that slip off when touched-healthy Burro’s Tail roots stay firm and pale
- Whole sections of trailing stems detaching because tissue at the base has failed
Compare with underwatering: a dry lightweight pot, slightly deflated but firm leaves, and re-plumping after a soak point away from rot. Compare with normal handling: plump leaves scattering after a bump or repot without sour soil or mushy stems.
Why Burro’s Tail gets root rot
Burro’s Tail is a drought-built succulent from southern Mexico and Honduras. Indoors it tolerates missed waterings far better than constant sogginess, but its lush trailing look tricks growers into watering on a calendar instead of checking soil dryness.
Overwatering on wet mix. Root rot due to overwatering is the most common issue on Burro’s Tail. Watering while the root zone is still damp keeps the zone oxygen-poor-roots in waterlogged soil die because they cannot absorb oxygen. Thick leaves store water, so wilting and mush can lag behind root damage-plump upper stems are not proof that roots are healthy when soil stays wet.
Heavy mix and poor drainage. Dense peat-heavy potting soil, blocked drainage holes, oversized pots with excess wet mix around a small root ball, and saucers left full after bottom-watering all keep the bottom of the root ball anaerobic. Avoid wet or poorly drained conditions-Burro’s Tail needs gritty, fast-draining medium.
Winter low-light slow dry-down. A Burro’s Tail in a cool dim room uses far less water in fall and winter. The same weekly watering that worked in summer leaves mix wet for weeks-indoor plants may not need watering more than once a month in winter. Low light and wet soil together are the combination that destroys roots on succulents.
Hanging baskets and cachepots. Burro’s Tail is often grown in hanging baskets inside decorative outer pots. Runoff trapped in a cachepot or basket saucer keeps the root zone saturated even when the surface looks dry.
How to confirm the cause
Work through these checks in order before you repot. Each step narrows the diagnosis without stacking unnecessary treatments.
Soil moisture and pot weight
Press your finger into the top inch near the pot edge, not against the stem. Wet clinging soil on a heavy pot after days without watering strongly suggests chronic saturation. A dry wooden skewer inserted near the pot edge that comes out with damp particles clinging confirms moisture below the surface.
Lift the pot right after a known good watering to learn what “heavy” feels like, then compare when you suspect rot. Heavy plus limp leaves on wet soil equals trouble, not thirst.
Drainage and standing water
Confirm drainage holes are open-not sealed by roots, pebbles, or a glued-in liner. Pour a small amount of water and watch it exit within seconds. Check whether the inner pot sits in standing water inside a cachepot or hanging-basket saucer.
Root and stem inspection on trailing stems
Gently unpot and rinse roots under lukewarm water. Healthy roots are firm, pale, and hold their shape when pressed. Rotted roots are brown to black, soft, slimy, or hollow-and they smell sour. Soil that has been too long without oxygen usually smells sour or rotten.
Follow each trailing stem to the soil line. Stems should feel firm, not squishy. Soft tissue at the base means rot has moved above the roots.
Lookalikes to rule out
- Underwatering - Light pot, dry mix at depth, firm wrinkled leaves that re-plump after soak
- Overwatering without advanced rot - Wet mix and yellow edges but mostly firm pale roots when you inspect; dry-down may be enough
- Normal leaf drop from handling - Plump leaves on the floor after repotting or jostling; firm stem base and no sour smell
- Natural aging - One or two old lower leaves yellow while the rest of the plant and roots look healthy
First fix for Burro’s Tail
Make one clear first move: stop watering and stabilize the plant in bright light-not a dark corner. Do not fertilize. Do not repot on day one unless stems are already mushy and you need to trim immediately.
Once you have confirmed wet mix with failing roots, follow this numbered rescue workflow:
- Unpot and rinse roots so you can see color and texture clearly. Handle stems gently-Burro’s Tail leaves detach easily.
- Trim all mushy, brown, or hollow roots with clean scissors or pruners until only firm tissue remains. Sterilize blades between cuts if rot was advanced.
- Cut away soft stems at the soil line. If rot climbed the stem, cut back to firm green tissue above the damage.
- Let cut root and stem surfaces air-dry for three to seven days on a paper towel in bright indirect light-not direct hot sun. Callusing prevents fresh cuts from rotting in damp mix.
- Repot into fresh gritty succulent mix with perlite or pumice in a pot sized to the remaining root mass, not the former foliage volume. See the soil and repotting guides for mix ratios.
- Wait about one week before the first light watering so cut surfaces finish callusing and new root tips can start without fresh saturation-wait about a week after repotting to water.
- If most roots are gone but firm stem tips remain, take 4–6 inch cuttings with clean breaks and root them in dry gritty mix per the propagation guide. Leaf and stem cuttings root easily on this species-stem salvage is often more reliable than saving a bare root stump.
Keep the plant in bright light during recovery. Avoid drafty cold windows and hot AC blasts. Bottom watering reduces jostling that sheds leaves during the fragile recovery phase.
Recovery timeline
Recovery is judged by new firm leaves along stem tips, not by old yellow or translucent leaves re-greening. Damaged leaves rarely recover their color; they may drop while the plant stabilizes.
- Mild rot with mostly firm roots - Stabilization within one to two weeks after repot and corrected watering; first new plump leaves in three to four weeks
- Moderate rot with heavy root trim - Four to six weeks before consistent new leaf growth along stems; expect some leaf loss
- Salvage via stem cuttings - Roots in gritty mix in three to five weeks; trailing growth resumes in two to four months under good light
- Advanced stem mush at the base - Often fatal on the mother plant; prioritize propagation from the highest firm stem sections
Signs of improvement: firm stems at the soil line, new plump leaves overlapping tightly along stem tips, roots holding firm pale tips when you gently check after a month, and soil that dries down fully between waterings.
Signs the problem is worsening: spreading dark mush on stems, limp leaves on wet soil after repot, sour smell returning within days, or no new growth after six weeks in good light.
What not to do
- Do not water because leaves look soft when soil is already wet-that deepens root failure.
- Do not fertilize until new growth resumes; stressed roots cannot use nutrients safely.
- Do not repot into garden soil, a larger pot, or a container without drainage hoping it will dry faster.
- Do not leave the plant in the same sour mix without trimming damaged roots-the anaerobic conditions remain.
- Do not top-water aggressively during recovery-brittle stems shed leaves when the pot is tilted; use bottom watering instead.
When to propagate stem cuttings instead
If more than half the root mass is mushy but you still have firm green stem sections above the damage, propagation is often a better bet than forcing the original root ball to recover. Burro’s Tail evolved to regenerate from detached leaves and stem fragments-this is the species’ built-in backup plan.
Cut healthy stem tips 4–6 inches long, strip the lower leaves from the buried portion, callus three to seven days, then plant in dry gritty mix. Do not water for five to fourteen days after planting. Full step-by-step timing lives in the propagation guide.
Discard the mother plant when the stem base is fully mushy with no firm tissue remaining above the rot line.
How to prevent root rot next time
Prevention on Burro’s Tail is mostly dry-down rhythm, not luck:
- Allow the soil to nearly dry out between waterings-water only when the root zone is fully dry, not on a fixed calendar. Active summer growth may mean every 10–14 days; cool winter rooms may go a month or longer.
- Use gritty, well-drained succulent mix and a pot matched to the root ball-Burro’s Tail does well slightly potbound.
- Empty saucers and cachepots within 30 minutes of every watering. Lift hanging baskets out of decorative holders to drain.
- Match watering to light and season-low-light winter placements need much longer dry-down intervals.
- Avoid oversized pots where a large volume of mix stays wet around modest roots.
The watering guide is the best long-term companion to this page-it covers finger tests, pot weight, seasonal shifts, and the overwatered Burro’s Tail symptom set in depth.
Related Burro’s Tail guides
- Watering - dry-down protocol and mushy-leaf diagnosis
- Wilting - dry-pot vs wet-pot first checks
- Overwatering - early saturation before roots fail
- Yellow leaves - lower-leaf yellowing patterns
- Soil and repotting - mix and pot sizing for recovery
- Propagation - stem and leaf salvage when roots are mostly gone