Burro's Tail Repotting: When, How, and Mistakes to Avoid
Burro's Tail Repotting: When, How, and Mistakes to Avoid
Burro's Tail Repotting: When, How, and Mistakes to Avoid
Burro’s Tail is one of those plants that looks effortless on Instagram and becomes a stress test the moment you try to move it. Sedum morganianum trails thick, bead-like stems that can reach several feet on mature specimens, and every one of those plump leaves is attached by a narrow, fragile point that detaches at the slightest bump. Repotting is necessary - soil breaks down, roots eventually circle, and a top-heavy plant in a lightweight pot becomes a tipping hazard - but the job rewards preparation and punishes rushing. The goal is not a perfect, leaf-loss-free transplant. The goal is a fast, controlled move into fresh, fast-draining mix with the smallest possible root disturbance and a recovery plan that keeps rot out of the equation.
This guide covers when Burro’s Tail actually needs repotting (hint: less often than you think), how to handle the plant without treating the stems like a rope you can yank, which pot and soil choices prevent the post-repot death spiral, and the mistakes that turn a routine refresh into a month-long recovery. Guidance here aligns with University of Wisconsin-Madison Extension recommendations for Sedum morganianum: repot in spring when the plant has filled its pot, use a well-drained medium, and wait about a week after repotting before watering.
Why Burro’s Tail Is the Trickiest Succulent to Repot
Most succulents tolerate a rough transplant. Aloe pups get separated with a knife. Echeveria rosettes get knocked loose and replanted. Burro’s Tail does not play by those rules. Its entire aesthetic - long cascading stems packed with overlapping leaves - is also its biggest liability during any physical task. You are not just moving roots. You are maneuvering a fragile chandelier through a narrow pot opening while gravity works against you.
What Makes Sedum morganianum Different From Other Succulents
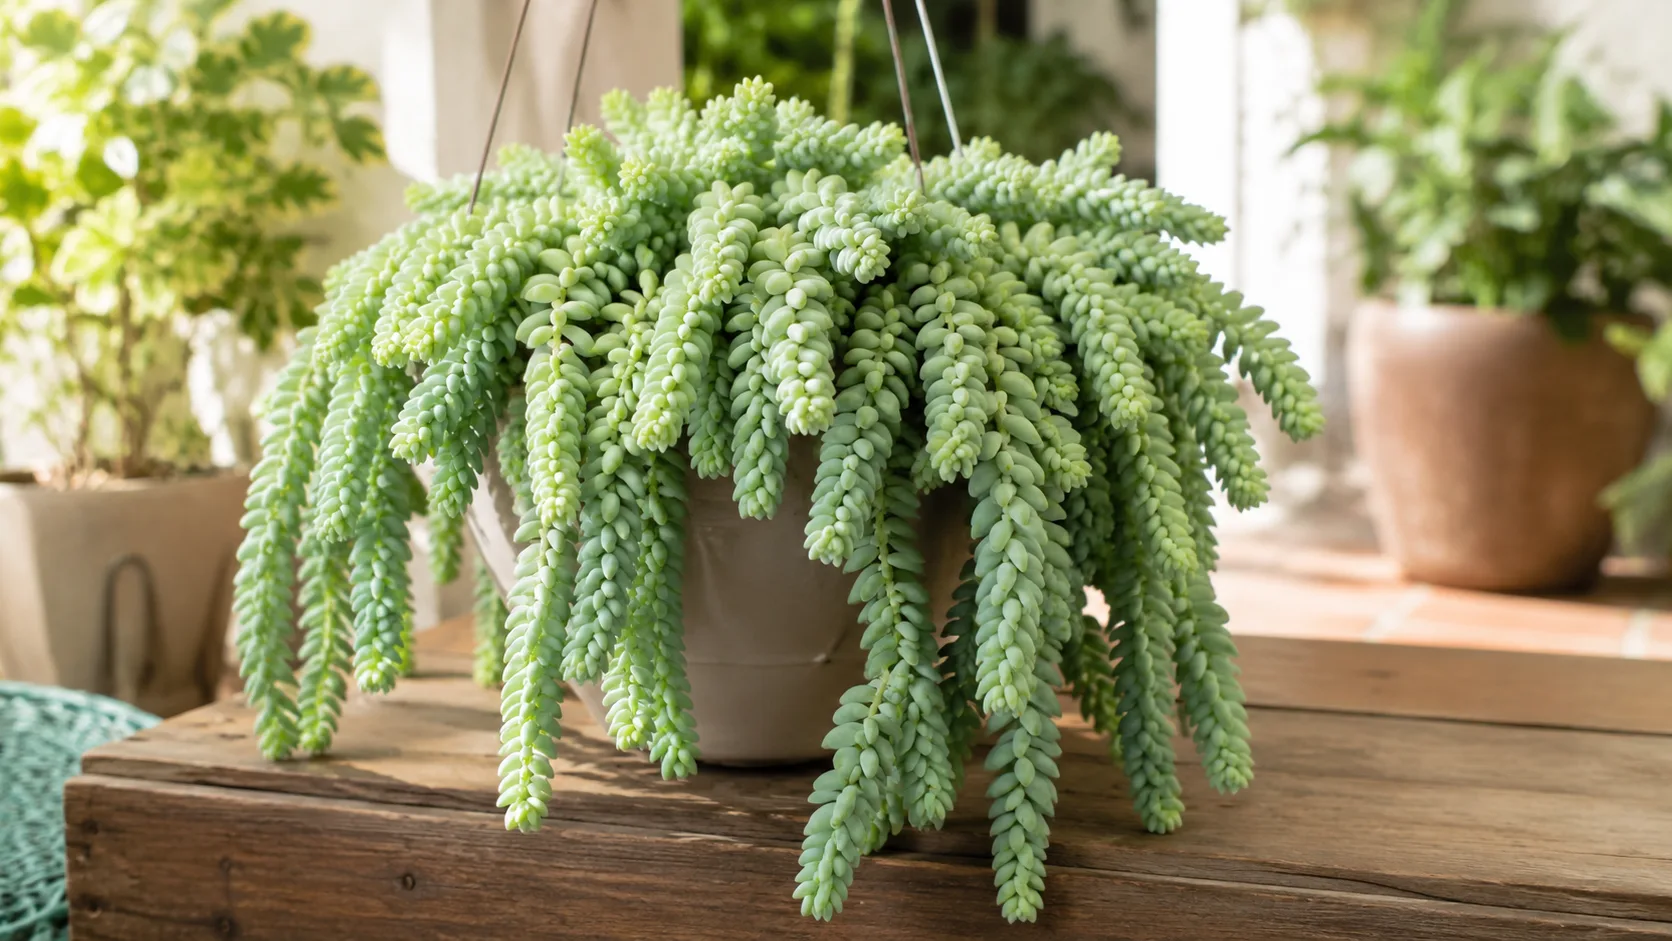
Burro’s Tail, also called Donkey’s Tail, is a trailing succulent in the Crassulaceae family native to cliff faces in southern Mexico and Honduras. In habitat, stems hang downward and shed leaves easily - a reproductive strategy that lets fallen leaves root in crevices below. That same biology shows up on your windowsill. Each leaf stores water in a thick, jelly-bean-shaped body coated in a powdery epicuticular wax (sometimes called farina). The stems are succulent too, but they are not structural steel; they bend, snap, and shed leaves when handled.
Unlike upright succulents that you can grip at the base, Burro’s Tail asks you to work from the root ball outward. The visible plant mass is mostly leaves and stem tissue above the soil line, and disturbing that mass is what triggers leaf drop. Wisconsin Extension notes that Burro’s Tail does well when slightly pot-bound, which means many owners repot too early and too large, creating moisture problems without solving a real root-space issue.
The Leaf-Drop Reality You Need to Accept Before You Start
Some leaf loss during repotting is normal. Not a little - sometimes a noticeable shower of beads across your work surface. That is not automatically a sign you killed the plant. It is the plant doing what evolution trained it to do when disturbed. The practical response is twofold: minimize handling time so the cascade stops sooner, and save the fallen leaves for propagation rather than sweeping them into the trash.
If you go into the job expecting zero damage, you will either freeze up and take too long - which causes more loss - or panic and overwater a stressed plant afterward. A better mindset: leaf drop is a cost of doing business; root rot on Burro’s Tail from a sloppy repot is the actual failure mode. Your procedure should optimize for root health and speed, not cosmetic perfection on day one.
When to Repot Burro’s Tail: Clear Signs It Is Time
Burro’s Tail does not need an annual pot upgrade. The Old Farmer’s Almanac suggests repotting only every three to five years for many specimens, and only when there is a real reason. Treat repotting as a targeted intervention - soil refresh, root correction, or stability - not a calendar ritual.
Root-Bound Signals and Soil Fatigue
Watch for these signs together or separately:
- Roots visible at drainage holes or circling tightly when you slip the plant out for inspection.
- Water runs straight through without absorbing, or the opposite - water sits on the surface because the mix has compacted.
- Soil level drops noticeably year over year as organic matter decomposes, leaving a sunken crown and less stable stems.
- Growth stalls in spring and summer despite adequate light and appropriate watering - after you have ruled out other causes.
- The plant dries out unusually fast because roots have consumed most of the usable mix volume.
- White salt crust on the soil surface that returns quickly after flushing - a sign the medium is exhausted.
A single fallen leaf or one dry week is not a repotting trigger. Two or more structural signs - especially poor drainage plus circling roots - make a strong case for action during the next active growth window.
Emergency Situations That Cannot Wait for Spring
Most repotting should happen in spring, but three scenarios override the calendar:
- Active root rot - mushy stems at the soil line, sour-smelling mix, or blackened roots when you probe gently. Remove the plant from wet soil immediately, trim affected tissue with clean scissors, and repot into dry, fresh mix. You may sacrifice leaves in the process; saving the root crown matters more.
- Severe pest infestation in the root zone - mealybugs occasionally colonize stem joints and soil interfaces. A full soil replacement is often cleaner than repeated drenches.
- Physical pot failure - a cracked container or a plant that has become dangerously top-heavy and tips weekly. Stability is a legitimate repotting reason even off-season, though you should keep recovery conditions conservative afterward.
If the issue is cosmetic leaf drop only and the roots are healthy, you do not need an emergency repot. You need less handling and better placement.
How Often Burro’s Tail Actually Needs Repotting
Young plants in small starter pots may need repotting every two to three years as they establish. Mature specimens with long trailing stems often go three to five years between full repotting, and some growers refresh soil on a similar schedule without upsizing the pot at all. Wisconsin Extension explicitly recommends repotting in spring only when the plant has completely filled its pot, because Burro’s Tail tolerates - and sometimes prefers - being somewhat root-bound.
That tolerance changes the math. You are not asking, “Has it been two years?” You are asking, “Is the mix still draining fast, and are the roots still proportionate to the container?” If a mature Burro’s Tail is stable, growing in spring, and water behavior is predictable, leaving it alone is often the better call. Top-dressing - scraping out the top inch or two of old mix and replacing it with fresh gritty soil each spring - can extend the interval between full repots by a year or more.
Best Time of Year to Repot Burro’s Tail
Spring is the best time to repot Burro’s Tail, with early summer as a secondary option while the plant is still in active growth. During these months, roots repair quickly, new leaf pairs initiate along stems, and the plant can rebuild the root-to-shoot balance before shorter days arrive.
Why Spring Wins and Winter Usually Loses
In spring, soil temperatures in your home rise, daylight lengthens, and Sedum morganianum shifts from its conservative winter metabolism into growth mode. A repot at this stage gives the plant months to re-establish before it slows again.
Winter repotting is a gamble. Burro’s Tail already wants less water in the cold season - sometimes no more than monthly indoors, depending on humidity and temperature. Fresh mix in an oversized pot stays wet longer while roots are barely functioning. The combination invites rot. Wisconsin Extension’s guidance to reduce watering frequency in fall and provide just enough moisture in winter to keep the medium from going bone-dry applies doubly after repotting: there is no growth surge to burn through excess water.
If you must repot in winter due to rot or pot failure, use the same pot size or only slightly larger, keep the plant in bright but not hot direct sun, and extend the post-repot dry period at the conservative end - often seven to ten days before the first light watering. Do not fertilize until spring.
Choosing the Right Pot for a Trailing Succulent
The right pot for Burro’s Tail balances drainage, proportion, and physics. A beautiful but top-light container is how a four-foot trail ends on the floor.
Pot Size, Weight, and Drainage Rules
Follow the one-size-up rule: choose a pot only 1 to 2 inches (2.5 to 5 cm) wider in diameter than the current one unless you are correcting a grossly undersized starter pot. Jumping from a four-inch pot to an eight-inch pot “so it can grow” is one of the most common ways owners drown a succulent that was doing fine.
Drainage holes are non-negotiable. Burro’s Tail cannot tolerate water pooling at the bottom of a decorative cache pot. If you use a cover pot, lift the grow pot out to water and drain fully before returning it.
For mature, heavy trails, pot weight matters as much as pot width. A wide, shallow bowl in lightweight plastic will tip. A deeper terracotta or heavy ceramic pot with a broad base anchors long stems and reduces the wobble that causes ongoing leaf drop from vibration. Hanging baskets work well for younger plants; older specimens often transition to a sturdy shelf or wide tabletop pot as stems lengthen.
Terracotta vs Plastic for Top-Heavy Plants
Unglazed terracotta pulls moisture from the soil through its porous walls, which helps prevent the prolonged dampness that triggers root rot after repotting. It is also heavy - an advantage for top-heavy Burro’s Tail. The trade-off: you may need to water slightly more often during peak summer growth, which is manageable if you already follow a soak-and-dry rhythm.
Plastic retains moisture longer and weighs less. It can work in bright, dry rooms or for growers who underwater, but it is less forgiving immediately after repotting when roots are compromised and the mix is still settling. If you choose plastic, be especially strict about pot size and the post-repot dry period.
Glazed ceramic without drainage is a display option only. Do not plant directly into it.
The Best Soil Mix for Repotting Burro’s Tail
Burro’s Tail needs a fast-draining, airy medium - not rich houseplant soil straight from the bag. Wisconsin Extension recommends a well-drained growing medium such as cactus mix or regular potting medium liberally augmented with perlite, pumice, baked clay granules, or small pea gravel. It specifically cautions against fine sand, which fills soil pores and can reduce drainage rather than improve it.
A Simple DIY Recipe and What to Avoid
A reliable starting blend for repotting:
- 50% commercial cactus or succulent mix
- 50% perlite, pumice, or coarse mineral grit
For a slightly leaner mix in humid homes or plastic pots, push the mineral fraction to 60%. Mix dry in a bucket before you start repotting so you are not fiddling with bags while holding a fragile plant.
Avoid these common soil mistakes:
- Regular potting soil alone - holds too much moisture around succulent roots.
- Fine play sand or beach sand - compacts and blocks air pockets.
- Heavy compost or moisture-retention additives - keep the mix lean.
- Reusing old soil - depleted structure and possible pest or pathogen carryover.
If your existing plant is healthy and you are only upsizing slightly, you do not need to bare-root and destroy every old grain of mix. Keeping a thin shell of old soil around the root ball reduces stress. Replace everything only when rot, pests, or severe compaction demand it.
Pre-Repot Preparation: Setting Up for a Fast, Low-Damage Job
Speed and setup separate a controlled repot from a leaf blizzard. Gather materials before you touch the plant:
- New pot with drainage holes, cleaned if reused
- Pre-mixed dry soil
- Soft cloth or old t-shirt to loosely wrap trailing stems
- Clean scissors or pruning shears for dead roots
- A chopstick or pencil for settling mix around the root ball
- A tray, towel, or shallow box to catch fallen leaves
- Optional: a second person for mature specimens
Let the soil dry completely for several days before repotting. This is counterintuitive if you have read generic houseplant advice to “water the day before” for easier unpotting. For Burro’s Tail, dry soil and slightly dehydrated leaves detach less readily than plump, water-filled leaves. The root ball will still slide out of a dry pot with gentle tapping and sideways pressure on the container walls. Never pull the plant out by the stems.
Water the plant normally at least a week before you plan to repot, then stop. You want a dry root zone on repot day, not a drought-stressed skeleton. If the plant is already underwatering on Burro’s Tail and leaves are wrinkled, give one light watering and wait five to seven days before proceeding.
Choose the plant’s final display spot before you begin. Every relocation after repotting adds vibration and leaf drop. Set it once, then leave it alone for several weeks.
Step-by-Step: How to Repot Burro’s Tail With Minimal Leaf Loss
Work on a stable surface at roughly pot height so you are not lifting long trails repeatedly. If the plant hangs, unhook it carefully and lower it onto your prepared towel rather than letting stems swing.
Unpotting and Inspecting the Root Ball
- Lay the pot on its side on the towel. Gently gather the trailing stems toward the center and loosely wrap them in soft fabric - not tight enough to crush leaves, just enough to keep them from snagging.
- Support the pot, not the plant. Tap the rim, squeeze flexible nursery pots, or run a knife around the inside edge of rigid pots to release the root ball.
- Slide the root ball out with gravity. If it resists, invert slightly while cradling the wrapped stems. Do not yank.
- Brush away loose old mix from the bottom and outer edges. Tease circling roots at the bottom gently with your fingers. Trim black, mushy, or hollow roots with clean scissors. Healthy succulent roots are white or tan and firm.
- Inspect the stem base where it meets soil. Soft, discolored tissue here signals rot that must be cut back to clean flesh and allowed to callus if the cut is significant.
Keep the root ball largely intact. Bare-rooting strips fine root hairs and extends recovery time without meaningful benefit for a healthy plant.
Planting, Backfilling, and Final Placement
- Add a layer of dry mix to the bottom of the new pot so the crown will sit at the same depth as before. Burro’s Tail should not be buried deeper than it was growing; stem tissue underground rots easily.
- Lower the root ball in while a helper holds wrapped stems clear of the rim, or rest stems over the pot edge temporarily if working alone.
- Fill around the sides with dry mix in small handfuls. Use a chopstick to settle soil between the root ball and pot wall - never pack tightly.
- Leave a small gap below the rim for watering without overflow.
- Unwrap stems carefully and arrange them on the soil surface or over the pot edge so no heavy trail puts pressure on newly planted roots.
- Place the pot in its permanent bright location - Burro’s Tail light guide is ideal for recovery. Avoid intense direct sun for the first two weeks, which stresses leaves already compromised by handling.
- Collect fallen leaves and set them on dry mix in a separate tray or on top of the new pot soil for propagation. They do not need to be planted immediately; let leaf ends callus for a few days in indirect light.
Do not water yet.
Post-Repotting Care and Common Mistakes to Avoid
The first month after repotting determines whether your work succeeds. Roots need time to heal micro-tears in dry conditions before moisture returns.
Wait five to seven days before the first watering - Wisconsin Extension and multiple succulent references align on roughly a week. Some growers in humid climates push to ten days after a rough repot with root trimming. The first watering should be light: enough to moisten the root zone, not a full soak that saturates an only partially occupied pot.
After that, return to your normal soak-and-dry rhythm. Let the mix dry thoroughly between waterings. In winter recovery, stretch the interval further.
Hold fertilizer for four to six weeks. Fresh roots in new mix do not need chemical encouragement, and salts in fertilizer can burn compromised tissue. Resume half-strength feeding only when you see new growth in spring or early summer.
Do not move, bump, or “check on” the plant daily. Vibration is a leaf-drop trigger. Trust the process.
Common mistakes worth naming explicitly:
- Oversized pots - the mix stays wet in the unused volume while roots sit in limbo. One size up only.
- Pulling by stems - snaps trails and strips leaves. Always handle the root ball and pot.
- Watering immediately - the fastest route to rot after root injury.
- Bare-rooting healthy plants - unnecessary stress with no upside.
- Repotting in deep winter for non-emergencies - slow recovery plus excess moisture equals rot risk.
- Throwing away dropped leaves - they are free propagation material, not failure debris.
Recovery timeline: mild leaf wilt or pause in growth for one to two weeks is normal. New leaf pairs along stems within four to six weeks signal success. Old damaged leaves do not repair, but new growth in the correct blue-green color and plump texture means the root system is back online.
If stems go mushy, smell sour, or blacken from the base upward after repotting, remove the plant from wet mix immediately, cut back to healthy tissue, and repot dry. That is a rescue, not a retry of the same Burro’s Tail watering guide.
Conclusion
Repotting Burro’s Tail is less about brute force and more about choreography: dry soil, a barely larger pot, gritty fast-draining mix, root-ball-focused handling, a week without water, and a hands-off recovery spot where the trails can hang undisturbed. You will lose some leaves. That is the plant’s biology, not your incompetence. What you can control is rot risk - and that is what separates a thriving Sedum morganianum from one that lingers in transplant shock until you give up.
Repot when the mix is tired or roots have genuinely filled the pot, favor spring, skip the oversized container, and treat every fallen leaf as a propagation bonus. Do that, and the same plant that showered beads across your table in March will be pushing new trails by early summer - often fuller than before, because you finally gave the roots a medium that drains as fast as this succulent demands.
When to use this page vs other Burro’s Tail guides
- Burro’s Tail overview - Start here for whole-plant context before deep-diving this topic.
- Burro’s Tail problems hub - Jump to symptom-specific fix guides when this care topic does not resolve the issue.
- Root Rot on Burro’s Tail - Escalate here when repotting adjustments are not enough.