Mealybugs on Burro's Tail: Causes, Checks & Fixes
Quick answer
Mealybugs on Burro's Tail nest in bead axils and stem joints on trailing Sedum morganianum-white cotton where leaves meet stems. First step: isolate and inspect axils with a hand lens before spraying; this succulent drops beads under rough handling.
Mealybugs on Burro's Tail: Causes, Checks & Fixes
This guide covers mealybugs on Burro's Tail. See also the general Mealybugs guide, watering, and light pages for this plant.
Mealybugs on Burro's Tail: Causes, Checks & Fixes
Quick answer
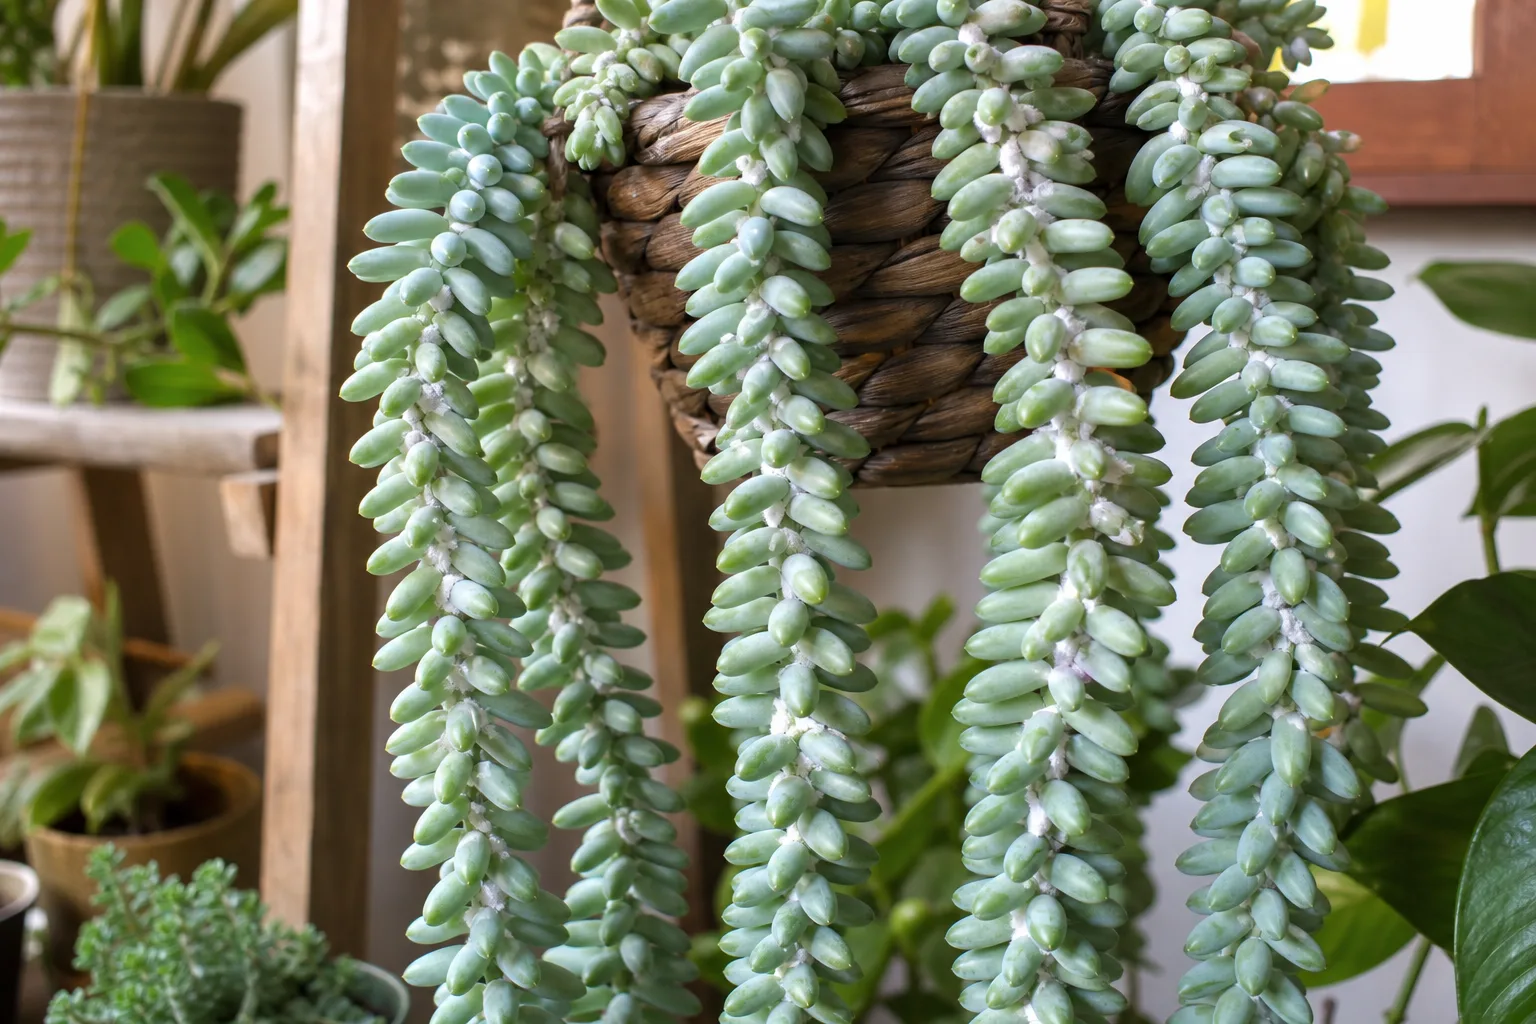
Mealybugs on Burro’s Tail (Sedum morganianum, donkey’s tail) are white cottony sap feeders that hide in bead axils and stem joints along trailing stems-not scattered across the powdery blue-green leaf surfaces. The plant’s dense cascade makes colonies easy to miss until honeydew or ants appear on the pot or shelf below.
First step: isolate the hanging basket and inspect axils with a hand lens before spraying anything. Burro’s Tail leaves detach easily with rough handling-confirm pests, then use targeted alcohol dabs rather than forceful rinses.
For baseline care rhythm-light, watering, soil, and seasonal expectations-see the Burro’s Tail overview. For the same gentle-handling treatment philosophy on soft-bodied pests, see the companion aphids guide.
What mealybugs look like on Burro’s Tail
Healthy Burro’s Tail beads are firm, powdery blue-green, and attached tightly along cascading stems. Mealybug damage looks different:
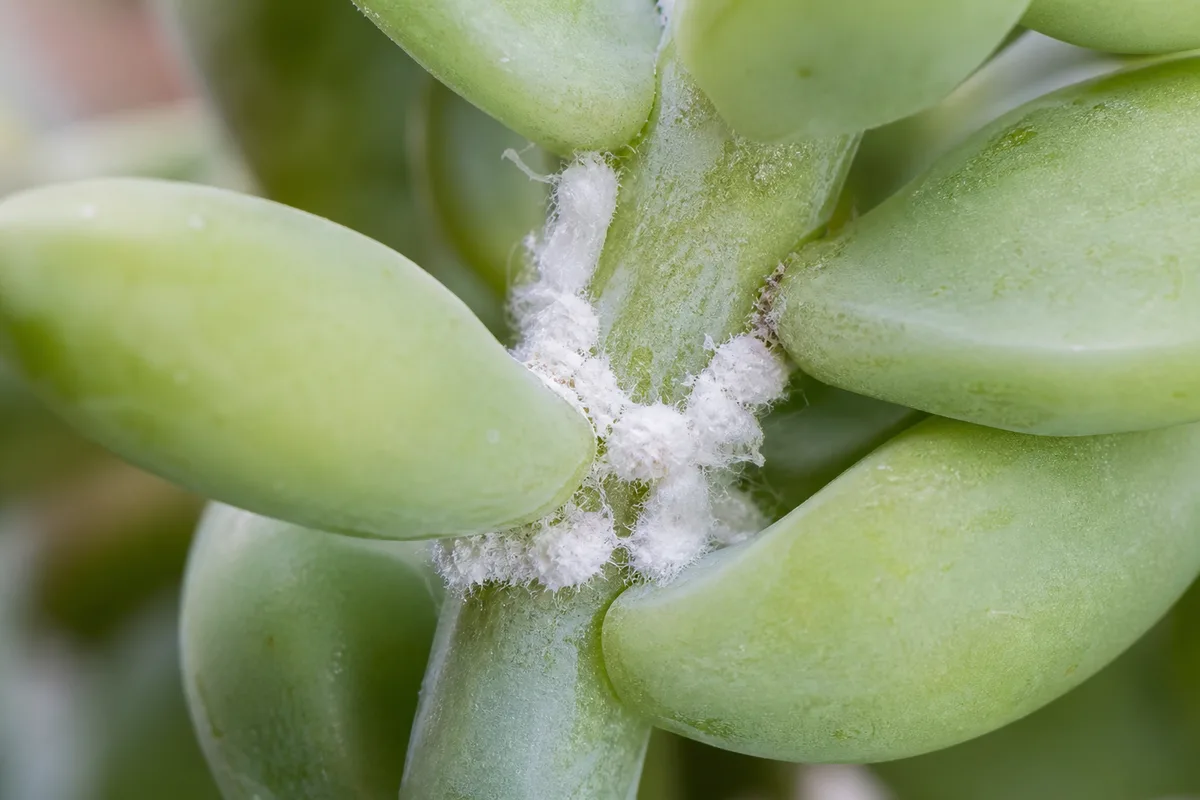
Mealybug cotton in a Burro’s Tail axil - irregular fluffy wax hiding flat slow insects, distinct from uniform farina on bead faces.
- White cottony masses tucked where beads meet stems and at stem joints-the sheltered crotches mealybugs prefer
- Flat slow insects when cotton is parted with a toothpick-mealybugs are sluggish oval pests roughly 1/8 inch long
- Sticky honeydew glazing beads or dripping onto the hanger, shelf, or pot rim below
- Ant trails on hooks, neighboring pots, or the display shelf-ants farm honeydew producers
- Yellowing or stunted beads near heavy colonies; feeding drains sap from attached tissue
- Sooty mold as a black film on honeydew-coated beads-it wipes off and is not sunburn
Farina vs. mealy cotton: what to look for
This distinction trips up many Burro’s Tail owners because both can look white on the plant. Use location and texture, not color alone:
| Feature | Healthy farina | Mealybug cotton |
|---|---|---|
| Location | Even powder across the bead face | Fluffy clumps in axils and joints where beads meet stems |
| Texture | Dry, uniform bloom you can rub smooth | Irregular, fluffy tufts that part to reveal insects |
| When touched | No change; powder redistributes | Cotton pulls away; flat pinkish insects underneath |
| Alcohol swab | No reaction | Insects turn brown; wax dissolves |
Healthy beads carry farina-a uniform powdery bloom evolved to reflect harsh sun on Mexican cliffs. Mealy cotton is fluffy, irregular, and hides live insects in the sheltered gaps between overlapping beads. If you only scan bead faces from across the room, you will miss axil colonies until the infestation is advanced.
Confirm mealybugs vs. lookalikes
| Sign | Mealybugs | Farina / dust | Aphids |
|---|---|---|---|
| Texture | Cottony clumps in axils | Even powder on bead face | Soft pear-shaped clusters on tips |
| Location | Axils, joints, soil line | Whole bead surface | Newest stem tips |
| Movement | Slow flat insects when exposed | None | Slow pear shapes |
| Alcohol test | Insects brown | No change | Insects brown |
Spider mites - Fine stippling and webbing in hot, dry window bays-not cottony masses or sticky honeydew. Mites favor bead undersides; mealybugs nest in axils.
Scale insects - Hard tan or brown bumps glued to stems. They do not move when poked and lack fluffy wax.
Normal leaf drop - Random firm green beads on the floor after a bump point to mechanical drop, not disease. No cotton, stickiness, or clustering on remaining stems.
Why Burro’s Tail gets mealybugs
Trailing sedum stems create sheltered axils mealybugs prefer. Mealybugs feed in hidden locations-leaf axils, stem crotches, and crown tissue-exactly where Burro’s Tail packs dozens of overlapping beads along each pendulous strand.
Most indoor outbreaks start with introduction, not weak culture alone. Mealybugs hitchhike on newly purchased succulents, shared cuttings, or plants summered outdoors near infested garden beds. They spread by crawling between pots on a hanging display shelf-one infested Echeveria or jade nearby can seed your Burro’s Tail within weeks.
overwatering on Burro’s Tail does not directly cause mealybugs, but stressed roots slow recovery once insects arrive. Dense hanging displays with multiple succulents on one shelf accelerate crawler spread when one pot goes untreated.
Low humidity-the normal indoor condition this plant prefers per the Burro’s Tail overview-does not prevent mealybugs the way it limits spider mites. Mealybugs are a separate pest group. Good light and sharp drainage still matter because a vigorous plant outgrows minor feeding faster than a leggy specimen in dim corners.
How to confirm the cause
Work through these checks before treating:
- Axil inspection - Follow each trailing stem bead by bead through joints where beads attach. Mealybugs hide in crotches, not on exposed bead faces.
- Alcohol swab test - Dab one cotton cluster with 70% isopropyl alcohol on a cotton swab. Live mealybugs turn brown within seconds; farina and dust do not react.
- Honeydew check - Rub a bead above a suspect cluster between your fingers. Sticky residue that glazes your skin confirms sap feeding. Dry powder alone is farina.
- Ant activity - Ants marching up a hanger or across a display shelf strongly suggest honeydew producers above-mealybugs, aphids, or scale.
- Root check - White waxy deposits on drain holes or the outside of the pot suggest root mealy; unpot only if you see this sign or surface treatment fails after three cycles.
- Neighbor scan - Inspect every succulent within three feet on the same shelf. Mealybugs affect a wide range of houseplants; isolation means the whole display, not just one basket.
If you find no insects, no stickiness, and no ant activity, yellowing beads may trace to overwatering instead-confirm soil dryness per the watering guide before assuming pests.
First fix for Burro’s Tail
Isolate the plant and dab visible mealybugs with a cotton swab dipped in 70% isopropyl alcohol-support each stem with your free hand while you work.
This single step kills insects on contact without showering the cascade or shaking beads loose. Target axils and joints where a fine swab reaches without soaking the whole plant. UC IPM recommends dabbing alcohol directly on mealybugs for houseplant spot treatment-test one bead near a colony first and wait 48 hours to check for spotting before wider treatment.
Why alcohol first instead of a hose blast? Donkey’s tail leaves detach easily with rough handling-a well-known trait of Sedum morganianum. Forceful sprays knock off healthy beads for every mealybug dislodged. Alcohol dabs on confirmed colonies are the safer opening move-the same philosophy as aphids on Burro’s Tail.
After the first pass, wait 24 hours and re-inspect axils you could not reach. If colonies remain in dense crotches, move to a dilute insecticidal soap mist labeled for houseplants. Spray must contact insects directly-these products have no residual effect. Mist lightly in early morning or evening, not in hot direct sun, and test one stem section first.
Repeat alcohol dabs or soap mist every five to seven days for two to three cycles-mealybug eggs hatch on a rolling schedule and hide in dense axils missed by a single pass.
Step-by-step recovery
Once isolation and the first alcohol pass are done, follow this sequence:
- Quarantine the display shelf - Move the Burro’s Tail away from other succulents and inspect every pot that shared the hanger or shelf. Mealybugs crawl between containers; treating one plant while neighbors stay infested guarantees reinfection.
- Alcohol dabs on all visible colonies - Work axil by axil along each trailing strand. Support the stem; never pull or shake the cascade.
- Tweezer removal - Pull large cotton masses where tweezers reach without tearing beads off. Drop removed material into a sealed bag, not the compost bin.
- Light soap mist if needed - Use for colonies beyond what alcohol reached. Cover axils thoroughly; dense bead packing may require splitting treatment across multiple sessions.
- Root inspection - If white wax appears at drain holes, unpot and inspect roots. Repot firm tissue into fresh succulent mix after rinsing wax off roots with diluted alcohol-discard old soil in the trash, not the garden.
- Monitor new tip growth - Clean firm beads at stem ends mean control is working. Distorted older beads may stay damaged until they drop naturally.
Tip-cutting salvage when infestation is severe
When colonies cover most stem joints and three weekly treatment cycles fail to shrink cotton masses, salvage healthy tissue rather than fighting a collapsed specimen:
- Identify firm upper sections - Follow each strand upward from the soil line. Stop at the highest point where stems feel firm and beads are plump, even if lower sections are coated in cotton.
- Cut with sterile scissors - Snip 3–4 inch tip sections from firm growth. Each cutting needs several healthy beads and a clean stem end. Burro’s Tail propagates easily from stem cuttings-this is your reset path.
- Treat cuttings before propagating - Dab every axil on salvaged tips with alcohol. Let cut ends callus 2–3 days on dry paper towel in bright indirect light before placing on soil per the propagation guide.
- Discard infested trailing mass - Seal heavily cotton-coated lower stems and old soil in a bag and trash them. Do not compost infested material near outdoor succulents.
- Sterilize the pot - Scrub the hanging basket with hot soapy water if you plan to reuse it. Replace mix entirely; root mealy eggs persist in old soil.
A mature Burro’s Tail rarely dies from surface mealybugs alone if you catch them early. Severe root mealy combined with rot is the scenario where tip cuttings become the practical save-not a failure, but how this species is designed to recover.
Recovery timeline
Expect cottony clusters to shrink within one week of consistent alcohol dabs. Honeydew stops accumulating within days once feeding ends. Plan two to three weekly follow-up passes minimum; skipping a week often lets newly hatched crawlers rebuild colonies in hidden axils.
Signs recovery is working:
- No live insects when you part axil cotton with a lens
- Honeydew stops; beads feel dry and powdery again
- New beads emerge clean at stem tips
- Sooty mold stops spreading and wipes off existing coating
Signs the problem is worsening:
- White wax appears at drain holes (root mealy escalation)
- Colonies spread to neighboring pots on the same shelf
- Three treatment cycles pass with no reduction in cotton mass
- Beads yellow and drop in clusters while soil stays wet-pest stress plus rot
Distorted beads from heavy feeding do not re-plump, but the stem continues producing new beads once sap pressure normalizes. Judge success by new growth at tips, not old damaged tissue.
Mistakes to avoid
- Blasting the trailing cascade with a hose - Dislodges mealybugs and dozens of healthy beads at once. Support stems and use targeted swabs instead.
- Shaking the basket to dislodge pests-you lose beads and scatter crawlers across the shelf.
- One-and-done spraying - Single soap applications miss eggs and nymphs that hatch within days. Schedule weekly repeats for at least three weeks.
- Treating in midday sun - Soap on beads in hot direct light increases burn risk. Treat in early morning or evening.
- Overwatering during recovery - Stressed roots slow rebound. Hold your normal dry-down rhythm per the watering guide.
- Ignoring root mealy at drain holes - Surface alcohol dabs do not reach soil-dwelling colonies.
- Returning the plant too soon - Keep it isolated until two weeks pass with no live mealybugs on axil inspection.
Burro’s Tail care cross-check
While treating mealybugs, keep baseline care steady-do not stack Burro’s Tail repotting guide, relocation, and heavy pruning in the same week.
- Light - Bright indirect to some direct morning sun keeps growth compact. See the light guide for placement that supports recovery without scorching treated beads.
- Water - Water only when soil is completely dry. Honeydew plus overwatering in a dim spot can rot beads at the stem base.
- Handling - Move the pot by supporting the basket, not the trailing stems. Every touch risks bead drop during an already stressful pest period.
- Display shelf hygiene - Wipe sticky residue from hangers and shelves. Ant highways between pots reinfect treated plants.
How to prevent mealybugs next time
- Quarantine new plants for at least two weeks on a separate shelf before hanging them near your Burro’s Tail. Inspect regularly during isolation and treat before mixing collections.
- Scout axils weekly during active growth-mealybugs are easiest to dab when colonies are small cotton specks, not full axil mats.
- Check outdoor summer placements before bringing pots back inside in fall; inspect trailing stems at the transition.
- Keep sharp drainage so roots stay vigorous-see soil guidance for mix that dries fast in hanging baskets.
- Isolate at the first cotton speck rather than waiting for honeydew to appear on the shelf below.
- Control ants on hangers and display shelves so they cannot farm mealybugs across your collection.
When to worry
Escalate treatment when root mealy wax appears on pot bases, colonies cover most stem joints on multiple strands, or three full weekly treatment cycles fail despite careful isolation. At that point, combine alcohol dabs, soap mist, and tip-cutting salvage rather than hoping one pass suffices.
Discard the parent plant only if stems are mushy from rot combined with pest stress, or if reinfestation returns after salvage cuttings and pot sterilization. Burro’s Tail propagates easily from firm tip sections-salvage upper growth rather than fighting a collapsed trailing mass.
Ants throughout the room, not just on one pot, mean honeydew sources may span several plants. Inspect the whole collection before focusing on the Burro’s Tail alone.
Conclusion
Mealybugs on Burro’s Tail are manageable when you respect the plant’s fragile beads and inspect axils early. Confirm cottony clusters in joints-not farina on bead faces-isolate the display shelf immediately, and start with alcohol swabs, not a shower. Repeat treatment weekly, watch for root mealy at drain holes, and salvage firm tip cuttings if surface colonies overwhelm the cascade. For the full care picture-light, soil, propagation, and seasonal rhythm-see the Burro’s Tail overview.
This guide was built from UC IPM mealybug references, NC State Extension Sedum morganianum, University of Wisconsin–Madison Extension Burro’s Tail care, Michigan State University Extension indoor mealybug guidance, and LeafyPixels Burro’s Tail overview, watering, soil, and propagation pages. Claims were validated against those sources before publication.
When to use this page vs other Burro’s Tail guides
- Burro’s Tail watering guide - Use for routine moisture checks before assuming mealybugs is the main issue.
- Burro’s Tail problems hub - Browse all 16 common issues on this species.
- Yellow Leaves on Burro’s Tail - Different entry point when symptoms overlap with mealybugs.
- Slow Growth on Burro’s Tail - Different entry point when symptoms overlap with mealybugs.
- Spider Mites on Burro’s Tail - Different entry point when symptoms overlap with mealybugs.