Hoya Kerrii Care: Light, Water, Soil & Tips
Hoya kerrii
Single Hoya kerrii leaves (gift plants) will never grow new leaves - they have no node. True multi-leaved vine specimens grow slowly but eventually bloom. Bright light, careful watering, never cut peduncles.
Hoya Kerrii Care: Light, Water, Soil & Tips
Start with wateringThe most common care mistake for Hoya KerriiWatering guide →Hoya Kerrii care essentials
Light
bright indirect light
Water
Top half dry before watering. Every 10–14 days summer; every 21–28 days winter. Very succulent leaves store water well.
Soil
Epiphytic mix: compost + perlite + orchid bark. Small pot.
Humidity
40–60%
Temperature
18–27°C (65–80°F)
Fertilizer
Use diluted balanced fertilizer and stop if the plant is stressed, newly repotted, or not actively growing. Over-fertilizing slow growers; winter feeding.
About Hoya Kerrii
Hoya Kerrii is native to Southeast Asia (Laos, Thailand, Vietnam, China), typically reaches Up to 4 m vining; single-leaf cuttings sold as novelties never vine indoors, with slow growth. Hoya Kerrii has a trailing growth habit and part of the Apocynaceae family. It is also known as Sweetheart Hoya, Valentine Hoya, Lucky Heart Plant, and Heart Leaf Hoya.
| Detail | Information |
|---|---|
| Also known as | Sweetheart Hoya, Valentine Hoya, Lucky Heart Plant, Heart Leaf Hoya |
| Native region | Southeast Asia (Laos, Thailand, Vietnam, China) |
| Mature size | Up to 4 m vining; single-leaf cuttings sold as novelties never vine |
| Growth rate | Slow |
| Growth habit | Trailing |
| Scientific name | Hoya kerrii |
| Family | Apocynaceae |
Hoya Kerrii Care: Light, Water, Soil & Tips
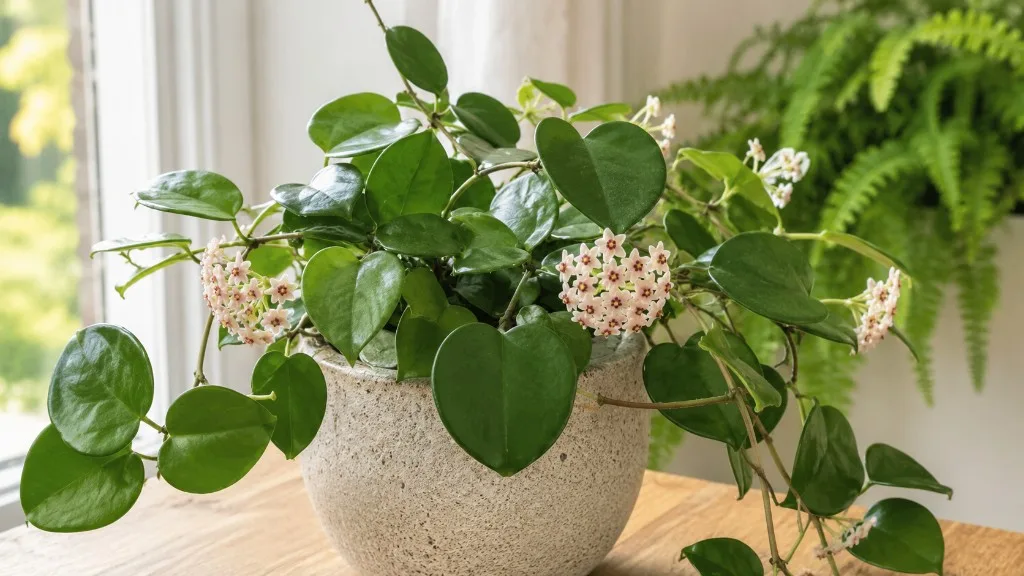
Hoya kerrii - the sweetheart plant, valentine hoya, or wax hearts - is one of the most recognizable houseplants sold today, and one of the most misunderstood. The thick, heart-shaped leaves look like succulents, the single-leaf pots sold around Valentine’s Day look permanent, and the growth rate feels glacial compared with pothos or philodendron. None of that means the plant is difficult. It means the care logic is different: bright light, a chunky epiphytic mix, and a Hoya Kerrii watering guide built around dry-down checks rather than a weekly calendar. Get those three aligned and a mature vine can reward you with fragrant clusters of star-shaped flowers. Get them wrong and you will stare at a single rooted leaf for years wondering why nothing happens.
What Is Hoya Kerrii?
Hoya kerrii is a climbing epiphytic vine in the Apocynaceae family (formerly classified under Asclepiadaceae). In cultivation it produces pairs of thick, opposite, heart-shaped leaves on wiry stems that can reach several meters when given support, warm temperatures, and years of consistent care. The leaves are waxy, succulent in texture, and store water efficiently - a trait that helps the plant survive dry spells in its native habitat but also tricks indoor growers into treating it like a desert cactus. It is not a cactus. It is a tropical vine that happens to have drought-tolerant leaves, and that distinction drives almost every care decision you will make.
Botanical Background and Native Habitat
Hoya kerrii occurs naturally across Indo-China to Malesia, including Laos, Thailand, Vietnam, and Malaysia. In the wild it climbs trees and rocks as an epiphyte, anchoring itself with adventitious roots while its thick leaves handle intermittent dry periods between tropical rains. That ecology explains why the plant hates soggy, airless potting mix and why it tolerates - even prefers - drying out between waterings. It also explains the slow growth: epiphytic vines in filtered forest light do not race upward the way fast-growing terrestrial understory plants do. Indoors, a well-cared-for Hoya kerrii typically grows at a slow pace, producing a few new leaf pairs each active season rather than inches of stem every month. Mature specimens can eventually vine up to about 2.4 to 3 meters with support, though most indoor plants stay much smaller unless given a trellis, bright light, and time measured in years rather than weeks.
The species was described by William Grant Craib and remains popular in horticulture partly because of its leaf shape and partly because it is relatively forgiving of missed waterings. A variegated form, Hoya kerrii var. albo-marginata, adds cream or white margins and needs slightly more light to maintain color without scorching. Whether green or variegated, the underlying care rules are the same: drainage, Hoya Kerrii light guide, and patience. Mature, well-established vines can produce umbels of fragrant, star-shaped flowers - typically white or pale pink with a red or pink corona - though blooming indoors is never guaranteed and often requires years of growth, bright light, and a slightly root-bound pot. Treat flowers as a bonus, not a baseline expectation, and you will not misread slow foliage growth as care failure.
Why the Heart-Shaped Leaf Gets Marketed as a Gift Plant
Retailers frequently sell Hoya kerrii as a single heart-shaped leaf rooted in a tiny pot - a novelty gift tied to Valentine’s Day and anniversaries. The leaf is real, alive, and often genuinely rooted. What it usually lacks is a stem with a node, the only tissue capable of producing new shoots. A single leaf with no node can photosynthesize and survive for years as a living bookmark, but it will not grow well unless stem tissue was included with the cutting - and without a node it will never develop into a vining plant. That is not a care failure on your part; it is basic plant anatomy. If you bought a single-leaf pot and expected a trailing vine, you were sold a permanent novelty unless the cutting included stem tissue below the leaf. Full plants with visible stems and multiple nodes behave completely differently and are the starting point for anyone who wants actual growth, propagation, or flowers.
Understanding this upfront saves months of frustration. Check your plant: is there a stem segment with nodes, or just a leaf stuck in soil? The answer tells you whether to adjust care expectations or shop for a different specimen.
Best Growing Conditions for Hoya Kerrii
Hoya kerrii performs best when four environmental variables work together: light, water, soil, and temperature. Nail those and feeding, Hoya Kerrii repotting guide, and propagation become straightforward. Break any one badly - especially light or drainage - and the plant will stall, yellow, or rot no matter how carefully you fertilize. Because growth is inherently slow, environmental mistakes take longer to show and longer to fix. That makes proactive setup more valuable than reactive troubleshooting.
Light Requirements
Hoya kerrii needs bright, indirect light - dappled sunlight in extension terms - for healthy, compact growth. An east-facing window is often ideal: gentle morning sun plus strong ambient light through the day. A south- or west-facing window works when the plant sits back from the glass or light filters through a sheer curtain, giving one to two hours of soft direct sun without harsh midday exposure. North windows can sustain the plant in many homes, but growth will be slower and leaves may stay smaller - acceptable if you understand the trade-off, problematic if you expected a vigorous vine.
The plant can tolerate some direct sun when acclimated gradually. Leaves formed in lower light burn easily if moved suddenly into harsh afternoon rays. Increase exposure over one to two weeks and watch for bleached patches, brown crispy edges, or curling at midday - all signs to pull back. Too little light produces different symptoms: long internodes, pale thin leaves, and a plant that stays frozen in place season after season. A practical test is new growth: firm, correctly colored leaves on short internodes mean light is adequate. Leggy, floppy stems mean the plant wants more.
If natural light is weak - basement apartments, north rooms in winter, office environments - a full-spectrum LED grow light placed 12 to 18 inches above the canopy for 10 to 12 hours daily can substitute effectively. Hoya kerrii under good artificial light often outperforms the same plant in a dim corner with a window nearby.
Temperature and Humidity
Hoya kerrii prefers stable indoor temperatures between 65 and 80°F (18–27°C) during active growth. It handles normal household conditions well but suffers in cold drafts, unheated windowsills in winter, and hot air blasting from heating vents. Sustained exposure below 50°F (10°C) can damage leaves and roots. If you move the plant outdoors for summer, bring it in before nights drop toward that threshold.
Humidity in the 40–60% range supports healthy foliage and reduces spider mite pressure, though the plant adapts to average home humidity without drama. Very dry air below 30% may cause slight leaf edge crisping on variegated forms and encourages mites. A pebble tray, grouping plants together, or a small humidifier all help in arid climates. Misting leaves is a poor substitute - the humidity boost lasts minutes while wet foliage can invite fungal spotting.
Soil and Drainage
Use a chunky, well-draining epiphytic mix rather than standard peat-heavy potting soil. Hoya roots need air as much as moisture; dense mix that stays wet for days is the fastest route to root rot on Hoya Kerrii. A reliable home recipe:
- 40% quality potting compost or peat-free houseplant mix
- 30% perlite or pumice
- 30% orchid bark or coconut husk chips
The exact ratios matter less than the outcome: water runs through freely, the mix dries within a reasonable interval, and the root zone never feels soggy days after watering. Terracotta pots accelerate dry-down and suit Hoya Kerrii overview well. Every pot needs a drainage hole; decorative cachepots that hold runoff will undo good soil and good intentions. Target substrate pH around 6.0–7.5 - normal indoor mixes land close enough that hobbyists rarely need adjustment.
Keep the pot appropriately small relative to the root system. Hoyas often flower more readily when slightly root-bound, and an oversized pot holds excess moisture the roots cannot use. For Hoya kerrii var. albo-marginata, the same mix and drainage rules apply, but variegated tissue burns more easily in unfiltered afternoon sun and may need slightly brighter ambient light to maintain crisp white margins without fading to green. If margins brown before the green center scorches, soften the direct exposure rather than moving the plant to a darker corner.
How to Water Hoya Kerrii
The general rule for Hoya kerrii watering is simple: let the soil dry substantially between drinks, then water thoroughly until excess runs from the drainage holes. The thick leaves store water, so the plant survives drought better than saturation. Calendar schedules mislead because pot size, mix porosity, light intensity, and season all change how fast the container dries. A plant in bright summer sun may need water every 10–14 days; the same plant in a cool dim winter room may go three to four weeks between waterings.
Check moisture before every decision. Push a finger or wooden skewer two inches into the mix - or wait until the top 3 cm of soil becomes dry in potted plants. Lift the pot - a light pot means dry; a heavy cool pot means wait. Surface color alone is unreliable because bark-heavy mixes dry from the bottom up. When dry, soak evenly until water exits the drainage holes, then empty the saucer so the roots never sit in standing water.
Watering Rhythm During Active Growth
During the warm, bright months when Hoya kerrii produces new leaves, water on a dry-down rhythm rather than a fixed weekday. The plant uses water predictably when actively growing, and the pot weight becomes easier to read with practice. Water deeply once the deeper mix is dry, not when you happen to remember on Sunday. Shallow sips every few days keep the surface damp while the core stays wet - a pattern that causes more rot than occasional thorough drought.
Leaf texture is a useful secondary signal. Firm, plump hearts indicate adequate hydration. Slightly soft or wrinkled surfaces on thick-leaved forms suggest the plant has dipped into stored leaf water and wants a drink. Yellow, mushy leaves with wet soil point the opposite direction: too much water, not too little.
Seasonal Adjustments and Common Mistakes
Growth slows in cooler, dimmer months. The watering interval that worked in July will overwater the plant in January. Stretch the dry period, verify with moisture checks, and pause fertilizer until new growth resumes in spring. Resume the summer rhythm only when you see fresh leaves or stem extension.
The most common watering mistakes are watering on autopilot, using pots without drainage, leaving runoff in cachepots, and misreading wrinkled leaves as thirst when the roots are actually rotting from chronic overwatering on Hoya Kerrii. When symptoms conflict - limp leaves plus wet soil - inspect roots before adding more water. When limp leaves meet a light, dry pot, a thorough soak followed by proper drainage is the fix.
How to Feed Hoya Kerrii
Hoya kerrii is not a heavy feeder. A modest application of balanced water-soluble fertilizer at one-quarter to one-half strength of the label rate, given every four to six weeks during active growth, is sufficient for most indoor plants. Apply to already-moist soil so the solution distributes without burning roots. If your potting mix includes a starter fertilizer charge, wait the first month before supplementing.
Organic options like diluted fish emulsion or worm-casting tea work at similarly reduced concentrations. The goal is steady micronutrient availability, not forced growth - this species will not transform into a fast vine because you feed heavily. Over-fertilizing accumulates salts, burns fine roots, and shows up as brown leaf tips or crusty soil surfaces. Flush the pot with plain water every few months if you feed regularly.
Pause feeding during dormancy, immediately after repotting, while the plant recovers from pest damage, and through the darkest winter weeks. Resume when new growth is clearly visible and the pot dries on a normal active-season rhythm.
Repotting and Root Health
Repot Hoya kerrii roughly every one to two years, or when roots circle drainage holes, water runs straight through without absorbing, or the plant becomes unstable in its container. These epiphytic roots prefer snug quarters, so avoid jumping to an oversized pot. One size up - typically one to two inches wider in diameter - gives room for fresh mix without creating a waterlogged void around a small root ball.
When to Repot and Best Timing
The best window is early spring as the plant enters active growth, giving it a full warm season to colonize fresh mix. Signs that repotting is due include roots at the soil surface, roots protruding from drainage holes, mix that has broken down into fine compacted particles, or a sour smell from anaerobic breakdown. If the plant is healthy and flowering reliably in a tight pot, delaying repotting is reasonable - hoyas often bloom more when slightly root-bound.
Use fresh chunky epiphytic mix, gently loosen only the outermost circling roots, and water lightly for the first week while cut root surfaces callus. Heavy watering immediately after repotting on damaged roots invites rot. Hold fertilizer for four to six weeks post-repot.
Propagation Methods for Hoya Kerrii
Home propagation of Hoya kerrii succeeds through stem cuttings that include at least one node. Division works on mature multi-stem specimens but is less common because most indoor plants are single vines or small clumps. Seeds exist but are impractical for hobbyists. The method you choose matters less than whether the cutting includes the tissue needed to generate new shoots.
Single-Leaf Cuttings Versus Stem Cuttings
This distinction is the most important propagation fact for Hoya kerrii:
- Single leaf, no node: may root and live for years, but cannot produce stems, new leaves, or flowers. It remains one heart forever.
- Stem cutting with node: can develop roots, then activate the node to push new growth, eventually forming a vine.
To propagate a vining plant, take a 4-to-6-inch stem segment with at least one node and one or two healthy leaves. Cut with clean sharp scissors or a knife. Let the cut end callous for several hours to a day to reduce rot risk. Root in water (change weekly, keep the node submerged but leaves above water), moist sphagnum moss, or perlite in a warm bright spot. Roots typically appear in three to six weeks; transplant to chunky mix when roots reach 1 to 2 inches. Keep humidity moderate and light bright but indirect during establishment.
A plastic bag mini-greenhouse over a soil-planted cutting boosts humidity for slow rooters, but vent periodically to prevent mold. Patience is mandatory - Hoya kerrii propagates slowly even under ideal conditions, mirroring the parent plant’s temperament.
Common Hoya Kerrii Problems
Most Hoya kerrii problems trace to environment, not mystery disease. Because the plant reacts slowly, symptoms often reflect conditions from weeks earlier. Document when you last repotted, moved windows, or changed watering - that timeline usually reveals the cause faster than guessing.
Yellow Leaves, Wrinkling, and Pests
Yellow leaves most often indicate overwatering, especially in dense soil or oversized pots with low light. Check root-zone moisture first. If soil is wet and roots are brown or mushy, trim damaged tissue, repot into fresh airy mix, and reduce watering frequency. Yellow lower leaves on an otherwise healthy plant may simply be natural senescence - older leaves drop as the vine extends. Sudden widespread yellowing after a cold draft or repot suggests shock; stabilize conditions and wait.
Wrinkled or soft leaves on thick-leaved Hoya kerrii usually mean underwatering on Hoya Kerrii or root damage that prevents uptake. Confirm the pot is genuinely dry and roots are white and firm before soaking. If soil is wet and leaves still wrinkle, suspect root rot rather than drought.
Pests include mealybugs in leaf axils, spider mites in dry air, scale along stems, and fungus gnats when surface mix stays constantly damp. Inspect weekly, especially stem joints and leaf undersides. Manual removal, a shower rinse, and insecticidal soap handle early infestations. Severe mealybug colonies may require repeated treatments over several weeks because eggs hide in crevices.
Very slow or zero growth on a stemmed plant usually means insufficient light, a pot too large for the root system, chronic overwatering, or simply insufficient time - this species does not respond to rushing. Upgrade light first, verify soil dry-down, then reassess over a full growing season before concluding the plant is failing.
Is Hoya Kerrii Safe for Pets?
The ASPCA lists Hoya kerrii (sweetheart hoya) as non-toxic to cats and dogs. That is genuinely good news for pet-friendly households, and it applies to the species whether sold as a single leaf or a full vine. Non-toxic does not mean edible. Large quantities of fibrous leaf material can still cause mild gastrointestinal upset - vomiting or loose stool - simply from bulk and fiber, not from poison. Curious chewers may also gag on thick waxy leaves.
Place the plant out of reach if your pets treat every pot as a salad bar, and avoid leaving fallen leaves on the floor. If a pet ingests a substantial amount and shows persistent vomiting, lethargy, or distress, contact your veterinarian or the ASPCA Animal Poison Control Center at 888-426-4435 for guidance. Fertilizer residue on leaves is a more practical toxicity concern than the plant tissue itself, so wipe leaves if you foliar feed and keep pets away until products dry.
Conclusion
The most useful thing to understand about Hoya kerrii is that it is a slow-growing epiphytic vine from Southeast Asia with heart-shaped, water-storing leaves - not a fast succulent and not a permanent single-leaf ornament unless it was sold without a node. Give it bright indirect light, a chunky well-draining mix, and water only when the pot has dried down, and a stemmed plant will gradually extend, fill out, and potentially bloom. Give it dim corners, soggy soil, or unrealistic growth expectations, and you will conclude the species is impossible when the environment was the variable all along. Check whether your plant has a stem and nodes, match care to that reality, and measure success in seasons rather than weeks. That mindset fits the plant better than any rigid calendar ever will.
When to use this page vs other Hoya Kerrii guides
- Hoya Kerrii overview - Canonical hub for this species - care topics and problems branch from here.
- Hoya Kerrii problems - Symptom-first path when you already know something is wrong.
Related Hoya Kerrii guides
How to care for Hoya Kerrii?
How much light does Hoya Kerrii need?
bright indirect light
- bright indirect light - bright indirect light.
When should you water Hoya Kerrii?
Top half dry before watering. Every 10–14 days summer; every 21–28 days winter. Very succulent leaves store water well.
- Allow soil to dry almost completely before watering - Top half dry before watering.
- thick heart leaves store significant water - Very succulent leaves store water well.
- Drain excess water - Top half dry before watering.
What soil works best for Hoya Kerrii?
Epiphytic mix: compost + perlite + orchid bark. Small pot.
- potting mix - Epiphytic mix: compost + perlite + orchid bark.
- perlite - Epiphytic mix: compost + perlite + orchid bark.
- coarse sand - Adds weight and drainage; use coarse horticultural sand rather than fine beach sand.
Grower notes for Hoya Kerrii
What matters most with Hoya Kerrii
Hoya Kerrii stores more water than it looks like it does. Treat soft leaves, wrinkling, and stalled growth as signals to check both moisture and light before watering again. In practice, the care checkpoint is simple: bright indirect light. Pair that with epiphytic mix: compost + perlite + orchid bark. Small pot, and avoid changing water, pot size, and placement all at once.
Best placement in a real home
Hoya Kerrii belongs where bright indirect light is realistic for most of the day, not only where the pot looks good. Top half dry before watering. Every 10–14 days summer; every 21–28 days winter. Very succulent leaves store water well. If the pot stays wet longer than expected, move the plant into better light or reassess the mix before watering again. Humidity target: 40–60%. Temperature comfort zone: 18–27°C (65–80°F).
Before you buy this plant
Choose Hoya Kerrii with firm new growth, clean leaf undersides, and soil that does not smell sour or feel compacted. Be cautious if you see no growth, sticky residue, collapsed crowns, or a pot that is wet in poor light. Cosmetic old-leaf damage is less worrying than weak roots or active pests.
First month after bringing it home
Do not repot Hoya Kerrii on day one unless the mix is failing or pests are obvious. Quarantine it, learn how fast the pot dries, and keep care boring while it adjusts. Watch especially for no growth, yellow-leaves, and mealybugs. If problems appear, correct the condition first rather than stacking fertilizer, repotting, and pruning together.
Pet-aware note for Hoya Kerrii
Hoya Kerrii is a better choice for pet-aware homes than toxic ornamentals, but pet safe does not mean the plant should be chewed. Use hanging, shelf, or room placement if pets dig in soil or shred leaves, and choose sturdier plants for high-traffic pet zones.
How to tell Hoya Kerrii is settling in
Also sold as Sweetheart Hoya, Valentine Hoya, and Lucky Heart Plant, this plant should be judged by stable new growth rather than label names alone. If you plan to multiply it later, common methods include Node stem cuttings. Repot only when you see roots escaping pot. If yellow-leaves shows up early, inspect light, watering, and roots before assuming the plant is permanently weak.
Is it pet safe?
Hoya kerrii is non-toxic to cats and dogs.
Non-toxic to cats and dogs.
Watering Hoya Kerrii
For Hoya Kerrii, allow soil to dry almost completely before watering; thick heart leaves store significant water and water every 2–4 weeks; very infrequent. Water only monthly or less in winter.
| Detail | Information |
|---|---|
| How often | Every 2–4 weeks; very infrequent |
| How to check | Allow soil to dry almost completely before watering; thick heart leaves store significant water |
| Seasonal changes | Water only monthly or less in winter |
Signs of overwatering
- yellowing heart leaf
- mushy petiole
- root rot
Signs of underwatering
- slightly wrinkled leaf surface (rare in thick-leaved forms)
Soil & potting for Hoya Kerrii
Use a mix of potting mix, perlite, coarse sand for Hoya Kerrii. Excellent; never let sit in water. Target soil pH around 6.0–7.5. Repot every 2–3 years; very slow grower, ideally in spring.
| Detail | Information |
|---|---|
| Recommended mix | potting mix, perlite, coarse sand |
| Drainage | Excellent; never let sit in water |
| Soil pH | 6.0–7.5 |
| Repotting frequency | Every 2–3 years; very slow grower |
| Best season to repot | Spring |
Signs it needs repotting
- roots escaping pot
Humidity & temperature for Hoya Kerrii
Hoya Kerrii prefers 40–60%, though normal home humidity is usually fine. Keep temperatures around 18–27°C (65–80°F).
| Detail | Information |
|---|---|
| Humidity | 40–60% - normal home humidity is fine. |
| Ideal temperature | 18–27°C (65–80°F) |
Fertilizer & pruning for Hoya Kerrii
Use use diluted balanced fertilizer and stop if the plant is stressed, newly repotted, or not actively growing. Over-fertilizing slow growers; winter feeding. for Hoya Kerrii.
| Detail | Information |
|---|---|
| Fertilizer type | Use diluted balanced fertilizer and stop if the plant is stressed, newly repotted, or not actively growing. Over-fertilizing slow growers; winter feeding. |
Common problems on Hoya Kerrii
Yellow Leaves
MediumLikely cause: Overwatering causes yellowing in the succulent-textured kerrii leaves
Quick fix: Allow top half to dry fully; check drainage
Full fix guide →Mealybugs
MediumLikely cause: Mealybugs in leaf axils are common across hoya species
Quick fix: 70% alcohol on cotton swab; neem oil spray
Full fix guide →Brown Tips
MediumLikely cause: Common on this plant type; confirm with recent watering, light, and root checks.
Quick fix: Inspect the plant and correct the most likely care stressor before stacking treatments.
Full fix guide →Root Rot
MediumLikely cause: Common on this plant type; confirm with recent watering, light, and root checks.
Quick fix: Inspect the plant and correct the most likely care stressor before stacking treatments.
Full fix guide →Overwatering
MediumLikely cause: Common on this plant type; confirm with recent watering, light, and root checks.
Quick fix: Inspect the plant and correct the most likely care stressor before stacking treatments.
Full fix guide →Underwatering
MediumLikely cause: Common on this plant type; confirm with recent watering, light, and root checks.
Quick fix: Inspect the plant and correct the most likely care stressor before stacking treatments.
Full fix guide →Spider Mites
MediumLikely cause: Common on this plant type; confirm with recent watering, light, and root checks.
Quick fix: Inspect the plant and correct the most likely care stressor before stacking treatments.
Full fix guide →Aphids
MediumLikely cause: Common on this plant type; confirm with recent watering, light, and root checks.
Quick fix: Inspect the plant and correct the most likely care stressor before stacking treatments.
Full fix guide →Leggy Growth
MediumLikely cause: Common on this plant type; confirm with recent watering, light, and root checks.
Quick fix: Inspect the plant and correct the most likely care stressor before stacking treatments.
Full fix guide →Slow Growth
MediumLikely cause: Common on this plant type; confirm with recent watering, light, and root checks.
Quick fix: Inspect the plant and correct the most likely care stressor before stacking treatments.
Full fix guide →Wilting
MediumLikely cause: Common on this plant type; confirm with recent watering, light, and root checks.
Quick fix: Inspect the plant and correct the most likely care stressor before stacking treatments.
Full fix guide →Drooping Leaves
MediumLikely cause: Common on this plant type; confirm with recent watering, light, and root checks.
Quick fix: Inspect the plant and correct the most likely care stressor before stacking treatments.
Full fix guide →Low Humidity
MediumLikely cause: Common on this plant type; confirm with recent watering, light, and root checks.
Quick fix: Inspect the plant and correct the most likely care stressor before stacking treatments.
Full fix guide →Not Enough Light
MediumLikely cause: Common on this plant type; confirm with recent watering, light, and root checks.
Quick fix: Inspect the plant and correct the most likely care stressor before stacking treatments.
Full fix guide →Fungus Gnats
MediumLikely cause: Common on this plant type; confirm with recent watering, light, and root checks.
Quick fix: Inspect the plant and correct the most likely care stressor before stacking treatments.
Full fix guide →Mold on Soil
MediumLikely cause: Common on this plant type; confirm with recent watering, light, and root checks.
Quick fix: Inspect the plant and correct the most likely care stressor before stacking treatments.
Full fix guide →