Hoya Kerrii Repotting: When, How & Mistakes
Hoya Kerrii Repotting: When, How & Mistakes
Hoya Kerrii Repotting: When, How & Mistakes
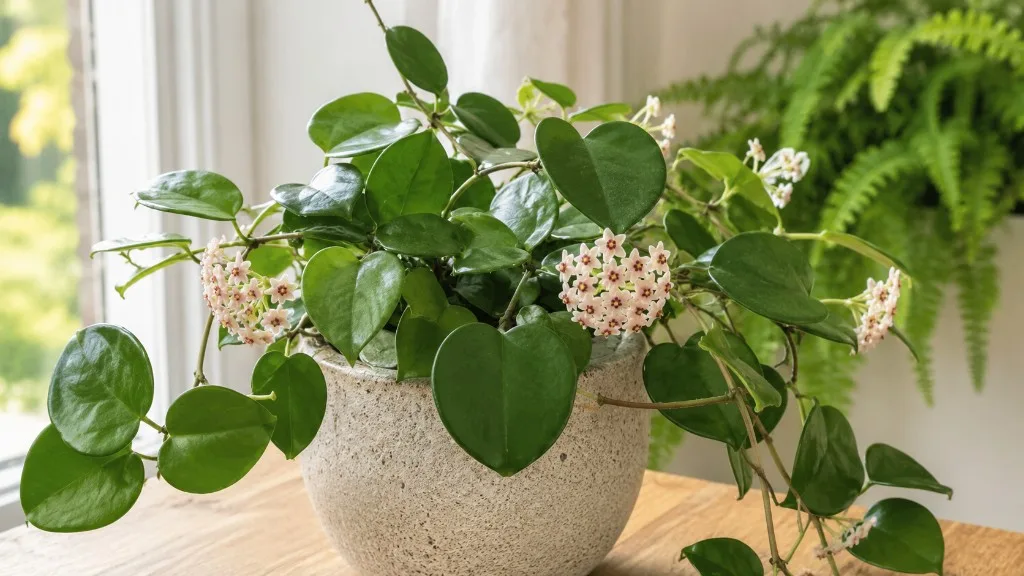
Hoya kerrii - the sweetheart hoya, valentine hoya, lucky heart plant - is famous for two opposite frustrations. Collectors with a trailing vine wait months between visible changes and wonder whether anything is wrong. Gift recipients with a single heart-shaped leaf in a tiny pot wait years and wonder why nothing ever vines. Both groups share one repotting trap: treating a slow epiphyte like a fast-growing foliage plant that wants fresh soil every spring. Hoya kerrii repotting is not a yearly chore. It is an occasional, gentle reset you perform when the root ball or the mix - not the calendar - demands it. This guide explains why minimal disturbance matters, how slow growth stretches the timeline, when to repot versus top-dress, the one-size-up pot rule, and the mistakes that turn a forgiving plant into a months-long recovery project.
Why Minimal Disturbance Matters for Hoya Kerrii
Hoya kerrii belongs to Apocynaceae, the dogbane family, and grows naturally as an epiphyte in Southeast Asia - Laos, Thailand, Vietnam, and Malaysia - where it anchors to tree bark with relatively thin roots and draws moisture from brief rain events and humid air. (Missouri Botanical Garden) Those roots evolved to grip and breathe, not to sit in a deep block of constantly wet compost.
Iowa State Extension notes that many hoyas grow on tree branches where roots anchor and absorb nutrients from rainwater and decomposing organic matter - a habit that explains why they prefer airy, fast-draining mix and tolerate slightly snug pots better than frequent uprooting.
When you repot aggressively - bare-rooting, shaking off every crumb of old mix, jumping two pot sizes, fertilizing the same week - you strip fine root hairs that handle water uptake and force the plant to rebuild its anchoring system from scratch. On a fast-growing pothos, that rebuild might take two weeks. On Hoya kerrii, one of the slow-growing hoyas indoors, rebuild can mean months of visible pause even when you did everything else right.
Minimal disturbance is not laziness. It is matching the plant’s biology. Keep most of the existing root ball intact, refresh only what breaks down, size up one container at a time, and let the plant tell you when it is ready - not your spring cleaning impulse.
How Slow Growth Shapes Repotting Frequency
If you repot most houseplants every one to two years, Hoya kerrii will feel like it lives in the same pot forever. That is often correct. NParks Singapore notes that kerrii grows and flowers best if kept rootbound and should be repotted only when mix condition demands it.
Slow growth changes the math in three ways. First, roots do not fill a pot on a predictable annual schedule - a kerrii vine might add one or two nodes in a good year indoors, so the root mass expands gradually. Second, thick, succulent heart-shaped leaves store water, which reduces how fast the plant demands new root volume compared to thin-leaved tropicals. Third, kerrii often arrives in commerce as a single-leaf cutting rooted in a small cup; that specimen may never produce a vine at all if the cutting lacked a node, which means it may never need a larger pot - only occasional mix refresh.
A practical default for a multi-leaved vine in stable indoor care: plan a full repot every three to five years, with top-dressing or mix refresh in between if drainage slows or salt crust appears. A single-leaf gift plant may never outgrow its original container; treat repotting there as soil hygiene, not growth promotion. If your kerrii added no visible vine length for twelve months but roots are not circling and water still drains well, the answer is usually better light and patience - not another pot.
When Hoya Kerrii Actually Needs Repotting
Repot when the container or mix is limiting root function, not when you feel guilty that the plant looks unchanged. Hoya kerrii tolerates snug roots; it does not tolerate sour, compacted, or permanently wet mix. The decision starts with lifting the pot and inspecting what happens at the drainage hole and just below the surface.
Root-Bound Signals Worth Acting On
Several signs together mean a full repot is reasonable during the next active growth window. Roots emerging from drainage holes or circling tightly against the pot wall indicate the root ball has used the available volume. Water running straight through without absorbing - the classic “hydrophobic dry block” pattern - often means peat has broken down or roots packed the center so tightly that fresh water channels around the mass instead of rewetting it. Mix drying in hours after a thorough watering, when it used to hold moisture for a week, suggests roots have displaced soil and you are watering mostly root, not substrate. Stalled growth despite adequate light and sensible watering can follow long-term root crowding or exhausted mix, though always rule out low light first - kerrii will not grow in dim corners no matter how fresh the soil.
Softer signals alone - a slight lean, a faded pot, aesthetic mismatch - are not urgent reasons to repot. Salt crust on the soil surface or persistent fungus gnats in compacted mix may justify refresh, but top-dressing or slip-potting into the same size with new mix around the edges can solve that with less trauma than a full teardown.
If only one mild signal appears and the plant otherwise looks firm and green, mark your calendar to recheck in six months. Slow growers reward patience more than preemptive intervention.
When to Skip Repotting and Top-Dress Instead
Not every soil problem requires unpotting. Top-dressing - scraping away the top inch or two of degraded mix and replacing it with fresh chunky blend - handles surface compaction, minor salt buildup, and slow organic breakdown without disturbing the deeper root ball. It is the right move when drainage is slightly slower but roots are not circling the pot bottom, or when you repotted recently and the lower mix is still airy.
Another skip scenario: the plant is mid-bloom or forming peduncles. Hoyas rebloom from short spurs called peduncles; disturbing the root zone during bud formation can abort flowers. If peduncles are swelling, delay repotting until the bloom cycle finishes unless you face root rot on Hoya Kerrii emergency.
Also skip repotting a stressed plant whose problem is clearly environmental - recent cold draft, sun scorch, severe underwatering on Hoya Kerrii - until stable foliage returns. Repotting adds a second stress layer and makes diagnosis harder.
When top-dressing, use the same epiphytic-style mix you would for a full repot (compost, perlite, orchid bark), water lightly to settle, and observe drainage for two weeks. If the pot still dries abnormally fast or water channels out instantly, escalate to a full repot in spring.
Best Season to Repot Hoya Kerrii
Timing matters as much as technique for slow metabolisms. Spring through early summer is the safest window for Hoya kerrii repotting, when lengthening days and warmer room temperatures push the plant toward active growth and faster root repair. The Royal Horticultural Society recommends spring as the best time to repot hoyas.
Why Spring Beats Winter for Transplant Recovery
During active growth, kerrii has the hormonal and energy resources to seal minor root abrasions, send new anchor roots into fresh mix, and resume foliar growth within weeks to months. In winter slowdown - cooler rooms, weaker light, minimal new leaves - the same transplant may sit visually frozen until spring even if roots are quietly adjusting below soil. That quiet period panics owners who assume they killed the plant.
Winter repotting is justified only when delaying risks greater harm: advanced root rot, a pot so root-bound that water never penetrates, or a nursery container with no drainage holes. In those cases, repot gently, trim only clearly dead roots, provide Hoya Kerrii light guide, and accept a longer recovery. Do not pair winter emergency repot with fertilizer or heavy watering “to help it along.”
Choosing a Pot One Size Larger
The single most important pot decision: go up one size only. The Royal Horticultural Society advises choosing a pot only a few centimetres larger than the rootball to avoid overpotting.
Oversizing creates a ring of unused mix that stays wet long after the root ball dries. Kerrii’s modest root system cannot drink that outer zone quickly, especially in low light. The result is chronic damp periphery - exactly the condition epiphytic roots hate - and yellowing succulent leaves that feel soft despite wet soil.
Drainage holes are non-negotiable. Decorative cachepots are fine only if the grow pot drains freely and you never let runoff sit. Terracotta dries faster and suits heavy-handed waterers; glazed ceramic and plastic retain moisture longer - adjust watering after repot accordingly. Depth matters less than width for hoyas; shallow wide pots often outperform deep narrow ones because excess mix at the bottom stays wet.
If the root ball is small relative to the current pot but mix is exhausted, you may repot into the same size with fresh blend rather than upsizing - a valid “same pot refresh” that still counts as repotting but avoids extra wet volume.
Soil Mix for Repotting Epiphytic Hoya Roots
Repotting is the best time to fix the hidden factor behind most kerrii failures: dense, peat-heavy mix that compacts and suffocates epiphytic roots. Clemson Extension recommends a well-draining mix of potting soil, orchid bark, and perlite when repotting hoyas. Iowa State Extension suggests a chunky blend of potting soil, orchid bark, and perlite or pumice so water drains quickly and roots get oxygen.
A reliable home recipe: equal parts quality potting compost, perlite, and orchid bark, adjusted until water runs through in seconds when you pour onto dry mix. You should see distinct particles, not a uniform mud. Target pH roughly 6.0–7.5; precise adjustment is rarely needed indoors if you use fresh, lime-balanced compost.
Avoid garden soil, heavy moisture-control mixes marketed for tropicals, and straight peat without amendment - all hold water too long for kerrii. Avoid a layer of gravel at the pot bottom; it does not improve drainage and reduces usable root zone. If you are refreshing a vine that bloomed well in its old blend, reuse part of that structure in the new mix so microbial and root familiarity eases transition - another small nod to minimal disturbance.
Prep Checklist Before You Unpot
Good repotting starts days before you touch the pot. Water two to three days ahead so the root ball holds together but is not soggy - Iowa State Extension recommends watering before repotting so roots stay pliable. Gather a clean new pot one size up with drainage, pre-moisten enough mix to fill it, sterilized scissors for dead roots only, and a chopstick to settle soil without packing. Kerrii vines are stiff; heart leaves bruise if you let the pot crash onto a table edge. If the plant hangs, unhook it before starting so you are not fighting gravity mid-transplant.
Mentally commit to the minimum viable intervention: you are upgrading housing and refreshing degraded mix, not performing root surgery for sport. If you find healthy white roots with firm tips, you should leave almost all of them alone.
Minimal-Disturbance Repotting Step by Step
Step 1 - Slide out gently. Tip the pot and support the base of stems with your hand. If the plant resists, squeeze flexible nursery pots or run a knife around the inside edge of rigid pots. Never yank by the vine.
Step 2 - Inspect, do not demolish. Look at the bottom and outer edge for circling roots. Tease only the bottom quarter and outer circle where roots spiral - loosen them so they point outward into new mix, but keep the central root mass and old soil intact. Iowa State Extension recommends conservative repotting and upsizing only when the mix no longer drains well.
Step 3 - Trim sparingly. Cut only black, mushy, or hollow roots with clean shears. White or tan firm roots stay even if long. If you must trim substantially due to rot, let the plant dry on newspaper for an hour so cuts callus slightly before replanting.
Step 4 - Settle in the new pot. Add a shallow layer of fresh mix, center the root ball, and fill around the sides with loose blend. Use a chopstick to poke mix into gaps without compressing the center into a brick. The previous soil line on the stem should match the new line - do not bury nodes deeper chasing stability.
Step 5 - Water lightly once. One moderate watering to settle particles, then stop. Place in bright indirect light - the same intensity the plant handled before, not brighter “to compensate.” Skip fertilizer entirely for the first month minimum.
Watering In and the First Two Weeks
The first watering after repot is settling water, not a deep soak cycle. You want mix to contact roots without saturating an oversized void. For the next two to three weeks, water lighter and less often than your pre-repot rhythm until new fine roots grow into fresh mix. Lift the pot; if the core still feels heavy from the old ball while outer mix is dry, that is normal - do not flood repeatedly trying to wet the periphery faster.
Expect no new visible growth for weeks. That is not failure on kerrii. Watch for firm existing leaves and no spreading yellow - those are the early win signals.
Single-Leaf Sweetheart Plants Need Different Expectations
The valentine market sells single heart-shaped leaves rooted in tiny pots. They are charming; they are also biologically limited. A leaf cutting without an axillary node cannot produce a vine - it may root and persist for years as one leaf, but it will not develop into a vining plant no matter how often you repot or fertilize.
For these specimens, repot only when mix smells sour, gnats persist, or the cup has no drainage. Use the same airy blend in a pot only slightly larger - or the same size with refreshed mix. Do not interpret lack of growth post-repot as transplant shock; it is the normal permanent state of a node-less leaf.
If you want a vining kerrii, start with a multi-node cutting or established vine from a reputable seller, then apply the full repotting guidance in this article. The two products share a name and leaf shape but not the same repotting outcome expectations.
Inspecting Roots Without Bare-Rooting
Root inspection is smart; bare-rooting - washing every particle of soil from the root system - is usually a mistake on kerrii. Fine root hairs responsible for water uptake break off in rinsing and scrubbing. The plant then behaves like a fresh propagation cutting for months.
Instead, inspect the bottom and sides while keeping the core soil cap. Slide the root ball out, look underneath for healthy white tips versus brown mush, sniff for sour anaerobic smell, and probe the outer edge with a finger. If the center is sound, you do not need to see every centimeter.
When rot is suspected in the center only, you may wash minimally in room-temperature water to expose damaged tissue, trim decisively, and repot into fresh mix - but treat that as emergency medicine, not standard repotting. Document how much you removed; large trim jobs need longer dry-down cycles afterward.
Healthy kerrii roots are firm, white to tan, and often sparse compared to terrestrial houseplants - epiphytic anchoring roots look modest even on mature vines. Do not repot just because the root mass “looks small” for the pot.
Aftercare: Water, Light, and Fertilizer Holds
Post-repot care is mostly restraint. Hold fertilizer for at least four weeks, longer if growth is visibly paused or you trimmed rot. Fresh roots burn easily on full-strength feed. Resume at half strength only when you see new firm leaves or active vine tip growth.
Watering returns to your normal top-half-dry epiphytic rhythm gradually - typically every two to four weeks for kerrii indoors, faster in bright summer rooms, slower in winter. After upsizing one pot size, the mix may stay wet longer; extend intervals rather than keeping a pre-repot calendar.
Light should stay stable bright indirect; sudden moves to harsh direct sun add stress. Temperature ideally 18–27°C (65–80°F) with no cold drafts on wet fresh mix.
Humidity helps but does not replace drainage discipline; misting leaves is optional and brief. Peduncles - if present - should be left intact; never cut spurs thinking you are helping the plant focus on roots.
If leaves yellow one at a time from the oldest inner leaf while the rest stay firm, that may be natural senescence accelerated slightly by stress. Multiple soft yellow leaves on a heavy wet pot means pause watering and verify drainage.
Transplant Shock vs Normal Pause in Growth
Owners often cannot tell transplant shock from normal kerrii slowness because both look like “nothing is happening.” Shock usually brings sudden leaf softness, widespread yellowing, or vine wilt within days of repotting, especially if roots were bare-rooted, the pot was oversized, or winter timing stacked stress. Normal post-repot pause shows firm green leaves, no spreading rot smell, and simply no new nodes for four to twelve weeks - sometimes longer indoors.
Recovery timeline benchmarks for a gentle spring repot of a healthy vine: one to two weeks for the plant to look settled, four to eight weeks for new root extension into fresh mix (invisible), two to six months before you might see a new leaf or vine increment under good light. NC State Extension classifies kerrii as a slow grower - after repot, extend your expectations rather than repotting again chasing progress.
If shock symptoms worsen past three weeks - spreading mush, foul odor, collapsing stems - unpot, inspect for rot, trim dead tissue, and repot into fresh airy mix in the same or smaller pot. If the plant stays green but idle, patience and light beat repeated repotting.
Biggest Repotting Mistakes with Hoya Kerrii
Mistake: repotting on a fixed calendar every year. Kerrii does not outgrow pots annually indoors. Unnecessary repots reset root progress and delay blooming. Repot on signals, not dates.
Mistake: expecting instant growth after repot. Fresh mix does not override genetics and light limits. A healthy kerrii may pause visibly for months while roots establish - that is normal, not a call for fertilizer bombs.
Mistake: repotting single-leaf gifts to “make them vine.” Without a node, no pot size fixes the biology. Buy or propagate a multi-node vine instead.
Mistake: fertilizing or heavy watering immediately “to help establishment.” Both increase rot risk in fresh mix around disturbed roots. Light watering and a fertilizer hold protect recovery.
Mistake: repotting during bloom or bud formation. You risk dropping flowers and peduncle progress that took seasons to develop.
Oversized Pots and Aggressive Root Teasing
The two mechanical errors that cause the most preventable damage are oversized pots and aggressive root teasing. An oversized container surrounds a small kerrii root ball with perpetually damp mix; roots stay in the old core while the outer zone grows algae and fungus gnats - then rot spreads inward. Fix by slip-potting back into an appropriate size with chunky mix, not by watering less alone while the wet zone remains.
Aggressive teasing - combing out every root like detangling hair - destroys fine absorptive hairs and opens wounds across the system. Kerrii compensates slowly. Fix on future repots by loosening only circling bottom roots and accepting that slightly pot-bound outer roots are healthier than a bare, washed skeleton.
If you already oversize-potted, you can carefully repot again into a tighter container with minimal extra disturbance during the next spring window - better one short second adjustment than years in a swamp.
Conclusion
Hoya kerrii repotting succeeds when you treat the plant like the slow epiphyte it is - not like a fast filler that wants fresh soil every season. Repot every three to five years for typical indoor vines, or sooner only when roots escape drainage holes, mix collapses, or water behavior breaks down. Use spring through early summer, a pot one size larger with real drainage, and a chunky compost-perlite-bark blend that dries quickly. Keep the root ball intact, tease only circling edges, trim only mush, and hold fertilizer and heavy watering while the plant settles. Single-leaf sweetheart gifts follow different rules: refresh soil if needed, but do not expect a vine where biology never included a node. When leaves stay firm and green but nothing new appears for months, patience and light usually outperform another pot. Minimal disturbance is not optional on kerrii - it is the difference between a quiet root refresh and a year-long setback you could have avoided.
When to use this page vs other Hoya Kerrii guides
- Hoya Kerrii overview - Start here for whole-plant context before deep-diving this topic.
- Hoya Kerrii problems hub - Jump to symptom-specific fix guides when this care topic does not resolve the issue.
- Root Rot on Hoya Kerrii - Escalate here when repotting adjustments are not enough.