Best Soil for Hoya Kerrii: Chunky Epiphytic Mix
Best Soil for Hoya Kerrii: Chunky Epiphytic Mix
Best Soil for Hoya Kerrii: Chunky Epiphytic Mix
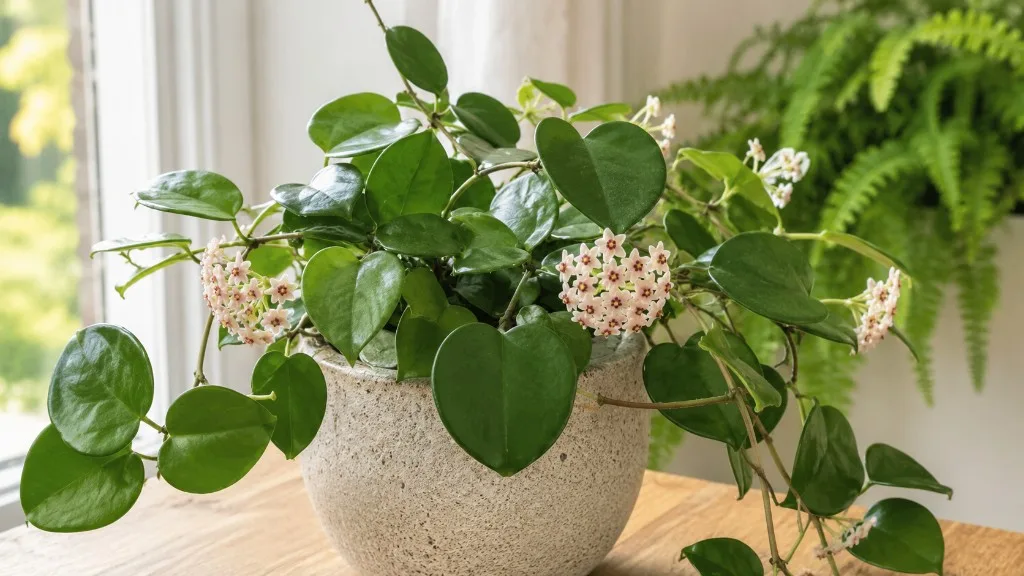
Hoya kerrii - the sweetheart hoya with thick, heart-shaped leaves - stores water in its foliage far more efficiently than most beginners expect. That storage capacity is a clue about what happens underground. In nature, Hoya Kerrii overview grows as an epiphyte across Southeast Asia (Laos, Thailand, Vietnam, and Malaysia), anchoring to tree bark and branches rather than sitting in ground soil. Rain passes through quickly, air circulates around the roots constantly, and organic debris breaks down in thin layers. Your indoor mix needs to reproduce that balance: enough moisture for root function, enough air for respiration, and enough structure to stay open for years-not a wet sponge that compacts after the third watering.
The best soil for Hoya kerrii is a chunky epiphytic mix: roughly equal parts quality potting soil (or peat-free compost), medium-grade orchid bark, and coarse perlite by volume. Clemson University’s Home & Garden Information Center recommends this 1:1:1 blend for waxflower hoyas, and the Royal Horticultural Society uses the same three-component framework with peat-free compost, orchid bark, and coarse perlite. That consensus exists for a biological reason, not horticultural fashion. Hoya roots need oxygen during active growth, and dense peat-heavy mixes displace air after watering, creating the hypoxic conditions where rot begins long before leaves wrinkle or yellow.
Why Hoya Kerrii Roots Reject Dense Soil
Most houseplant failures blamed on “overwatering on Hoya Kerrii” are actually substrate failures. You can water on a reasonable schedule and still rot a Hoya kerrii if the mix holds water in the root zone for days because it lacks macropores-large air spaces that let oxygen reach thick, fleshy roots. Standard all-purpose potting soil is formulated for moisture retention. That is the opposite of what an epiphyte needs. When peat or fine compost compacts, water moves slowly, the center of the pot stays damp, and aerobic root respiration stalls. Anaerobic microbes then take over, producing the sour smell that tells you the root zone has already shifted toward decay.
Hoya kerrii is also a slow grower with very succulent leaves. Those leaves buffer drought, which means the plant tolerates dry mix far better than wet mix. A short dry spell might wrinkle a leaf temporarily; chronic wetness kills roots permanently. If you have ever nursed a sweetheart hoya that looked fine for months and then collapsed suddenly, inspect the substrate before you blame your watering calendar. The mix may have looked acceptable on the surface while the interior had been suffocating since the first repot into generic potting soil.
Epiphyte Biology in Southeast Asia
Understanding where Hoya kerrii evolved clarifies every ingredient choice. Epiphytic hoyas in tropical forests receive intermittent rain, rapid drainage off bark surfaces, and constant airflow. Roots attach for stability and absorb moisture from thin organic films-not from waterlogged pockets. NC State Extension describes the general hoya requirement as any “loose, fast-draining mix high in organic matter”-a phrase that sounds contradictory until you recognize that “organic matter” here means structurally chunky bark and coir, not fine, water-retentive peat alone.
The species can vine up to several meters in ideal conditions, though single-leaf cuttings sold as novelty gifts often never produce vines regardless of soil quality. That distinction matters when choosing pot size and mix porosity. A rooted single leaf needs an extremely airy, small-volume mix because it has minimal root mass to pull moisture and almost no transpiration demand. An established vining plant can handle slightly more water-holding capacity-but never a return to dense bagged potting soil straight from the shelf.
Anatomy of a Chunky Epiphytic Mix
A proper Hoya kerrii soil mix is defined by texture and pore space, not by a brand name on the bag. When you squeeze a handful, it should feel loose and irregular-more like gravel mixed with bark chips than like smooth dirt. Water poured onto the surface should penetrate within seconds, not pool. After a full soak, excess water should exit the drainage hole immediately. The goal is a substrate that dries throughout within roughly five to ten days in a typical bright, indoor environment, though your exact interval depends on pot material, humidity, and season.
Each component plays a specific role. Fine ingredients alone create capillary hold; coarse ingredients create drainage channels and air pockets. The art is balancing them so the plant gets a drink without living in one.
The Three Core Ingredients
Potting soil or peat-free compost (one part) supplies baseline nutrients and a small amount of moisture retention. It should be a quality indoor mix without added moisture-control gels or water-holding crystals-those amendments are particularly harmful for hoyas because they override the drainage you are trying to build. Peat-free compost, increasingly recommended by the RHS, performs the same structural role while avoiding peat harvesting concerns; either works as the “fine” fraction as long as it is not the majority of the blend.
Medium-grade orchid bark (one part) is the structural backbone. Fir bark in medium grade creates long-lasting macropores without breaking down as fast as fine bark fines. It mimics the tree surfaces Hoya kerrii clings to in habitat. Bark also prevents the mix from collapsing inward over time-a critical function perlite alone cannot provide because perlite particles are small relative to hoya roots. Avoid dust-heavy bark products; rinse or screen if the bag is mostly fines.
Coarse perlite (one part) accelerates drainage and resists compaction. Those white volcanic-glass particles keep the matrix open. Some growers substitute pumice for part or all of the perlite because pumice does not float to the surface over repeated waterings, maintaining consistent aeration depth. Both are valid; pumice is often harder to source in small quantities but performs excellently in hoya mixes.
Step-by-Step: Mix Your Own Hoya Kerrii Soil
Mixing your own Hoya kerrii potting mix takes ten minutes and saves you from Hoya Kerrii repotting guide into the wrong substrate later. Work on a tarp or in a large tub so you can blend evenly.
Measure by volume, not by weight. Use the same scoop for each part: one scoop potting soil, one scoop orchid bark, one scoop perlite. Pour the potting soil and bark into your tub first, breaking up any clumps. Add perlite (or pumice) and mix with your hands or a trowel until the color and texture look uniform-no streaks of pure peat, no bare patches of bark. The finished blend should be visibly chunky; if it still looks like regular potting soil, you have not added enough bark and perlite.
Moisten slightly before potting if the mix is dust-dry-just enough to settle dust, not enough to make it soggy. Fill the pot loosely, set the plant, and backfill without packing the mix down with heavy pressure. A gentle tap on the bench settles it; a fist compacting the surface defeats the purpose. Leave a small gap below the rim for watering.
For a single established plant in a 4-inch pot, roughly one to two cups of each component is plenty. Scale up proportionally for larger pots, but remember Hoya kerrii prefers tight quarters-a pot only slightly larger than the root ball dries more predictably than an oversized container full of unused wet mix.
Optional Add-Ins Worth Using
Horticultural charcoal (roughly half a part, or a handful per quart of mix) is optional but useful. It absorbs impurities, reduces sour odors as organic matter decomposes, and keeps long-term substrates fresher-similar to how epiphytic roots in habitat never sit in stagnant organic soup. Charcoal does not replace drainage materials; it complements them.
Worm castings (a few tablespoons per quart, not a full part) add gentle nutrition and microbial life without the salt load of synthetic fertilizer mixed into soil. Hoya kerrii is not a heavy feeder, but a light organic boost at repotting supports the slow root establishment this species is known for.
Coconut coir can substitute for part of the potting-soil fraction if you prefer a peat-reduced blend. Coir holds moisture without becoming hydrophobic as quickly as peat when allowed to dry completely-a behavior hoya growers encounter because the recommended watering style lets the mix go nearly dry between drinks. Use coir as a portion of the fine fraction, not as the entire base, or you risk creeping back toward excess retention.
Avoid sand as a drainage amendment indoors. Sand fills pore spaces in small pots and often makes compaction worse, contrary to popular advice. Avoid garden soil, compost from outdoor piles, and moisture-retention crystals entirely.
Fine-Tuning for Climate, Pot, and Watering Style
The 1:1:1 recipe is a baseline, not a straitjacket. Your home environment interacts with the mix the moment you pot the plant. A blend that dries in five days in a dry, heated apartment may take twelve in a humid bathroom with low airflow. Adjusting the ratio is easier than fighting a Hoya Kerrii watering guide that never matches the pot.
Think in terms of drying speed, not perfection. The mix should approach dryness through most of the root zone before you water again-consistent with the top-half-dry guideline most hoya growers use. If you are always waiting too long and leaves wrinkle severely, hold slightly more moisture. If the pot still feels heavy a week after watering, increase drainage.
When to Increase Drainage
Add extra perlite or bark-pushing toward 40 percent inorganic or bark fraction-when any of the following apply: you use plastic pots without terracotta’s wicking effect; your home runs above 50 percent humidity consistently; the plant sits in a lower-light spot where evaporation is slow; you tend to water generously; or the mix still feels damp ten days after a thorough soak. NParks Singapore classifies kerrii as intolerant of waterlogging, so humid climates and non-porous pots favor airier blends because the pot cannot pull moisture away from the mix exterior.
Increasing drainage is always safer for Hoya kerrii than decreasing it. This species forgives drought more readily than saturation.
When to Hold a Little More Moisture
Reduce perlite slightly-while keeping bark structure intact-when you grow in terracotta, which pulls moisture through porous walls; when your air is consistently dry below 35 percent humidity; when the plant sits in bright, warm windows that accelerate drying; or when you water lightly and the mix dries in two to three days, causing chronic leaf wrinkling. Even in these cases, never revert to straight potting soil. You are adjusting a chunky mix, not abandoning one.
Match adjustments to observation over two to three watering cycles. One fast dry week in a heat wave does not necessarily mean the mix is wrong; sustained patterns do.
Store-Bought Mixes That Work as Starting Points
Not everyone wants to buy three bags. Commercial shortcuts exist, with trade-offs.
Cactus or succulent mix plus 20 to 30 percent extra perlite is the simplest store-bought path. Clemson Extension recommends a well-draining mix of potting soil, orchid bark, and perlite for hoyas, and the perlite bump closes the aeration gap between succulent blends and the full three-part epiphytic recipe. Choose a gritty cactus mix without added fertilizer spikes if possible-you control feeding separately.
Orchid potting mix amended with perlite and a small amount of potting soil works when orchid bark already dominates the bag. Add roughly one part perlite and half a part potting soil to two parts orchid mix as a starting point, then adjust after one month based on drying speed.
Pre-made “hoya” or “epiphyte” blends from specialty sellers can be excellent if the label shows visible bark chunks and perlite or pumice-you should see structure, not black peat alone. If the product looks like standard potting soil dyed with a few bark shards, treat it as a base and amend heavily.
Straight all-purpose potting soil, even “indoor” labeled, is not acceptable alone for Hoya kerrii. At minimum it needs 30 to 40 percent perlite plus bark to become usable, which essentially means you are building the proper mix anyway. The full 1:1:1 blend still outperforms partial fixes because bark provides large pore architecture perlite cannot replicate alone.
Soil for Single-Leaf Sweetheart Cuttings
The novelty single-leaf Hoya kerrii in a tiny pot is one of the most common forms of this plant in commerce-and one of the most misunderstood. A leaf with a rooted petiole base may stay alive for years without ever producing a vine or new leaves. Soil cannot override that biology if the cutting lacked a node capable of breaking dormancy. But soil can keep a living leaf healthy while you wait, or fail it quickly if the mix stays wet around a minimal root system.
For single-leaf pots, use an even airier blend: two parts orchid bark, one part perlite, and half a part potting soil or coir. Keep the pot small-often the original 2-inch container is appropriate. The root mass is tiny; a large wet reservoir is dangerous. Water sparingly, letting the mix dry almost completely because the single leaf transpires slowly and stores significant water in its thick tissue.
If you graduate to a vining plant with multiple nodes and active stem growth, transition toward the standard 1:1:1 mix at the next repot. Established vines can use slightly more of the fine fraction because root volume and leaf surface area increase water draw.
pH, Salt Buildup, and Mineral Flushes
Hoya kerrii tolerates a slightly acidic to neutral pH range of roughly 6.0 to 7.5. NParks Singapore recommends planting in well-drained, slightly acidic to neutral soil (pH 6–7.5) using roughly one-third orchid mix to two-thirds potting mix. Hobbyists rarely need a pH meter for this species unless tap water is extremely alkaline or fertilizer salt crust visibly whitens the mix surface.
What matters more in practice is salt accumulation from hard water and repeated fertilizer application in a small pot. Leaf-tip burn and crusty soil surfaces signal that minerals are concentrating as water evaporates. Flush the pot occasionally by watering deeply until runoff flows freely for several minutes, or refresh the top inch of mix during the growing season. At repotting, replace degraded substrate entirely rather than stacking fertilizer on exhausted material.
If your municipality treats water with high bicarbonates, consider filtered or rainwater for a sensitive hoya collection-not because Hoya kerrii is fragile, but because soil chemistry in a small root zone shifts faster than in garden beds.
The Drainage Test Every Owner Should Run
Every Hoya kerrii owner should run a simple drainage test within the first week of potting-before problems hide inside the root ball. Water the plant thoroughly until water exits the bottom. Note the time. Pick up the pot: it should feel substantially heavier immediately. Check again at 24 hours, 72 hours, and one week. By day five to seven in typical indoor conditions, the pot weight should drop noticeably and the top half of the mix should be approaching dry.
If water sits on the surface during watering, runs down the gap between mix and pot wall without soaking in, or the pot still feels heavy after ten days, your Hoya kerrii drainage is insufficient. Correct the mix before you correct the watering schedule.
One-Minute Drainage Check
For a quick ongoing check after you know the plant is healthy: water until runoff, then watch the surface. Water should vanish within 30 seconds, not pool. Lift the pot after thirty minutes-it should not drip continuously. Smell the drainage hole area the next day; earthy is fine, swampy is not. Stick a dry bamboo skewer into the center and pull it out after three days; faint moisture is acceptable, muddy clinging mix is a warning.
This one-minute habit catches compacted mix months before leaves show stress.
Signs Your Mix Is Failing
Substrate problems announce themselves subtly first. Persistent leaf wrinkling after you water suggests roots are not absorbing-often because they are damaged or oxygen-starved. Yellow leaves on an otherwise stable plant frequently trace to wet mix, not nitrogen deficiency. Soft stems at the soil line indicate advanced rot. White fuzzy mold on the surface means the top layer stays wet too long, usually from low light plus dense mix rather than from harmless humidity.
A sour or rotten smell when you disturb the top inch is definitive. Remove the plant, inspect roots immediately, trim anything brown and mushy, and repot into fresh chunky mix only after you understand why the previous blend failed-usually decomposition, overpotting, or lack of drainage holes.
Fungus gnats in large numbers point to mix that stays moist near the surface for extended periods. They are a symptom of substrate moisture dynamics, not a primary disease.
If symptoms repeat after repotting into “better” soil, verify you actually changed the structure. Many bagged “well-draining” products still retain too much water for epiphytes.
When to Refresh or Repot
Even excellent epiphytic soil mix decomposes. Bark breaks down, perlite crushes under root pressure and watering, and the pore spaces that kept roots alive slowly collapse. Plan to refresh Hoya kerrii soil every two to three years for a mature plant, or sooner if growth stalls, drying slows dramatically, or you notice fine peat dominating the texture.
Repot when roots circle the pot lightly-not necessarily when they explode outward. Hoyas bloom more reliably when slightly root-bound, so aggressive upsizing hurts more than helps. Choose a pot one size up at most, with a mandatory drainage hole. Spring and early summer, when active growth resumes, is the safest window. Avoid repotting a stressed plant unless the mix itself is the clear cause; stabilize watering and light first when possible.
When refreshing, gently remove old mix from the outer root zone without bare-rooting unnecessarily. Replace with fresh 1:1:1 blend. Wait a week before resuming fertilizer to let broken root hairs heal.
Soil Mistakes That Cause root rot on Hoya Kerrii
Certain errors recur across forums and plant shops. Using rocks at the pot bottom for drainage does not work; it raises the water table in the root zone via capillary action and reduces usable soil volume. Oversized decorative pots surround small root balls with wet mix that never dries at the center. Cachepots without drainage hide standing water if the inner nursery pot is overwatered even once.
Moisture-control potting soil with gels or crystals keeps hoya roots wetter than you intend-avoid it entirely. Garden soil introduces compaction, pests, and pathogens inappropriate for containers. Repotting on day one when you bring a healthy plant home disrupts establishment; quarantine and observe drying speed first unless the existing mix is clearly peat soup or infested.
Burying vines or nodes too deep during repotting encourages stem rot in a species that naturally roots along climbing surfaces, not from buried tissue. Keep the crown at the same depth it grew before.
If rot occurs, surgery and fresh airy mix can save the plant if caught early. Delay guarantees loss.
Pairing Soil with Pot Size and Watering
Soil does not work in isolation. A perfect chunky hoya mix in a too-large plastic pot in dim light will still stay wet too long. Pair substrate choices with pot size and watering rhythm for a complete system.
Choose a pot only slightly wider than the root ball. Terracotta forgives slightly richer mixes by wicking moisture through walls; plastic demands airier blends or more careful watering. Clear nursery pots help beginners see when the root zone dries-a useful training tool for Hoya kerrii’s slow rhythm.
Water when the top half of the mix is dry, roughly every ten to fourteen days in active summer growth and every three to four weeks in cooler winter slowdown-always verifying with finger or skewer tests rather than a calendar alone. Water thoroughly until runoff, then empty the saucer. The mix should handle that flood-and-dry cycle without collapsing.
Bright indirect light (roughly 18–27°C / 65–80°F comfort zone) accelerates healthy drying. A plant in low light and dense mix is the highest-risk combination; fix light or fix mix before adjusting both simultaneously so you know what worked.
Humidity between 40 and 60 percent suits most homes. Higher humidity extends drying time-another reason to favor bark-heavy blends in steamy bathrooms.
Conclusion
The best soil for Hoya kerrii is not a mystery product-it is a chunky epiphytic mix you can assemble from ordinary materials: one part potting soil or peat-free compost, one part medium orchid bark, and one part coarse perlite by volume, adjusted for your pot, climate, and watering habits. That ratio mirrors what Clemson Extension and the RHS recommend for waxflower hoyas because it reproduces the airflow and fast drainage Hoya kerrii evolved with on tree branches across Southeast Asia.
Measure by volume, test drying speed after every repot, and refresh the blend every few years as bark decomposes. Keep single-leaf novelty cuttings in extra-airy, small pots with realistic expectations about growth. Pair the mix with a drainage hole, a appropriately sized container, Hoya Kerrii light guide, and a water-when-dry rhythm. When roots breathe and water moves through predictably, the slow-growing sweetheart hoya rewards patience with firm leaves, healthy roots you can trust, and-on properly rooted vines-the possibility of new growth and flowers worth the wait.
When to use this page vs other Hoya Kerrii guides
- Hoya Kerrii overview - Start here for whole-plant context before deep-diving this topic.
- Hoya Kerrii problems hub - Jump to symptom-specific fix guides when this care topic does not resolve the issue.
- Root Rot on Hoya Kerrii - Escalate here when soil adjustments are not enough.
- Mold on Soil on Hoya Kerrii - Escalate here when soil adjustments are not enough.