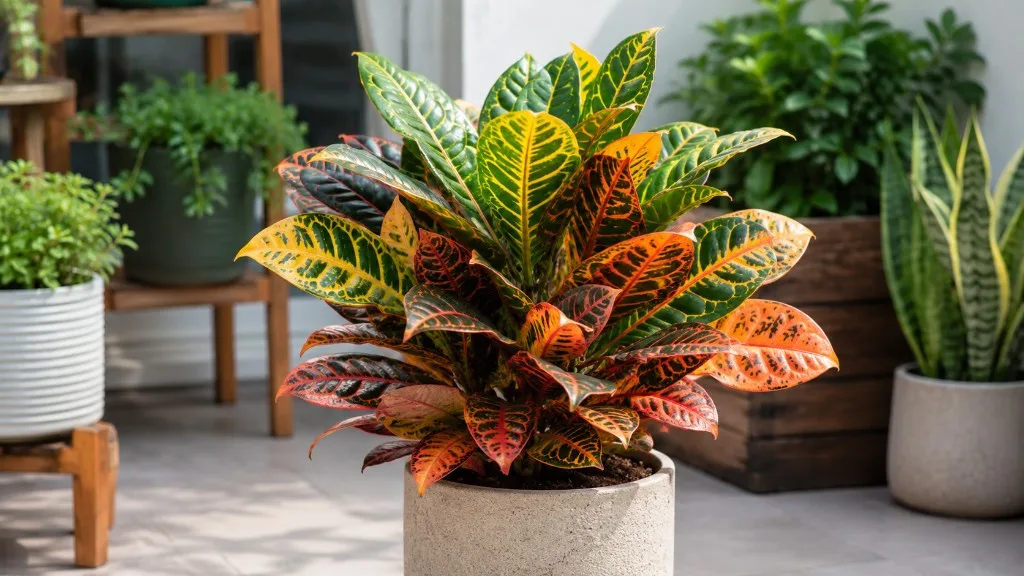
Croton Plant Care: Light, Water & Color Tips
Codiaeum variegatum
Croton needs the brightest light available to maintain vivid colour. Keep it in a stable position - any move triggers leaf drop. Water when the top inch dries. Toxic to cats and dogs.
Croton Plant Care: Light, Water & Color Tips
Start with wateringThe most common care mistake for CrotonWatering guide →Croton care essentials
Light
bright indirect to some direct sun
Water
Water when the top inch of soil dries. Every 5–7 days in summer; every 10–14 days in winter.
Soil
Rich, well-draining potting mix with perlite and worm castings.
Humidity
40–80%
Temperature
18–27°C (65–80°F)
Fertilizer
Use balanced liquid fertilizer at half strength and stop if the plant is stressed, newly repotted, or not actively growing. Fertilizing in winter or when the plant is stressed from relocation.
About Croton
Croton is native to Southeast Asia and Western Pacific (Indonesia, Malaysia, Australia), typically reaches 2–4 ft tall indoors; leaves 4–12 inches indoors, with moderate growth. Croton has a bushy growth habit and part of the Euphorbiaceae family. It is also known as Variegated Croton, Garden Croton, and Joseph's Coat.
| Detail | Information |
|---|---|
| Also known as | Variegated Croton, Garden Croton, Joseph's Coat |
| Native region | Southeast Asia and Western Pacific (Indonesia, Malaysia, Australia) |
| Mature size | 2–4 ft tall indoors; leaves 4–12 inches |
| Growth rate | Moderate |
| Growth habit | Bushy |
| Scientific name | Codiaeum variegatum |
| Family | Euphorbiaceae |
Croton Plant Care: Light, Water & Color Tips
What Is Croton?
Croton is a tropical evergreen shrub grown almost exclusively for foliage - leaves that can combine red, orange, yellow, green, purple, pink, and cream in patterns that look hand-painted. The accepted botanical name is Codiaeum variegatum, though you will see the plant sold simply as “croton,” “garden croton,” or “codiaeum” on tags and in garden centers. That naming overlap causes real confusion, because a separate genus also called Croton exists within the same broad plant family. For houseplant care, assume Codiaeum variegatum unless a tag clearly indicates otherwise.
Indoors, croton typically reaches 2 to 4 feet (60 to 120 cm) tall with individual leaves 4 to 12 inches (10 to 30 cm) long, depending on cultivar and age. Growth is moderate in a typical home - faster in bright, warm, humid conditions and slower when light or temperature drops. The plant forms a bushy, upright habit with woody stems on mature specimens. Hundreds of cultivated varieties differ in leaf shape, texture, and color combination, which is why two pots labeled “croton” can look like entirely different species even though the care basics overlap.
If you are deciding whether croton fits your home, the honest summary is this: croton rewards bright light, stable warmth, consistent moisture, and patience through relocation stress - and it punishes cold drafts, dim corners, and sudden environmental changes. It is more demanding than a pothos or snake plant and less finicky than some calatheas, but its reputation for dramatic leaf drop makes beginners nervous. The payoff is one of the boldest foliage displays available as a houseplant, with color intensity that few flowering plants match year-round. One critical caveat for pet owners and parents: croton is toxic and carries irritating latex sap, which makes it a poor choice within reach of cats, dogs, or curious children.
Botanical Background and Naming Confusion
Croton belongs to the family Euphorbiaceae - the spurge family - which matters for care and safety more than most buyers realize. Euphorbiaceae plants share characteristic patterns: they produce milky or latex-like sap when cut, they dislike cold and wet roots in combination, and many species carry diterpene-based irritants that affect skin and digestion. Other familiar Euphorbiaceae houseplants include poinsettia, crown of thorns, and some euphorbias. If you have handled any of those, you already know the glove-and-wash-hands habit that croton demands.
The species is native to tropical regions of Malaysia, Indonesia, northern Australia, and nearby Pacific islands, where it grows as an evergreen shrub in warm, humid forest margins. In USDA Hardiness Zones 10 through 12, croton survives outdoors as a landscape shrub and can reach substantially larger dimensions than typical houseplant specimens. Everywhere else, it is grown as a container houseplant or seasonal patio accent brought indoors before temperatures fall below about 50°F (10°C). According to the University of Wisconsin Extension, croton suffers leaf drop when temperatures remain below that threshold for extended periods.
The naming confusion deserves a direct mention because it sends people to the wrong care advice. Retailers use “croton” for Codiaeum variegatum, but botanists also use Croton as a genus name for unrelated plants - including some wild euphorbs and the unrelated croton oil plant historically used in medicine. When you search care forums, check whether the writer means Codiaeum (colorful houseplant) or another species. Leaf shape is a quick tell: Codiaeum variegatum has broad, often glossy, heavily variegated leaves on upright woody stems, not the narrow herbal leaves of unrelated “croton” species.
Why Croton Foliage Demands the Extra Attention
Croton earns its popularity on leaf color alone, and that color is not a passive trait - it is a live report on light levels. In insufficient light, pigments fade toward plain green long before the plant looks obviously unhealthy. In too much unfiltered midday sun through glass, leaves can bleach, gray, or scorch. The sweet spot is bright, indirect light with enough intensity to keep pigments saturated without baking the foliage. The RHS Growing Guide for codiaeum notes that leaves may lose vibrant color or drop in low light, while full summer sun through glass can overheat and scorch them.
Croton also has a behavioral trait that shapes its reputation: leaf drop after relocation. Moving the pot from a greenhouse to your living room - or even from one windowsill to another - can trigger shedding of older leaves as the plant recalibrates to new light, humidity, and airflow. That response looks alarming but is often temporary stress, not a death sentence, provided the new location meets basic needs and you avoid compounding the shock with overwatering on Croton. Understanding this upfront prevents the common cycle where a panicked owner waters more, rots roots, and turns a recoverable adjustment into a permanent decline.
Beyond color, croton fits specific roles well. It works as a solo specimen in a bright living room, as a patio focal point in warm climates, and as short-term interior color in commercial plantings - though spider mite pressure in dry air sometimes limits long-term interiorscape use, as NC State Extension notes. It is not a low-light filler plant and not a set-and-forget option for beginners who want zero drama. It is a plant for growers who enjoy reading foliage and adjusting the environment until the leaves tell you the setup works.
Best Growing Conditions for Croton
Croton performs best when your space approximates the warm, bright, humid rhythm of its native range. The four variables that decide almost every outcome are light, water, soil, and temperature. Align those and feeding, Croton repotting guide, pruning, and propagation become straightforward maintenance. Misalign any one - especially light or cold - and the plant declines in ways that fertilizer cannot fix.
Light Requirements
Croton needs bright light for at least six to eight hours daily to maintain compact growth and vivid color. A practical indoor placement is within about 3 feet (1 meter) of a south- or west-facing window, where the plant receives strong ambient daylight without continuous harsh midday sun on the leaves. East-facing windows work well in many homes: direct morning sun, then bright indirect exposure the rest of the day. North windows are usually too dim unless the room is exceptionally bright or supplemented with grow lights.
The diagnostic for incorrect light is new growth, not the oldest leaves. Compact internodes, firm stems, and colors that resemble the cultivar’s tag photo mean the plant is probably satisfied. Long, floppy stems with smaller, greener leaves mean the plant wants more light. Bleached patches, brown crisp edges, or gray-dull leaf surfaces mean it wants less direct sun or a slower acclimation to a brighter spot. Acclimate over one to two weeks when upgrading light - leaves formed in dim conditions burn easily if you jump straight into unfiltered afternoon sun.
Higher light does more than preserve color. It also keeps the plant more compact and metabolically active, which indirectly improves watering safety because the root zone dries on a predictable rhythm. Wisconsin Extension notes that higher light levels produce more vibrant color and a tighter habit, while too little light reverts leaves toward green and too much direct sun dulls or damages foliage. If natural light is weak in winter, a full-spectrum grow light on a 10–12 hour timer, positioned 12–18 inches above the canopy, prevents the slow fade and leaf drop that northern-latitude windowsill crotons often show between November and February.
Temperature and Humidity
Croton prefers stable temperatures between 60 and 85°F (15 and 29°C) during active growth. The RHS recommends keeping plants above 15°C (59°F) and ideally in the 18–35°C (65–95°F) range year-round. Cold is the urgent limit: sustained exposure below about 50°F (10°C) causes wilting and leaf drop, and cold drafts from doors, winter windows, or air-conditioning vents can trigger shedding even when the thermostat reads a comfortable 72°F elsewhere in the room.
Humidity matters more for croton than for many common houseplants. Native rainforest habitats run well above 60% relative humidity, but most healthy specimens adapt to 40–60% in homes without constant distress. Below about 30%, leaf edges may brown and spider mite risk rises sharply in winter when heating dries the air. A pebble tray with the pot elevated above the water line, grouping plants together, or a small humidifier near the plant all outperform occasional misting, which raises humidity for minutes and can leave wet foliage that invites fungal spotting where airflow is poor.
Temperature stability is as important as the absolute number. Croton dislikes rapid swings - the classic failure is placing a lush greenhouse plant directly under a cold draft or beside a heating vent that cycles on and off. If you must move the plant, do it once, accept some leaf drop, then hold other variables steady while new leaves emerge.
Soil and Drainage
Use a rich, well-draining potting mix that holds moisture without staying waterlogged for days. The principle matters more than a single branded recipe: roots need access to both water and air. A workable home blend combines quality peat-free or peat-based houseplant mix with perlite and compost or worm castings - roughly two parts mix, one part perlite, and a modest portion of organic amendment. The RHS recommends a peat-free ericaceous (acidic) compost that is light and fast-draining for repotting, which aligns with croton’s preference for slightly acidic conditions.
Target a substrate pH around 4.5–6.5. Hobbyists rarely need to meter pH precisely; the bigger practical issues are compaction, overpotting, and salt buildup from hard tap water and over-fertilizing. Always plant in a container with a drainage hole. Decorative cachepots are fine only if you empty runoff after every watering. Heavy, peat-dominated mixes that have sat in the same pot for two or more years often compact into a water-retentive block that suffocates roots even when you believe you are watering correctly.
How to Water Croton
The general rule for croton is water when the top half-inch to one inch (1 to 2.5 cm) of mix feels dry, then soak thoroughly until a small amount runs from the drainage hole. Wisconsin Extension describes this as moderate water needs - enough to keep the root zone consistently moist during active growth without letting the pot sit in soggy mix for days. In warm, bright conditions that often works out to roughly every five to seven days in summer and every ten to fourteen days in winter for many indoor containers, though your calendar should be a reminder to check, not a rule to follow blindly.
Water with room-temperature water when possible. Cold water shocks warm roots and can contribute to leaf drop in a plant already stressed from relocation. If your tap water is heavily chlorinated or fluoride-rich and leaf tips brown despite good care, try filtered or rainwater for a few months and compare new growth - tip burn from water chemistry is real on some sensitive tropicals, though it is often over-diagnosed before basic moisture and light issues are fixed.
Croton watering guide During Active Growth
During the warm, bright months when new leaves are expanding, croton uses water steadily. The goal is a consistent moisture band: the mix should feel like a wrung-out sponge through most of the root zone, not wet mud and not dusty dry throughout. Check moisture with a finger, a wooden skewer, or by lifting the pot - a noticeably light pot means the root zone has dried more than croton prefers, while a heavy pot with a wet surface usually means wait before adding more water.
If you just bought the plant, expect a short adjustment period that may include leaf drop regardless of your watering precision. Do not compensate for transplant shock by watering more frequently unless the pot is genuinely dry at depth. Stabilize light and temperature first, then fine-tune the interval based on how fast your specific container dries in your home. A croton that is shedding older leaves while the mix stays wet is a root-risk scenario, not a thirst scenario.
Seasonal Adjustments
In cooler, dimmer months, growth slows and the pot dries more slowly. Stretch the interval between waterings and reduce or pause fertilizer until new growth resumes in spring. The most common winter failure mode is continuing a midsummer watering schedule in lower light, which keeps the mix waterlogged and leads to yellow lower leaves, fungus gnats, and root rot on Croton. Wisconsin Extension explicitly recommends reducing watering in winter and notes that extended periods of too-wet or too-dry soil both cause leaf drop.
Outdoor container crotons in warm climates need a parallel shift in autumn as nights cool and day length shortens. Move pots to sheltered spots before temperatures approach 50°F at night, and check moisture before each watering rather than assuming the summer rhythm still applies. Plants brought indoors for winter should be inspected for pests and acclimated gradually to lower light rather than plunged from Croton light guide into a dim corner.
Common Watering Mistakes
The single most damaging mistake is watering on a fixed schedule without checking the pot. The second is letting the plant sit in a full saucer or cachepot, which suffocates roots within days even if the top of the mix looks acceptable. The third is giving tiny daily sips instead of a full soak when the plant is dry - that wets only the surface while the center stays parched, producing wilt cycles that weaken roots over time.
People also misread croton wilting. A thirsty plant in dry mix recovers after a thorough watering. A plant with rotting roots may wilt while the mix stays wet and then decline despite your efforts. Always pair wilt with a moisture check at depth before adding more water. If stems are soft at the base and the mix smells sour, stop watering, inspect roots, trim any brown mushy tissue, and repot into fresh mix only after you understand why the previous rhythm failed.
How to Feed Croton
Croton is a moderate feeder during active growth, not a heavy one. A balanced water-soluble houseplant fertilizer - for example 10-10-10 or 20-20-20 - diluted to one-quarter to one-half of the label rate is sufficient for most indoor specimens. Apply to already-moist soil every four to six weeks from spring through early fall, or monthly if your potting mix already contains a slow-release starter charge. Gardener’s Supply recommends feeding during the growing season while holding back in winter - matching the plant’s natural slowdown.
Hold fertilizer entirely during the cool, low-light months, after a major repot until new growth appears, and while the plant is recovering from root rot, pest damage, or heavy leaf drop. Overfeeding produces salt buildup and brown leaf margins that look like drought stress but persist even when watering is correct. If margins crisp despite good moisture, flush the pot with plain water at two to three times the pot volume and pause feeding for six to eight weeks.
Wisconsin Extension notes that fertilizing once or twice during the growing season is adequate for maintenance, while more frequent light feeding can support faster growth on young plants being trained into bushier shapes. Either approach works if doses stay dilute and you never feed a dry, cold-stressed root zone.
Repotting and Root Health
Repot croton roughly every one to two years, or whenever roots circle drainage holes, the plant dries out within a day of watering, or water runs straight through without soaking in. The best timing is early spring as active growth resumes, which gives the plant a full warm season to fill the new root zone. The RHS advises repotting only when roots have filled the current container and warns against overpotting - a much larger pot holds excess wet mix around a root system that cannot use it, which is the most common trigger for rot after repotting.
Choose a pot only one size larger than the current root ball - typically 1 to 2 inches (2.5 to 5 cm) wider. Use fresh, well-draining mix, plant at the same depth as before, and water lightly for the first week while cut roots heal. Wear gloves when handling the root ball or pruning stems, because broken roots and cut stems release irritating sap. Keep the plant in bright indirect light and avoid fertilizer until you see new tip growth.
Signs It Is Time to Repot
Physical signs include roots emerging from drainage holes, a top-heavy plant that wilts despite moisture, or mix that has broken down into fine, water-retentive mud. Performance signs include stalled growth for weeks during warm weather despite adequate light and feeding, or chronic edge burn that persists after you have corrected watering - sometimes indicating mineral-loaded old mix rather than current care errors.
Do not repot a plant that is actively collapsing from overwatering until you have inspected roots and trimmed rot. Moving a failing root ball into fresh mix without fixing the underlying moisture problem rarely saves croton. Conversely, a root-bound plant that dries out twice a week in summer may need a larger pot even if the calendar says repotting season is months away - dryout speed is a more reliable trigger than the date.
Propagation Methods for Croton
The standard home propagation method for croton is softwood stem cuttings taken during active growth - typically late spring through early summer when stems are firm but not woody. Seed is possible but impractical for named cultivars because offspring will not match parent coloration. Division works on large multi-stemmed specimens but is less common indoors than simple cuttings.
Take a 3- to 6-inch (8 to 15 cm) cutting just below a leaf node using clean, sharp shears. Wear gloves - the milky sap irritates skin and eyes, and NC State Extension notes it can permanently stain fabrics. Let the cut end air-dry for five to ten minutes until sap films over, then dip in rooting hormone if you have it and insert the cutting into moist, well-draining mix. Remove leaves from the lower half of the stem, leaving one or two leaf pairs at the top. Cover the pot with a clear plastic bag or dome to raise humidity, keeping plastic off the foliage, and place the cutting in bright indirect light at 70–80°F (21–27°C).
Roots typically form in four to eight weeks depending on warmth and humidity. Tug gently on the stem to feel resistance before removing the cover and treating the plant as established. Expect some leaf drop on the cutting during rooting - the same stress response mature plants show after relocation. Do not propagate stressed, diseased, or heavily pest-infested plants; cuttings inherit the parent’s problems and weak parent tissue fails at much higher rates.
Common Croton Problems
Most croton problems are environmental, not mysterious diseases. The plant communicates through leaf color, drop timing, and wilt patterns long before the entire specimen collapses. The useful habit is to check light, moisture, temperature, and recent moves in that order before reaching for pesticide or extra fertilizer.
Leaf Drop, Yellow Leaves, and Pests
Leaf drop is the signature croton complaint and has several distinct causes. Relocation shock after purchase or moving the pot sheds older leaves while new ones emerge - hold care steady and avoid overwatering during this phase. Cold drafts or temperatures below 50°F (10°C) drop leaves within days. Moisture extremes - too wet or too dry for extended periods - produce yellowing followed by shedding, as Wisconsin Extension describes. Low light causes gradual decline and color loss before drop. Diagnose by asking what changed in the last two weeks: if the answer is “I moved it,” patience and stable care usually win; if the answer is “I put it beside the AC vent,” fix the temperature first.
Yellow leaves can mean overwatering, underwatering on Croton, low light, natural aging of older leaves, sudden temperature drop, or nutrient issues. If yellow leaves are soft and the mix is wet, suspect overwatering and inspect roots for brown mushy tissue. If yellow leaves are crisp and the pot is light, drought stress is more likely. A single yellow lower leaf on an otherwise full plant is often normal senescence - remove it and watch new growth rather than overcorrecting every variable at once.
Brown leaf tips and margins usually point to low humidity, drought stress, salt buildup from over-fertilizing, or water chemistry in dry indoor winter air. Flush the pot with plain water if salts are suspected, and review whether the watering rhythm matches how fast the plant actually dries in its current light. Tips that are already brown will not turn green again; judge success by undamaged new leaves.
Faded or greening color with firm leaves usually means insufficient light - move the plant closer to a bright window or add a grow light, then read the newest leaves after two to three weeks. Bleached or scorched patches mean too much direct sun for the current acclimation state.
Watch for spider mites in dry indoor air - fine webbing and stippled leaves are the tell. Mealybugs hide in leaf axils as white cottony clusters. Scale appears as immovable bumps along stems. Fungus gnats indicate overly wet surface mix; let the top layer dry slightly between waterings. Catch pests early with weekly inspection. A strong shower, manual removal, and insecticidal soap applied per label directions handle most infestations if you act before the population spreads. NC State Extension specifically flags spider mite susceptibility as a limiting factor for long-term interior use.
Is Croton Safe for Pets?
Croton is toxic to pets and carries irritating sap that affects humans on contact. The Pet Poison Helpline lists ingestion effects as mild oral and gastrointestinal irritation with drooling, vomiting, and diarrhea. NC State Extension identifies diterpene esters as the toxic principle, with all plant parts - leaves, stems, roots, sap, and seeds - capable of causing nausea, vomiting, and diarrhea if eaten in quantity, plus allergic dermatitis from repeated skin contact with sap.
The ASPCA includes croton on its toxic plant listings for pets. Toxic does not always mean fatal in a small nibble, but the safe assumption for pet households is keep croton out of reach - on high shelves, in rooms pets cannot access, or replaced with confirmed non-toxic alternatives if you have a cat that treats houseplants as salad. The sap adds a second layer of risk for humans: wear gloves when pruning or propagating, wash hands thoroughly afterward, and avoid touching your eyes while handling cut stems.
If you suspect your pet ingested croton, contact your veterinarian or the ASPCA Animal Poison Control Center at (888) 426-4435 (a consultation fee may apply). Bring a photo of the plant for identification. This is general information, not veterinary advice - when symptoms are severe or persistent, professional care is the right move.
For households with curious pets or toddlers, croton belongs in the same caution category as dieffenbachia or euphorbia: visually stunning, chemically irritant, and a poor choice at nose level.
Conclusion
Croton (Codiaeum variegatum) is a tropical Euphorbiaceae shrub from Southeast Asia and the Pacific that trades consistent environmental attention for some of the boldest foliage color available indoors. Give it bright light for six to eight hours daily, moist well-draining soil that dries slightly at the surface between waterings, stable temperatures between 60 and 85°F, and humidity at or above 40%, and it will hold compact, vivid growth through the warm season. Accept that leaf drop after relocation is common, hold care steady rather than overwatering through the stress, and wear gloves whenever sap is involved.
When something looks wrong, read the plant in context: green, stretched new growth means more light; bleached or scorched leaves mean less direct sun or slower acclimation; sudden drop after a move often means patience, not panic; wilt on wet mix means roots, not thirst. Yellow leaves usually trace to moisture imbalance, cold, or light - not a missing magic nutrient. Fix the environment first, adjust watering second, and treat pests before they spread. Do that, and croton becomes a dramatic, worthwhile houseplant - as long as you respect its cold limits, handle the sap carefully, and keep it away from pets and children who chew leaves.
When to use this page vs other Croton guides
- Croton overview - Canonical hub for this species - care topics and problems branch from here.
- Croton problems - Symptom-first path when you already know something is wrong.
Related Croton guides
How to care for Croton?
How much light does Croton need?
bright indirect to some direct sun
- bright indirect to some direct sun - bright indirect to some direct sun.
When should you water Croton?
Water when the top inch of soil dries. Every 5–7 days in summer; every 10–14 days in winter.
- Water when the top inch is dry; do not allow to wilt - Water when the top inch of soil dries.
- Drain excess water - Water when the top inch of soil dries.
What soil works best for Croton?
Rich, well-draining potting mix with perlite and worm castings.
- peat-free potting mix - Rich, well-draining potting mix with perlite and worm castings.
- perlite (20%) - Rich, well-draining potting mix with perlite and worm castings.
- worm castings (10%) - Rich, well-draining potting mix with perlite and worm castings.
Grower notes for Croton
What matters most with Croton
Croton is easiest to grow when you judge the whole plant: new growth, root-zone moisture, light exposure, and how quickly the pot dries after watering. In practice, the care checkpoint is simple: bright indirect to some direct sun. Pair that with rich, well-draining potting mix with perlite and worm castings, and avoid changing water, pot size, and placement all at once.
Best placement in a real home
Croton belongs where bright indirect to some direct sun is realistic for most of the day, not only where the pot looks good. Water when the top inch of soil dries. Every 5–7 days in summer; every 10–14 days in winter. If the pot stays wet longer than expected, move the plant into better light or reassess the mix before watering again. Humidity target: 40–80%. Temperature comfort zone: 18–27°C (65–80°F).
Before you buy this plant
Choose Croton with firm new growth, clean leaf undersides, and soil that does not smell sour or feel compacted. Be cautious if you see spider-mites, sticky residue, collapsed crowns, or a pot that is wet in poor light. Cosmetic old-leaf damage is less worrying than weak roots or active pests.
First month after bringing it home
Do not repot Croton on day one unless the mix is failing or pests are obvious. Quarantine it, learn how fast the pot dries, and keep care boring while it adjusts. Watch especially for spider-mites, brown-tips, and yellow-leaves. If problems appear, correct the condition first rather than stacking fertilizer, repotting, and pruning together.
Safety note for Croton
Croton is not a plant to keep within reach of pets or children. The database flags it for cats and dogs. Use gloves if sap or plant tissue is irritating, and pick a pet-safe alternative for floor pots or low shelves.
How to tell Croton is settling in
Also sold as Variegated Croton, Garden Croton, and Joseph's Coat, this plant should be judged by stable new growth rather than label names alone. If you plan to multiply it later, common methods include Stem cuttings in water and Air layering. Repot only when you see Roots circling the pot and plant drying out very rapidly. If brown-tips shows up early, inspect light, watering, and roots before assuming the plant is permanently weak.
Is it pet safe?
Croton is toxic to cats and dogs.
All parts toxic. Sap causes skin and eye irritation; ingestion causes vomiting, diarrhoea. Seeds are the most toxic part.
Watering Croton
For Croton, water when the top inch is dry; do not allow to wilt and water every 5–7 days in summer; every 10–14 days in winter. Reduce watering slightly in winter.
| Detail | Information |
|---|---|
| How often | Every 5–7 days in summer; every 10–14 days in winter |
| How to check | Water when the top inch is dry; do not allow to wilt |
| Seasonal changes | Reduce watering slightly in winter |
Signs of overwatering
- Yellow leaves
- mushy stems
- root rot at base
Signs of underwatering
- Leaf drop
- wilting leaves
- dry crispy edges
Soil & potting for Croton
Use a mix of peat-free potting mix, perlite (20%), worm castings (10%) for Croton. Well-draining but more moisture-retentive than succulent mix. Target soil pH around 4.5–6.5. Repot every 2 years, ideally in spring.
| Detail | Information |
|---|---|
| Recommended mix | peat-free potting mix, perlite (20%), worm castings (10%) |
| Drainage | Well-draining but more moisture-retentive than succulent mix |
| Soil pH | 4.5–6.5 |
| Repotting frequency | Every 2 years |
| Best season to repot | Spring |
Signs it needs repotting
- Roots circling the pot
- plant drying out very rapidly
- growth stalling in spring
Humidity & temperature for Croton
Croton prefers 40–80%, though normal home humidity is usually fine. Keep temperatures around 18–27°C (65–80°F).
| Detail | Information |
|---|---|
| Humidity | 40–80% - normal home humidity is fine. |
| Ideal temperature | 18–27°C (65–80°F) |
Fertilizer & pruning for Croton
Use use balanced liquid fertilizer at half strength and stop if the plant is stressed, newly repotted, or not actively growing. Fertilizing in winter or when the plant is stressed from relocation. for Croton.
| Detail | Information |
|---|---|
| Fertilizer type | Use balanced liquid fertilizer at half strength and stop if the plant is stressed, newly repotted, or not actively growing. Fertilizing in winter or when the plant is stressed from relocation. |
Common problems on Croton
Spider Mites
HighLikely cause: Dry air and dusty leaves create ideal habitat for spider mites - the most common croton pest
Quick fix: Shower plant thoroughly; apply neem oil spray every 5 days for 3 weeks; raise humidity
Full fix guide →Brown Tips
LowLikely cause: Low humidity or inconsistent watering causes progressive tip browning
Quick fix: Increase humidity; maintain consistent moisture; use a pebble tray
Full fix guide →Yellow Leaves
MediumLikely cause: Overwatering or sudden cold exposure triggers leaf yellowing
Quick fix: Allow soil to dry; move away from cold air sources
Full fix guide →Root Rot
MediumLikely cause: Common on this plant type; confirm with recent watering, light, and root checks.
Quick fix: Inspect the plant and correct the most likely care stressor before stacking treatments.
Full fix guide →Overwatering
MediumLikely cause: Common on this plant type; confirm with recent watering, light, and root checks.
Quick fix: Inspect the plant and correct the most likely care stressor before stacking treatments.
Full fix guide →Underwatering
MediumLikely cause: Common on this plant type; confirm with recent watering, light, and root checks.
Quick fix: Inspect the plant and correct the most likely care stressor before stacking treatments.
Full fix guide →Mealybugs
MediumLikely cause: Common on this plant type; confirm with recent watering, light, and root checks.
Quick fix: Inspect the plant and correct the most likely care stressor before stacking treatments.
Full fix guide →Aphids
MediumLikely cause: Common on this plant type; confirm with recent watering, light, and root checks.
Quick fix: Inspect the plant and correct the most likely care stressor before stacking treatments.
Full fix guide →Leggy Growth
MediumLikely cause: Common on this plant type; confirm with recent watering, light, and root checks.
Quick fix: Inspect the plant and correct the most likely care stressor before stacking treatments.
Full fix guide →Slow Growth
MediumLikely cause: Common on this plant type; confirm with recent watering, light, and root checks.
Quick fix: Inspect the plant and correct the most likely care stressor before stacking treatments.
Full fix guide →Wilting
MediumLikely cause: Common on this plant type; confirm with recent watering, light, and root checks.
Quick fix: Inspect the plant and correct the most likely care stressor before stacking treatments.
Full fix guide →Drooping Leaves
MediumLikely cause: Common on this plant type; confirm with recent watering, light, and root checks.
Quick fix: Inspect the plant and correct the most likely care stressor before stacking treatments.
Full fix guide →Low Humidity
MediumLikely cause: Common on this plant type; confirm with recent watering, light, and root checks.
Quick fix: Inspect the plant and correct the most likely care stressor before stacking treatments.
Full fix guide →Not Enough Light
MediumLikely cause: Common on this plant type; confirm with recent watering, light, and root checks.
Quick fix: Inspect the plant and correct the most likely care stressor before stacking treatments.
Full fix guide →Fungus Gnats
MediumLikely cause: Common on this plant type; confirm with recent watering, light, and root checks.
Quick fix: Inspect the plant and correct the most likely care stressor before stacking treatments.
Full fix guide →Mold on Soil
MediumLikely cause: Common on this plant type; confirm with recent watering, light, and root checks.
Quick fix: Inspect the plant and correct the most likely care stressor before stacking treatments.
Full fix guide →