Croton Repotting: When, How, and Mistakes to Avoid
Croton Repotting: When, How, and Mistakes to Avoid
Croton Repotting: When, How, and Mistakes to Avoid
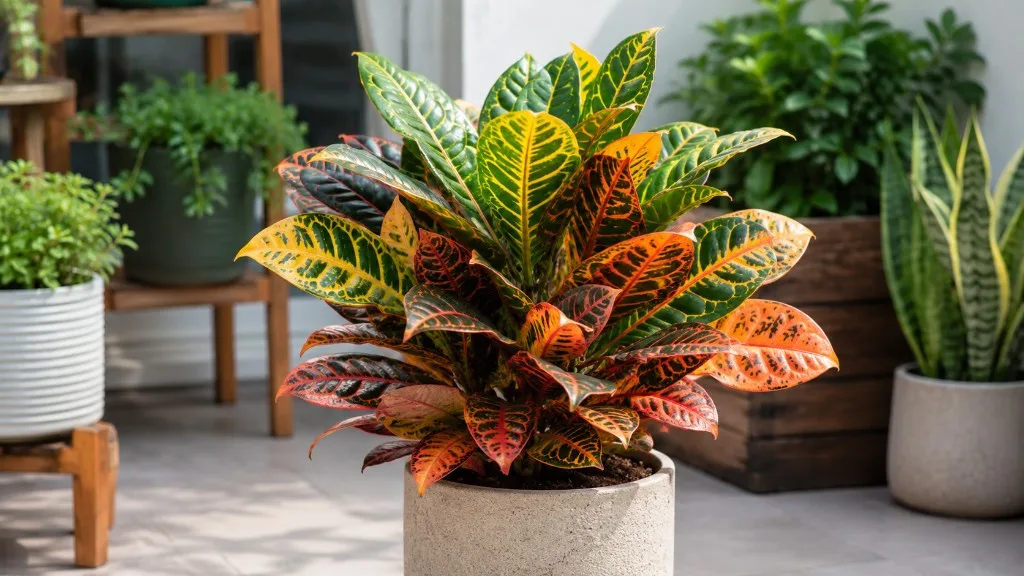
Croton repotting is one of those tasks that looks simple on paper and punishes impatience in practice. Codiaeum variegatum - the plant most people call croton or Joseph’s Coat - is grown for its painted foliage: orange, red, yellow, green, and purple leaves that can drop in clusters when the root zone is disturbed, the pot is too large, or the timing is wrong. That sensitivity does not mean you should avoid repotting. It means you should repot deliberately: in spring or early summer, into a container only one size larger, with fresh well-draining mix, and with the root ball kept as intact as possible.
The practical goal for most home growers is straightforward: repot when roots circle the pot or growth stalls despite good light and water, not on a rigid calendar. Water the plant 24 hours before the move. Slide the root ball out cleanly rather than shaking off soil. Fill gaps with new mix, water once to settle, then hold fertilizer for four weeks while the plant re-establishes. Expect some leaf drop for one to six weeks - that is a normal stress response on Croton overview, not necessarily a death sentence, as long as stems stay firm and new roots form in the fresh mix.
This guide covers when to repot, how often, which pot and soil to use, a low-disturbance step-by-step method, what recovery looks like, and the mistakes that turn a routine upgrade into weeks of wilted, bare stems.
Why Repotting Matters for Croton
Croton is a woody tropical shrub in the Euphorbiaceae family - the same group as poinsettia and rubber tree - native to Southeast Asia and the western Pacific. Indoors it typically reaches 60–120 cm (2–4 ft) with leaves 10–30 cm (4–12 inches) long, depending on cultivar and light. That bushy habit depends on a root system that can access oxygen, moisture, and nutrients without sitting in stagnant wet soil.
Over time, three things degrade the root zone in a container. Physical crowding happens when roots circle the pot bottom and colonize every pore of the mix. Organic breakdown happens when peat or compost fibers collapse, reducing air space and slowing drainage. Salt accumulation happens when fertilizer and hard water leave residues that stress fine root hairs. Repotting addresses all three at once: it gives roots room, replaces exhausted mix, and resets the Croton watering guide to match the new soil volume.
The RHS notes that crotons can usually stay in their original pot for a year or two, then should move into a slightly larger container in spring once roots become crowded (RHS - Codiaeum Growing Guide). BBC Gardeners’ World gives similar guidance: repot every two or three years in spring if root-bound, into a pot the same size or a little larger than the root ball (BBC Gardeners’ World - Croton). Those sources agree on the core principle - refresh when needed, not on autopilot - but croton adds a wrinkle many generic houseplant articles skip: the plant reacts strongly to how you repot, not just whether you do.
Think of repotting as maintenance for root health and soil structure - not a rescue for a croton that is losing color because it sits in a dark corner, or dropping leaves because cold drafts hit 12°C (55°F) every night. Fix light, temperature, and watering first. Repot when the container itself is the limiting factor: roots out of drainage holes, water running straight through, or mix that smells sour and stays wet for days.
When Croton Needs Repotting
Timing splits into two questions: Is the plant physically ready? and Is the season right? A root-bound croton repotted in deep winter may survive, but it will struggle longer than the same plant moved in April. A healthy croton that is not yet crowded should stay put - unnecessary repotting is one of the fastest ways to trigger leaf drop on a species already famous for it.
Use multiple signals, not a single checkbox. One drainage hole with a visible root tip is not urgent. Two or more signs together - fast drying, stalled spring growth, circling roots when you slip the plant out, and a top-heavy pot that tips easily - mean you should plan a repot within the next active growth window.
Signs Your Croton Is Root-Bound
Roots emerging from drainage holes are the most obvious sign. On croton, thick white roots pushing through the bottom often mean the interior is a dense mat. Water that runs straight through without soaking the mix suggests the root mass has replaced most of the soil volume - there is little medium left to hold moisture, so liquid channels down the sides. The plant drying out unusually fast after you have been watering on your normal schedule is the same problem from a different angle: too many roots, too little mix.
Stalled growth in spring and early summer matters because croton should push new leaves when light and warmth are adequate. If stems stay static while neighbors on the same windowsill grow, inspect the root ball. A pot that feels light immediately after watering can mean roots have consumed the mix structure. Top-heaviness - the plant leaning because foliage outweighs a tiny root anchor - sometimes indicates the container is undersized for the canopy, though check light and staking before assuming roots are the issue.
When you gently remove the plant for inspection, white or tan roots circling the bottom confirm root-bound status. Brown, mushy, or foul-smelling roots point to rot and need a different protocol - trim damaged tissue, improve drainage, and repot even off-season if the plant will not survive otherwise.
Best Time of Year to Repot
Early spring through early summer is the ideal window. Day length is increasing, temperatures are stable above 18°C (65°F), and croton metabolism supports new root and leaf production. The RHS and BBC both recommend spring repotting for codiaeums (RHS - Codiaeum Growing Guide). Early summer remains acceptable if you missed spring - avoid late summer if your winters arrive abruptly, because the plant needs weeks to establish before growth slows.
Avoid winter repotting for routine upgrades. Croton growth slows when temperatures drop below 15°C (59°F) for extended periods, and root repair is slower in cool, dim conditions. The exception is emergency repotting: confirmed root rot on Croton, a pot that shattered, or soil so degraded that anaerobic conditions are killing roots. In those cases, repot immediately into fresh mix, trim only dead tissue, and accept a longer recovery.
Fall sits in the middle. If the plant is mildly crowded but healthy, top-dressing - scraping off the top 2–3 cm of old mix and replacing it with fresh soil - carries less risk than a full repot heading into shorter days. Save the full move for next spring unless signs are urgent.
How Often to Repot Croton
There is no universal calendar, but these guidelines match how croton actually grows in containers:
- Young plants (first one to two years): Often benefit from annual spring repotting as they fill a 10–15 cm starter pot quickly in bright light.
- Mature, established plants: Typically every two to three years, or whenever root-bound signs appear - whichever comes first.
- Emergency only: Root rot, pest-infested soil, or structural pot failure - repot immediately regardless of season, then stabilize conditions.
Fast-growing cultivars in large bright windows may hit the two-year mark sooner. A croton in moderate light in a cool room may stay comfortable for three years. Let the root ball and soil condition decide, not the date on a sticky note. If you repotted last spring and the plant is thriving with no circling roots, skip this year. If you bought a nursery croton in a peat-heavy plug that dries in two days, repot within the first month at home even if the calendar says otherwise.
Choosing the Right Pot Size and Material
Pot choice on croton is less about aesthetics and more about water physics. The container must hold enough mix to anchor the plant, drain freely, and not surround a small root system with a large volume of wet soil that cannot dry between waterings.
One Size Up Rule
Move to a pot 2.5–5 cm (1–2 inches) wider in diameter than the current one - one standard nursery size up. If your croton sits in a 15 cm pot, the next stop is 17–18 cm, not 25 cm. The RHS explicitly warns against choosing a pot much bigger than the rootball, because overpotting keeps compost wet too long and risks root rot (RHS - Codiaeum Growing Guide).
Depth matters less than width for most bushy crotons, but match the root habit: a shallow, wide root mat suits a pot proportionate to spread, not a deep cachepot chosen for height. The top of the root ball should sit slightly below the rim - roughly 1–2 cm - so water pools on the surface briefly before soaking in, rather than running over the edge.
Drainage Holes and Pot Types
Drainage holes are non-negotiable for long-term croton care. A decorative pot without holes works only as an outer cachepot after water drains from an inner nursery pot. Croton roots need oxygen; waterlogged anaerobic soil is a direct path to rot, especially in fresh mix that has not yet been colonized by roots.
Terracotta breathes and dries faster - useful if you tend to overwater or keep croton in moderate light. Glazed ceramic and plastic retain moisture longer - better if you underwater or run high humidity and warm temperatures. Self-watering pots can work for experienced growers who monitor moisture precisely; beginners often struggle because the reservoir keeps the bottom wet while the top looks dry.
Whatever material you choose, confirm the new pot is clean. Scrub used pots with hot water and mild soap, or a diluted bleach rinse followed by thorough rinsing, to reduce pathogen carryover.
Best Soil Mix for Repotting Croton
Croton wants rich, well-draining, slightly acidic mix - not cactus grit, not heavy garden loam. Target pH 4.5–6.5. The RHS recommends a peat-free ericaceous compost blended with grit - roughly three parts compost to one part grit for light, fast drainage (RHS - Codiaeum Growing Guide). For most indoor growers without ericaceous compost on hand, a practical substitute performs well:
- 70% peat-free all-purpose potting mix
- 20% perlite or pumice for aeration
- 10% worm castings or fine compost for gentle fertility
Avoid chunky succulent mixes that dry too fast for croton’s moderate moisture preference. Avoid dense, moisture-retentive blends with heavy peat and no amendment - they suffocate roots after repotting when the plant is already stressed. Do not reuse old soil; it may harbor pathogens, salts, or collapsed structure.
If your tap water is alkaline, slightly acidic mix helps counter long-term pH drift. That matters less on day one of repotting than drainage does, but it supports nutrient uptake over the next year.
Tools and Safety Before You Start
Gather materials before you touch the plant:
- New pot with drainage holes (one size up)
- Fresh potting mix (pre-moisten slightly so it is workable, not dust-dry)
- Hand trowel or scoop
- Clean scissors or pruners
- Chopstick or pencil for settling mix
- Newspaper or tarp for the workspace
- Nitrile or gardening gloves
That last item is not optional decoration. Croton belongs to the Euphorbiaceae family and exudes a milky latex sap when stems or roots are cut. BBC Gardeners’ World states that all parts are toxic, including sap, and recommends gloves when handling (BBC Gardeners’ World - Croton). Pet Poison Helpline lists croton as causing mild oral and GI irritation in pets plus skin irritation from sap (Pet Poison Helpline - Croton). Wear gloves, keep children and pets away from cuttings and spilled sap, wash skin promptly if exposed, and rinse eyes immediately if sap splashes - seek medical attention if irritation persists.
Some growers keep charcoal powder nearby to dab on cut stems during propagation; it is less critical during repotting unless you accidentally snap a branch. Focus on minimizing cuts in the first place.
Step-by-Step: How to Repot Croton
The sequence below prioritizes low root disturbance - the single biggest factor in whether your croton drops a few leaves or half its canopy.
Pre-Water and Remove the Plant Intact
Water thoroughly 24 hours before repotting. Moist root balls slide out as cohesive units; dry roots cling to pot walls and break. Do not repot bone-dry or sopping wet - evenly moist is the target.
Prepare the new pot with 2–3 cm of fresh mix in the bottom. Tilt the old pot sideways, support the stem base with your flat hand, and slide the root ball out without yanking the plant by its foliage. If the pot is stuck, run a knife around the inner edge or squeeze flexible nursery pots. Never tip and shake - that strips fine root hairs croton depends on for water uptake.
Inspect Roots and Refresh Soil Gently
Look at the root ball surface and bottom. Healthy roots are white, tan, or light brown and firm. Trim only black, mushy, or foul-smelling sections with clean scissors. Do not bare-root the plant. Do not aggressively tease apart a solid root mat unless rot requires it - on croton, keeping the root ball intact reduces shock more than “fluffing” roots the way you might on a pothos.
Place the root ball in the new pot so the soil line stays at the same depth as before - never bury the stem deeper. Backfill around the sides with fresh mix, using a chopstick to settle medium into gaps without compacting the center. Firm lightly with your fingers; heavy packing removes air pockets you need. Leave 1–2 cm below the rim for watering.
Water once, slowly, until a little drains from the bottom. Discard saucer water. Do not fertilize. Do not move the plant to a new room and a new pot the same day - stability matters for the next month.
After Repotting Care and Recovery Timeline
Post-repot care is about consistency, not pampering. Keep the croton in Croton light guide - the same exposure it had before, or slightly gentler if you had it in harsh direct sun. Avoid relocating to a dark corner “to rest” or a south-facing sill “to boost growth”; both extremes extend shock.
Watering shifts after repotting because fresh mix and a larger (but modestly larger) pot change drying speed. Check the top 2–3 cm with your finger. Water when dry, lightly at first - the root ball still occupies most of the volume, and outer mix may stay wet while the center dries. Never let the pot sit in a full saucer.
Hold fertilizer for four weeks minimum. Roots with fresh cut surfaces and disturbed fine hairs cannot handle salt load. Resume half-strength feeding only when you see new growth - a fresh leaf unfurling is a better signal than the calendar.
Humidity and temperature: Maintain 40–80% humidity if you already were; do not mist obsessively unless you normally do. Keep temperatures 18–27°C (65–80°F) and avoid drafts from AC vents, heaters, and open windows.
| Phase | Timeline | What to expect |
|---|---|---|
| Immediate | Days 1–7 | Possible wilt, a few yellowing leaves; soil settling |
| Short-term | Weeks 1–3 | Some leaf drop; hold watering steady; no fertilizer |
| Establishment | Weeks 3–6 | New white root tips in outer mix; first new leaves |
| Normal care | Week 6+ | Resume full watering rhythm; light feeding if growing |
Transplant Shock and Leaf Drop
Leaf drop after croton repotting is common and often normal. Croton is among the most environment-sensitive houseplants - it reacts to moves, temperature shifts, and root disturbance by shedding leaves through abscission. That looks alarming when colorful foliage covers the floor, but firm stems and healthy buds usually mean the plant is reallocating resources while roots rebuild.
Shock driven by overpotting, bare-rooting, winter repotting, or immediate heavy watering is worse and lasts longer. Leaves go yellow, stems soften, and new growth fails for six weeks or more. The distinction matters: normal shock stabilizes if conditions stay even; mistake-driven shock progresses until you fix the pot size or soil moisture.
Do not compensate by fertilizing, overwatering on Croton, or moving the plant repeatedly. Each change resets the clock. Trim fully brown, crispy leaves for aesthetics if you want, but leave partially green leaves - they still photosynthesize. Patience is the treatment.
Seasonal and Situational Adjustments
Spring repotting pairs naturally with increased watering frequency as light strengthens. Summer repotting works in warm homes but watch faster drying on outer mix. Fall top-dressing refreshes the surface without full disturbance when the plant is healthy but mix is crusty. Winter is for emergencies only unless you supplement light and heat professionally.
Situational tweaks:
- Recently purchased croton: Wait two to four weeks after bringing it home unless the nursery pot is clearly too small or waterlogged. Acclimate first, repot second.
- Pest history (spider mites): Rinse foliage before repotting; replace all mix; inspect roots for unusual webbing or damage.
- Leggy, bare-stem plant: Repotting alone will not restore lower foliage - pair with pruning after recovery, not the same day as repotting.
- Root rot recovery: Trim mushy roots, drop one pot size if you removed substantial mass, use extra perlite, and water sparingly until new growth.
Common Croton Repotting Mistakes
Jumping two or more pot sizes is the most damaging routine mistake. Excess wet soil around a small root system causes rot before the plant fills the space. One size up - every time.
Bare-rooting and aggressive root teasing strips fine hairs and breaks the root-soil interface croton relies on. Keep the ball intact unless rot forces surgery.
Repotting in winter for convenience adds weeks of leaf drop when the plant cannot grow into the new space. Wait for spring unless rot demands action.
Fertilizing immediately burns stressed roots and shows up as brown leaf margins within days. Four weeks minimum.
Overwatering “to help it settle” keeps fresh outer mix soggy while the root ball drowns. Water once after repotting, then follow the finger test.
Skipping gloves risks sap dermatitis and spreads sap to eyes, pets, and furniture. Treat croton like the Euphorbiaceae member it is.
Repotting while the plant is already stressed from underwatering on Croton, cold, or mite damage stacks failures. Stabilize first when possible.
How Repotting Connects to Other Croton Care
Repotting resets the soil, root, and water triangle - it does not replace good light or sensible feeding. After recovery, croton still needs bright indirect to some direct sun for strong color, water when the top inch dries, and balanced fertilizer at half strength during active growth. A freshly repotted plant in a dark room will stay pale no matter how perfect the mix.
Repotting also intersects with soil refresh without upsizing: if the pot size is still appropriate but mix has compacted, spring top-dressing or same-size repotting with root ball intact refreshes drainage without encouraging rot from oversizing. Link decisions across care topics - if you repot into heavier mix, adjust watering down; if you move to terracotta, adjust watering up slightly.
When leaf problems persist six weeks after a careful repot, look beyond the pot: spider mites, inconsistent temperature, and low light cause similar yellowing. Repotting fixes root-zone limits; it does not fix every croton complaint.
Conclusion
Croton repotting succeeds when you treat it as a low-disturbance spring maintenance task, not an aggressive root overhaul. Repot when roots circle, water runs through, or growth stalls - typically every two to three years for mature plants, more often for fast-growing young ones. Choose a pot only 2.5–5 cm wider, use fresh well-draining slightly acidic mix, water the day before, keep the root ball intact, and wait four weeks before feeding. Expect some leaf drop for up to six weeks while roots establish; firm stems and new leaves mean you are on track.
Wear gloves for sap safety, keep pets and children away from cut tissue, and reserve winter repotting for emergencies like rot. Get the pot size and root handling right, keep light and temperature stable, and croton will reward you with the vivid foliage that made you buy it - without the bare-stick panic that sends so many growers back to the search bar.
When to use this page vs other Croton guides
- Croton overview - Start here for whole-plant context before deep-diving this topic.
- Croton problems hub - Jump to symptom-specific fix guides when this care topic does not resolve the issue.
- Root Rot on Croton - Escalate here when repotting adjustments are not enough.