Mold on Soil on Croton: Causes, Checks & Fixes
Quick answer
Fluffy white or gray growth on croton's soil surface is usually harmless saprophytic mold feeding on organic matter in a mix that stays wet too long - often after stress leaf drop or in a dim hallway where vivid foliage hides slow dry-down. First step: scrape off the moldy top layer and any fallen leaves, then let the upper inch of mix dry before watering again.
Mold on Soil on Croton: Causes, Checks & Fixes
This guide covers mold on soil on Croton. See also the general Mold on Soil guide, watering, and light pages for this plant.
Mold on Soil on Croton: Causes, Checks & Fixes
Quick answer
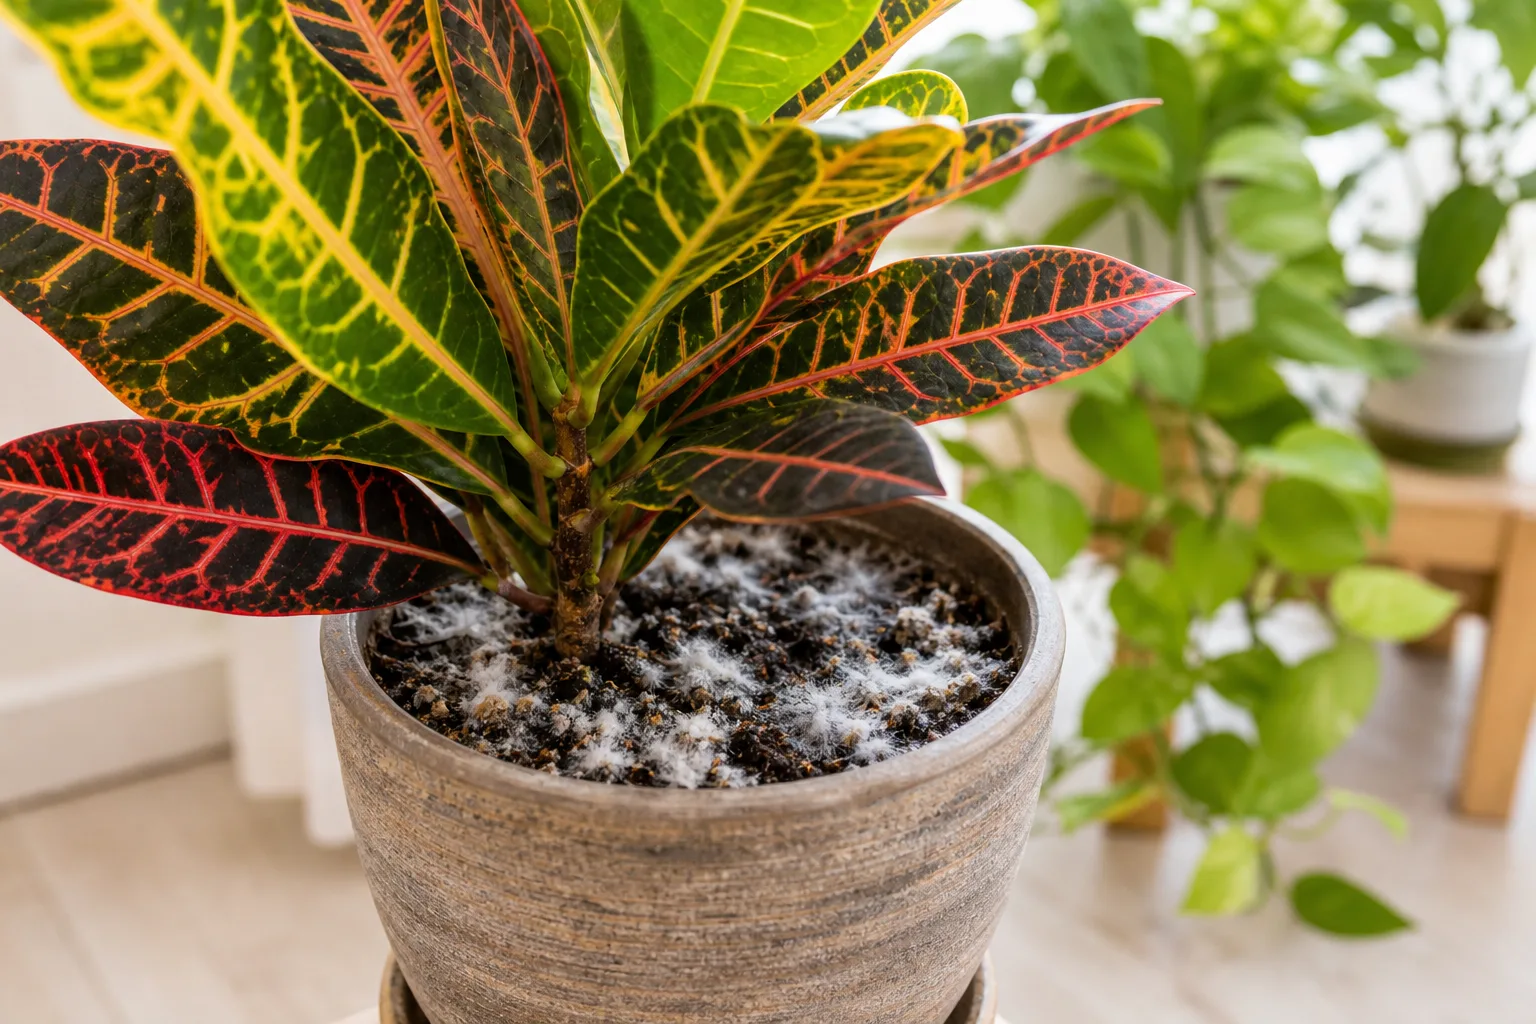
You see white or gray fuzz on the potting mix while your croton’s colorful, firm leaves still look fine - and that mismatch is exactly why surface mold gets ignored until it spreads. The growth is almost always saprophytic mold: a fungus feeding on decaying organic matter in soil that stays wet at the surface. It is unsightly but rarely attacks living plant tissue. What it tells you is that the top layer of mix is not drying between waterings.
On Codiaeum variegatum, two croton-specific traps accelerate that wet surface. Bright-light drying paradox: croton needs bright indirect to partial direct sun for vivid color, yet a dim hallway placement slows evaporation so the mix stays damp even when watering feels moderate. Stress leaf drop as mold fuel: croton drops leaves when moved or stressed; those large leathery leaves landing on wet mix decompose within days and feed the fungus while foliage above still looks healthy.
First step: scrape off the moldy surface layer and any fallen croton leaves, then pause watering until the top inch of mix feels dry. Do not reach for fungicide. Fix the moisture rhythm first and watch whether new mold appears over the next two weeks. For the full dry-check workflow, see our croton watering guide.
What mold on soil looks like on Croton
Surface mold on croton pots has a distinct look that separates it from leaf diseases:
Mold on Soil symptoms on Croton - compare with healthy tissue on the same plant.
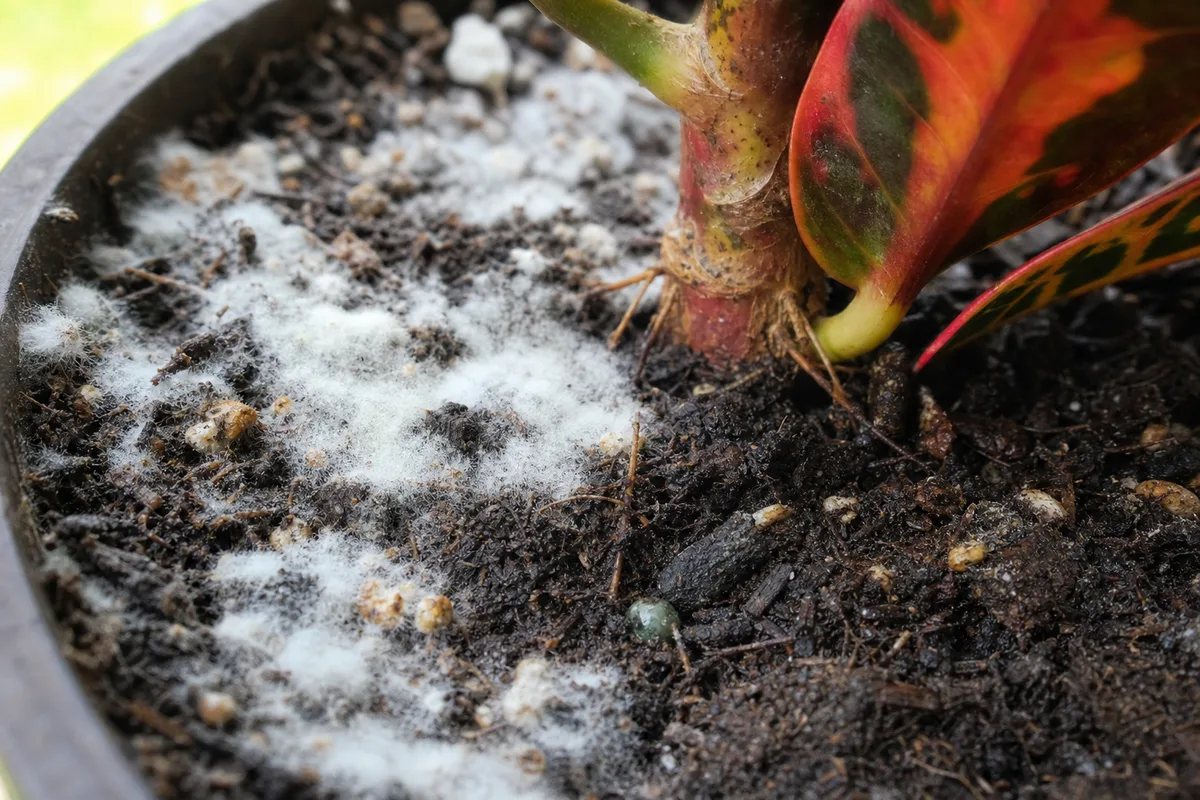
- White, gray, or occasionally yellow-tan fuzzy patches sitting on the potting mix, sometimes spreading to the inner pot rim or drainage-hole edges
- Soil surface that stays dark and cool for many days after watering, even when lower leaves look fine
- Musty smell when you disturb the top layer, especially if fallen leaves are decaying underneath
- Plant foliage still firm and colorful, unless separate overwatering damage is already underway
This is different from powdery mildew or gray mold on leaves, which starts on foliage in damp, stagnant air - not on the soil surface alone. Croton leaves are thick and leathery; if white growth appears on leaf blades with yellow halos or soft brown spots, you are dealing with a foliar disease or pest issue, not the harmless soil fungus this guide covers.
Mold can also be confused with green algae on the soil surface. Algae form a slimy green film in constant moisture and low light - common when croton sits in a dim corner where evaporation is slow. Both algae and saprophytic mold point to the same underlying problem: a wet, stagnant surface layer.
Why Croton gets mold on its soil
Croton is not unusually prone to mold compared with other houseplants, but its normal care setup creates conditions where surface fungus thrives when watering slips out of balance.
Rich, organic potting mix. Croton grows best in fertile, well-draining mix with perlite and worm castings - see our soil guide for workable recipes. That organic content is exactly what saprophytic fungi consume. When the surface never dries, those fungi colonize the top layer within days. The mold is feeding on the mix and decaying debris - not “eating” your croton.
Moderate watering with a slow-drying surface. Croton wants consistent root-zone moisture and should be watered when the top half-inch to an inch of soil dries. If you water on a calendar without checking dryness - or if the pot stays heavy because the plant is in low light - the surface can remain wet while you assume the plant “needs” another drink. Crotons should dry out between waterings, and overwatering is a common mistake on container plants. Chronic wet roots are covered in our overwatering guide.
Bright light affects drying speed. Croton needs bright indirect to partial direct sun for vivid color and steady growth - detailed in our light guide. In insufficient light, the plant uses less water and the mix evaporates slowly. A croton pushed into a dim hallway often has chronically damp soil even when watering frequency seems reasonable. Mold on the surface is an early signal that the pot is not drying at the pace this species expects.
Fallen leaves become mold food. Croton drops leaves readily when moved, chilled, or stressed - the same shock pattern covered in our wilting guide. Those large, leathery leaves landing on wet mix decompose quickly and create a perfect fungal buffet. A plant that looks healthy above the rim can still grow mold where leaf litter collects against the stem base. Mold appearing within a week of repotting or relocation usually traces to this debris-plus-moisture combination, not a new pathogen attacking roots.
Oversized or slow-draining containers. Placing a small root ball in a large pot means moist mix that dries slowly around the plant. Decorative cachepots without drainage, or saucers that hold runoff, keep the bottom and surface wet longer than croton roots can tolerate - a setup trap common with showy floor specimens.
Lookalike symptoms to rule out
| What you see | Likely cause | What to do |
|---|---|---|
| White fuzz on soil only; firm plant | Saprophytic mold on wet surface | Scrape, dry surface, fix watering |
| Green slimy film on soil | Algae in constant moisture + low light | Reduce water, brighten light slightly |
| White powder on leaf surfaces | Powdery mildew (uncommon on croton) | Improve airflow; isolate; treat foliar fungus |
| Gray fuzzy growth on faded flowers or injured leaves | Botrytis gray mold | Remove affected tissue; reduce humidity around foliage |
| Tiny flies when soil is disturbed | Fungus gnats in wet mix | Dry surface; traps; see fungus gnats guide |
How to confirm the cause
Work through these checks before changing anything beyond the first surface cleanup:
- Location of the growth - Fuzz confined to soil and pot rim points to saprophytic mold. White or gray patches on leaves or petioles suggest a different problem.
- Surface moisture - Push your finger into the top inch. If it feels cool, dark, and clingy several days after watering, the surface is too wet. Croton should dry at the top before the next drink.
- Plant firmness - Gently tug a stem. Firm, upright growth with only soil-surface fuzz means roots are likely fine. Mushy stems at the base or wilted leaves with wet soil suggest root rot - treat via our root rot guide.
- Smell test - Sour or rotten odor from the mix indicates anaerobic conditions and possible root decline, not harmless surface mold alone.
- Debris check - Lift fallen croton leaves and look underneath. Decaying organic matter under the mold confirms the fungus has a food source on the surface.
- Fungus gnat scan - Tiny flies hovering near the pot when you disturb the soil share the same wet habitat. Their presence supports a moisture diagnosis but does not mean the mold itself is pathogenic.
- Light and pot assessment - Note whether the croton sits in low light or an oversized pot. Either slows drying and makes mold recurrence likely even after scraping.
If the plant is firm, colorful, and only the soil surface is fuzzy, you have cosmetic saprophytic mold tied to moisture - not an emergency foliar disease.
First fix for Croton
Scrape off the top quarter-inch of moldy mix and all visible leaf debris, discard it in the bin (not the compost pile if you reuse media), and hold your next watering until the top inch of mix is dry.
Use a spoon or small trowel and work gently near the stem base. Wear gloves - croton belongs to the Euphorbiaceae family, and its milky latex sap can irritate skin and eyes on contact. Wash hands before touching your face. You do not need to repot for a first occurrence. Removing the active spore layer and cutting off the fungus’s food supply is the correct opening move.
After scraping, do not water from the top immediately. Let the surface dry. When you resume, water thoroughly until excess drains, then empty the saucer within 30 minutes. If the pot feels heavy and the surface still will not dry within a week, skip to the secondary steps below rather than scraping again without changing conditions.
Step-by-step recovery
Once the surface is clean, address the conditions that allowed mold to establish:
Adjust the watering rhythm
Check dryness at the top half-inch to an inch before every watering during active growth. In winter, when croton growth slows, let the top inch to two inches dry. The goal is a moist root zone with a dry surface between drinks - not a constantly wet top layer. Full seasonal depth guidance lives in the watering guide.
Improve drying with light and airflow
Move the croton to brighter indirect light if it sits in a dim spot. Better light increases water use and surface evaporation without forcing the plant into harsh direct sun that can scorch leaves. Ensure gentle air movement in the room; stagnant humid corners prolong surface wetness.
Switch to bottom watering temporarily
Set the pot in a tray of water for 15 to 30 minutes so the plant absorbs moisture from below while the surface stays dry. This breaks the mold cycle and still meets croton’s need for thorough hydration. Remove excess water after soaking.
Refresh the top layer if needed
If mold returns after scraping and drying adjustments, replace the top half-inch with fresh, dry potting mix matched to croton’s usual blend. This is less disruptive than a full repot and removes lingering spores in the surface layer.
Repot only when mold keeps returning
Full repotting is warranted if mold recurs within days despite dry surface intervals, the mix smells sour, roots are brown and soft, or the pot is clearly too large. Move up only one pot size - about 1 to 2 inches wider than the root ball - with fresh well-draining mix and confirmed drainage holes.
Repot mix for croton after recurring mold: blend 2 parts peat-free potting mix or coconut coir, 1 part perlite or pumice, and 1 part pine bark fines or orchid bark, plus a handful of worm castings per gallon of finished mix. That roughly 50% organic base with 25% drainage amendment and 25% bark matches what croton needs: moisture retention in the root zone without a perpetually wet surface. Size the pot to the trimmed root mass, not the leaf canopy. Step-by-step technique is in our repotting guide.
Recovery timeline
Surface mold should not reappear within one to two weeks once the top layer dries reliably between waterings. You will know conditions are improving when:
- The soil surface lightens in color and feels dry to the touch at the top inch before each watering
- No new fuzzy patches form after scraping
- Fungus gnat numbers drop as the surface stays dry
- Croton continues pushing firm new leaves at stem tips
Croton leaves do not “heal” from mold because mold was never on the leaves. Judge success by absence of new mold and stable new growth, not by changes to existing foliage.
If yellowing, wilting, or leaf drop continues after the surface stays dry for two weeks, inspect roots. The mold was a moisture indicator; ongoing decline usually means root damage from earlier overwatering.
Reviewed case: post-move leaf drop and dim-hallway dry-down
Editorial case note reviewed by LeafyPixels Review Board - composite of common indoor croton setups.
A ‘Petra’ croton in a 20 cm nursery pot developed white fuzz three days after a hallway move that triggered roughly thirty percent leaf drop. Colorful upper foliage still looked firm; the top inch of mix stayed damp nine days between drinks in January light. Fallen leaves sat against the stem base under the canopy.
Actions taken: scraped surface mold and all leaf debris; moved the pot 1.5 m closer to an east-facing window over one week; paused top watering until the top inch dried (twelve days); resumed soak-and-drain watering with saucer emptied within thirty minutes.
Measured outcome: pot weight dropped noticeably by day 10; surface stayed dry four to five days after the next drink; no new fuzz by day 18; one firm new leaf at a stem tip by day 24. Existing yellowed leaves from the move did not re-green - recovery judged by stopped regrowth and clean new foliage.
This pattern - relocation leaf drop, debris on wet mix, dim placement slowing dry-down - is the recurrence signature to watch on your own croton.
Mistakes to avoid
Do not spray fungicide on harmless surface mold - it adds chemicals without fixing the wet surface that caused the problem. Do not keep watering on schedule while mold is visible; scraping without drying the mix brings mold back within days. Do not confuse a firm, colorful croton with a dying one and repot unnecessarily on day one; surface mold alone rarely requires repotting.
Avoid letting dropped croton leaves accumulate on the mix. Do not leave the pot in a sealed decorative outer pot that traps humidity. Do not place croton in an oversized container hoping it “grows into it” - excess wet mix around a small root ball is a common mold trigger.
Do not assume mold means your croton is doomed. It means the surface environment is out of balance. Fix moisture first.
How to prevent mold on croton soil
Prevention follows croton’s normal care rhythm, tightened at the surface:
- Water on dryness, not calendar - Top half-inch to inch dry in growth season; deeper in winter. Full rhythm in the watering guide.
- Bright enough light - Enough exposure that the pot dries predictably between drinks (light guide).
- Clean soil surface - Remove fallen leaves within a day or two, especially after moves or repotting.
- Drainage discipline - Pots with holes; saucers emptied after every watering; no standing water in cachepots.
- Right-sized containers - One size up at repot, not a jump to a much larger pot.
- Occasional bottom watering - Keeps the surface dry during fungus-prone months.
If mold appears once a year after a heavy hand with the watering can, treat it as feedback and adjust. If it returns every week, the drying cycle - not the fungus - is the problem to solve.
When to worry
Surface mold alone on an otherwise healthy croton is low urgency. Escalate your response when:
- Mold returns within three to five days of removal despite a dry surface interval
- Mix smells sour or roots are brown and mushy when you slip the plant from the pot
- Stems soften at the soil line or the plant wilts while soil is wet
- Fungus gnats persist with stunted new growth and yellowing lower leaves
- Multiple plants in the same wet corner all develop mold and gnats together - fix the environment, not just one pot
In those cases, treat potential root rot and chronic overwatering alongside surface cleanup. Cosmetic mold and advancing root damage can coexist when wet conditions have persisted for weeks. If mold and sour soil persist after two corrected dry-down cycles, contact your local cooperative extension office for a root-health assessment before repeated scraping.
Pet safety and croton sap
Croton is toxic to cats and dogs if ingested, per ASPCA listings. The milky latex sap in stems and leaves - typical of Euphorbiaceae - can irritate skin and cause oral upset if chewed. Common white saprophytic soil fungi are not the same as toxic wild mushrooms, but discourage pets from digging in moldy mix; ingestion of any houseplant soil can cause mild stomach upset.
When scraping mold near the stem base, wear gloves, work over newspaper, discard debris in the trash, and wash hands before touching your face. Keep plants and scraped material out of pet reach. If a pet ingests croton tissue or a large amount of moldy soil, contact your veterinarian or ASPCA Animal Poison Control at (888) 426-4435.
Immunocompromised growers may prefer a dust mask when disturbing fuzzy colonies and should avoid inhaling spores directly over the pot.
Related croton guides
- Croton overview - care hub, toxicity, and species basics
- Watering - dry-depth probes and seasonal rhythm
- Light - bright exposure that speeds pot dry-down
- Soil - perlite-bark mix recipes and drainage testing
- Overwatering - wet heavy soil before rot advances
- Root rot - trim, repot, and salvage when sour smell appears
- Fungus gnats - flies sharing the same wet-surface cause
- Wilting - relocation shock and leaf drop after moves
- Repotting - timing and technique without triggering more drop
Conclusion
Mold on croton soil tells you the potting mix surface has stayed wet too long - not that your colorful Codiaeum variegatum is doomed. Confirm white or gray fuzz on damp topsoil with firm foliage above, scrape it, dry the top inch, and fix light and cachepot habits before adding another drink. Most crotons recover without heroic measures when stems stay firm and roots stay healthy. When mold returns after two proper dry-down cycles, inspect roots before scraping again - persistent fuzz on a firm plant usually means an unresolved wet-surface culture, but sour smell and mushy roots mean rot, not cosmetic mold.