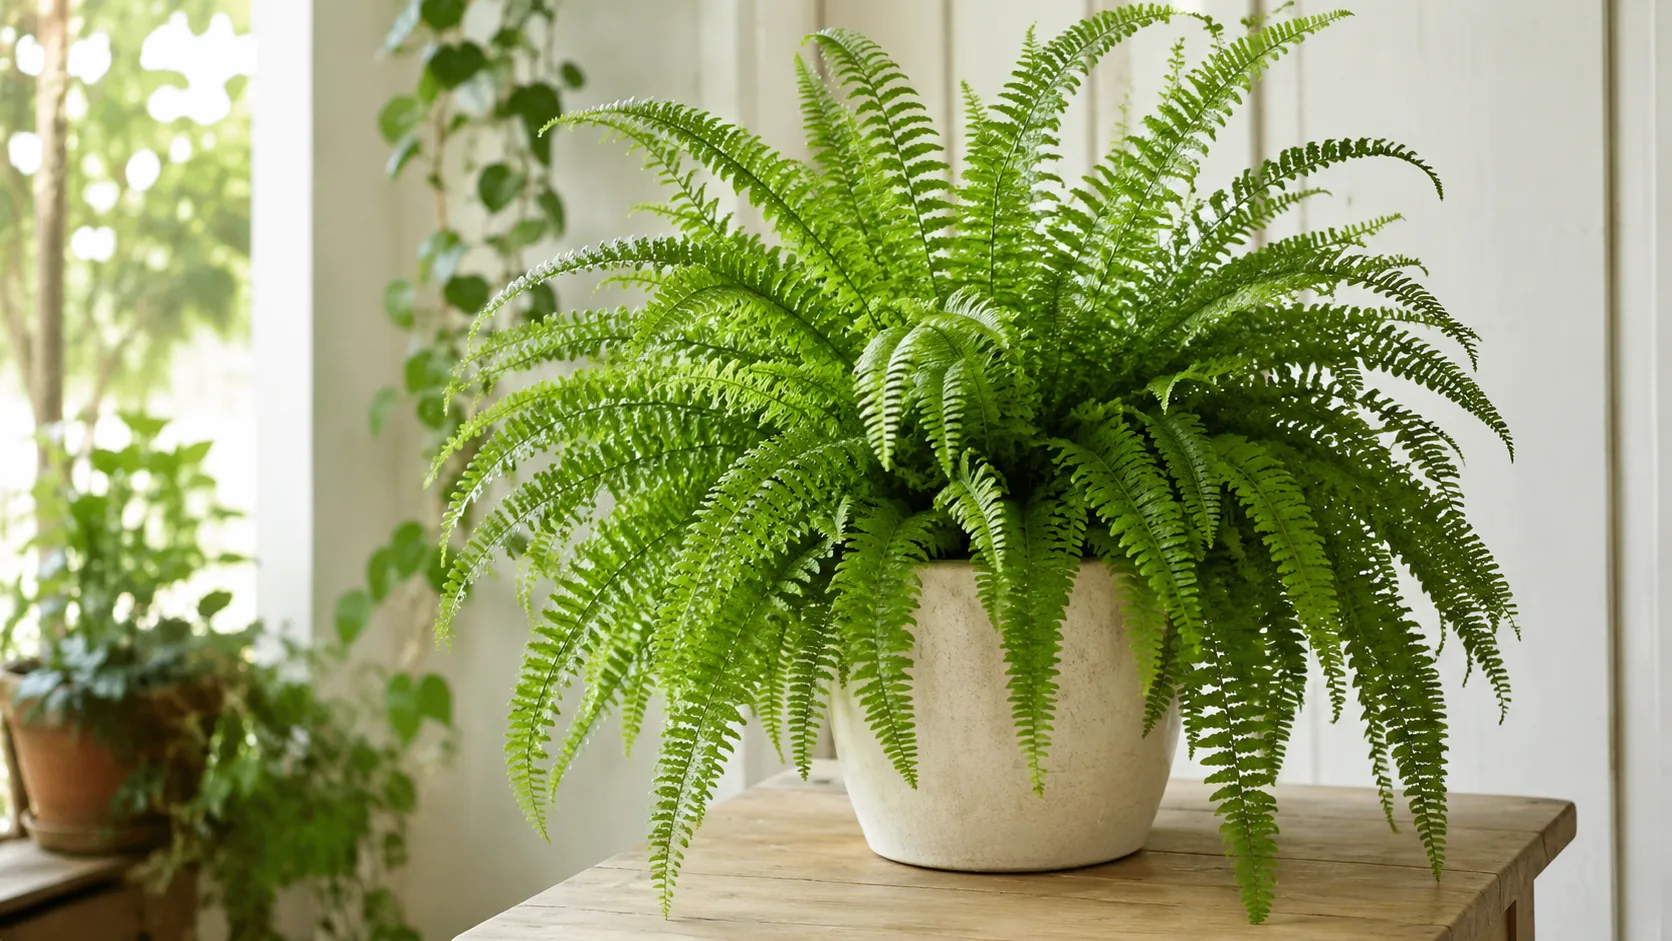
Boston Fern Care: Light, Water, Humidity, and Soil
Nephrolepis exaltata
Keep Boston fern lush - high humidity, consistent moisture, indirect light, and brown frond fixes.
Boston Fern Care: Light, Water, Humidity, and Soil
Start with wateringThe most common care mistake for Boston FernWatering guide →Boston Fern care essentials
Light
bright to medium indirect light, medium indirect light
Water
Every 3–5 days spring and summer (top 2 cm beginning to dry). 5–7 days in winter. Keep consistently moist but not waterlogged.
Soil
Well-draining but moisture-retentive potting mix. pH 5.0–5.5. Peat or coco-based with perlite.
Humidity
50–70%
Temperature
16–24°C (60–75°F)
Fertilizer
Feed lightly during active growth.
About Boston Fern
Boston Fern has a upright growth habit.
| Detail | Information |
|---|---|
| Growth habit | Upright |
| Scientific name | Nephrolepis exaltata |
Boston Fern Care: Light, Water, Humidity, and Soil
What Boston Fern Actually Is (and Why Its Native Range Matters)
Boston fern is not a single mystery plant behind a generic label. The species most houseplant buyers receive is Nephrolepis exaltata (L.) Schott, a terrestrial or epiphytic herbaceous perennial fern in the family Polypodiaceae. The classic indoor form is usually sold as the cultivar ‘Bostoniensis’ - the arching, feathery sword fern that became the default “Boston fern” in North American commerce after a sport of N. exaltata was selected in the late nineteenth century. The species epithet exaltata is Latin for “very tall,” which describes its wild habit more than the compact potted versions on most nursery benches.
In nature, Boston fern grows across tropical and subtropical regions of the Americas, from Florida through Central America into parts of South America. NC State Extension notes it is commonly grown as a houseplant in USDA zones cooler than 10a, where outdoor winters would kill it. That geographic fact is the spine of indoor care: this is a plant adapted to warm, humid, filtered light under forest canopy - not to the dry, dim corners where people often park a fern because it “likes shade.”
Wild plants root in moist, organic-rich soil or attach as epiphytes on trees, where humidity stays high and direct sun rarely hits the fronds for long. Mature specimens in cultivation typically reach 2 to 3 feet (60–90 cm) in height and spread, with a moderate growth rate when light, moisture, and humidity align. The growth habit is upright to arching, which is why hanging baskets and elevated pedestals show off the fronds so well - the plant is built to cascade rather than climb.
Two practical consequences follow from the taxonomy. First, fine fern roots suffocate in stale, airless wet soil far faster than the thick roots of a pothos or snake plant. Second, not every plant labeled “fern” shares Boston fern’s tolerances. Asparagus fern (Asparagus aethiopicus) is unrelated and has different needs. Some outdoor fern species are toxic to pets. When you keep the botanical name Nephrolepis exaltata on the tag, you keep the care instructions honest.
Boston Fern at a Glance
Before diving into each variable, here is the reference card most experienced growers keep in their heads:
Light: Bright to medium indirect light for most of the day. East-facing windows, bright north exposures, and filtered west or south light work well. Deep shade slows growth; direct midday sun scorches fronds.
Water: Keep the mix consistently moist but never waterlogged. In active growth, check every few days; water when the top 2 cm (about 1 inch) of mix is beginning to dry. Expect roughly every 3–5 days in spring and summer and every 5–7 days in winter - but always verify with your finger, a skewer, or pot weight rather than a calendar.
Humidity: Target 50–70% relative humidity, with some finer cultivars appreciating levels toward the upper end. Below ~40% for extended periods, expect brown tips and spider mite risk.
Temperature: 60–75°F (16–24°C) is the comfort zone. Avoid sustained exposure below 55°F (13°C) and keep the plant away from heating vents, air-conditioner drafts, and cold window glass in winter.
Soil: Well-draining but moisture-retentive mix, ideally peat- or coco-based with perlite, in the pH 5.0–5.5 range that fern roots prefer. A drainage hole is non-negotiable for long-term indoor health.
Feeding: Light, balanced fertilizer during active growth only - typically spring through early fall.
Propagation: Division and runners (stolons) are the reliable home methods.
Pet safety: ASPCA lists Boston fern as non-toxic to cats and dogs.
If those seven lines match your home setup, the rest of this guide is refinement. If two or more are off, fix the environment before buying more fertilizer or chasing pests.
Light: Bright Indirect and What to Avoid
Boston fern needs bright, indirect light - the kind that fills a room without casting hard shadows of individual leaves on the wall. NC State Extension classifies its outdoor tolerance as dappled sunlight and deep shade, but indoors “shade-tolerant” does not mean “thrives in a dark hallway.” Low light may keep a plant alive for a while, yet new fronds emerge smaller, paler, and spaced farther apart on thin stems. That stretched growth is the plant telling you it is spending energy reaching for photons it is not receiving.
Too much light produces a different failure mode. Direct sun - especially harsh afternoon rays through an unfiltered south or west window - bleaches fronds to a washed-out yellow-green, scorches pinnae tips, and can cause sudden frond collapse after a quick move from a dim shop to a bright sill. If you want to increase light, do it gradually over one to two weeks so existing fronds can acclimate.
The best proof of correct light is new growth, not old leaves. Mature fronds that browned last winter will not repair themselves. What matters is whether the newest unfurling frond is firm, evenly green, and proportional to the plant’s mature size. Compact new pinnae on a full-sized frond mean the light level is working.
Window Placement and Grow Lights
East-facing windows are often ideal: gentle morning sun, bright ambient light the rest of the day. A bright north window in the Northern Hemisphere can support a healthy Boston fern if the room is not shaded by buildings or trees. West and south exposures work when filtered by sheer curtains or when the plant sits several feet back from the glass.
If natural light is weak - common in winter at higher latitudes - a full-spectrum grow light can supplement. Position it far enough to deliver steady illumination without heating the frond canopy. Start with moderate duration (10–12 hours) and watch for heat stress or bleaching. Grow lights are a support tool, not a substitute for correcting overwatering on Boston Fern or dry air.
Every light change alters watering speed. A fern moved from a dim corner to a bright east window will dry its pot faster. After any relocation, check moisture more frequently for two weeks before settling into a new rhythm.
Watering: Consistent Moisture Without Waterlogging
Watering is where most Boston ferns are won or lost. The species evolved with steady root-zone moisture and high ambient humidity, but its fine roots also require oxygen. That combination means the goal is even hydration without a swamp - not bone-dry soil for days, and not a pot that stays wet from Monday to Sunday.
The most reliable check is physical: press your finger into the mix to the depth of the top 2 cm. When that layer is beginning to dry but the deeper mix still feels lightly moist, it is time to water. A wooden skewer left in the pot for ten minutes and pulled out works the same way - damp wood means wait; barely moist at the tip with drier surface means drink. Pot weight is the advanced version: lift the container when you know it is properly watered, then lift it daily until the weight drops noticeably.
Water thoroughly until excess runs from the drainage hole, then empty the saucer within fifteen minutes. Some growers bottom-water by setting the pot in a tray of water for twenty to thirty minutes and letting the mix wick moisture upward; that method works if you still drain excess afterward. Never let the pot sit in runoff - root rot on Boston Fern begins in stagnant water at the pot bottom long before the surface looks wet.
Boston fern dislikes swinging between drought and flood. Letting the mix go completely dry turns fronds crispy and can damage fine root hairs. Flooding a dry plant repeatedly without checking the root zone invites rot. If you missed a watering and the fronds wilted, rehydrate fully once, drain well, and then return to the normal check-before-you-pour rhythm instead of compensating with daily shallow sips that never reach the root ball.
Tap water is usually acceptable, but fluoride and chlorine can accumulate in the mix and contribute to tip burn on sensitive ferns. If tips brown despite good humidity and correct watering, try filtered or distilled water for a few months, or flush the pot with plain water until it runs clear from the bottom to leach salts.
Seasonal Rhythm and Common Mistakes
During active growth - typically spring through early fall when light is stronger and temperatures are warmer - the pot dries faster and the plant uses more water. Expect to water every 3–5 days as a starting interval, then adjust to your room.
In winter, growth slows even indoors. The same watering frequency that worked in July will overwater the plant in January. Stretch checks to every 5–7 days, verify moisture at depth, and pause fertilizer until new growth resumes. Overwatering a semi-dormant fern in cool, dim conditions is the most common winter kill.
The three watering mistakes worth naming explicitly: calendar watering without checking the mix, shallow daily top-ups that never hydrate the root ball, and decorative cachepots that trap runoff and keep roots submerged. Fix the system before blaming the plant.
Humidity and Temperature
Boston fern is a humidity-loving tropical, not a desert survivor. Most sources converge on 50% relative humidity as a practical minimum indoors, with 60–80% ideal for lush frond edges. In heated winter air that drops into the twenties or low thirties percent, you will see brown tips, slowed unfurling, and increased spider mite pressure - mites thrive where fronds are dry and dust accumulates.
Temperature stability matters as much as the absolute number. The comfort band is 60–75°F (16–24°C). Brief dips below 55°F (13°C) can cause frond wilting and dieback. Hot, dry air blasting from a furnace vent or car dashboard on the ride home from the nursery produces the same crispy edges as underwatering on Boston Fern, but no amount of watering fixes it until you move the plant.
Keep Boston fern away from cold window glass on winter nights, exterior doors that leak drafts, and air-conditioning vents that desiccate foliage in summer. A stable microclimate beats a perfect window with chaotic airflow.
Practical Humidity Boosters
Misting is the most overrated humidity tool. It raises moisture for minutes, wets foliage in ways that can encourage fungal spotting, and gives a false sense of security. Use misting only as a minor supplement, not your primary strategy.
What actually works:
- A small humidifier near the plant (not pointed directly at fronds) is the most reliable fix in dry homes.
- A pebble tray filled with water beneath the pot - pot elevated above the waterline - adds localized humidity as water evaporates.
- Grouping plants creates a shared humid microclimate through collective transpiration.
- A bright bathroom or kitchen can be an excellent location if steam from showers and cooking raises ambient moisture and the window still delivers adequate indirect light.
Measure humidity with a cheap hygrometer if you are troubleshooting tip burn. Guessing “it feels dry” is less useful than knowing the reading drops to 28% every night when the heat cycles on.
Soil Mix, Pots, and Drainage
Boston fern roots are fine and fibrous. They need a mix that holds moisture evenly while draining freely and resisting compaction. The LeafyPixels baseline recipe - and a solid starting point for most homes - is a peat- or coco coir-based potting medium with perlite, targeting pH 5.0–5.5. A practical home blend might be 60% peat or coco, 30% perlite, and 10% fine bark or orchid bark for extra structure. Commercial indoor potting mixes labeled for houseplants work if you lighten them with extra perlite; straight heavy peat with no aeration compacts after a year and suffocates roots.
Drainage speed is your quality check. After a full watering, water should exit the bottom within seconds to a minute, not pool on the surface for ten minutes. If water runs down the gap between mix and pot wall - the “channeling” problem - the root ball may be hydrophobic from prior drought or the mix may be too decomposed. Submerge the pot briefly in a tub of water to re-wet the core, then repot into fresh mix if the problem repeats.
Pot size should match the root ball, not the frond cascade. Go up one size at Boston Fern repotting guide - typically 1–2 inches (2.5–5 cm) wider. An oversized pot holds wet mix around roots that cannot use it, which is the fastest route to rot after repotting. Hanging baskets are excellent display choices because they allow fronds to arch naturally and improve airflow around the canopy.
Do not rely on rocks in the bottom of the pot to fix poor drainage. They create a perched water table that can keep the root zone wetter, not drier. One drainage hole, quality mix, and disciplined emptying of the saucer beat decorative shortcuts.
Fertilizer During Active Growth
Boston fern is not a heavy feeder. It wants modest nutrition during active growth and silence the rest of the year. A balanced water-soluble houseplant fertilizer diluted to one-quarter to one-half the label strength, applied every four to six weeks from spring through early fall, is sufficient for most indoor specimens. Always apply to already-moist soil so nutrients distribute without burning fine roots.
If your potting mix includes a starter fertilizer charge, skip supplemental feeding for the first four to six weeks after repotting. Salt buildup from overfeeding shows up as crust on the mix surface and brown, burned frond tips even when humidity and watering are correct. Flush the pot with plain water quarterly in hard-water areas, or refresh the mix at repotting.
Pause feeding when the plant is not growing - winter slowdown, immediately after repotting, during pest recovery, or when fronds are declining from root problems. Fertilizer does not rescue a plant in the wrong environment; it accelerates growth only when the light-moisture-humidity triangle is already working.
Repotting and Root Health
Repot Boston fern when roots circle the drainage holes, the mix has compacted or smells sour, water runs straight through without soaking in, or the plant dries out unusually fast despite a normal Boston Fern watering guide. For many indoor ferns, that timeline is roughly every one to two years, but the physical signs matter more than the calendar.
Use fresh, well-draining mix as described above. Tease apart only the outermost circling roots; you do not need to demolish the entire root ball. Position the crown at the same depth it grew before - burying the rhizome too deep invites crown rot. Water lightly after repotting and keep humidity slightly elevated for the first two weeks while damaged root tips heal.
Best Time of Year to Repot
The ideal window is early active growth - late winter into spring when days lengthen and new croziers (coiled fronds) begin appearing. That gives the plant an entire bright season to colonize fresh mix with new roots. Repotting during the deepest winter slowdown or mid-heatwave adds stress without recovery time. If the mix is genuinely sour and roots are suffocating, repot immediately regardless of season - but adjust expectations and withhold fertilizer until growth resumes.
Propagation by Division and Runners
Boston fern propagates reliably at home by division and by runners, the thin stolons that arch over pot edges and root at nodes when they touch moist medium. Spore propagation and tissue culture exist commercially, but they are impractical for most indoor gardeners and will not reproduce named cultivar traits from spores.
Division is the best method for potted plants:
- Water the parent a day ahead so the root ball is hydrated.
- Remove the plant from its pot and inspect roots. Healthy roots are firm and light tan to brown, not black and mushy.
- Slice the root ball into sections with a clean knife or hands, ensuring each division has healthy roots and several fronds.
- Pot each section into fresh mix in a container with drainage, at the original planting depth.
- Water lightly, maintain Boston Fern light guide and elevated humidity (a loose clear bag or humidifier helps), and withhold fertilizer until new growth is obvious - usually several weeks in warm conditions.
Runner propagation works when you see leafless or sparsely leafed stolons with visible nodes:
- Identify a runner with a node that has rooted or is touching the mix surface.
- Cut it close to the parent with sterile shears, keeping any small roots attached.
- Plant the node in a small pot of moist, sterile mix, pinning it gently if needed so the node stays in contact with soil.
- Keep the medium lightly moist - not saturated - and humidity high until the runner stiffens and pushes new fronds.
Do not propagate a stressed, pest-infested, or rotting parent plant. Weak divisions inherit weak health. Stabilize the original fern first, then take clean material from recovered growth.
Common Problems and Symptom Reading
Most Boston fern problems are environmental, not mysterious diseases. The fronds are a slow-moving dashboard: they record watering, humidity, and light mistakes from days or weeks earlier. Patience is part of the fix - correcting the environment today does not green up yesterday’s fronds tomorrow.
Yellow Fronds, Brown Tips, and Leaf Drop
Yellowing fronds usually trace to one of four causes, checked in this order:
- Overwatering - especially in winter or low light. Yellow fronds with soft, darkened base tissue and sour-smelling mix point here. Reduce frequency, improve drainage, and inspect roots.
- Underwatering or uneven moisture - yellow-tan fronds that are crispy at the edges and a pot that feels feather-light. Rehydrate thoroughly once, then maintain even moisture.
- Low light or sudden light change - generalized pale yellowing and sparse new growth. Increase bright indirect light gradually.
- Natural senescence - older fronds at the base yellow and drop as new ones emerge from the center. Remove spent fronds at the base with clean scissors.
Brown tips most often mean low humidity, inconsistent watering, salt or fluoride buildup, or hot dry airflow. Raise humidity with a humidifier, flush salts, try filtered water, and move the plant off the radiator.
Sudden mass frond drop after bringing a plant home or moving it is often transplant or relocation shock - especially if the nursery grew it in high humidity and your home is dry. Stabilize light and moisture, raise humidity, and wait. New croziers are the sign recovery is working.
Spider Mites, Scale, and Fungus Gnats
Spider mites appear as fine stippling on fronds, sometimes with webbing on undersides, almost always in dry air. Shower the foliage gently to knock mites off, increase humidity, and treat with insecticidal soap on a weekly cycle for three applications if populations persist. Mites are a humidity warning as much as a pest problem.
Mealybugs hide in frond axils as white cottony masses. Scale looks like brown bumps on stipes and rhizomes. Manual removal plus insecticidal soap handles early infestations. Isolate the plant until you see no new pests for two weeks.
Fungus gnats indicate the mix surface stays wet too long. Let the top layer dry slightly more between waterings, add a layer of coarse sand or orchid bark on the surface if needed, and address overpotting. Larvae rarely kill established ferns but signal a moisture system out of balance.
Cultivars and Buying a Healthy Plant
The name “Boston fern” in commerce usually means N. exaltata ‘Bostoniensis’, but cultivars differ in texture, size, and humidity tolerance. Wisconsin Horticulture lists several worth knowing:
- ‘Compacta’ - shorter, more upright, 15–18 inch fronds; good for smaller spaces.
- ‘Dallas’ / ‘Dallas Jewel’ - compact, spreads quickly, tolerates lower light and less humidity than classic Bostoniensis.
- ‘Fluffy Ruffles’ - smaller, dense, wavy pinnae; showy but can demand higher humidity.
- ‘Whitmanii’ - finely cut, feathery fronds; appreciates moisture and humidity.
- ‘Verona’ - very pendulous, lacy fronds for hanging displays.
- Rita’s Gold™ - chartreuse foliage; same care, slightly less forgiving of low light.
When buying, choose plants with firm emerging croziers, no sticky residue on fronds (honeydew from pests), and mix that smells earthy, not sour. Avoid pots with collapsed centers, widespread brown fronds in low light (often rot), or soil that is wet and cold to the touch - a sign of chronic overwatering at the store.
Your first month at home should be boring: quarantine from other plants for two weeks, no immediate repot unless roots are clearly failing, and consistent moisture checks while the fern adapts from greenhouse humidity to your room. Watch new growth, not old cosmetic damage.
Pet Safety: What the ASPCA Says
Boston fern is one of the rare ferns that pet owners can relax about. The ASPCA lists Nephrolepis exaltata (Boston fern) as non-toxic to both cats and dogs. That is a meaningful distinction in a category where many lookalikes - asparagus fern, for example - carry different risk profiles, and some outdoor fern species are genuinely poisonous.
Non-toxic does not mean salad-bar approved. Eating large quantities of fibrous fronds can still cause mild gastrointestinal upset - vomiting or diarrhea - simply from bulk and fiber, the same way a cat might react to eating too much grass. Chewing may also irritate mouths temporarily. Keep the plant accessible for household peace if you choose, but redirect habitual nibblers and call your veterinarian if a pet shows persistent vomiting, lethargy, or refusal to eat after consuming a large amount of plant material.
If you are unsure of the species - some retailers mislabel plants - confirm the botanical name on the tag or pot sticker before relying on pet-safety assumptions.
Placement Ideas for Real Homes
Boston fern earns its keep where light, moisture, and display value intersect:
- Hanging basket in a bright living room - fronds arch at eye level; rotate weekly for even growth.
- Elevated plant stand near an east window - keeps the cascade off the floor and away from pets and toddlers.
- Bright bathroom with a window - steam from showers supplements humidity; ensure at least four to six hours of meaningful indirect light daily.
- Kitchen counter away from the stove - cooking humidity helps, but grease film on fronds blocks light; wipe gently with a damp cloth monthly.
- Office with supplemental grow light - choose a compact cultivar like ‘Dallas’ if desk space is limited.
Boston fern also appears on lists of houseplants studied for air pollutant removal, including formaldehyde and xylene in controlled chamber research. That is a pleasant bonus, not a reason to pack a bedroom with ferns and skip ventilation. Healthy plants in appropriate numbers contribute to a pleasant indoor environment; they do not replace fresh air exchange.
Match the cultivar to the room. A classic ‘Bostoniensis’ in a dry, bright loft will struggle more than a ‘Dallas’ in the same spot. The care principles stay the same; the margin for error changes.
Conclusion
Boston fern rewards growers who respect its tropical origins instead of treating it like a plastic decoration that happens to be alive. Give Nephrolepis exaltata bright indirect light, a moisture rhythm built on checking the top 2 cm of mix rather than a calendar, humidity at or above 50%, and a well-aerated peat- or coco-based mix with a drainage hole. Feed lightly in summer, repot in spring when roots demand it, and propagate by division or runners when the plant is actively growing and healthy.
When fronds yellow or tips brown, read the symptom against watering, humidity, and light before reaching for fertilizer or pesticides. Most failures are environmental - fixable once you see the pattern. Get the four foundations right, choose a cultivar that fits your room’s humidity budget, and Boston fern becomes one of the most satisfying classic houseplants you can grow indoors: lush, arching, pet-safe, and genuinely responsive when you give it what it actually needs.
When to use this page vs other Boston Fern guides
- Boston Fern overview - Canonical hub for this species - care topics and problems branch from here.
- Boston Fern problems - Symptom-first path when you already know something is wrong.
Related Boston Fern guides
How to care for Boston Fern?
How much light does Boston Fern need?
bright to medium indirect light, medium indirect light
- bright to medium indirect light, medium indirect light - bright to medium indirect light, medium indirect light.
When should you water Boston Fern?
Every 3–5 days spring and summer (top 2 cm beginning to dry). 5–7 days in winter. Keep consistently moist but not waterlogged.
- Check top 2 inches - Every 3–5 days spring and summer (top 2 cm beginning to dry).
- Drain excess water - Keep consistently moist but not waterlogged.
What soil works best for Boston Fern?
Well-draining but moisture-retentive potting mix. pH 5.0–5.5. Peat or coco-based with perlite.
- Well-draining mix - Well-draining but moisture-retentive potting mix.
Grower notes for Boston Fern
What matters most with Boston Fern
Boston Fern is less forgiving of dry air and missed watering than tough foliage plants. The trick is steady moisture with oxygen, not a swampy pot. In practice, the care checkpoint is simple: bright to medium indirect light, medium indirect light. Pair that with well-draining but moisture-retentive potting mix; pH 5.0–5.5. Peat or coco-based with perlite, and avoid changing water, pot size, and placement all at once.
Best placement in a real home
Boston Fern belongs where bright to medium indirect light, medium indirect light is realistic for most of the day, not only where the pot looks good. Every 3–5 days spring and summer (top 2 cm beginning to dry). 5–7 days in winter. Keep consistently moist but not waterlogged. If the pot stays wet longer than expected, move the plant into better light or reassess the mix before watering again. Humidity target: 50–70%. Temperature comfort zone: 16–24°C (60–75°F).
Before you buy this plant
Choose Boston Fern with firm new growth, clean leaf undersides, and soil that does not smell sour or feel compacted. Be cautious if you see brown-tips, sticky residue, collapsed crowns, or a pot that is wet in poor light. Cosmetic old-leaf damage is less worrying than weak roots or active pests.
First month after bringing it home
Do not repot Boston Fern on day one unless the mix is failing or pests are obvious. Quarantine it, learn how fast the pot dries, and keep care boring while it adjusts. Watch especially for brown-tips and yellow-leaves. If problems appear, correct the condition first rather than stacking fertilizer, repotting, and pruning together.
Safety note for Boston Fern
Boston Fern is not a plant to keep within reach of pets or children. Treat it as an inaccessible display plant. Use gloves if sap or plant tissue is irritating, and pick a pet-safe alternative for floor pots or low shelves.
How to tell Boston Fern is settling in
If you plan to multiply it later, common methods include Runners and Division. If yellow-leaves shows up early, inspect light, watering, and roots before assuming the plant is permanently weak.
Is it pet safe?
Boston Fern is generally considered pet safe.
Watering Boston Fern
Every 3–5 days spring and summer (top 2 cm beginning to dry). 5–7 days in winter. Keep consistently moist but not waterlogged.
Soil & potting for Boston Fern
Well-draining but moisture-retentive potting mix. pH 5.0–5.5. Peat or coco-based with perlite.
Humidity & temperature for Boston Fern
Boston Fern prefers 50–70%, though normal home humidity is usually fine. Keep temperatures around 16–24°C (60–75°F).
| Detail | Information |
|---|---|
| Humidity | 50–70% - normal home humidity is fine. |
| Ideal temperature | 16–24°C (60–75°F) |
Fertilizer & pruning for Boston Fern
Use feed lightly during active growth. for Boston Fern.
| Detail | Information |
|---|---|
| Fertilizer type | Feed lightly during active growth. |
Common problems on Boston Fern
Brown Tips
MediumLikely cause: Low humidity (primary cause), fluoridated water, or cold draughts.
Quick fix: Humidifier 60–80% RH. Filtered water. Move away from draughts and heating vents.
Full fix guide →Yellow Leaves
MediumLikely cause: Drought stress - soil drying out fully - or overwatering in dark conditions causing root stress.
Quick fix: Check moisture every 3–4 days. Maintain consistently moist but not waterlogged soil.
Full fix guide →Root Rot
MediumLikely cause: Common on this plant type; confirm with recent watering, light, and root checks.
Quick fix: Inspect the plant and correct the most likely care stressor before stacking treatments.
Full fix guide →Overwatering
MediumLikely cause: Common on this plant type; confirm with recent watering, light, and root checks.
Quick fix: Inspect the plant and correct the most likely care stressor before stacking treatments.
Full fix guide →Underwatering
MediumLikely cause: Common on this plant type; confirm with recent watering, light, and root checks.
Quick fix: Inspect the plant and correct the most likely care stressor before stacking treatments.
Full fix guide →Spider Mites
MediumLikely cause: Common on this plant type; confirm with recent watering, light, and root checks.
Quick fix: Inspect the plant and correct the most likely care stressor before stacking treatments.
Full fix guide →Mealybugs
MediumLikely cause: Common on this plant type; confirm with recent watering, light, and root checks.
Quick fix: Inspect the plant and correct the most likely care stressor before stacking treatments.
Full fix guide →Aphids
MediumLikely cause: Common on this plant type; confirm with recent watering, light, and root checks.
Quick fix: Inspect the plant and correct the most likely care stressor before stacking treatments.
Full fix guide →Leggy Growth
MediumLikely cause: Common on this plant type; confirm with recent watering, light, and root checks.
Quick fix: Inspect the plant and correct the most likely care stressor before stacking treatments.
Full fix guide →Slow Growth
MediumLikely cause: Common on this plant type; confirm with recent watering, light, and root checks.
Quick fix: Inspect the plant and correct the most likely care stressor before stacking treatments.
Full fix guide →Wilting
MediumLikely cause: Common on this plant type; confirm with recent watering, light, and root checks.
Quick fix: Inspect the plant and correct the most likely care stressor before stacking treatments.
Full fix guide →Drooping Leaves
MediumLikely cause: Common on this plant type; confirm with recent watering, light, and root checks.
Quick fix: Inspect the plant and correct the most likely care stressor before stacking treatments.
Full fix guide →Low Humidity
MediumLikely cause: Common on this plant type; confirm with recent watering, light, and root checks.
Quick fix: Inspect the plant and correct the most likely care stressor before stacking treatments.
Full fix guide →Not Enough Light
MediumLikely cause: Common on this plant type; confirm with recent watering, light, and root checks.
Quick fix: Inspect the plant and correct the most likely care stressor before stacking treatments.
Full fix guide →Fungus Gnats
MediumLikely cause: Common on this plant type; confirm with recent watering, light, and root checks.
Quick fix: Inspect the plant and correct the most likely care stressor before stacking treatments.
Full fix guide →Mold on Soil
MediumLikely cause: Common on this plant type; confirm with recent watering, light, and root checks.
Quick fix: Inspect the plant and correct the most likely care stressor before stacking treatments.
Full fix guide →