Blue Star Fern (Phlebodium aureum) Care Guide: Complete
Phlebodium aureum
Blue star fern needs medium to bright indirect light (no direct sun), watering every 5–7 days when the top 3 cm is dry, 40–60%+ humidity (more forgiving than most ferns), and monthly half-strength fertiliser in the growing season.
Blue Star Fern (Phlebodium aureum) Care Guide: Complete Indoor Overview
Start with wateringThe most common care mistake for Blue Star FernWatering guide → →Blue Star Fern care essentials
Light
medium indirect light
Water
Every 5–7 days summer (top 3 cm dry). 7–10 days winter. Room-temperature water. Tolerates brief drought better than most ferns.
Soil
Well-draining potting mix with 20% orchid bark. Wide, shallow pot for spreading rhizome. pH 6.0–7.0.
Humidity
40–60%
Temperature
16–24°C (60–75°F)
Fertilizer
Use half-strength balanced liquid fertilizer and stop if the plant is stressed, newly repotted, or not actively growing.
About Blue Star Fern
Blue Star Fern is native to Tropical Americas (Florida to Argentina), typically reaches 30–60 cm tall indoors, with moderate growth. Blue Star Fern has a fern like growth habit and part of the Polypodiaceae family. It is also known as Golden Polypody, Cabbage Palm Fern, and Hare's Foot Fern.
| Detail | Information |
|---|---|
| Also known as | Golden Polypody, Cabbage Palm Fern, Hare's Foot Fern |
| Native region | Tropical Americas (Florida to Argentina) |
| Mature size | 30–60 cm tall |
| Growth rate | Moderate |
| Growth habit | Fern Like |
| Scientific name | Phlebodium aureum |
| Family | Polypodiaceae |
Blue Star Fern (Phlebodium aureum) Care Guide: Complete Indoor Overview
A blue star fern is one of those houseplants that rewards you when you understand what it actually is - and frustrates you when you treat it like a generic leafy fern in a peat swamp. Phlebodium aureum arrives in the shop with sculptural, blue-green fronds and distinctive golden rhizomes creeping across the soil surface. For a while it looks effortless. Then the fronds crisp at the edges, the blue-gray color fades to pale green, or those fuzzy rhizomes turn mushy and the whole plant stalls. Most of those failures trace back to a handful of predictable mistakes: burying the rhizomes, parking the pot in direct afternoon sun, watering on autopilot through a dim winter, or assuming that “fern” means it needs rainforest humidity in an overheated living room.
This guide is a complete indoor overview of blue star fern care: what the plant is, where it comes from, how to set up light and humidity, how to water without rotting the roots or rhizomes, what soil and pots work best, when to feed and repot, how propagation by division really works at home, and how to read the frond signals when something goes wrong. Phlebodium aureum is more forgiving than maidenhair ferns, Boston ferns, and many other classic fern houseplants - but forgiving is not the same as indifferent. Get the basics right and Blue Star Fern overview becomes one of the easiest long-term foliage investments you can make indoors.
What Is a Blue Star Fern?
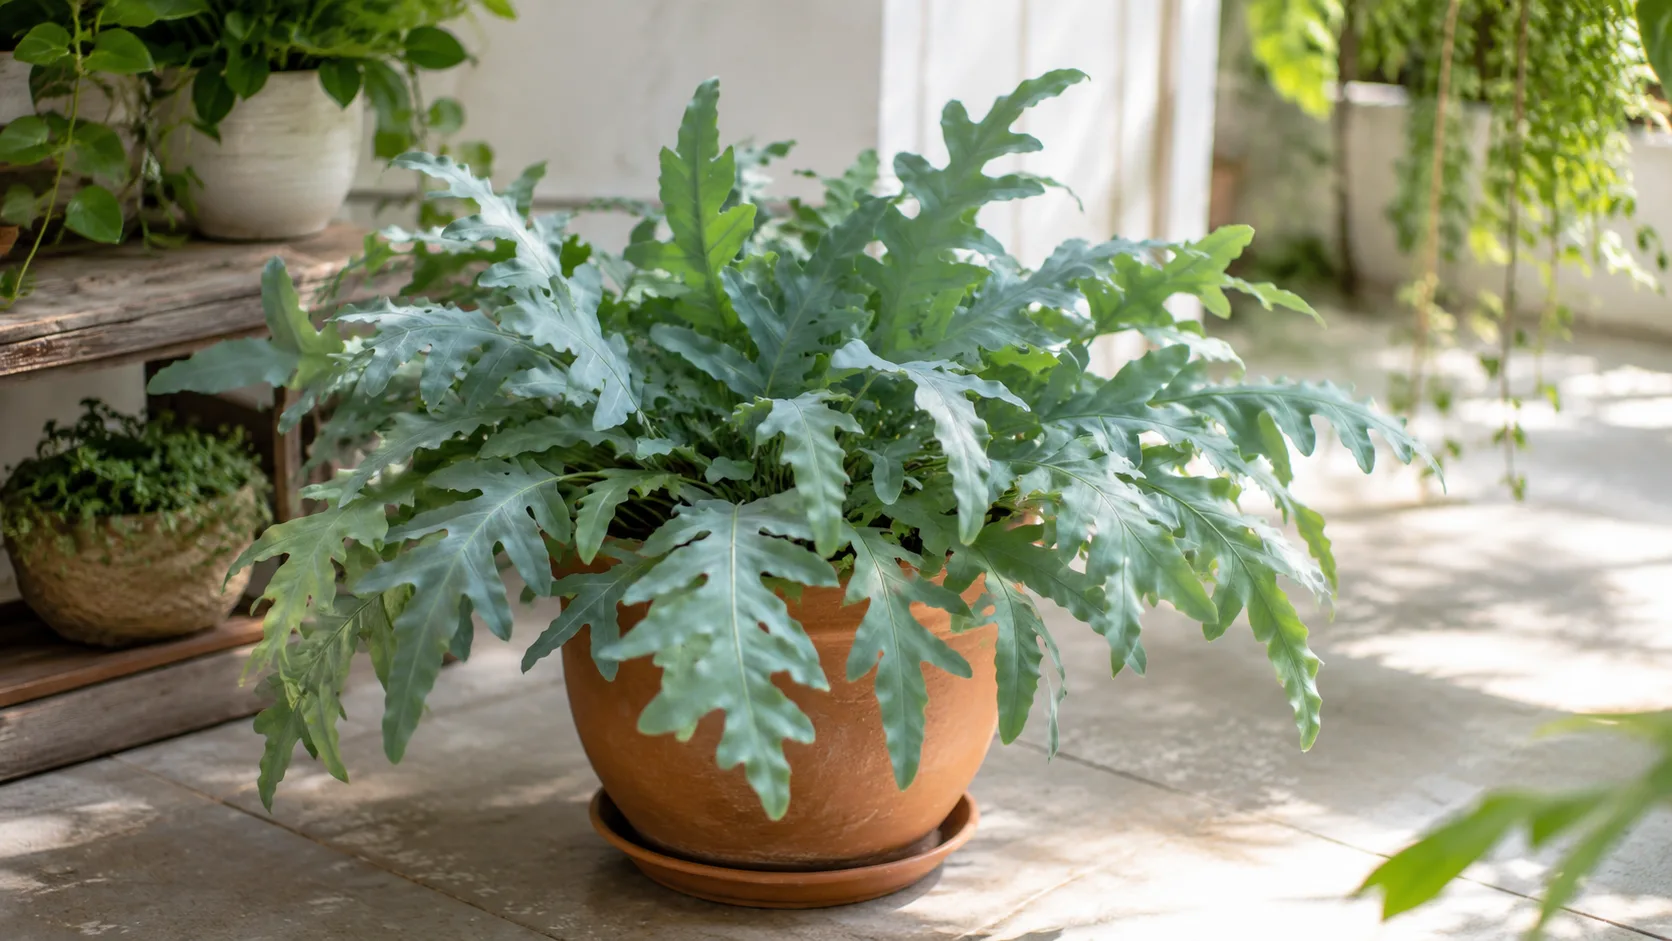
The blue star fern is a tropical fern in the genus Phlebodium, species aureum, belonging to the family Polypodiaceae. It is grown almost exclusively for foliage because its appeal is textural and architectural, not floral. Mature fronds are long, deeply lobed, and colored an unusual blue-green to gray-green that stands apart from the bright emerald tones most people associate with ferns. New fronds emerge from creeping rhizomes - thickened, fuzzy, golden-brown stems that travel across the soil surface rather than hiding underground. Those rhizomes are not decorative extras. They are the plant’s primary growth engine and storage tissue, and they change nearly every care decision you make.
Unlike the finely divided, feathery look of Nephrolepis Boston ferns, Phlebodium aureum produces bold, hand-sized leaf segments on thin stalks. The overall effect is sculptural and modern, which is why it appears in design-forward plant shops and mounted displays alongside staghorn ferns. Indoors, most specimens reach roughly 30–90 cm tall and wide over time, with individual fronds commonly stretching 30–50 cm under typical room conditions. Growth is moderate, which means you will not need to repot every six months, but it also means recovery from stress takes weeks, not days. Well-maintained plants can live 10–20 years indoors according to experienced growers and nursery references. (The Old Farmer’s Almanac)
Commerce can be confusing here. Labels may say blue star fern, golden polypody, cabbage palm fern, gold foot fern, or hare-foot fern. These are common names for Phlebodium aureum and close relatives such as Phlebodium pseudoaureum. For practical indoor care, they share the same core needs - bright to medium indirect light, warm stable temperatures, even moisture, airy soil, and rhizomes kept at or above the soil surface. If your plant came with a botanical tag, keep it. If not, watch how the plant responds to your home and adjust from there.
Botanical Background and Native Range
In the wild, Phlebodium aureum is an epiphyte: it grows on tree trunks, branches, and rock surfaces in humid tropical forests rather than rooting in dense ground soil. The Old Farmer’s Almanac and The Spruce both describe it as an epiphytic fern native to the tropical Americas, from Florida through the Caribbean and South America to Argentina. (The Old Farmer’s Almanac) That growth habit explains nearly everything about indoor care. The roots expect loose, organic-rich material that drains fast and holds air. The rhizomes expect to stay exposed to oxygen at the surface. The fronds expect filtered light under a forest canopy, not direct afternoon sun on a south-facing windowsill.
Because it evolved in warm, humid forests, Phlebodium aureum has limited tolerance for cold drafts, sudden temperature crashes, or prolonged bone-dry air. It is not a delicate novelty plant, but it is a climate-specific one. Your job indoors is to approximate a shaded tree branch in a tropical forest - not perfectly, but consistently enough that the plant is not swinging between extremes. Outdoors, it is hardy only in USDA zones 8b–13, which is why most readers outside those zones should think of it strictly as an indoor plant or a summer shade-patio guest brought in before nights drop below about 10°C (50°F).
One reason blue star fern has earned a reputation as an easier fern is drought tolerance relative to its cousins. The Almanac notes that blue star ferns handle low humidity and brief dry spells better than many fern species. (The Old Farmer’s Almanac) That does not mean you should let the pot go desert-dry for weeks. It means the plant has a wider comfort window than maidenhair or many Nephrolepis types - especially if you keep the rhizomes healthy and the soil evenly moist between waterings.
Why the Creeping Rhizomes Change How You Care for It
The golden, fuzzy rhizomes are the feature that separates Phlebodium aureum care from standard potted fern routines. In nature, these rhizomes creep along bark or rock, anchoring the plant and storing moisture and nutrients. Indoors, they should remain visible at or just above the soil surface. Burying them is one of the fastest ways to trigger rot, because the fuzzy tissue holds moisture against itself and breaks down without airflow.
When Blue Star Fern repotting guide or refreshing soil, place the rhizomes on top of the mix and lightly anchor them with bark chips or a thin layer of sphagnum if needed. Do not pack wet soil over them. When watering, avoid blasting the rhizomes with a heavy stream that keeps them constantly soaked. A gentle soak around the root zone is enough. If you see rhizomes wandering over the pot edge, that is normal growth - not a sign the plant is root-bound in the traditional sense.
Understanding rhizome placement also changes your pot choice. Phlebodium aureum spreads horizontally. A wide, shallow pot accommodates the creeping habit better than a tall, narrow cylinder that forces awkward coiling. Advanced growers sometimes mount blue star ferns on plaques with sphagnum and bark, similar to staghorn culture, which mimics epiphytic conditions directly. (The Old Farmer’s Almanac) Mounting is not required indoors, but it illustrates the principle: roots and rhizomes need air, fronds need filtered light, and water should pass through rather than pool.
Best Indoor Growing Conditions for Blue Star Fern
If you remember only four variables for blue star fern care, make them light, humidity, temperature, and Blue Star Fern watering guide. Soil and fertilizer matter, but they rarely cause sudden collapse the way buried rhizomes, hot direct sun, or a soggy pot in a dim corner do. The plant is more forgiving of minor feeding lapses than of a week spent next to a heating vent in February with dry soil and no humidity support.
Indoors, think of Phlebodium aureum as a bright-bedroom or bathroom fern with epiphyte logic, not a dark hallway survivor or a full-sun succulent companion. It wants the kind of filtered brightness you would find on a shaded porch or under tree cover. It also wants moisture you can maintain consistently - in the soil, in the air, and in your attention to how fast the pot dries. When those conditions are stable, the plant rewards you with firm blue-green fronds, steady rhizome growth, and a spreading habit that looks intentional rather than accidentally surviving.
Light Requirements and Window Placement
Blue star fern prefers medium to bright, indirect light for most of the day. The Spruce recommends a spot that receives medium-to-Blue Star Fern light guide, noting that the plant can survive low light but will grow sparser, less lush foliage. (The Spruce) In practical home terms, that usually means an east-facing window, a bright north-facing window, or a spot a few feet back from a west- or south-facing window where direct sun does not strike the fronds.
If you want a numeric anchor, many indoor growers place the sweet spot around 250 to 1,000 foot-candles - medium indirect to bright indirect light. That is bright enough for compact new growth and strong blue-green color, but below the threshold where fronds bleach, curl, or develop crisp brown patches. A plant that is too dark will not die overnight. Phlebodium aureum tolerates lower light better than many tropical foliage plants, which is why it works in offices and rooms with only moderate windows. But low light slows growth, fades the blue tone, and changes watering dynamics because the pot stays wet longer. If new fronds are smaller, paler, stretched, or slow to emerge, light is probably the limiting factor.
Direct sun is the faster killer. Afternoon sun through glass can scorch fronds in hours, especially if the plant was grown in softer nursery light. If you must move it closer to a brighter window, do so gradually over one to two weeks and watch the newest frond first - it is the most honest sensor. Grow lights work well when natural light is weak. A full-spectrum LED at moderate intensity, running on a consistent photoperiod, can supplement a north room or a dark winter season. Keep fixtures far enough away that the fronds do not heat up.
Temperature and Humidity Targets
Warm, stable temperatures suit Phlebodium aureum best. A practical indoor target is 16–24°C (60–75°F) during normal room conditions. The Spruce cites a broader tolerance range of 14–27°C (57–81°F), which is useful if your home runs slightly cooler at night. (The Spruce) Avoid placing the pot directly under air-conditioning vents, open winter windows, or radiators. Rapid temperature swings matter as much as absolute numbers because epiphytic roots and rhizome tissue react to instability with stalled growth and edge browning.
Humidity is important but more flexible than many fern guides suggest. The Almanac notes that blue star ferns prefer 60–80% relative humidity but handle standard indoor humidity better than most ferns. (The Old Farmer’s Almanac) A realistic home target is 40–60%, with higher humidity producing lusher frond margins. Below 40%, especially in heated winter air, frond tips brown in a gradual pattern that people often blame on watering alone. A humidifier is the most reliable fix. Pebble trays and plant grouping help at the margins. Misting is temporary, can leave mineral spots on fronds, and does not replace ambient humidity - use it as a supplement, not a strategy.
Bathrooms and kitchens often work well because humidity spikes regularly, provided there is enough light. A fern in a steamy but windowless bathroom will slowly decline unless you add a grow light. The best placements combine usable light plus moisture, not just one or the other. If you cannot run a humidifier, compensate with more attentive watering and keep the plant away from the driest heat sources in the room.
On pet safety, blue star fern is widely listed as non-toxic to cats and dogs. The Almanac explicitly notes it is non-toxic to cats, dogs, and humans. (The Old Farmer’s Almanac) BBC Gardeners’ World reports no toxic effects to cats, dogs, or people for Phlebodium aureum. (BBC Gardeners’ World) That does not mean pets should eat houseplants freely - fibrous foliage can still cause mild gastrointestinal upset - but it is a strong choice for pet-conscious homes compared with many popular tropicals.
Choosing the Right Soil and Pot
Because Phlebodium aureum is epiphytic, its roots want access to air as much as to moisture. Dense, heavy potting soil that stays saturated for days will suffocate fine roots even if you water carefully. The goal is a mix that holds moisture in the root zone briefly, then releases excess water and retains air pockets. Think orchid culture logic applied to a creeping fern.
Soil Mix Recipe and pH
The Spruce recommends planting blue star fern in a chunky, well-draining potting mix that stays moist yet drains freely. (The Spruce) A reliable home recipe is 70–80% high-quality peat- or coco-based potting mix blended with 20–30% coarse amendments - orchid bark, perlite, and/or coco chips - to keep the structure open. Some growers push bark content toward 40% in humid homes where drying is slow. LeafyPixels plant-care data for this species targets well-draining potting mix with 20% orchid bark and a pH around 6.0–7.0.
Target a slightly acidic to neutral range around pH 5.5–7.0. Exact pH micromanagement is rarely necessary for hobbyists, but avoid alkaline, chalky mixes and untreated hard water patterns that push salts upward over time. Refresh the substrate every one to two years because organic components decompose, collapse, and hold water longer than they did when new.
When repotting or potting up, keep the rhizomes at or above the soil surface, not buried deeply. Epiphytic ferns rot when creeping stems are entombed in wet mix. The roots should be covered, but the golden rhizomes should remain visibly exposed.
Pot Size, Drainage, and Mounting Options
Choose a wide, shallow pot only slightly larger than the spreading rhizome mass. One size up during repotting is enough. Oversized pots hold excess moisture that slow-growing roots cannot use, creating a classic path to root rot on Blue Star Fern after repotting. Drainage holes are mandatory. If you use a decorative cachepot, lift the nursery pot out after watering and empty standing water.
Terracotta dries faster than plastic, which can help in dim, humid rooms but may demand more frequent checks in bright, dry ones. Either material works if you read the soil rather than the calendar. Because Phlebodium aureum spreads via rhizomes, a shallow bowl-shaped planter often looks better and performs better than a tall narrow pot that forces the plant into an unnatural coil.
Advanced growers sometimes mount blue star ferns on plaques or in open terrariums using sphagnum and bark. The Almanac notes they can be wall-mounted like staghorn ferns or grown in roomy terrariums. (The Old Farmer’s Almanac) That is not required indoors, but it illustrates the principle: roots need air, rhizomes need surface exposure, and water should pass through rather than pool.
How to Water Blue Star Fern Indoors
Watering is where blue star fern care is won or lost. The plant likes even moisture, not alternating floods and droughts, and it likes a rhythm tied to how your pot actually dries. The Spruce advises keeping the fern evenly moist while avoiding overwatering on Blue Star Fern, with the exact method depending on your soil mix. (The Spruce) A practical starting rule: water when the top 3–4 cm (1–1.5 inches) of mix feels dry to the touch.
That surface-dry rule is a starting point, not a law. In practice, check the top 3 cm of mix with a finger or wooden skewer. If it is dry and the pot feels lighter, water thoroughly until excess drains from the bottom. If the deeper mix is still cool and damp, wait. Phlebodium aureum tolerates brief drought better than many ferns, but repeated dry cycles show up as faded blue color, wilting fronds, and crispy edges. Chronic soggy soil is worse: it kills roots and rhizomes faster than occasional dryness.
When to Water and How to Check Moisture
Use three signals together: surface dryness, pot weight, and frond texture. Surface dryness tells you when to consider watering. Pot weight confirms whether the root ball is still waterlogged. Frond texture tells you whether the plant is chronically too wet or too dry. Healthy fronds feel firm and flexible, with a distinct blue-green cast, not floppy or dull gray-green.
Water slowly around the root zone, moistening the full soil profile without leaving the pot sitting in runoff. If you occasionally bottom-water, do not leave the pot submerged for hours; epiphytic roots still need air in the upper profile. After watering, empty the saucer within 15–30 minutes. Use room-temperature water when possible. Very cold water can shock warm roots in winter.
Many care guides suggest intervals like every 5–7 days in summer and every 7–10 days in winter, with a broader range of 7–14 days depending on conditions as a useful check reminder. Those ranges are useful only as prompts to inspect the pot, not as automatic schedules. A bright, warm room may dry a small pot in four days; a cool north room may take two weeks. Let the plant and pot teach you the rhythm.
Seasonal Watering Adjustments
During active growth - typically late spring through early autumn - the fern uses water faster and can handle a steadier moisture profile. In late autumn and winter, growth slows, light drops, and indoor heating dries the air while sometimes slowing soil evaporation in cooler rooms. That combination tricks people into overwatering. Stretch intervals in winter, verify moisture depth before each drink, and pause fertilizer when no new fronds are emerging.
If you run a humidifier all winter, the plant may stay more active and drink more than other houseplants in the same room. That is why seasonal rules are less reliable than pot checks. Change one variable at a time when troubleshooting. If you recently moved the plant, adjust watering only after you know how the new spot dries.
Fertilizing Blue Star Fern During Active Growth
Phlebodium aureum is not a heavy feeder. It needs modest nutrition during active growth and little to none when stalled. The Spruce recommends fertilizing lightly during spring and summer. (The Spruce) A balanced water-soluble houseplant fertilizer at one-quarter to one-half of the label rate is a safe starting point. Apply to already-moist soil so salts distribute without burning fine roots.
A balanced liquid formula such as 10-10-10 or 20-20-20 diluted to quarter- or half-strength works well. Feed roughly monthly during active growth, or every two to three months if your potting mix already contains slow-release nutrients. Skip feeding on stressed plants - recent repot, pest damage, rhizome rot, or obvious root problems. Skip feeding in winter unless you are supplementing with grow lights and seeing steady new fronds. Over-fertilizing shows up as brown or scorched frond tips, sometimes mistaken for low humidity. If that happens, flush the pot with plain water on the next two watering cycles and reduce strength.
Organic slow-release fertilizers can work in small doses, but salt buildup is harder to diagnose. For most indoor growers, a light monthly liquid feed during the warm months is the simplest path.
Repotting, Pruning, and Routine Maintenance
Routine maintenance on a blue star fern is mostly observational. Weekly, check rhizomes for softness or darkening, inspect frond undersides for pests, and note whether new growth is emerging with good color. Monthly, wipe dust from mature fronds with a damp cloth if needed, avoiding torn tissue. Quarterly, reassess whether the pot still dries at a healthy pace and whether rhizomes need more horizontal space.
When and How to Repot
Repot every one to two years, or when rhizomes crowd the pot edge, roots circle drainage holes, water runs straight through without soaking in, or the mix has clearly broken down. The best timing is spring, when new growth is starting and the plant has a full warm season to settle. Choose a wide, shallow pot one size larger, refresh the bark-heavy mix, and keep rhizomes on the soil surface.
Go up only one size at a time. A pot that is too large holds too much water for the root system to use, which is the most common cause of root rot after repotting. Use fresh, well-draining mix, and water lightly for the first week to let any damaged roots heal. If the plant is stable but the mix is tired, you can refresh the bottom third of soil without moving to a larger container - a useful trick for mature specimens that already fill their current pot.
Pruning is limited to removing dead or fully brown fronds at the base with clean scissors. Do not cut partially green fronds hoping to stimulate bushiness - this is a rhizomatous fern, not a branching shrub. If rhizomes are rotting, remove only the mushy sections with sterilized scissors and improve airflow and watering before expecting recovery.
Propagation by Rhizome Division
Home propagation of Phlebodium aureum is straightforward compared with spore-grown ferns, but timing and plant health matter. The reliable method is rhizome division during active growth. You are not taking leaf cuttings - fronds alone will not root. You need a section of rhizome with attached roots and at least one growing point.
Remove the plant from its pot and inspect the rhizome network. Look for natural sections where the creeping stem branches or where separate clusters of fronds emerge from distinct rhizome segments. Using a clean, sharp knife or scissors, separate a section that includes healthy rhizome tissue, roots, and several fronds. Do not divide a weak, pest-infested, or drought-stressed plant. The division inherits the parent’s problems, and weak sections fail at a much higher rate than healthy ones.
Pot each division in a small, shallow container with airy bark-heavy mix. Keep rhizomes on the surface, maintain bright indirect light, and keep humidity moderately high without soaking the crown area. Water when the top of the mix approaches dryness, but avoid sogginess while roots establish. Expect several weeks before new frond growth confirms success. Spring divisions typically root faster than winter attempts.
For most readers, buying a healthy plant or waiting until a mature specimen has clearly outgrown its pot is more practical than forcing early division. Propagation belongs in this overview because searchers ask about it constantly, but honesty saves months of frustration. If your plant is a young nursery pot with only one rhizome line, patience is cheaper than surgery.
Common Problems, Pests, and Fixes
Most blue star fern problems trace back to environment, not invisible disease. The fronds are large, unprotected sensors. Read them systematically instead of changing five variables at once.
Yellowing, Browning, and Rhizome Rot Troubleshooting
Wide brown edges and tips usually mean low humidity, chronic underwatering on Blue Star Fern, or salt and fluoride stress from tap water and fertilizer buildup. Raise humidity first, then review watering depth, then flush the pot if salts are suspected. Sudden bleached patches on sun-facing areas mean too much direct light - move the plant and accept that damaged tissue will not revert to green.
Yellowing fronds can indicate overwatering, poor root oxygen, low light, or natural senescence of older fronds. If yellow starts at the base while rhizomes are firm and new growth continues, older fronds may simply be aging. If yellow spreads while rhizomes are soft, dark, or smell sour, suspect rot and inspect roots immediately.
Rhizome rot shows as collapsed new fronds, black or mushy golden stems, and a sour smell from the soil surface. Prevention is the most reliable cure: keep rhizomes exposed, avoid burying them at repotting, and do not let the pot sit in standing water. If rot has consumed the only growing points on a small plant, recovery may be impossible. Larger specimens sometimes survive if you cut away rotten rhizome sections back to firm tissue and repot into fresh, airy mix.
Pests include spider mites in dry air, mealybugs in leaf axils and along rhizomes, scale along frond bases, and fungus gnats if the surface of the mix stays wet. Catch infestations early by inspecting the plant weekly. A strong shower, manual removal, and insecticidal soap handle most issues if you start before the population is large. Spider mites are especially common when humidity drops below 40% and airflow is stagnant.
Frond dullness or loss of blue tone often points to low light, underwatering, or both. Restoring the distinctive blue-green color is one of the clearest signs that conditions have improved. New growth is your report card; old fronds may not fully recover their color even after you fix the environment.
Conclusion
Blue star fern care indoors comes down to respecting what Phlebodium aureum is: a moderate-growing, epiphytic tropical fern that wants filtered light, steady warmth, consistent moisture, airy soil, and golden rhizomes kept on the soil surface - never buried. Place it where you can provide medium to bright indirect light without direct sun scorch, keep humidity at or above 40% with 60–80% ideal, water when the top 3 cm of mix dries while avoiding standing runoff, feed lightly during active growth, and repot into a wide shallow pot when rhizomes outgrow the container.
When fronds brown, yellow, or lose their blue cast, check humidity and rhizome health before reaching for fertilizer or a bigger pot. When in doubt, protect the creeping stems. Healthy rhizomes can carry this plant for years with bold, architectural fronds that justify its reputation as one of the most forgiving ferns you can grow indoors - as long as you stop treating it like a generic pot of peat that tolerates being ignored.
When to use this page vs other Blue Star Fern guides
- Blue Star Fern overview - Canonical hub for this species - care topics and problems branch from here.
- Blue Star Fern problems - Symptom-first path when you already know something is wrong.
Related Blue Star Fern guides
- Blue Star Fern watering
- Blue Star Fern light
- Blue Star Fern soil
- Blue Star Fern propagation
- Blue Star Fern fertilizer
- Blue Star Fern repotting
- Blue Star Fern pruning
- Brown Tips on Blue Star Fern
- Yellow Leaves on Blue Star Fern
- Root Rot on Blue Star Fern
- Overwatering on Blue Star Fern
- Underwatering on Blue Star Fern
How to care for Blue Star Fern?
How much light does Blue Star Fern need?
medium indirect light
- medium indirect light - medium indirect light.
When should you water Blue Star Fern?
Every 5–7 days summer (top 3 cm dry). 7–10 days winter. Room-temperature water. Tolerates brief drought better than most ferns.
- Top 3–4 cm dry before watering - Every 5–7 days summer (top 3 cm dry).
- Drain excess water - Room-temperature water.
What soil works best for Blue Star Fern?
Well-draining potting mix with 20% orchid bark. Wide, shallow pot for spreading rhizome. pH 6.0–7.0.
- potting mix - Well-draining potting mix with 20% orchid bark.
- perlite - Light white granules that keep soil airy and help prevent compaction.
- orchid bark - Well-draining potting mix with 20% orchid bark.
Grower notes for Blue Star Fern
What matters most with Blue Star Fern
Blue Star Fern is less forgiving of dry air and missed watering than tough foliage plants. The trick is steady moisture with oxygen, not a swampy pot. In practice, the care checkpoint is simple: medium indirect light. Pair that with well-draining potting mix with 20% orchid bark. Wide, shallow pot for spreading rhizome; pH 6.0–7.0, and avoid changing water, pot size, and placement all at once.
Best placement in a real home
Blue Star Fern belongs where medium indirect light is realistic for most of the day, not only where the pot looks good. Every 5–7 days summer (top 3 cm dry). 7–10 days winter. Room-temperature water. Tolerates brief drought better than most ferns. If the pot stays wet longer than expected, move the plant into better light or reassess the mix before watering again. Humidity target: 40–60%. Temperature comfort zone: 16–24°C (60–75°F).
Before you buy this plant
Choose Blue Star Fern with firm new growth, clean leaf undersides, and soil that does not smell sour or feel compacted. Be cautious if you see brown-tips, sticky residue, collapsed crowns, or a pot that is wet in poor light. Cosmetic old-leaf damage is less worrying than weak roots or active pests.
First month after bringing it home
Do not repot Blue Star Fern on day one unless the mix is failing or pests are obvious. Quarantine it, learn how fast the pot dries, and keep care boring while it adjusts. Watch especially for brown-tips and yellow-leaves. If problems appear, correct the condition first rather than stacking fertilizer, repotting, and pruning together.
Pet-aware note for Blue Star Fern
Blue Star Fern is a better choice for pet-aware homes than toxic ornamentals, but pet safe does not mean the plant should be chewed. Use hanging, shelf, or room placement if pets dig in soil or shred leaves, and choose sturdier plants for high-traffic pet zones.
How to tell Blue Star Fern is settling in
Also sold as Golden Polypody, Cabbage Palm Fern, and Hare's Foot Fern, this plant should be judged by stable new growth rather than label names alone. If you plan to multiply it later, common methods include Rhizome division. Repot only when you see rhizomes escaping pot and rapid drying. If yellow-leaves shows up early, inspect light, watering, and roots before assuming the plant is permanently weak.
Safe for cats, dogs, and humans
Phlebodium aureum is non-toxic to cats, dogs, and humans.
Watering Blue Star Fern
For Blue Star Fern, top 3–4 cm dry before watering and water every 7–14 days depending on conditions. Reduce watering in winter.
| Detail | Information |
|---|---|
| How often | Every 7–14 days depending on conditions |
| How to check | Top 3–4 cm dry before watering |
| Seasonal changes | Reduce watering in winter |
Signs of overwatering
- yellowing fronds
- mushy rhizomes
- soggy soil
Signs of underwatering
- fronds losing blue tinge
- wilting
Soil & potting for Blue Star Fern
Use a mix of potting mix, perlite, orchid bark for Blue Star Fern. Good; terracotta or mounted culture works well. Target soil pH around 5.5–7.0. Repot every 2 years, ideally in spring.
| Detail | Information |
|---|---|
| Recommended mix | potting mix, perlite, orchid bark |
| Drainage | Good; terracotta or mounted culture works well |
| Soil pH | 5.5–7.0 |
| Repotting frequency | Every 2 years |
| Best season to repot | Spring |
Signs it needs repotting
- rhizomes escaping pot
- rapid drying
Humidity & temperature for Blue Star Fern
Blue Star Fern prefers 40–60%, though normal home humidity is usually fine. Keep temperatures around 16–24°C (60–75°F).
| Detail | Information |
|---|---|
| Humidity | 40–60% - normal home humidity is fine. |
| Ideal temperature | 16–24°C (60–75°F) |
Fertilizer & pruning for Blue Star Fern
Use use half-strength balanced liquid fertilizer and stop if the plant is stressed, newly repotted, or not actively growing. for Blue Star Fern.
| Detail | Information |
|---|---|
| Fertilizer type | Use half-strength balanced liquid fertilizer and stop if the plant is stressed, newly repotted, or not actively growing. |
Common problems on Blue Star Fern
Brown Tips
MediumLikely cause: Low humidity, fluoridated tap water, or over-fertilisation.
Quick fix: Use filtered water. Increase humidity to 50%+. Halve fertiliser dose.
Full fix guide →Yellow Leaves
MediumLikely cause: Overwatering or insufficient light causing chlorophyll breakdown.
Quick fix: Allow top 3 cm to dry before watering. Move to brighter indirect light.
Full fix guide →Root Rot
MediumLikely cause: Common on this plant type; confirm with recent watering, light, and root checks.
Quick fix: Inspect the plant and correct the most likely care stressor before stacking treatments.
Full fix guide →Overwatering
MediumLikely cause: Common on this plant type; confirm with recent watering, light, and root checks.
Quick fix: Inspect the plant and correct the most likely care stressor before stacking treatments.
Full fix guide →Underwatering
MediumLikely cause: Common on this plant type; confirm with recent watering, light, and root checks.
Quick fix: Inspect the plant and correct the most likely care stressor before stacking treatments.
Full fix guide →Spider Mites
MediumLikely cause: Common on this plant type; confirm with recent watering, light, and root checks.
Quick fix: Inspect the plant and correct the most likely care stressor before stacking treatments.
Full fix guide →Mealybugs
MediumLikely cause: Common on this plant type; confirm with recent watering, light, and root checks.
Quick fix: Inspect the plant and correct the most likely care stressor before stacking treatments.
Full fix guide →Aphids
MediumLikely cause: Common on this plant type; confirm with recent watering, light, and root checks.
Quick fix: Inspect the plant and correct the most likely care stressor before stacking treatments.
Full fix guide →Leggy Growth
MediumLikely cause: Common on this plant type; confirm with recent watering, light, and root checks.
Quick fix: Inspect the plant and correct the most likely care stressor before stacking treatments.
Full fix guide →Slow Growth
MediumLikely cause: Common on this plant type; confirm with recent watering, light, and root checks.
Quick fix: Inspect the plant and correct the most likely care stressor before stacking treatments.
Full fix guide →Wilting
MediumLikely cause: Common on this plant type; confirm with recent watering, light, and root checks.
Quick fix: Inspect the plant and correct the most likely care stressor before stacking treatments.
Full fix guide →Drooping Leaves
MediumLikely cause: Common on this plant type; confirm with recent watering, light, and root checks.
Quick fix: Inspect the plant and correct the most likely care stressor before stacking treatments.
Full fix guide →Low Humidity
MediumLikely cause: Common on this plant type; confirm with recent watering, light, and root checks.
Quick fix: Inspect the plant and correct the most likely care stressor before stacking treatments.
Full fix guide →Not Enough Light
MediumLikely cause: Common on this plant type; confirm with recent watering, light, and root checks.
Quick fix: Inspect the plant and correct the most likely care stressor before stacking treatments.
Full fix guide →Fungus Gnats
MediumLikely cause: Common on this plant type; confirm with recent watering, light, and root checks.
Quick fix: Inspect the plant and correct the most likely care stressor before stacking treatments.
Full fix guide →Mold on Soil
MediumLikely cause: Common on this plant type; confirm with recent watering, light, and root checks.
Quick fix: Inspect the plant and correct the most likely care stressor before stacking treatments.
Full fix guide →