Best Soil for Blue Star Fern: Mix Recipe, Drainage
Best Soil for Blue Star Fern: Mix Recipe, Drainage, and Container Tips
Best Soil for Blue Star Fern: Mix Recipe, Drainage, and Container Tips
Why Soil Matters More Than the Fronds You See
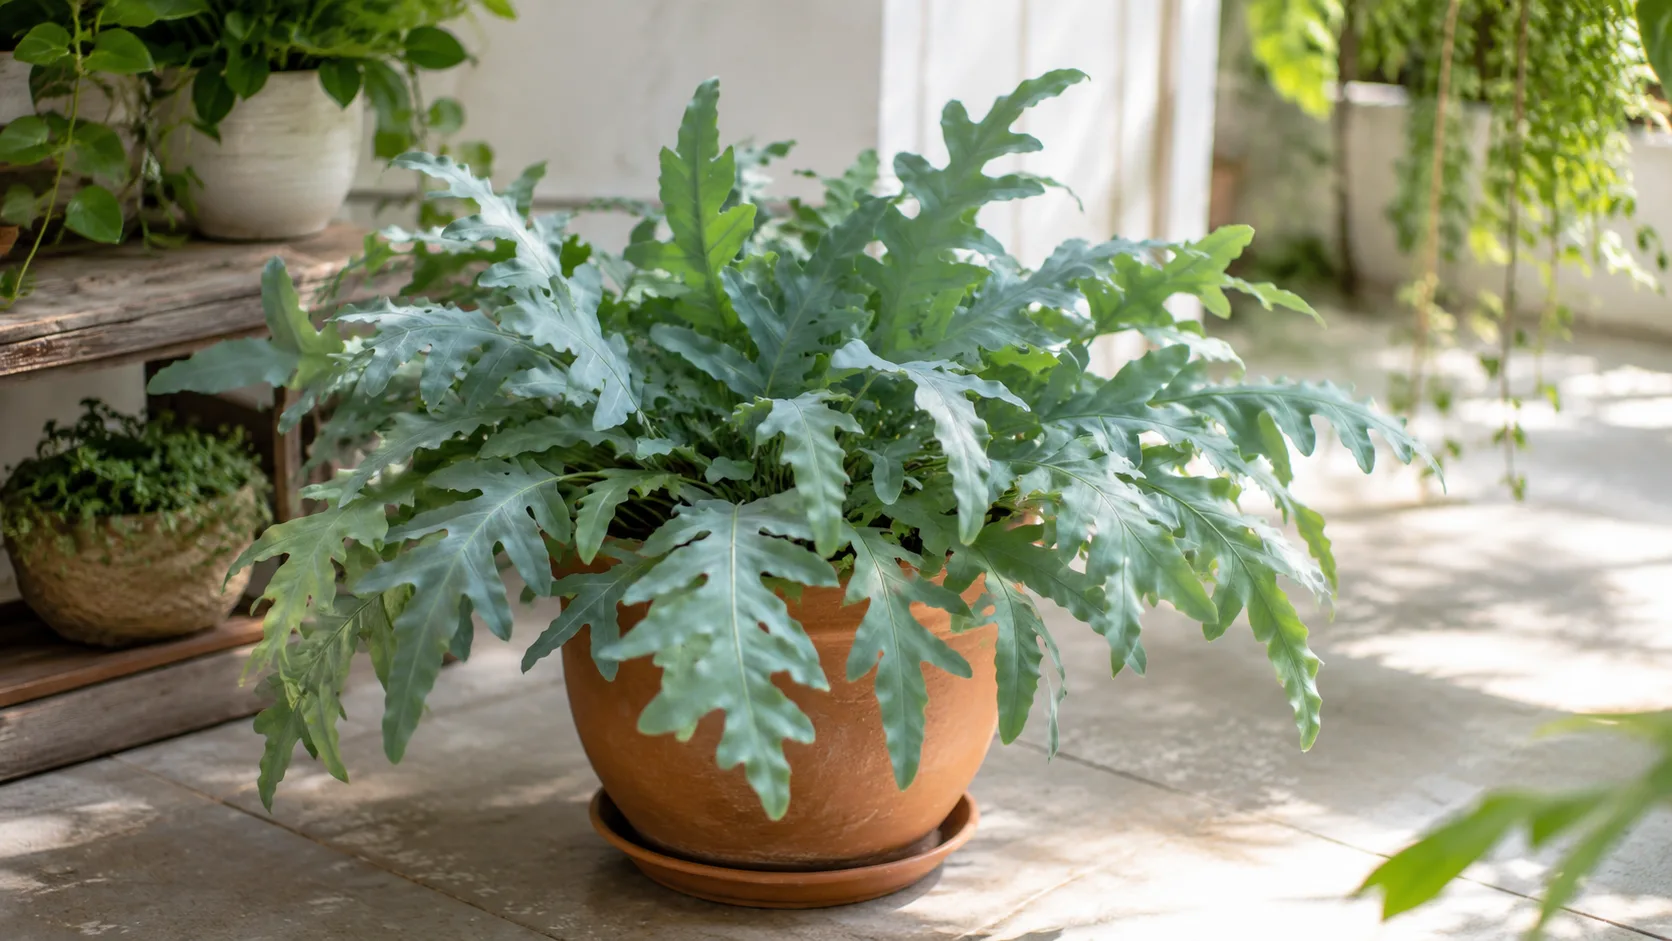
Blue star fern (Phlebodium aureum) is sold for its blue-green, deeply lobed fronds and the fuzzy golden rhizomes that crawl over the pot rim like something from a terrarium display. Indoors, though, survival depends on what you cannot see: the air pockets around fine roots and the moisture balance at the rhizome surface. Blue star fern is a rhizomatous epiphyte - it grows on trees, rocks, and debris-rich surfaces in the American tropics, not in dense garden mud. That growth habit changes every soil decision you make.
The best blue star fern soil is not a single branded bag. It is a loose, chunky, well-draining organic substrate that holds light, even moisture for the roots while keeping the creeping rhizomes airy and visible. NC State Extension describes ideal cultural conditions as partial sun, good air circulation, medium to high humidity, and a moist but not soggy substrate in a loose, organic mix with acid pH. (NC State Extension) The Spruce reinforces the same epiphytic logic: blue star fern does best in a loose, airy potting mix, with orchid bark mix working well on its own or as a major amendment if you use soil-based blends. (The Spruce)
That framing changes how you shop. A bag labeled “indoor potting mix” may be fine as a starting point, not a finished solution. Standard peat-heavy blends are engineered for moisture retention across many houseplants. Blue star fern needs enough organic matter to stay lightly moist, but it also needs structure that does not collapse after six months of watering. Your job is to balance drainage, organic richness, and open macropores - then match the container, rhizome placement, and watering method to that balance.
What Phlebodium aureum Wants Underground
In the wild, Phlebodium aureum spreads by creeping rhizomes densely covered in golden scales, an adaptation that helps the plant cling to bark and rock while tolerating periodic drying. NC State Extension notes the species epithet aureum is Latin for “golden,” referencing those rhizome scales. The plant is often grown in hanging baskets, which provide excellent air circulation and show off the fuzzy rhizomes - a clue that exposure and airflow matter as much as what’s in the pot. (NC State Extension)
Indoors, you are not recreating a Florida swamp or a cloud forest floor. You are building a small epiphytic root zone where water passes through quickly, organic material holds moderate moisture, and roots never sit in stagnant anaerobic mud for days. The plant tolerates drying out between waterings better than many ferns, but that tolerance applies to the root zone rhythm, not to leaving rhizomes bone dry on a windowsill for weeks.
Epiphyte Roots and Creeping Rhizomes
Epiphytic ferns solve a different problem than terrestrial houseplants. Their roots expect fast drainage, high oxygen, and thin organic layers - not a deep column of wet peat. Blue star fern roots are relatively fine and spread through the upper portion of the mix. The rhizomes are a separate tissue system: they store energy, creep outward, and produce new fronds. When rhizomes stay too wet - especially when buried - they rot before the fronds show the full damage.
The practical split is simple. Roots can tuck into the mix and enjoy steady moisture. Rhizomes should rest on top of the mix or only barely nestle into the surface, visible and airy. Growers who treat the golden rhizomes like buried tubers are copying potato logic on a plant that evolved to crawl across bark. That single placement error causes more failures than a slightly imperfect bark ratio.
The Four Jobs Blue Star Fern Soil Must Do
Good potting mix has to perform four jobs at once: anchor the plant, retain moderate moisture, drain excess water, and keep air pockets open between waterings. For blue star fern, a fifth job appears: support rhizome display and airflow at the surface without drying the roots below into dust.
When you squeeze a slightly moist handful of the right mix, it should feel springy and chunky, not sticky or dense. If it forms a muddy lump, it will probably stay too wet in a typical indoor plastic pot. If water runs straight through and the plant wilts two days later, the mix may be too coarse or hydrophobic. The goal is not “wet soil” or “dry soil.” The goal is moisture plus oxygen - the same pairing NC State Extension summarizes as moist but not soggy. (NC State Extension)
Even Moisture Without a Swamp
Blue star fern is often described as wanting consistent moisture, which scares growers into keeping pots permanently damp. Consistent does not mean saturated. It means the root zone should not swing from desert dry to soggy every week. A chunky mix buffers those swings: bark and perlite create drainage paths; peat or coir holds water in smaller pores where roots can access it.
The drying speed you want depends on your home. In a bright bathroom with 50 percent humidity, a bark-heavy mix may need watering twice weekly in summer. In a cool north-facing room, the same mix might last ten days. Soil is the timing mechanism for watering. Get the structure right and your finger-test checks become reliable. Get it wrong and you are guessing while the rhizomes suffer.
Best Homemade Blue Star Fern Soil Mix
The most dependable home recipe mirrors what experienced fern growers converge on: a three-part blend that balances moisture retention with chunk and airflow. You are building a fern-orchid hybrid mix, not a standard houseplant blend.
The Reliable 2-1-1 Indoor Recipe
My recommended starting point for most indoor blue star ferns:
- 2 parts quality peat- or coco-based houseplant potting mix (or coco-based fern mix)
- 1 part fine to medium orchid bark
- 1 part perlite or pumice
Mix thoroughly in a clean tub until the bark and perlite are evenly distributed. The finished blend should look visibly chunky, with white perlite flecks and bark chips throughout - not a dark, uniform peat cake. Optionally add a small handful of worm castings or leaf mold per liter of finished mix if your base is sterile and low in organic fertility. That enriches the substrate without turning it dense.
This recipe gives roots a moisture-holding base, bark for structure and slow decomposition, and perlite for immediate aeration. The Spruce notes that if you use soil at all, you should add plenty of perlite and orchid bark to make the mix “super chunky and airy.” (The Spruce) Almanac.com offers a similar path: blend bark and perlite into standard houseplant mix, or use orchid bark mix directly. (Almanac.com)
For growers who tend to overwater or keep plants in lower light, push the recipe toward 1 part base, 1 part bark, 1 part perlite - more drainage, less water retention. For very dry homes with strong indirect light where the pot dries in three days, keep the 2-1-1 ratio or add a little extra coir to the base for rewetting ease.
Adjusting for Overwaterers and Dry Homes
Soil recipes are not universal laws. They are starting hypotheses you refine against how your pot actually dries. If the surface stays damp for five days in an average room, increase bark and perlite before you blame yourself for “overwatering on Blue Star Fern.” If fronds curl and the pot weighs nothing every forty-eight hours, your mix may be too fast-draining for your watering habits - add a bit more base mix or coir, not heavy garden soil.
Bark-heavy orchid mix alone works well for blue star fern, especially if you adopt the soak-and-dry watering method: submerge the pot in room-temperature water for fifteen to twenty minutes, let it drain fully, then wait until the bark lightens before soaking again. The Spruce describes this approach for bark-based culture. (The Spruce) Soil-based 2-1-1 mixes usually pair better with top watering when the top inch approaches dry, because the peat or coir holds moisture longer and releases it more gradually.
Upgrading Store-Bought Mixes
Not everyone wants to batch-mix on the kitchen floor. Store-bought upgrades are legitimate if you treat bagged products as raw materials.
Orchid bark mix straight from the bag is an excellent blue star fern substrate for experienced growers comfortable with soak-and-dry watering. It drains fast, matches the epiphytic habit, and rarely compacts in year one. The trade-off is faster drying and less forgiveness if you forget a watering cycle.
All-purpose indoor potting mix needs amendment before use. A practical upgrade: for every 3 cups of bagged mix, blend in 1 cup perlite and 1 cup orchid bark. Stir until uniform. If the bag already contains slow-release fertilizer, you do not need to add more at Blue Star Fern repotting guide - wait until the next growing season to feed.
Cactus or succulent mix alone is usually too lean and fast-drying for blue star fern unless you are very attentive. If that is what you have on hand, blend it 50/50 with peat- or coir-based potting mix and add a handful of bark for structure. Test drainage before repotting a healthy plant.
“Fern mix” products from specialty suppliers can be excellent out of the bag. Check the label for high bark and perlite content. If the mix looks uniformly dark and fine, treat it like all-purpose soil and amend anyway.
Avoid garden soil, topsoil, and compost-heavy outdoor blends in containers. They compact, harbor pathogens, and hold water unpredictably. Blue star fern’s native range includes rocky and shallow organic substrates - not heavy clay loam in a ten-inch plastic pot.
pH, Organic Matter, and Mineral Buildup
NC State Extension lists acid pH (below 6.0) and high organic matter among blue star fern’s preferred cultural conditions, alongside good drainage and moist availability. (NC State Extension) The Spruce summarizes soil type as moist but well-drained with acidic pH. (The Spruce) In practice, most peat- or coir-based mixes amended with bark and perlite land in a range blue star fern tolerates without laboratory adjustment.
Target pH for Acid-Loving Fern Roots
A reasonable indoor target is pH 5.5 to 6.5, slightly acidic but not extreme. Pure peat can be more acidic; coir is often nearer neutral. For hobbyist growers, chasing decimal-point pH is less important than structure and drainage. Test or amend pH only if new fronds stay pale or stunted while light, watering, and pest checks are already correct, or if you use very hard tap water that leaves white crust on the soil surface.
Mineral salt buildup is a slow soil killer indoors. Each watering with hard water deposits a little calcium and magnesium; fertilizer adds more salts. Over a year, the surface can crust and the root zone chemistry drifts. If you see white deposits, brown leaf tips despite good humidity, or water running down the pot sides without soaking in, flush the pot with several volumes of water in the sink and let it drain fully. At repotting, replace old mix rather than only top-dressing when salts are heavy.
Organic matter matters because epiphytic ferns evolved in debris-rich environments - leaf litter, moss, and decaying bark - not sterile sand. A little worm castings or leaf mold improves cation exchange and microbial activity without reducing airflow the way extra peat would. Do not substitute compost for half the mix; that invites compaction.
Container Choice That Protects Drainage
Soil and container are one system. The same perfect mix fails in a pot with no drainage hole, or in an oversized deep cylinder where the bottom stays wet while the top looks dry.
Drainage holes are non-negotiable for long-term indoor culture. Without an exit path, even chunky bark mix becomes waterlogged at the base. If you use a decorative cachepot, lift the inner pot to water, drain completely, and never let runoff sit overnight.
Wide Shallow Pots vs Deep Containers
Blue star fern spreads by creeping rhizomes, not a single deep taproot. A wide, shallow pot usually outperforms a tall narrow one because it matches the plant’s natural growth plane, gives rhizomes room to crawl at the surface, and reduces the volume of wet mix sitting below a small root mass. Many growers choose a pot only one size larger at repotting - roughly 2 to 4 cm more in diameter - rather than jumping to a statement planter that holds three times the soil.
Plastic nursery pots with drainage holes are a practical default. They are light, easy to lift for weight checks, and do not wick moisture away as aggressively as terracotta. Some growers report terracotta drying fern mixes too fast at the rim while the center stays damp; others in humid homes prefer terracotta’s breathability. Neither is wrong - match the pot material to your observed drying speed.
Hanging baskets work beautifully for blue star fern because they maximize air circulation around fronds and rhizomes, echoing NC State Extension’s cultivation notes. (NC State Extension) Use a coco liner or moss basket only if you can keep watering consistent without letting the core stay sodden.
Glazed ceramic is fine with a drainage hole. Sealed decorative pots without holes are display-only. Do not plant directly into them.
How to Test Whether Your Mix Drains Correctly
Before you repot a healthy blue star fern into a new blend, run two quick tests on a sample pot or the old container after a normal watering.
The runoff test: Water until liquid exits the drainage holes. Water should appear within seconds of pouring, not pool on the surface for minutes. If the mix floats or channels - water runs down the inside wall while the center stays dry - the blend may be too peat-heavy or insufficiently mixed.
The finger-depth test: Twenty-four hours after a full watering in typical room conditions, press your finger 3 to 4 cm deep. The mix should feel lightly moist, not wet mud. At the depth where roots actively grow, you want moisture without squeezing water out. If it is still saturated after two days in average light, add bark and perlite before repotting.
The weight test: Lift the pot when freshly watered and again when it is due for the next drink. Learn the lightweight cue for your setup. Blue star fern in bark-heavy mix becomes noticeably light before roots are stressed; in peat-heavy mix, the pot may stay deceptively heavy while the center stagnates.
The smell test: Healthy mix smells earthy. Sour, swampy, or stagnant odor means anaerobic conditions - roots losing oxygen even if fronds still look acceptable. Refresh the mix and inspect rhizomes for softness.
Rhizome Placement - The Detail Most Growers Miss
If you remember one rule from this entire guide, make it this: keep the fuzzy golden rhizomes on top of the potting mix, not buried under it.
Rhizomes are adapted to crawl across bark and debris with good air exchange. When you bury them, moisture sits against the scales, fungal issues follow, and the plant declines from the base up while new fronds still emerge for a while. At repotting, set the plant so rhizomes rest on the surface or only lightly press into the top layer. Roots can descend into the mix below. The crown where fronds emerge should stay at or slightly above the rim, not sunk in a well of peat.
Watering technique should respect that anatomy. Pour near the pot edges or use bottom soaking so you do not drench rhizomes every time. The Spruce warns against pouring water into the frond crown, which invites rot. (The Spruce) Almanac.com gives the same caution for crown watering on soil-based mixes. (Almanac.com)
When rhizomes creep over the pot edge - a healthy sign - let them. You can gently tuck wandering sections back onto the surface, but do not pack soil over them to tidy the display.
When to Refresh or Replace the Mix
Blue star fern does not need annual repotting drama. The Spruce suggests every two to three years, or when the plant outgrows its container. (The Spruce) Refresh sooner if you see structural failure regardless of calendar.
Repot or fully replace mix when:
- The blend compacts and water runs down the sides without soaking in
- The mix smells sour or looks green with algae on the surface
- Fungus gnats persist because the top stays wet for days
- Roots fill the pot and rhizomes press against plastic, warping the container
- The plant dries in one day because roots displaced most of the mix
- You are correcting buried rhizomes or root rot on Blue Star Fern discovered during inspection
Spring and early summer are the safest windows in northern climates because active growth helps recovery. A healthy plant in autumn can still be repotted if the room stays warm and bright. Avoid repotting a newly purchased fern on day one unless the nursery mix is clearly failing or pests are present. Quarantine, learn drying speed, then intervene with a plan.
At repotting, refresh as much old mix as you can without shredding healthy roots. Use clean scissors on mushy sections only. Choose the next pot size modestly, rebuild a chunky blend, position rhizomes on top, water once to settle, and return the plant to its previous light without stacking fertilizer and relocation the same week.
Signs the Mix Is Working-or Failing
Healthy soil shows up in whole-plant behavior. When the mix works, new fronds emerge firm and blue-green, rhizomes stay golden and firm, and the pot dries on a predictable rhythm for your light and season. After watering, the plant does not collapse the next day. Soil smells earthy, not swampy.
Failure signs tied to soil and drainage include:
- Yellowing fronds while the mix stays wet at depth
- Mushy, dark rhizomes when you inspect the surface
- Brown crispy frond edges that worsen despite humidity fixes - sometimes underwatering on Blue Star Fern in an overly fast mix, sometimes root damage from old soggy peat
- Fungus gnats in consistently moist surface soil
- Stalled new growth in good light with sane watering - sometimes compacted, depleted mix
- Crown or rhizome rot after repotting into denser, unamended bagged mix
NC State Extension lists crown rot and root rot as potential disease problems, with browning fronds often indicating humidity or underwatering stress and curling pointing to low humidity and drought. (NC State Extension) Always cross-check light and watering before blaming the recipe alone. Still, if problems follow every repot into straight indoor potting soil, soil structure is the lead suspect.
Soil Mistakes That Rot Blue Star Fern Indoors
These errors appear repeatedly in otherwise well-lit homes:
Using unamended all-purpose potting mix. It compacts within a season and holds water too long for epiphytic roots.
Burying golden rhizomes “to neaten the pot.” That invites rhizome rot faster than any minor recipe imbalance.
Adding gravel or pot shards at the bottom “for drainage.” That creates a perched water table - a saturated zone above the gravel where roots sit wetter than if the pot were uniformly filled with good mix. Fill the entire container with well-draining medium.
Oversized pots after purchase. Extra soil volume stays wet around a small root ball. Size up one step, not three.
Garden soil in containers. Too dense, unpredictable pH and salts, pathogen risk.
Moisture-control gel crystals for “easier care.” They extend wet time where blue star fern needs less stagnation.
Repotting into dry peat without pre-moistening, then watering from above while the center stays hydrophobic - roots avoid the dry core while you think you watered enough.
Ignoring the drainage hole because of a decorative outer pot. Stagnant runoff is root rot in slow motion.
Choosing only deep pots for a creeping rhizomatous fern. Depth without spread misaligns soil volume with root architecture.
Watering the crown and rhizomes every time instead of targeting the root zone at the pot edges or using controlled soaking.
Conclusion: A Soil System Built for Epiphyte Roots
The best blue star fern soil is a loose, chunky, well-draining organic mix - think two parts quality base, one part orchid bark, one part perlite, adjusted for your home’s drying speed - in a wide, shallow pot with drainage holes, with golden rhizomes resting on the surface, not buried. Target acid pH around 5.5 to 6.5, refresh the mix when it compacts or smells sour, and treat store-bought soil as raw material until you prove it drains fast enough for Phlebodium roots.
Soil never works in isolation from light and watering. Match bark-heavy orchid culture with soak-and-dry timing learned by pot weight; match soil-based 2-1-1 culture with top watering when the upper 2 to 3 cm approaches dry. In low light, favor smaller pots and maximum aeration over richer, wetter mix. If you change soil, change one variable at a time so you can read how the new blend dries.
Native epiphytic habit tells you the plant wants organic richness and oxygen at the same time. Indoor success is copying that balance, not buying the heaviest moisture-retentive bag on the shelf. Run the simple drainage tests, skip the gravel layer, place rhizomes where air can reach them, and repot on a calm schedule when structure breaks down. When soil, container, rhizome placement, light, and watering align, blue star fern stops being a rot lottery and becomes what it should be indoors: a steady, sculptural fern with creeping golden rhizomes worth displaying year after year.
When to use this page vs other Blue Star Fern guides
- Blue Star Fern overview - Start here for whole-plant context before deep-diving this topic.
- Blue Star Fern problems hub - Jump to symptom-specific fix guides when this care topic does not resolve the issue.
- Root Rot on Blue Star Fern - Escalate here when soil adjustments are not enough.
- Mold on Soil on Blue Star Fern - Escalate here when soil adjustments are not enough.