Houseplant Diseases: Identification and Treatment
Learn how to diagnose houseplant diseases, treat root rot and leaf spots, prevent mildew, and know when a sick plant cannot be saved.
A sick houseplant usually gives you clues before it collapses. The hard part is reading those clues correctly. Yellow leaves can mean root rot, but they can also mean low light, old foliage, underwatering, fertilizer burn, or normal aging. Brown spots can be fungal, bacterial, physical damage, sun scorch, cold-water spotting, or pest-related injury. Good treatment starts with one boring but powerful rule: diagnose the growing conditions before reaching for a spray bottle.
Wilting in wet soil? If leaves droop while the mix stays damp for days, inspect roots before treating leaves. That pattern often signals root failure, not thirst — see how to water indoor plants the right way for drainage checks that prevent most rot.
Many indoor plant problems are not true infectious diseases at all. Clemson Cooperative Extension notes that houseplants can develop many issues, but most are caused by environmental or cultural conditions rather than pathogens, because indoor conditions are often not ideal for disease development. (Clemson HGIC) That matters because the wrong treatment wastes time and can make the plant worse. A fungicide will not fix roots suffocating in a decorative pot with no drainage. Extra water will not revive a plant whose roots have already rotted.
The practical goal is not to name every possible pathogen with laboratory precision. At home, you rarely need that level of certainty. You need to know whether the issue is likely root rot, leaf spot, bacterial infection, powdery mildew, gray mold, viral disease, pest-related sooty mold, or non-disease stress. Once you can place the problem into the right bucket, the next step becomes much clearer: isolate, prune, repot, dry down, improve airflow, treat carefully, or discard.
Quick Diagnosis: Disease, Stress, or Pest Damage?
The fastest way to misdiagnose a houseplant is to look only at one leaf. A plant is a system. Leaves show symptoms, but roots, soil, light, water, air movement, and recent changes usually explain why those symptoms appeared. Before treating any suspected houseplant disease, check the whole plant and its environment. Ask what changed in the last two to four weeks: a new pot, darker corner, colder window, heavier watering, recent purchase, plant crowding, fertilizer, pest treatment, humidifier, or a decorative cachepot holding water under the nursery pot.
True disease often spreads in a pattern. New spots appear on multiple leaves. Wilting continues even after watering. Soft tissue collapses instead of simply browning at the edge. Mold develops where flowers, dead leaves, or damp debris sit against foliage. A single damaged leaf near a window or heater may be stress, not disease. A plant with sticky leaves and black surface film may have insects producing honeydew, followed by sooty mold, rather than a primary leaf disease; Penn State Extension describes honeydew from aphids, whiteflies, mealybugs, and scale as a medium for sooty mold growth. (Penn State Extension)
Disease vs. Care Stress vs. Pests
Care stress usually lines up with the plant’s growing conditions. Brown crispy tips often point to inconsistent watering, salt buildup, low humidity, or fertilizer issues. Pale stretched growth suggests insufficient light. Sudden leaf drop after moving a plant may be environmental shock. If the whole plant declines evenly after a recent care change, start with the save your dying houseplant revival guide before assuming infection.
Pest damage often comes with visible insects, webbing, sticky residue, stippling, cottony clusters, bumps on stems, or distorted new growth. Pests can also make disease worse because feeding wounds give pathogens easier entry. If you see sticky residue, inspect undersides of leaves and stems before blaming fungus — the indoor plant pest guide covers identification and first-line control.
Infectious disease is more likely when symptoms expand under wet, humid, stagnant conditions or when the plant keeps declining despite reasonable care adjustments. Fungal diseases often thrive with prolonged leaf wetness and poor airflow. Bacterial problems often appear as wet-looking, water-soaked, greasy, or mushy lesions. Viral diseases often show unusual mottling, rings, streaks, distortion, and stunting, but they cannot be cured once confirmed.
The Fast Triage Rule
Use this triage rule before treatment: roots first, then leaves, then spread pattern. If the plant is wilting, yellowing, dropping leaves, or declining from the bottom up, check the pot and roots before focusing on leaf symptoms. If the roots are firm and healthy, inspect leaf spots closely. If the same symptoms are appearing on several plants, isolate the affected plant and look for shared causes such as a recent purchase, contaminated tools, overhead watering, poor airflow, or pests.
A root problem can create leaf symptoms that look like nutrient deficiency or drought. Wisconsin Horticulture Extension explains that root rot often becomes obvious when a plant wilts even though the soil is wet, and affected plants may be stunted or show yellow or reddish leaves that can resemble nutrient issues. (Wisconsin Horticulture) That single clue — wilting in wet soil — is one of the most useful diagnostic signals for indoor gardeners.
What to Inspect Before Treating
Start with the soil moisture. Push a finger, wooden skewer, or moisture probe several centimeters into the mix. The surface can look dry while the root zone remains wet. Lift the pot and feel its weight. Check whether the pot has drainage holes and whether water is trapped in a saucer or decorative outer pot. Smell the soil near the drainage holes; sour, swampy, or rotten odors often point to root decline.
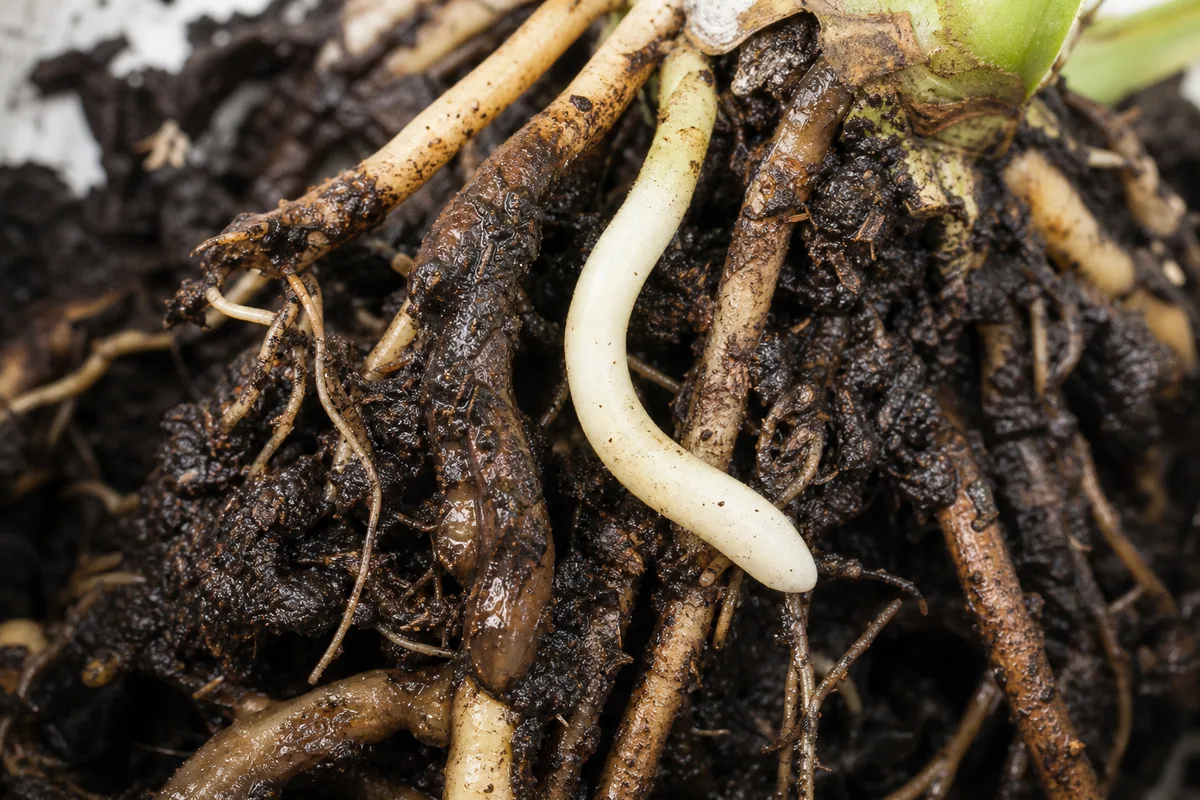
Next, examine the roots if the plant is declining quickly or staying wet too long. Slide the plant from the pot and look for root color and texture. Healthy roots are usually firm and pale, tan, or species-appropriate in color. Rotten roots are often brown to black, mushy, hollow, slippery, and sometimes foul-smelling. University of Maryland Extension notes that with Pythium root rot, the outer portion of the root can pull away from the core, leaving a fine hair-like thread. (University of Maryland Extension)
Then inspect leaves in good light. Look at both sides, because many problems start on undersides or along margins. Note whether spots are dry and papery, wet and translucent, yellow-haloed, powdery, fuzzy, sunken, circular, angular, or spreading from wounds. Remove dead leaves from the soil surface because decaying debris creates a humid, pathogen-friendly microclimate.
When to Use an Extension Plant Clinic
Home diagnosis works for most common houseplants, but a university plant clinic is worth using when the plant is rare or valuable, symptoms do not match any bucket above, or you need confirmation before discarding a large specimen. Cornell’s Plant Disease Diagnostic Clinic recommends including clear photos of the whole plant and close-ups of symptoms, the host plant name (common and scientific if known), when symptoms first appeared, how they spread, and recent care changes. (Cornell Plant Disease Diagnostic Clinic)
Clinic submission checklist:
| Include | Why it helps |
|---|---|
| Whole-plant photo plus symptom close-ups | Shows spread pattern and tissue texture |
| Host name and cultivar | Many pathogens are host-specific indoors |
| Symptom timeline (first noticed → today) | Separates acute infection from slow stress |
| Watering, repotting, and fertilizer history | Rules out cultural causes first |
| Whether neighbors show matching symptoms | Points to shared source or vector |
For physical samples, follow your clinic’s packaging rules — never mail wet, leaking material. Your county cooperative extension office can route you to the nearest diagnostic lab if you are unsure where to send material.
Root Rot: Symptoms, Causes, and Treatment
Root rot is less a single disease than a root failure pattern involving excess moisture, low oxygen, and sometimes pathogens such as Pythium, Phytophthora, Fusarium, or Rhizoctonia. Indoors, the trigger is often cultural: a pot without drainage, a dense potting mix, low light that slows water use, watering on a fixed calendar, or a plant sitting in runoff. Once roots lose oxygen and begin dying, pathogens can move in and accelerate the collapse.
Grower note: Last January I moved a golden pothos to a north-facing shelf but kept watering on the same Sunday schedule. Within ten days it wilted while the mix stayed heavy. Unpotting revealed tan firm roots only at the tips — the rest had turned brown and hollow. Trimming, repotting into a smaller pot, and skipping water for twelve days saved it; the lesson was light changed but my calendar did not.
Symptoms to Look For
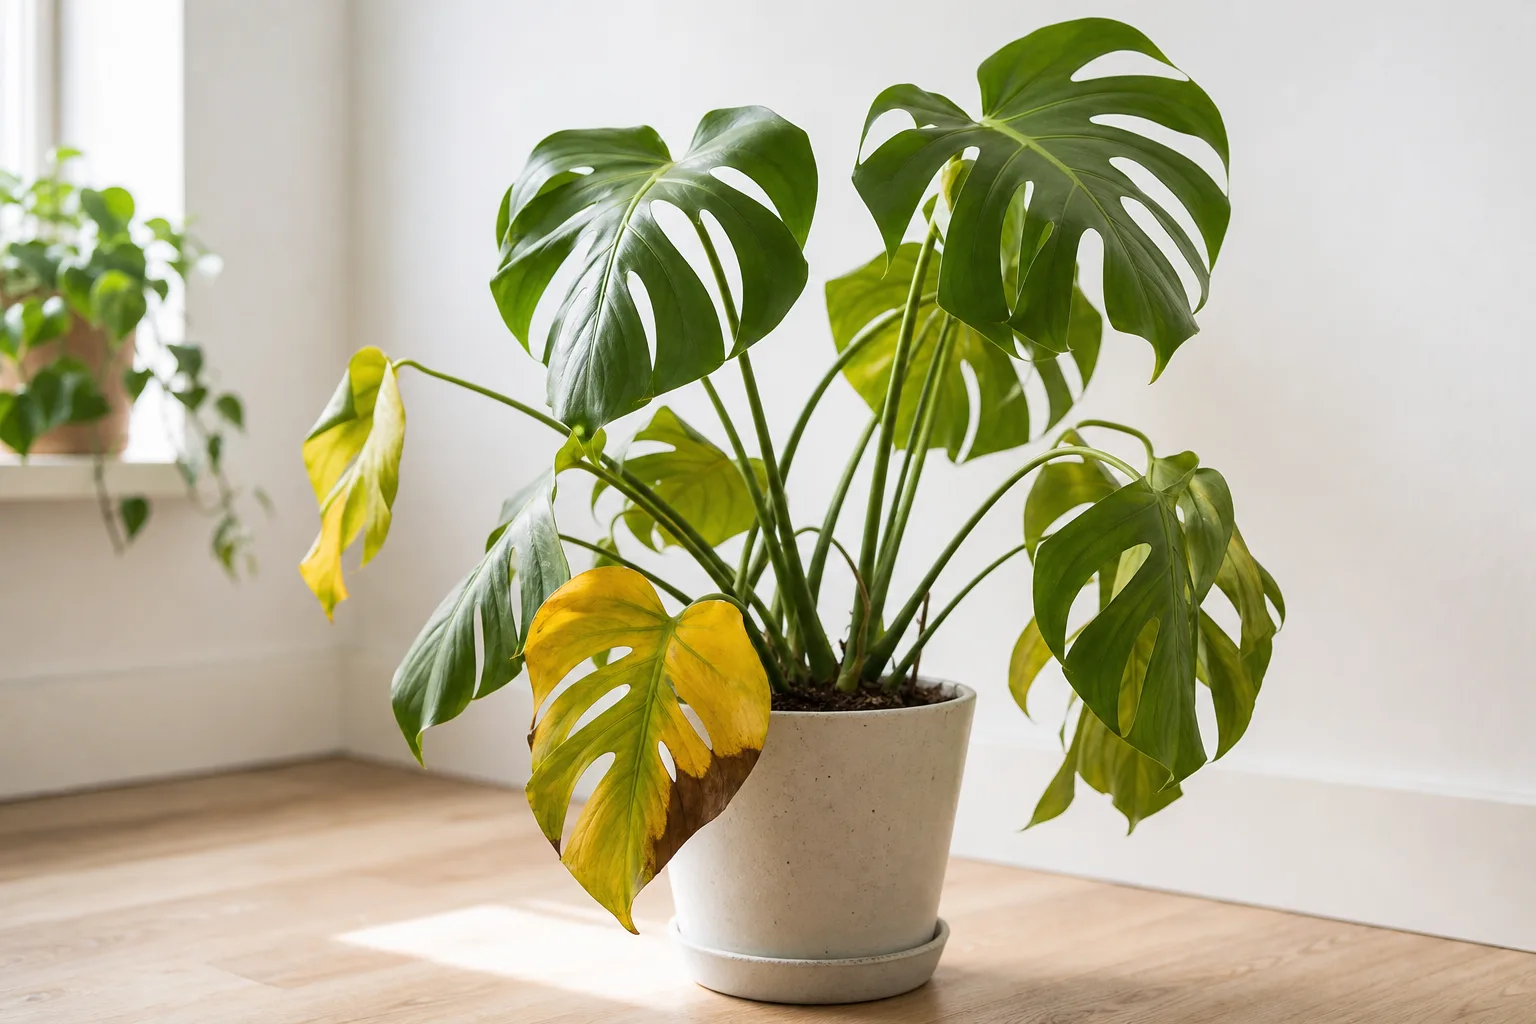
Root rot often shows above the soil before you ever see the roots. The plant may wilt even though the soil is moist. Leaves may yellow from the bottom, lose shine, curl, soften, or drop. Growth slows. Stems can become weak near the soil line — crown rot when the stem base turns black, brown, or mushy is especially serious. The pot may feel heavy for days after watering. In severe cases, the plant collapses suddenly because too few healthy roots remain to supply water.
The most reliable diagnosis comes from looking at the roots. Wisconsin Horticulture Extension describes affected roots as soft and brown, sometimes with a bad odor. (Wisconsin Horticulture) UF’s Emerging Pathogens Institute adds that healthy roots should be white and firm, while rotting roots turn soft and brown or black, sometimes with a sour smell from anaerobic conditions. (UF Emerging Pathogens Institute) Recovery is more likely when some firm, pale roots remain and the crown is still solid. Recovery is unlikely when most roots are mush, the stem base is soft, or the plant smells rotten.
Causes and Risk Factors
Root rot develops when roots sit in saturated, poorly aerated mix long enough to suffocate. Iowa State Extension lists frequent watering, saucers full of water, pots without drainage, and poor soil quality as common triggers for crown and root rot pathogens such as Phytophthora and Pythium. (Iowa State Extension) Decorative pots hide standing water. Peat-heavy mixes compact over time. Large pots stay wet around small root balls. Winter light drops, but watering habits stay the same — the watering guide covers check-drain-adjust habits that prevent most of these failures.
Treatment Actions
Symptom → cause → action for root rot:
| What you see | Likely cause | What to do |
|---|---|---|
| Wilting with wet soil | Roots suffocating; possible Pythium/Phytophthora | Unpot, inspect roots, trim mush, repot in fresh mix with drainage |
| Yellow lower leaves, heavy pot | Chronic overwatering or poor drainage | Adjust watering; empty cachepots; reduce pot size if oversized |
| Mushy stem base (crown rot) | Pathogen reached crown | Often discard; try stem cuttings only from firm tissue above rot |
| Mild browning on some roots | Early rot or stress | Trim affected roots, improve drainage, water less until stable |
Remove the plant from its pot and gently clear away wet, contaminated mix. Trim mushy, hollow, or blackened roots with clean, sharp scissors. Keep only firm tissue. If the plant lost many roots, reduce some damaged foliage so remaining roots are not supporting more top growth than they can hydrate. Repot into a clean container with drainage holes and fresh, well-aerated mix. Do not reuse the old wet mix. Disinfect tools between plants — a 10-minute soak in a 10% bleach solution (1 part household bleach to 9 parts water) or 70% isopropyl alcohol on blades reduces pathogen spread.
After repotting, water carefully and let the mix approach the plant’s preferred dryness before watering again. Do not keep watering because the plant looks wilted; damaged roots cannot use water normally. Move the plant into bright, indirect light if the species tolerates it. Avoid fertilizing until you see stable new growth.
For species-specific recovery steps, see Monstera root rot, pothos root rot, and peace lily root rot. Fungicides are rarely the best first move indoors; Wisconsin’s Plant Disease Diagnostics Clinic notes limited homeowner products and that correcting moisture is usually more effective. (Wisconsin Plant Disease Diagnostics Clinic)
Leaf Spot Diseases: Fungal and Bacterial
Leaf spots are frustrating because they look simple but have many causes. A brown mark can come from fungi, bacteria, cold water, sun scorch, pesticide burn, physical bruising, nutrient stress, or pest feeding. The useful question is not “What is the exact species?” but “Is this spot likely infectious, and what conditions are helping it spread?”
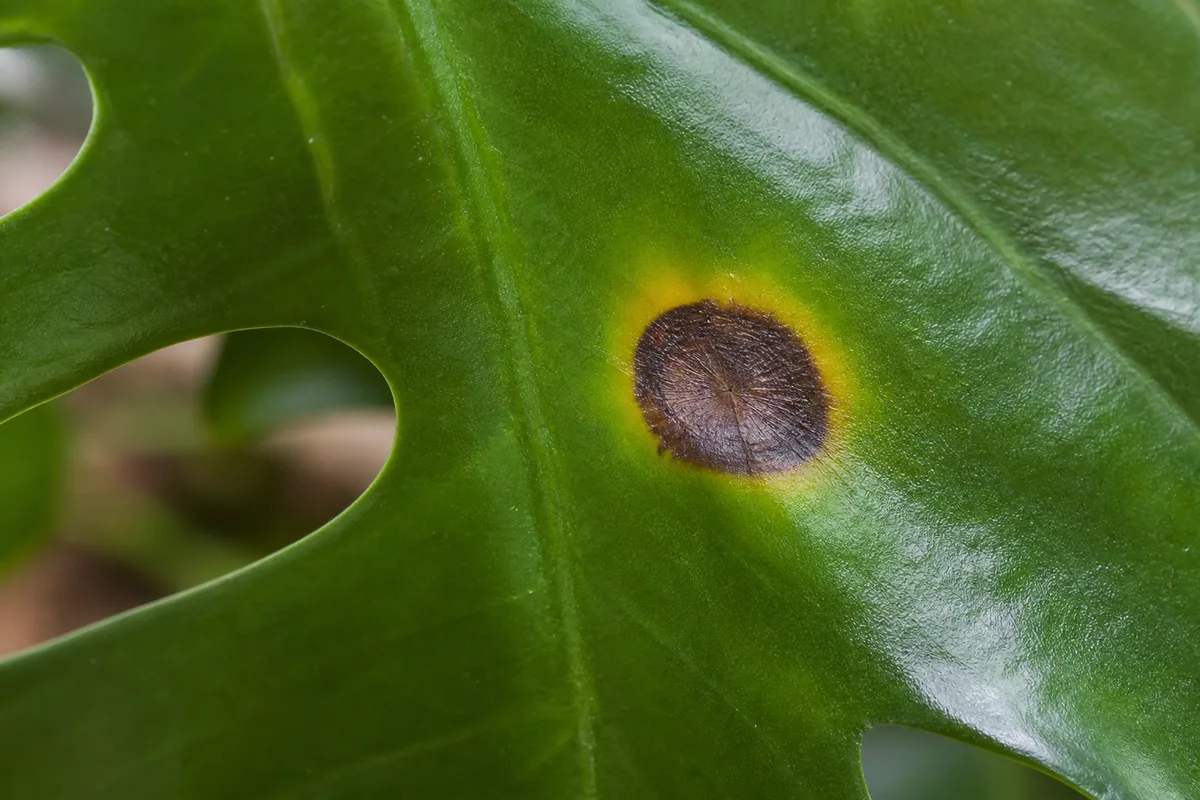
Grower note: A split-leaf monstera on my humidity tray developed tan circular spots with yellow halos on three leaves after I misted every evening for two weeks. Stopping misting, removing the worst leaves, and spacing it from neighbors halted new spots within a month — the pattern matched fungal leaf spot, not bacterial grease.
Fungal vs. Bacterial Leaf Spots
Symptom → cause → action summary:
| Pattern | Likely cause | First action |
|---|---|---|
| Dry, tan, circular spots with possible yellow margin | Fungal leaf spot | Remove leaves; keep foliage dry; improve airflow |
| Wet, greasy, angular, water-soaked lesions | Bacterial leaf spot | Remove leaves; isolate; discard if systemic |
| White or straw-colored rings after cold splash | Cold-water or physical damage, not disease | Adjust watering temperature; remove damaged leaf |
| Target-like rings with concentric bands | Fungal infection (advanced) | Remove infected leaves; reduce leaf wetness |
Fungal leaf spots often become worse when leaves stay wet and air movement is poor. University of Maryland Extension advises lowering humidity around foliage, reducing leaf wetness, and improving air circulation to lessen fungal leaf spot infection. (University of Maryland Extension) Bacterial spots are more likely to appear water-soaked, greasy, angular, or translucent at first, then turn brown or black as tissue dies. (University of Maryland Extension)
| Symptom | More suggestive of fungal leaf spot | More suggestive of bacterial leaf spot |
|---|---|---|
| Spot texture | Dry, papery, sometimes sunken | Wet, greasy, translucent, mushy |
| Spot shape | Round or irregular | Often angular or vein-limited |
| Halo | Possible yellow margin | Common yellow halo |
| Spread conditions | Humid air, wet leaves, poor airflow | Splashing water, wounds, warm damp conditions |
| Home treatment | Remove leaves, reduce wetness, improve airflow | Remove leaves, keep dry, isolate; discard if systemic |
RHS gives a useful caution: dark spots with yellow margins may be fungal leaf spot, while white or straw-colored marks or rings may come from cold water splashes, aerosol damage, or too much sun rather than disease. (RHS)
For species-specific fungal spot recovery, see Monstera leaf spot disease and snake plant leaf spot disease. African violets often show greasy bacterial lesions when crowns stay wet — African violet leaf spot disease walks through isolate-and-dry steps for that pattern.
Leaf Spot Treatment and Prevention
For fungal leaf spots, start with sanitation. Remove badly affected leaves and discard them in the trash — do not compost diseased indoor material if you may reuse that compost around other potted plants. Clean fallen leaves from the soil surface. Water the soil, not the foliage. Avoid misting diseased plants. Space plants so leaves are not pressed together.
If spots keep appearing after sanitation and care changes, consider a labeled fungicide for fungal leaf spots only if the product is appropriate for indoor ornamental plants. The EPA states that pesticide users should follow the directions on the product label and that using a pesticide inconsistently with its labeling is a misuse issue. (US EPA) The National Pesticide Information Center emphasizes that labels explain correct use, hazards, and steps to minimize risk. (National Pesticide Information Center)
Bacterial Diseases: When Cutting Is Not Enough
Bacterial diseases deserve a separate discussion because they are easy to underestimate. They often start as a few suspicious spots after splashing water, pruning, pest damage, shipping stress, or crowded humid conditions. Unlike many fungal problems that can be slowed by improving airflow and removing infected leaves, bacterial infections may move inside plant tissue. Once bacteria are systemic, surface sprays cannot reliably reach them.
Grower note: An African violet on my kitchen windowsill developed greasy, angular spots on lower leaves after I watered from above into the crown. I removed four leaves, switched to bottom watering, and isolated it for three weeks — no new lesions appeared, and the crown stayed firm.
Symptom → cause → action:
| What you see | Likely cause | What to do |
|---|---|---|
| Few wet spots on isolated leaves | Localized bacterial infection | Remove leaves with sterilized tools; keep foliage dry; isolate 2–3 weeks |
| New wet lesions after pruning infected tissue | Systemic bacterial spread | Discard plant; do not propagate |
| Soft crown with rotten smell | Bacterial crown rot | Discard; sanitize pot and tools |
| Rapid lesion spread in humid crowded shelf | Splashing + soft growth + poor airflow | Discard or isolate; improve spacing on neighbors |
UC IPM notes that control strategies for bacterial diseases are very limited and that discarding infected plants is often the best approach when pathogens are distributed throughout plant tissues. (UC IPM) Try saving the plant only if symptoms are limited to a few leaves, the crown is firm, and no new spots appear after two to three weeks of isolation and dry foliage care. Do not propagate from a plant with suspected systemic bacterial disease.
Powdery Mildew and Gray Mold
White or gray growth on leaves is alarming, but not all “mold” behaves the same way. Two common problems are powdery mildew and gray mold (Botrytis blight). They are both fungal problems, but they look different and often attack different kinds of tissue.
How to Tell Them Apart
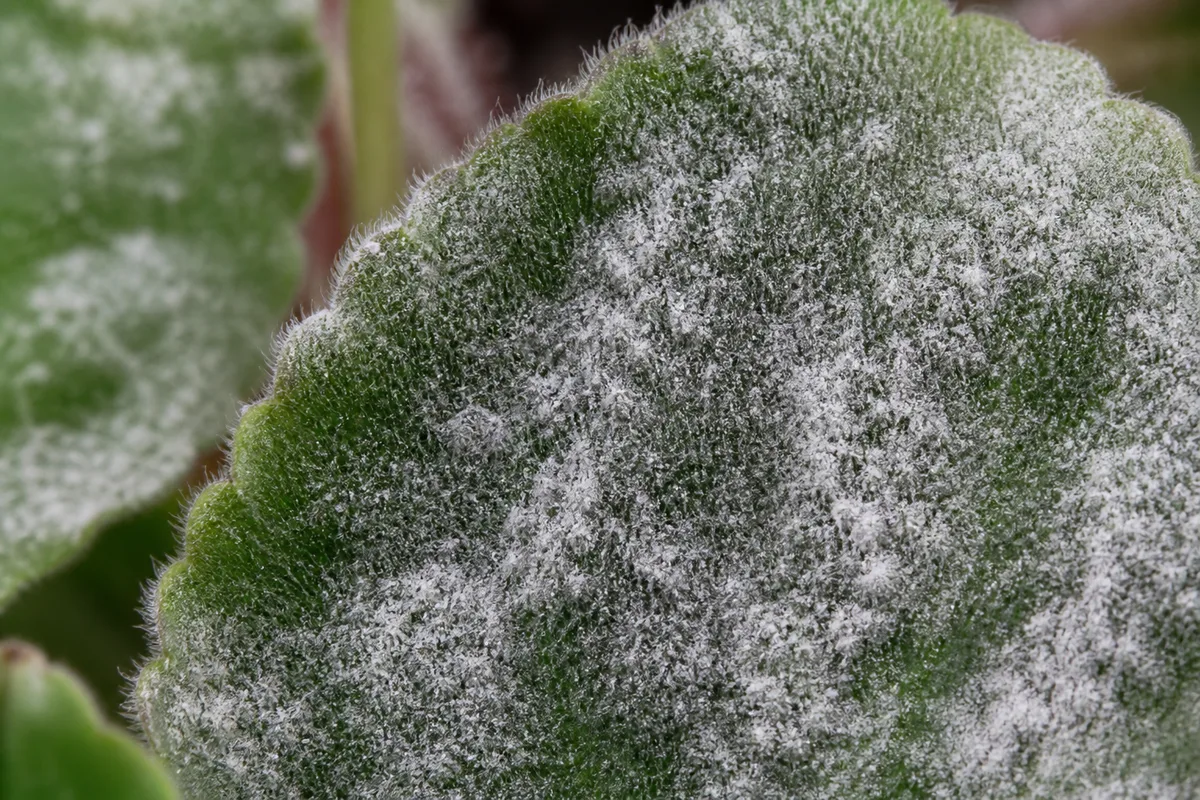
RHS describes powdery mildews as related fungi that cause a white, dusty coating on leaves, stems, and flowers. (RHS) Powdery mildew can develop on living leaves and often appears as white powdery patches that spread across the surface. Gray mold is more associated with aging, wounded, dead, crowded, or damp plant tissue. University of Maryland Extension describes gray mold management around reducing humidity, leaf wetness, and improving air circulation. (University of Maryland Extension)
Grower note: Powdery mildew appeared on a crowded shelf of African violets last autumn when heating dried the room but I kept trays full of water underneath. Opening spacing and running a small fan cleared surface powder within two weeks without fungicide.
The easiest memory hook: powdery mildew looks like dry powder on living surfaces; gray mold looks like fuzzy decay on damp or weakened tissue. White powder is not always mildew — dust, hard-water residue, pesticide film, or mealybugs can also look white. Mealybugs are insects, not fungus; see the indoor plant pest guide for that distinction.
Clemson’s gray mold guidance for ornamentals emphasizes sanitation and cultural practices such as removing infected debris, avoiding overhead watering, and improving air circulation. (Clemson HGIC) Begonias, African violets, kalanchoes, and jade plants can be vulnerable under stagnant, humid conditions.
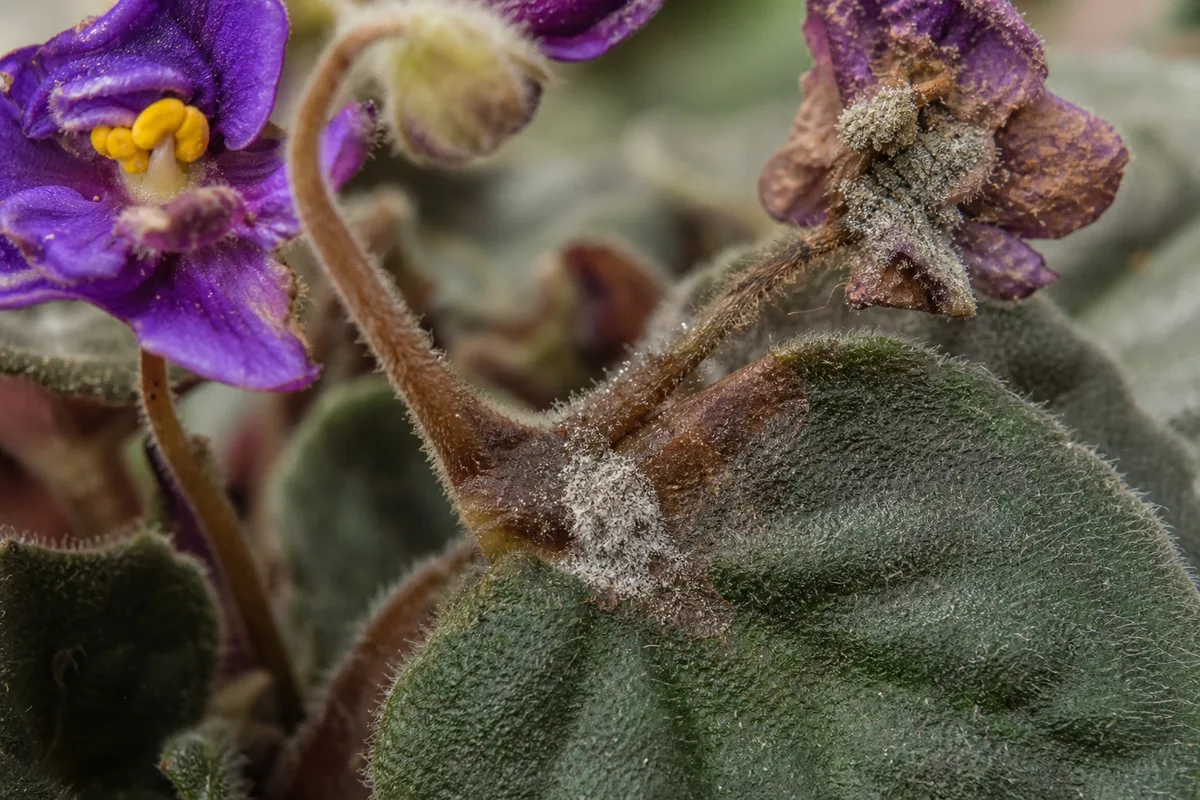
Grower note: Gray mold followed a spent African violet bloom I left sitting in the crown for a week during a humid spell — fuzzy gray tissue appeared at the flower base within days. Removing all debris and keeping the crown dry stopped spread; the plant recovered because the stem base stayed firm.
For species-specific mildew and blight steps, see African violet powdery mildew and African violet blight.
Treatment for Mildew and Mold
Symptom → cause → action for powdery mildew: white powder on living leaves → fungal spores in stagnant humid air → isolate, remove worst leaves, improve airflow and spacing, avoid overhead watering; use labeled fungicide only if severe and label allows indoor use.
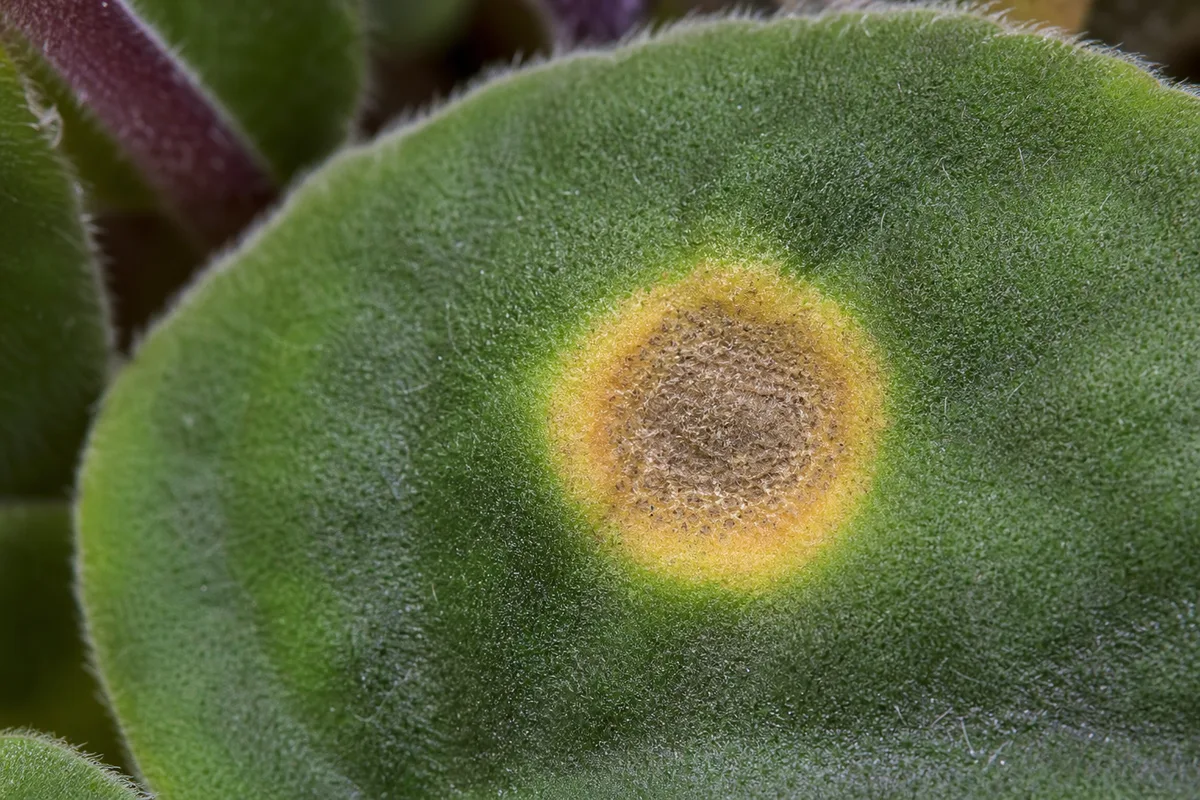
Symptom → cause → action for gray mold: fuzzy gray growth on dead flowers, wounded stems, or damp crowns → Botrytis on decaying tissue → remove all infected debris immediately, open dense canopy, keep crowns dry; discard if crown is rotting.
Home remedies deserve caution. Baking soda, milk sprays, cinnamon, hydrogen peroxide, and neem oil are often discussed online, but they are not interchangeable, and some can burn sensitive foliage. Test any product on a small area first. For indoor plants, the safest first-line control is almost always sanitation plus environmental correction.
Sooty Mold and Honeydew
Sooty mold is often misread as a leaf disease when it is actually a surface fungus growing on honeydew — the sticky waste excreted by sap-feeding insects such as aphids, whiteflies, mealybugs, and scale. Penn State Extension describes honeydew as a medium for sooty mold growth on leaves and stems. (Penn State Extension)
Grower note: A pothos above my couch developed a black film on upper leaves before I noticed cottony mealybugs tucked in two leaf axils. Treating the insects and wiping leaves twice over ten days cleared the soot; the film returned within a week when I missed one cluster — scouting mattered more than leaf washing alone.
Symptom → cause → action:
| What you see | Likely cause | What to do |
|---|---|---|
| Black sooty film on leaf surfaces | Sooty mold on honeydew | Find and treat the insect source via the indoor plant pest guide |
| Sticky leaves, no visible powder | Active sap feeders | Inspect undersides; isolate; treat pests first |
| Black film returns after wiping leaves | Underlying pest not controlled | Repeat pest treatment; improve scouting |
Wiping soot off leaves helps appearance but does not solve the problem if insects remain. Treat the pest population, then wash leaves gently with water. Sooty mold itself rarely kills a plant, but heavy coating can reduce photosynthesis. Link pest control to the integrated pest management indoors guide for a repeatable scouting and treatment workflow.
Viral Diseases
Viral diseases are less common than watering problems, but they are important because they are not curable. Viruses can produce mottled green and yellow foliage, ringspots, streaking, distorted growth, stunting, color breaks in flowers, or strange patterns that do not match normal variegation. A variegated plant is not automatically diseased. A single odd leaf is not proof of a virus. But if unusual mottling appears on new growth, the plant is stunted, patterns are irregular, and the issue persists despite good care, viral disease becomes more plausible.
Grower note: A solid-green pothos cutting from a friend showed patchy yellow-green mottling only on new leaves after six weeks, while older leaves stayed normal. I isolated it, ruled out thrips, and compared it to my Marble Queen — the pattern was irregular and worsening on new nodes. I discarded it rather than risk my philodendron collection; see pothos mosaic virus for the variegation-versus-virus decision tree.
Symptom → cause → action:
| What you see | Likely cause | What to do |
|---|---|---|
| Irregular mottling on new growth with stunting | Suspected virus | Isolate; do not propagate; consider disposal |
| Stable white/cream pattern on known variegated cultivar | Normal variegation, not virus | No action unless growth is unhealthy |
| Ringspots or streaks spreading to multiple plants | Virus via tools, insects, or propagation | Discard source plant; disinfect tools; control vectors |
University of Maryland Extension states that there is no cure for infected indoor plants and recommends disposal to prevent spread to healthy plants. (University of Maryland Extension) Missouri Botanical Garden gives similar guidance, explaining that viruses circulate internally and no treatment effectively removes them once diagnosed. (Missouri Botanical Garden) For rare or expensive plants, consider professional diagnostic testing through a local extension service or plant clinic before discarding.
A Prevention System for Healthier Indoor Plants
Prevention is not about keeping plants sterile. It is about making your home less favorable to pathogens and catching problems before they spread. Most houseplant disease prevention comes down to six habits: inspect, isolate, water correctly, improve airflow, remove dead tissue, and use clean tools. These habits work because they target the conditions diseases need.
Quarantine new plants for at least two to four weeks when possible. Water based on plant need, pot size, mix, light, season, and root health — not on a fixed weekly schedule. Airflow matters more than many indoor gardeners think; stagnant air lets moisture linger on leaves and inside dense foliage. Sanitation is the unglamorous habit that prevents repeated outbreaks: remove yellowing leaves before they decay, pick up fallen foliage, do not leave spent flowers rotting in crowns, and clean pruners between plants after diseased cuts.
Be careful with fertilizer. Overfertilizing pushes soft growth that is more vulnerable to disease and can add salt stress to damaged roots. Fertilize only when the plant is actively growing and already stable. Use fungicides with restraint — they work best when the disease is correctly identified, the product is labeled for that use, and underlying conditions have been corrected. The integrated pest management indoors guide applies the same inspect-before-treat logic to both pests and the conditions that invite disease.
A simple monitoring routine can prevent most disasters. Once a week, lift pots to judge moisture, check undersides of leaves, remove dead material, and look for changes. Once a month, review plant placement as seasons shift. Disease prevention is ongoing adjustment, not a one-time fix.
Related Guides
This guide covers site-wide disease identification. Use the links below when triage points you toward revival, pests, species-specific problems, or watering fixes.
- Save your dying houseplant — revival-first triage when decline may be stress or watering, not infection.
- How to tackle indoor plant pests at home — insect ID and treatment when honeydew, webbing, or stippling appear.
- Integrated pest management indoors — repeatable inspect-before-treat workflow for pests and disease-prone conditions.
- How to water indoor plants the right way — drainage and moisture checks that prevent most root rot.
- Monstera root rot — species-specific recovery after root rot diagnosis.
- Monstera leaf spot disease — fungal spot treatment after site-wide ID.
- African violet powdery mildew — mildew control on a common indoor bloomer.
- Pothos mosaic virus — variegation versus virus decision steps.
Conclusion
Houseplant disease treatment starts with accurate observation: roots first, then leaves, then spread pattern. When diagnosis is uncertain on a valuable plant, use an extension clinic rather than guessing — and discard systemic bacteria, advanced crown rot, or confirmed viruses to protect the rest of your collection.