How to Repot Monstera Deliciosa: When, Steps & Mistakes
Learn when to repot Monstera deliciosa, spot root-bound signs, size up only 1–2 inches, choose chunky aroid mix, and avoid transplant shock with this step-by-step guide.
Quick Answer: Timing, Signs, and the One-Pot-Size Rule
Repot a Monstera when roots crowd the pot, the mix breaks down, or watering becomes hard to manage - not because a calendar says spring and not because the leaves look huge. The best window is usually late winter through spring or early summer, when the plant is entering active growth and can recover faster. University of Minnesota Extension recommends repotting Monstera deliciosa every one to two years in late winter or early spring as it grows, and the RHS places the general houseplant repotting season from spring to early midsummer.
Size up only 1 to 2 inches in pot diameter, use a chunky, fast-draining aroid mix, disturb healthy roots as little as necessary, water thoroughly once after the move, and hold fertilizer for at least four weeks while roots settle. If you want the species-authoritative version with top-dress options, aerial-root detail, and extension-backed tables, start with the Monstera deliciosa repotting hub. This guide is the beginner-friendly walkthrough - the narrative path from “should I repot?” through cleanup and recovery.
Not sure whether crowding is the real problem? Run through is my Monstera rootbound before you haul a heavy floor plant across the room.
Why Repotting Matters for Climbing Aroids
Repotting is not automatically “give the roots more room.” Sometimes that is the goal. Sometimes the plant needs fresh, airy substrate in the same container, or a division because multiple stems have outgrown one pot. Monstera deliciosa is a climbing evergreen vine native from Mexico to Panama - a hemiepiphytic aroid that uses tree bark and aerial roots in habitat. Indoors, that biology explains why dense, soggy mix in an oversized decorative pot fails so often: the root zone needs oxygen, not a swimming pool.
Soil Exhaustion vs Root Crowding
Root crowding shows up as roots circling the bottom, escaping drainage holes, or a root ball that lifts out as one solid cylinder. Soil exhaustion is different: the mix has collapsed, repels water, or stays wet in the center while the surface looks dry. A Monstera can need intervention for either reason - or both. Mature plants you want to keep at a manageable size often benefit from a same-pot refresh rather than endless upsizing. That distinction keeps you from turning every repot into a bigger pot and a bigger watering mistake.
The Monstera deliciosa soil guide and our how to do Monstera soil mix walkthrough explain the 60/20/20 chunky blend in depth. For repot day, you mainly need a mix that holds moisture without staying stagnant - the same principle the RHS describes for thicker-rooted houseplants: larger air pockets plus finer water-holding particles.
What You Can Only Spot During Repot
Repotting is the rare moment you can see the root system before leaves tell the story. Circling roots, compacted peat, salt crust, fungus gnat larvae in soggy lower mix, hidden nursery plugs, and early root rot often appear only when the plant is out of the pot. Illinois Extension notes that aging compost loses drainage and structure - another reason refresh beats autopilot upsizing. Treat repotting as inspection plus maintenance, not just a bigger container.
When to Repot Monstera
Repot when the plant, roots, and soil give you a clear reason. A calendar is a reminder to look, not a command to disturb roots. Young, fast-growing Monsteras in bright light often need attention every 1 to 2 years; large established specimens may go 2 to 3 years between true pot upgrades if the mix stays healthy and watering rhythm still makes sense.
Best Season: Routine vs Rescue Repots
Routine repots belong in late winter, spring, or early summer - active growth windows when new roots and leaves help the plant rebound. University of Minnesota Extension specifically recommends late winter or early spring for Monstera repotting. Rescue repots happen whenever the pot is the problem: severe root rot, no drainage, roots bursting through the container, or mix that has turned into a waterlogged brick. Waiting for perfect spring timing while roots suffocate is worse than acting now - just use a modest size increase, stable light, and careful watering afterward.
Signs Your Monstera Actually Needs It
Most growers check these signs first:
- Roots circling the bottom or emerging from drainage holes
- Soil drying unusually fast - often within a day or two after a thorough watering
- Mix shrunk away from pot edges or water running straight through without absorbing
- Top-heavy, unstable plant despite reasonable watering
- Growth stalling in season despite adequate light and feeding
- Whole root ball lifting out as a dense mold when you tug gently (confirm with rootbound diagnosis)
One reality check: large leaves do not prove the roots are cramped. Monsteras climb; vertical leaf span can mislead. Judge by root escape, dry-down speed, and what you see when you slide the plant partway out.
When to Wait Instead of Repotting
Wait if the plant is pushing healthy new leaves, the mix dries on a normal schedule, and roots are not escaping. Monsteras tolerate slight snugness better than fresh wet soil around too few roots - the classic overpotting trap. Also wait if the plant is already stressed from shipping, a recent move, pests, or a sharp light change, unless the pot itself caused the stress. Deep winter idle growth is another reason to delay routine repotting; emergency cases excepted. If your only motivation is aesthetics and the plant is thriving, leave it alone.
Repot, Refresh, or Divide?
Smarter Monstera care starts with picking the least disruptive fix that solves the actual problem.
Full Pot Upgrade
Choose a larger pot when the root mass is genuinely crowded, roots circle heavily, and the plant dries out far too quickly. Go one pot size up - about 1 to 2 inches wider in diameter - not the next decorative size on the shelf. NC State Extension and standard houseplant repot guidance both warn that excess unused soil stays wet longer than roots can use it.
Same-Pot Soil Refresh
Refresh when plant size is fine but mix is depleted, hydrophobic, or swampy. Remove the plant, shake or brush away old mix from the outer root zone, trim only what is dead, and backfill with fresh chunky blend in the same pot. This is ideal for mature floor Monsteras you do not want getting dramatically bigger. Large specimens that are hard to move may also use top-dressing (scraping and replacing the top few inches) as bridge maintenance - detailed on the species repotting page.
Division When It Makes Sense
Divide when multiple stems are jammed together, the plant is too wide for the space, or you want separate specimens. After removing the root ball, identify natural splits where stems have their own roots, separate with clean hands or a knife, pot each section, and treat as you would any repotted plant. For cutting-based propagation after division, see the Monstera propagation guide.
Before You Start
Gather everything before the root ball sits exposed. Less handling time means less stress.
Materials Checklist
At minimum: a pot with drainage holes, fresh chunky mix, clean pruners, gloves if you want them, a tarp or tray, and soft plant ties. If the Monstera climbs, have a moss pole, coir pole, or stake ready - repotting is the easiest time to seat support deep in fresh mix. Our DIY moss pole guide covers build options if you are making one for this session.
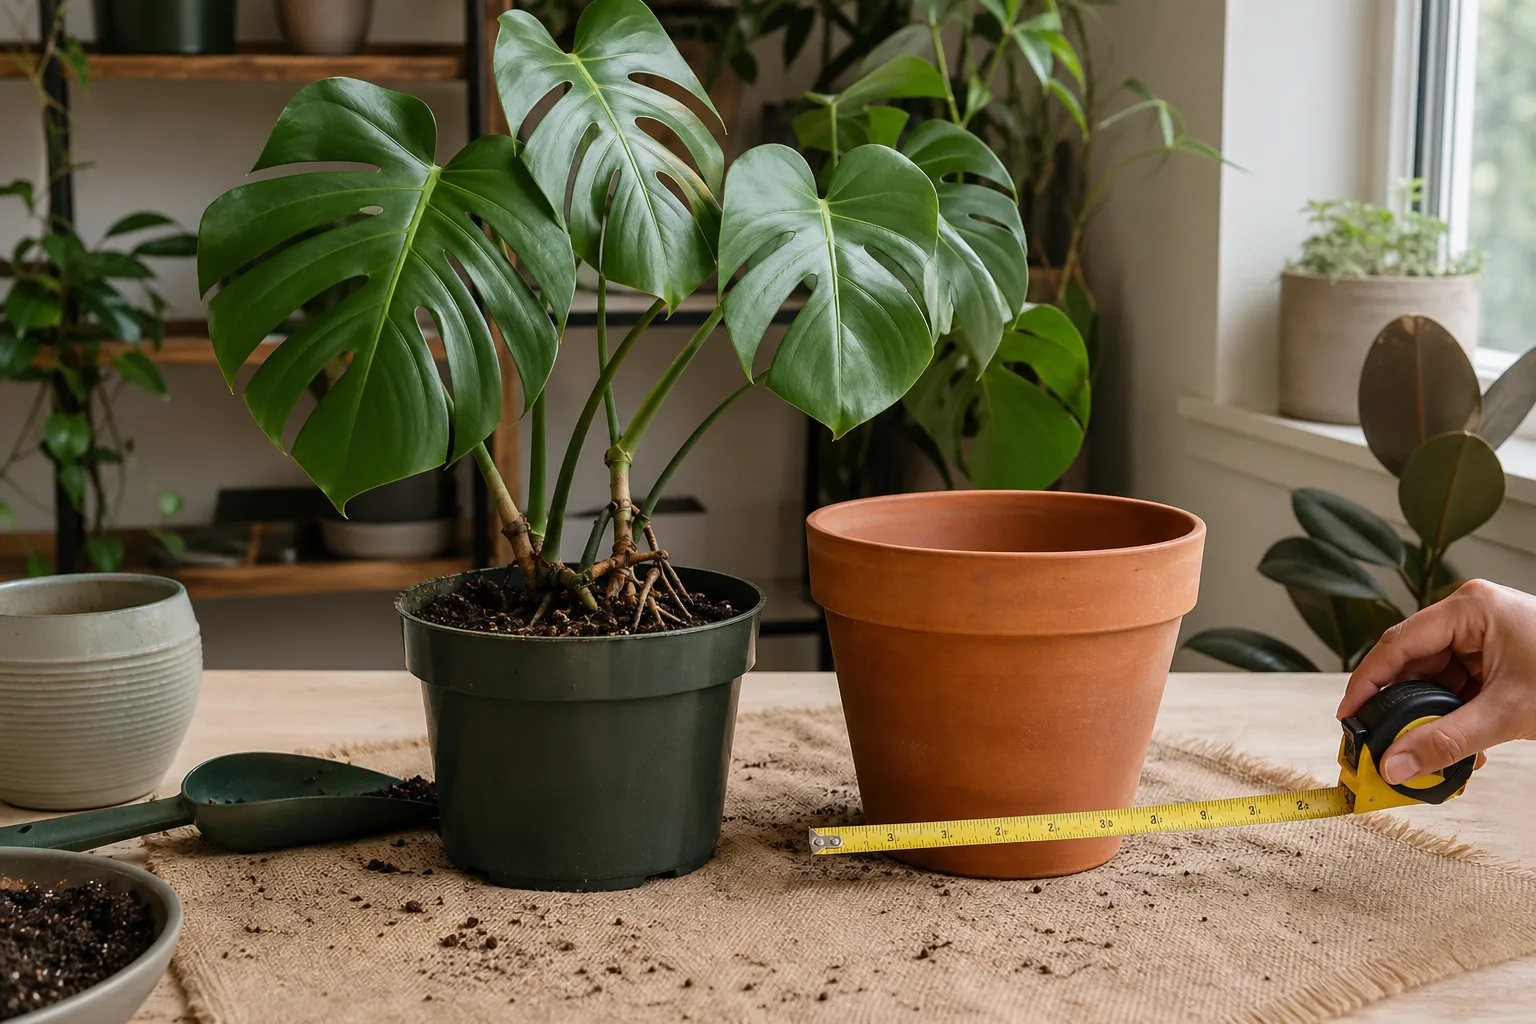
Pot Size Rule (1–2 Inches Wider)
The rule most indoor growers need: 1 to 2 inches wider in diameter than the current pot. Match the container to the root ball, not the leaf spread. A very fast grower with a massive root mass may justify a slightly larger jump only if the mix is extra airy and light is strong. Top-heavy vines may need a wider, heavier pot for stability even when root crowding is mild.
Soil Mix for Repotting
Use chunky, airy, moisture-retentive but fast-draining mix. A practical home blend:
- 2 parts quality indoor potting mix
- 1 part orchid bark
- 1 part perlite or pumice
- optional small coco coir for moisture balance
That aligns with the 60/20/20 aroid recipe on the species soil page. Avoid heavy “moisture control” blends that stay wet for days indoors - Monsteras dislike prolonged wet feet. Wisconsin Horticulture Extension notes that container-grown Monstera needs frequent repotting to accommodate roots - which only works if the new mix breathes.
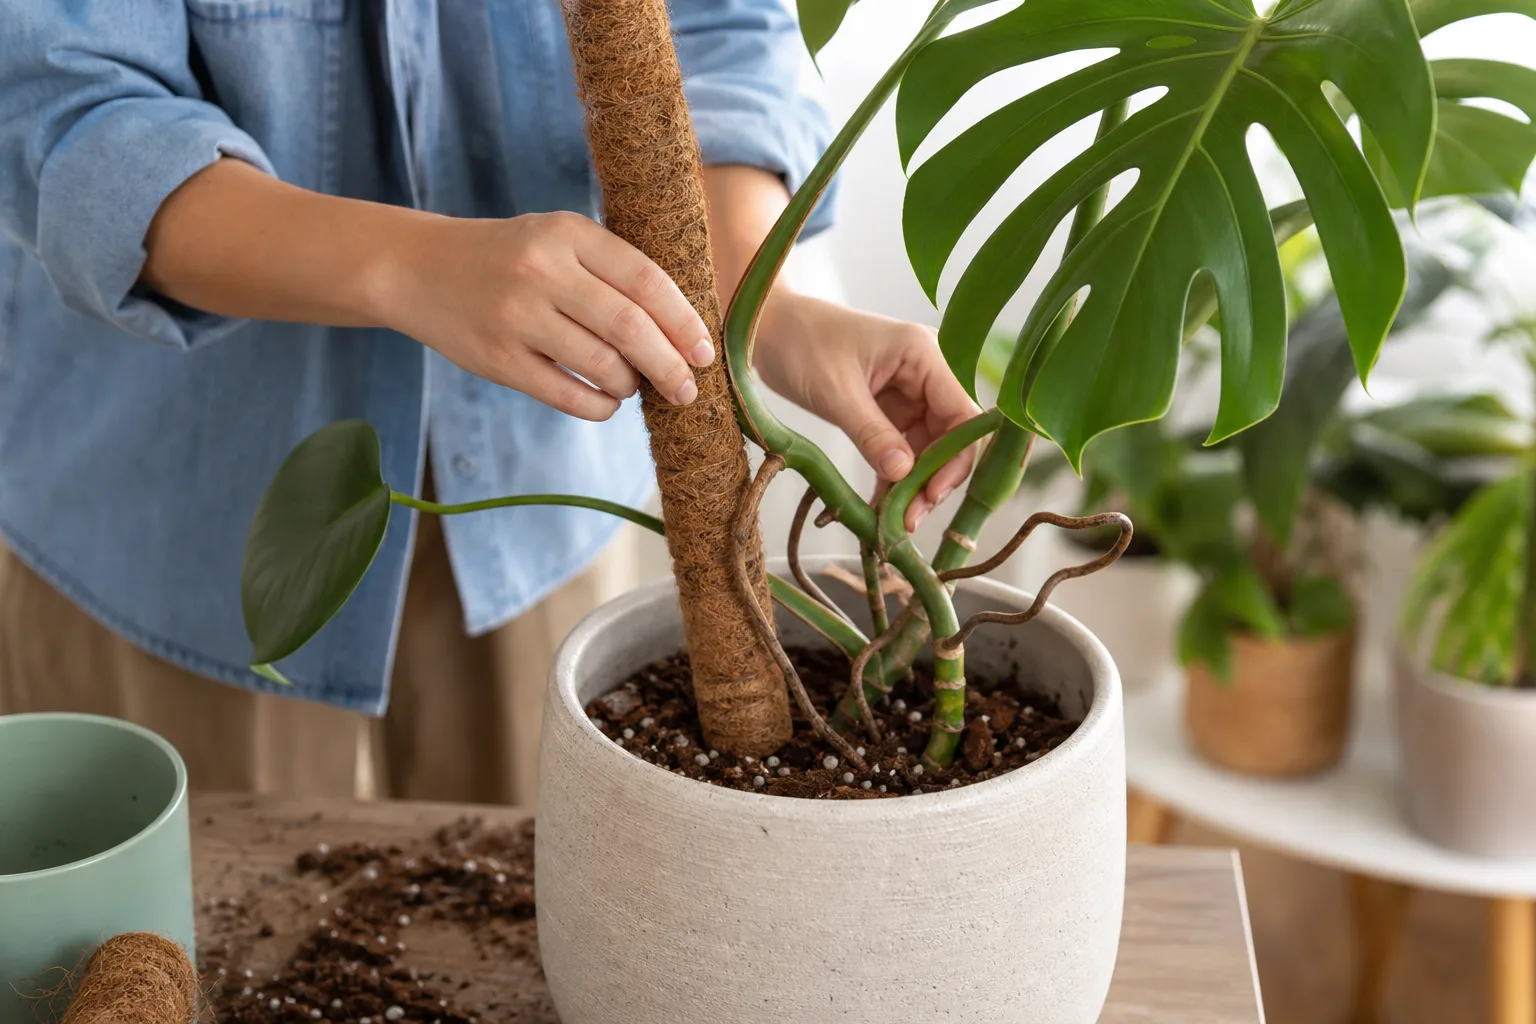
Moss Pole Timing
Install or extend a pole during repotting, not after roots have settled in a new pattern. Seat the pole to the bottom of the pot before backfilling, position the main stem with room to grow forward and upward, and tie loosely. NC State Extension lists sturdy support as necessary to prevent stem breakage on heavy vines. Climbing with moist pole contact encourages larger, more mature foliage when light is adequate.
Pet Safety During Repot
Monstera deliciosa is toxic to cats and dogs if chewed - insoluble calcium oxalates cause oral irritation. Keep clippings, spilled mix, and trimmed roots away from curious pets during the session. ASPCA lists Swiss cheese plant as toxic to cats and dogs. If a pet ingests plant material during cleanup, contact your veterinarian.
How to Repot Monstera Step by Step
Good repotting is orderly, not surgical. Keep disturbance reasonable unless roots are diseased.
Step 1: Prep the Plant and Work Area
Water a few hours before repotting - or the evening before - so the root ball slides out more cleanly and roots are less brittle. Illinois Extension recommends premoistening mix and having the new pot ready before removal. Set the new pot with drainage holes; add only a shallow base layer if needed so the crown stays at the same height. Position a moss pole now if you are using one. Clear enough space for a large plant laid gently on its side.
Step 2: Remove and Inspect the Root Ball
Support the base and tip the pot, not the petioles. Squeeze flexible nursery pots, run a blunt tool around the rim, or tap lightly - never yank by leaves. Once out, inspect roots: healthy roots are firm and pale to creamy white. Tease circling outer roots gently with fingers. Trim mushy, dark, foul-smelling sections with clean pruners and discard saturated old mix around them - standard root rot recovery practice. Do not bare-root a healthy plant unless the old mix is severely degraded.
Step 3: Position, Backfill, and Secure Support
Place the Monstera so the main growth point has room to continue upward. Keep the front toward the pole if the plant has a clear orientation - Monsteras are not symmetrical shrubs. Backfill with fresh mix, pressing lightly to remove large air gaps without compacting. Keep the soil line at the same height on the stem and leave space below the rim for watering. Tie the stem loosely to the pole; do not cinch petioles into unnatural shapes.
Step 4: Water and Reset the Environment
Water thoroughly once so mix settles around roots. Then place the plant in bright, indirect light with stable temperature - avoid repotting and immediately moving to a darker or hotter spot. Hold fertilizer for at least four weeks; fresh mix already contains nutrients and disturbed roots are salt-sensitive. University of Maryland Extension advises reducing or avoiding fertilizer on stressed or recently repotted houseplants until normal growth resumes.
Expect a short adjustment: slight droop or one older yellow leaf can be normal. Persistent collapse with soggy mix points to oversizing, dense soil, overwatering, or hidden root damage.
Aerial Roots During Repot
Aerial roots are climbing hardware, not flaws. During repot, guide them toward the moss pole and secure gently so they contact moist fiber - do not bury long aerial roots in wet potting mix, where they often rot. Roots hanging in open air can stay free. Trimming dried aerial tips is fine; coiling healthy aerial roots into the bottom of the pot is not. The goal is bark-like contact above the mix line.
For full protocol - including when to trim, redirect, or leave aerial roots alone - see the Monstera aerial roots guide and the species repotting hub section on aerial roots. Repot day is the best time to reset that relationship between stem, pole, and roots.
Troubleshooting After Repotting
“Why does my Monstera look worse?” Usually because repotting disrupts the root environment and changes moisture dynamics temporarily - not because you failed the whole process.
If stems feel firm and soil is evenly moist but not saturated, give a few days before overcorrecting with more water. If mix stays wet for a week or more, suspect pot too large or mix too dense. Curling or brown edges may mean dryness, root damage, or a sharp light/airflow change. Whole-plant limp with drenched soil: stop watering, confirm drainage, inspect for rot.
Yellowing after repot can mean normal older-leaf turnover (one leaf) or overwatering in the new setup (multiple leaves). Most “transplant shock” on Monsteras is really moisture management after an oversized pot or heavy mix. Recovery from rot repots is slower than simple crowding - stall while rebuilding roots is normal if conditions are now better than before.
Common Repotting Mistakes
The biggest mistake is using a pot that is too large - more unused soil holds moisture longer and invites rot. Second: dense, peat-heavy mix that never dries indoors. Third: repotting on autopilot every spring without inspecting roots. Fourth: stacking repot + division + major move + feeding in one week. Fifth: fertilizing too soon after fresh mix and root disturbance.
One more Monstera-specific note: variegated or slow cultivars such as Thai Constellation use water more slowly and recover more gradually - pot size discipline matters even more. When in doubt, refresh or wait beats oversizing.
Related Monstera Guides
- Monstera deliciosa overview - whole-plant care hub
- Monstera deliciosa repotting - species-authoritative timing, top-dress, and aerial-root detail
- Is my Monstera rootbound? - diagnosis before you disturb roots
- How to do Monstera soil mix - 60/20/20 blend and large-pot adjustments
- Monstera aerial roots guide - redirect aerial roots during repot
- DIY moss pole - build or upgrade support during the same session
- Watering Monstera deliciosa - moisture rhythm after mix and pot change
- Repotting houseplants - general repot workflow for non-Monstera plants
Conclusion
Repotting Monstera deliciosa is straightforward when you match the move to the problem: upgrade, refresh, or divide - and know when waiting is smarter. Repot in active growth when you can; act sooner in emergencies. Use drainage, a modest size increase, chunky mix, minimal healthy-root disturbance, one thorough watering, and a four-week fertilizer pause. For species-depth tables, top-dress paths, and aerial-root detail, bookmark the Monstera deliciosa repotting hub and the Monstera deliciosa care overview. The best repot solves the real bottleneck without creating a new one.