Monstera Deliciosa Repotting: When, How & Mistakes
Monstera Deliciosa Repotting: When, How & Mistakes
Monstera Deliciosa Repotting: When, How & Mistakes
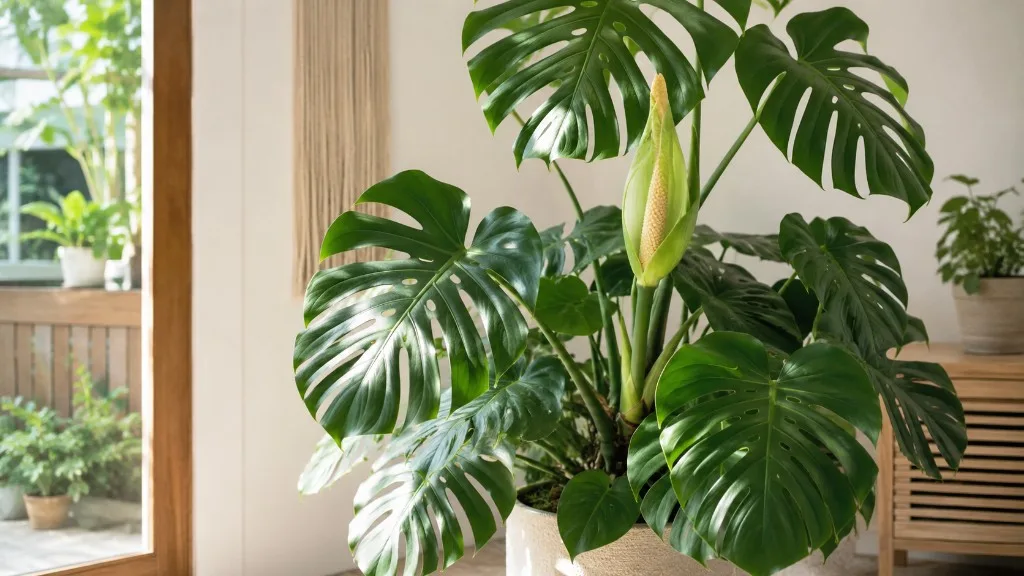
Monstera deliciosa repotting is not a calendar chore you perform because the app reminded you - it is the maintenance window where a large climbing aroid gets fresh, airy soil, a stable moss pole, and enough root room to keep pushing the split leaves that made Swiss cheese plant famous. Monstera deliciosa grows as a climbing evergreen vine native from Mexico to Panama, typically reaching 6 to 8 feet indoors when given support. That growth speed, combined with thick aerial roots and a top-heavy vine, means repotting mistakes show up fast: yellow lower leaves, a wobbling totem, or sour soil that leads to root rot before you realize the pot was two sizes too large.
Quick answer: Most indoor Monstera deliciosa specimens need a full repot every 1–2 years, ideally in early spring when active growth resumes. Go only one pot size up (about 2–5 cm / 1–2 inches wider in diameter), refresh with a chunky aroid mix (see the Monstera deliciosa soil guide for the 60/20/20 recipe), install or extend a moss pole during the same session, and hold fertilizer for at least four weeks while roots settle.
This guide covers when to full-repot versus top-dress, pot sizing for floor specimens, a numbered repot procedure, moss-pole installation, aerial-root handling, aftercare links across the Monstera deliciosa care cluster, and the mistakes that turn a routine upgrade into a month-long recovery.
Why Monsteras Need Thoughtful Repotting
Generic houseplant repot advice fails on deliciosa because the plant is a hemiepiphytic climber, not a compact tabletop succulent. In habitat it starts on the forest floor, then sends aerial roots to grip tree bark as the vine ascends. Indoors, that biology translates into three repot-specific realities: roots want chunky, oxygen-rich mix; the vine wants a stable vertical support; and the whole assembly can become top-heavy long before the foliage looks “too big” for the room.
Repotting solves problems that show up as leaf symptoms if you ignore them. Root-binding compresses the root mat until water channels through without wetting evenly. Depleted mix loses the perlite and bark structure that kept the bottom of a deep pot breathable. Salt buildup from tap water and fertilizer burns fine root hairs even when you water carefully. A well-timed repot is also the only easy moment to inspect roots for rot, redirect aerial roots onto a moist pole, and correct a pot that tips every time someone walks past.
Wisconsin Horticulture Extension notes that container-grown Monstera needs frequent repotting to accommodate the root system - more often than slow growers at a similar stem height. Treat the calendar as a reminder to lift the pot and look, not a command to disturb roots regardless of condition.
Aerial Roots, Moss Poles, and Fast Indoor Growth
Aerial roots are not decorative flaws - they are the plant’s climbing hardware. NC State Extension lists sturdy support as necessary to prevent stems from breaking on a heavy vine. When those roots find a moist moss pole or coco totem, they anchor the stem and signal the plant to produce larger, more mature leaves with stronger fenestrations - provided light is adequate.
Repotting is the best time to install a new pole deep in fresh mix or extend an existing totem without stabbing established roots blindly. Aerial roots that already reach toward a pole should be loosely tied with soft plant tape so they contact moist fiber. Roots hanging in open air can stay free or be guided to the pole - do not bury long aerial roots in wet potting mix, where they often rot (covered under Common Mistakes below).
Fast indoor growth also means deliciosa outgrows nursery pots sooner than beginners expect. A vigorous specimen in a 25 cm (10-inch) pot can become root-bound within a single growing season, while a cool, dim winter may buy another year. Judge by roots and dry-down speed, not vine length alone.
When to Repot vs. Top-Dress
Not every spring soil refresh requires hauling a 15 kg floor plant across the room. Two maintenance paths exist, and choosing the right one keeps stress proportional to the problem.
| Approach | Best when | What you do | Limitations |
|---|---|---|---|
| Top-dress | Plant is large and hard to move; roots not circling heavily; mix surface crusted or salt-loaded | Scrape off top 5 cm of old mix; replace with fresh bark-heavy blend | Does not fix circling roots at the bottom or severe root-binding |
| Full repot | Roots from drainage holes; water runs through in seconds; sour smell throughout; plant tips easily | Remove plant, tease circling roots, one pot size up, all-new mix | Higher shock risk if done in deep winter or with oversized pot |
| Moss-pole upgrade only | Roots fine but pole too short or wobbly | Repot or top-dress with new pole anchored deep - rarely pole alone without any soil refresh | Pole must reach pot bottom for stability |
Full repot when two or more root-bound signals appear during the active growth window. Top-dress in early spring as bridge maintenance between full repots every one to two years on vigorous climbers - matching UMN Extension guidance to repot every one to two years in late winter or early spring.
Signs the Root Zone Is Ready
The clearest signal is roots emerging from drainage holes or circling the surface when you lift the plant partway out. UMN Extension also lists: potting soil drying within 24 hours after watering, the plant tipping easily despite being well watered, the whole root ball lifting out as one solid mold, and growth stalling even though light and feeding have not changed.
Less obvious but reliable: the pot feels light again within hours of a thorough soak because water channels through a hydrophobic root mat. Yellow lower leaves on soil that stays wet can mean compacted mix - cross-check overwatering symptoms before repotting, because moving a already-stressed plant adds another variable.
Do not repot solely because one leaf yellowed. Deliciosa naturally sheds older lower foliage on a long vine. Confirm the root zone is the bottleneck first.
Tools, Pot Size, and the Right Soil Mix
Gather everything before you disturb roots - a large Monstera should not sit bare-root on the kitchen floor while you hunt for mix.
Tools and materials:
- New pot 2–5 cm (1–2 inches) wider than the current one, with drainage holes
- Pre-mixed chunky aroid blend (recipe below)
- Moss pole or coco totem sized for current vine height plus 30–60 cm of future growth
- Soft plant ties or velcro tape
- Hand trowel, chopstick or pencil for backfilling
- Clean scissors for mushy roots
- Watering can, tarp or table cover (deliciosa drips sap - wear gloves if sensitive)
Worked example: A root-bound deliciosa in a 25 cm (10-inch) nursery pot moves to a 30–32 cm (12–13-inch) pot - not a 40 cm decorative planter “for future growth.” At that upgrade, batch roughly 6–7 parts quality potting mix, 2 parts perlite, 1 part orchid bark by volume - the same 60/20/20-style blend detailed on the Monstera deliciosa soil page. Penn State Extension recommends a well-draining soilless mix rich in organic matter, noting that charcoal, bark, or perlite can amend purchased blend. NC State specifies good drainage, high organic matter, and neutral pH (6.0–8.0).
For 10-inch-plus floor specimens that stay wet longer than a week after watering, shift toward the soil guide’s large-specimen profile: 55–60% base, 25–30% perlite, 15–20% bark. The goal is dry-down through the full profile, not just the surface.
The One-Size-Up Rule and Pot Stability
UMN Extension advises choosing a container about two inches wider than the current pot and at least 1–2 inches taller when needed for root depth. The one-size-up rule exists because unused soil volume stays wet until roots colonize it - the primary path to rot after repotting on any aroid.
Deliciosa adds a stability dimension: a tall moss pole turns the pot into a lever. Prefer a wide-based nursery pot inside a decorative cachepot over a tall, narrow vase that tips when aerial roots pull the stem sideways. Weight at the base (a heavy ceramic outer pot, not gravel layers) beats a pretty top-heavy silhouette.
Every long-term pot needs drainage holes. Cachepots without holes are acceptable only if the inner nursery pot drains freely and you empty the saucer after every watering.
Step-by-Step: Full Repot Without Shock
Work when you have 45–60 minutes uninterrupted. Minimize root exposure time.
Step 1 - Water the day before. A lightly moist root ball holds together and slips out cleanly. Bone-dry soil crumbles; soggy soil smears.
Step 2 - Prepare the new pot. Add enough fresh mix to the bottom so the plant will sit with the previous soil line 2–3 cm below the rim. No gravel drainage layer - it does not improve drainage and can create a perched water table.
Step 3 - Remove the plant. Tip the Monstera on its side, support the base of stems, and slide it out. Squeeze flexible nursery pots; run a knife around rigid pots if needed. If a moss pole is installed, lift plant and pole together as one unit when possible.
Step 4 - Inspect and trim roots. White, firm roots are healthy. Trim brown, mushy, sour-smelling tissue with clean scissors. Tease circling roots at the bottom and sides so they point outward - do not strip all soil (see Bare-Rooting mistake).
Step 5 - Position aerial roots. Long aerial roots heading toward open air can stay free or be arranged toward where the moss pole will sit. Do not coil them into the bottom of the pot under wet mix.
Step 6 - Set the plant. Center the root ball. Maintain the same burial depth as before - deliciosa stems should not be buried deeper than they were growing.
Step 7 - Backfill. Add mix in stages, working it between roots with a chopstick. Firm lightly - enough to remove large air gaps, not enough to compact mix into concrete.
Step 8 - Water thoroughly. Soak until excess runs from drainage holes. Empty the saucer. Place in bright indirect light, out of direct sun, for 7–10 days.
Step 9 - Hold fertilizer. Skip feed for at least four weeks while roots settle - longer if the plant wilted significantly. Resume per the fertilizer guide only after new growth looks firm.
Step 10 - Track dry-down. Fresh chunky mix often dries slightly faster at first. Follow watering checks (top 3–5 cm dry) rather than your old calendar until the pot rhythm stabilizes in two to three weeks.
Step-by-Step: Install or Upgrade a Moss Pole
Repotting is the ideal window to add support because you can seat the pole to the pot bottom before backfilling - the stablest configuration for a heavy vine.
Step 1 - Choose pole height. Select a totem that reaches above the current vine tip with room to add extensions later. Modular stackable poles let you grow upward without repotting again solely for height.
Step 2 - Insert before the plant. Place the pole slightly off center if the main stem curves - you want the stem’s aerial-root side against moist fiber. Push the base to the bottom of the empty pot before setting the root ball.
Step 3 - Backfill around pole and roots. Hold the pole vertical while you add mix. The pole should not wobble when you tug lightly at mid-height.
Step 4 - Tie the stem loosely. Use soft ties every 20–30 cm so aerial roots touch moss or coco fiber. Do not strangle the stem - leave room for thickness growth.
Step 5 - Moisten the pole. Spray or pour water down the totem so aerial roots sense humidity. Keep the pole consistently damp (not dripping) during the first month after repot.
Step 6 - Plan extensions. When the vine reaches the top, add a pole segment before the plant becomes unstable - extending early beats emergency pruning to fit a too-short support.
If the plant is not ready for full repot but the pole is failing, you can sometimes slide a taller pole alongside the old one during top-dress - still anchor the new base to the pot bottom through the refreshed upper mix layer.
Common Repotting Mistakes
Too-Large Pot and Rot Risk
Jumping from a 25 cm pot to a 40 cm designer planter feels generous; biologically it is a swamp reservation. Excess mix stays saturated at the bottom while a small root system cannot pull water fast enough. Yellow lower leaves, sour smell, and soft stem bases follow - often misdiagnosed as “needs more fertilizer.”
Stick to one size up. If you want a bigger decorative cachepot, keep the plant in a right-sized draining inner pot.
Bare-Rooting and Root-Hair Damage
Stripping every crumb of old soil removes fine root hairs that absorb water and nutrients. Deliciosa recovers, but the shock window lengthens and leaf drop intensifies. Keep some original mix around the root ball; tease only circling exterior roots and obvious mush.
Burying Aerial Roots in Wet Mix
Aerial roots evolved for air and bark contact, not burial in peat. Coiling them into the pot bottom places tissue in a dark, wet zone where rot starts quickly. Guide them to the moist pole or let them hang freely. Trimming a few dried aerial tips is harmless; burying healthy ones is not.
Other mistakes worth avoiding: fertilizing immediately after repot; heavy watering daily in the first week; repotting during active pest treatment (wait until propagation or pest recovery finishes); winter repotting a merely slightly tight plant in a cool room; and decorative cachepots that trap drainage water after repot when mix is already wetter than usual.
After Repotting: Water, Light, and Fertilizer
Repotting resets the soil–water relationship. Fresh mix with more perlite and bark often means the top dries faster while the middle still holds moisture - exactly why finger checks beat calendars.
Water: Light, thorough soaks when the top 3–5 cm is dry per your normal watering routine. Avoid keeping mix constantly soggy “to help shock” - that worsens rot risk.
Light: Bright indirect exposure, no direct sun on wilted leaves for the first week. Deliciosa in too dim a corner after repot may stall longer because it cannot photosynthesize enough to fuel root repair.
Fertilizer: None for at least four weeks. Roots with cut surfaces and new mix do not need salt load. When new leaves arrive firm and green, resume monthly feeding during active growth per the fertilizer guide.
If wilting, yellowing, or sour smell persists beyond three weeks, inspect roots - you may be dealing with rot or an oversized pot, not normal shock.
Recovery Timeline and Shock Signals
Mild transplant shock - slight droop, one or two older yellow leaves, paused fenestration on the next leaf - commonly clears within one to two weeks in warm spring conditions. This window is a practical grower observation; individual homes vary with temperature and light.
Root re-establishment - roots exploring fresh mix, stable watering rhythm - often takes four to six weeks before growth feels “normal” again. The best recovery signal is a new leaf unfurling at full size with expected splits for your light level - not the repair of old damaged foliage, which will not revert.
Escalate if wilting worsens after the first week, multiple leaves yellow at once, stems soften at the base, or soil smells sour. Those patterns point to root rot or chronic overwatering in too-large pots - not patience-worthy shock.
Aerial roots that attach to a damp pole and turn plump during recovery are another positive sign the vine is re-anchoring.
Seasonal Timing for Deliciosa Repots
Spring through early summer is the safest default. Rising temperatures and longer days match NC State guidance to prune or repot in spring when the plant is actively growing. UMN Extension specifies late winter or early spring every one to two years for repotting rhythm.
Early fall top-dress can refresh the surface if you missed spring, but avoid full repot in late fall unless urgent.
Winter repot only when delay would clearly harm the plant: severe root-binding with repeated wilting, active rot requiring trim and fresh mix, or a broken pot. Keep indoor temperatures within the 60–85°F comfort range NC State cites for deliciosa, provide bright indirect light, and water more cautiously until new growth returns.
| Season | Full repot risk | Top-dress | Notes |
|---|---|---|---|
| Spring | Low | Ideal | Combine with moss pole install |
| Summer | Low–medium | OK | Avoid hottest week; slight shade first days |
| Fall | Medium | Preferred over full | Growth slowing |
| Winter | High | OK for surface refresh | Full repot only if urgent |
Practical Checks Before You Commit
Urgency check: If roots circle heavily and water runs straight through, plan a full repot in the next active growth window - delaying risks stunted growth and salt buildup in exhausted mix.
Inspection order: Lift the pot, check drainage holes, then slide the plant out 2–3 cm to peek at root color without full removal if unsure. Smell the root zone - sour means act soon. If repotting, tease only exterior circling roots; keep the core intact.
Stability check: Rock the moss pole. If the pot lifts with the pole, repot with a deeper-set pole or wider base pot before the vine tears stem tissue.
Pet and Child Safety
Monstera deliciosa contains insoluble calcium oxalate crystals that irritate pets and people if chewed or ingested. Repotting exposes sap and fallen debris - keep the work area away from cats and dogs, wear gloves if skin is sensitive, and contact your vet promptly if symptoms appear. Monstera Deliciosa overview belongs on inaccessible shelves or floor displays, not pet-accessible corners - see the overview pet section for placement guidance.
Conclusion
Monstera deliciosa repotting succeeds when you treat it as aroid infrastructure work: one pot size up, chunky mix from the soil guide, a moss pole anchored at the bottom, aerial roots on the pole instead of buried in peat, and a patient four-week fertilizer pause. Spring timing, firm new leaves, and plump aerial roots on a damp totem are your confirmation the vine is back on track - not the cosmetic repair of older hole-less foliage. When roots, pole, and mix work together, the plant earns its reputation as an architectural indoor climber rather than a yellowing mess in an oversized decorative pot.
When to use this page vs other Monstera Deliciosa guides
- Monstera Deliciosa overview - Start here for whole-plant context before deep-diving this topic.
- Monstera Deliciosa problems hub - Jump to symptom-specific fix guides when this care topic does not resolve the issue.
- Root Rot on Monstera Deliciosa - Escalate here when repotting adjustments are not enough.