Root Rot on Desert Rose: Caudex Squeeze Test & Recovery
Quick answer
Root rot on Adenium usually starts when wet soil meets a dormant or cold-stressed caudex. First step: stop watering and unpot immediately-press the caudex and rinse roots to see whether tissue is firm or mushy before any other fix.
Root Rot on Adenium: Causes, Checks & Fixes
This guide covers root rot on Adenium. See also the general Root Rot guide, watering, and light pages for this plant.
Root Rot on Adenium: Causes, Checks & Fixes
Quick answer
Root rot on Adenium obesum (Adenium overview) almost always traces to roots and caudex sitting wet too long-especially during winter dormancy or cool weather when the plant barely drinks. The swollen caudex stores water like a reservoir; once decay starts in the root zone, it can climb into that base within days.
First step: stop watering and unpot the plant today. You need to see whether roots are firm or mushy and whether the caudex is hard or soft before repotting, pruning, or spraying anything.
| What you find | What it usually means | Read next |
|---|---|---|
| Mushy roots after unpotting, wilt on wet mix | Root breakdown-may already reach the caudex | Stay on this page; use the squeeze test and trim workflow below |
| Spongy caudex at soil line before you unpot | Crown decay at the base | Crown rot on Adenium - same surgery path, soil-line focus |
| Firm caudex, dry soil, leafless in cool months | Normal winter rest | Adenium watering guide - withhold water unless the caudex clearly deflates |
For baseline culture that keeps roots dry between drinks, see the Adenium overview, soil guide, and watering guide.
Root rot vs. crown rot on Desert Rose
Searchers land on different pages, but on Adenium the damage is usually one problem seen from two angles. Root rot describes mushy roots below the soil after you unpot; crown rot describes decay climbing into the caudex at the soil line. Because the caudex is the crown on desert rose-not a separate collar above roots-the two terms overlap heavily on this species.
Use this decision flow:
- Press the caudex first (squeeze test below). Firm tissue with only root mush below soil → root-rot page workflow. Any spongy zone at the soil line → also read crown rot for soil-line triage.
- Unpot and rinse roots. Brown jelly that collapses between fingers confirms root rot. Firm pale roots with a hard caudex point to drought stress or dormancy-not surgery.
- Treatment when tissue is soft is the same: stop watering, trim to firm flesh, callus dry, repot into fast-draining mix per the repotting guide. The distinction matters so you do not confuse dormancy leaf loss with rot-and so you do not bounce between two guides repeating the same steps.
Start here when you have already unpot or need a root-by-root inspection workflow. Start on crown rot when the base feels spongy at the soil line before you lift the plant.
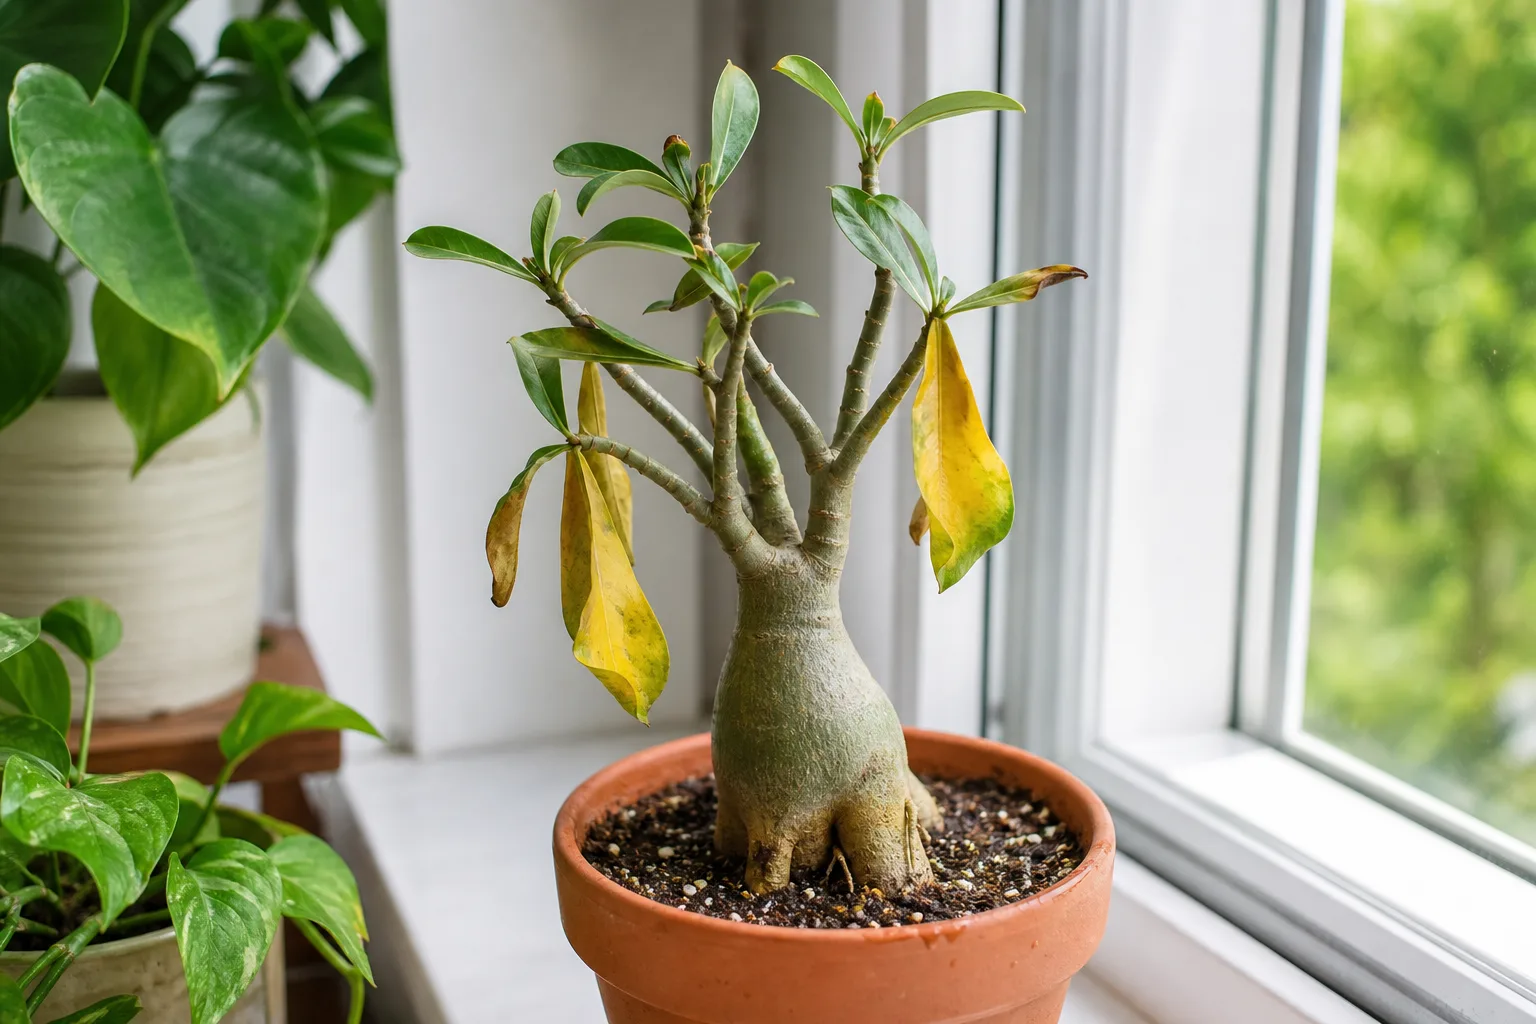
What root rot looks like on Adenium
Above soil, rot often mimics thirst. Leaves may yellow, curl, or wilt even though the mix feels damp-damaged roots cannot move water upward. Lower leaves drop first; stems may look limp. A sour or swampy smell from the pot is a strong rot clue.
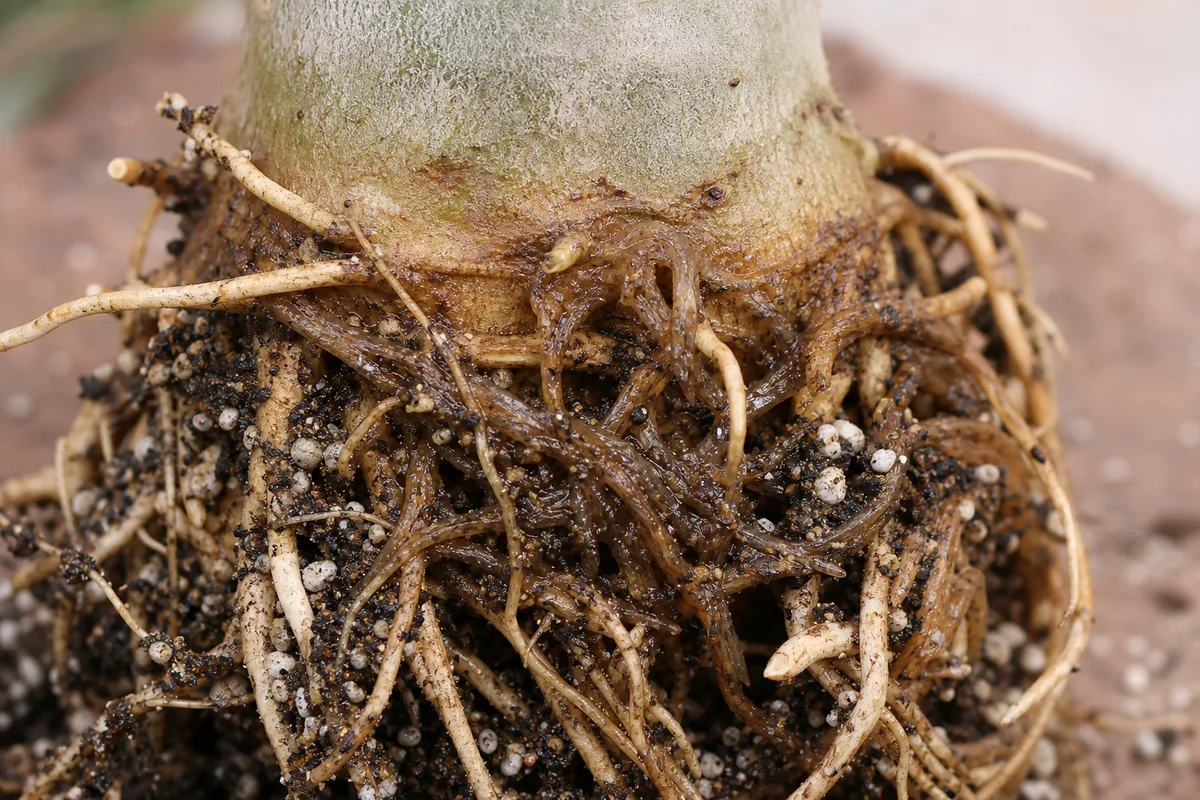
Brown mushy roots at the caudex base with damp gritty mix - compare firm pale roots above the rot line with collapsed brown tissue below.
The decisive check is the caudex-the swollen trunk base. Healthy Adenium tissue feels firm, like a ripe apple. Rot shows as:
- Soft, squishy, or dented caudex skin
- Dark brown or black patches spreading from soil line up stems
- Caudex that feels hollow or waterlogged when pressed
- Yellowing that continues while soil stays wet for days
Below soil, infected roots turn brown, translucent, or mushy instead of firm and pale. A white or gray fuzz on rotted roots is fungal growth, not healthy root hairs.
Salvageable subset: Mushy roots with a still-firm caudex often recover if you trim aggressively and repot dry-the crown has not yet failed. Once the caudex dents under light pressure, odds drop sharply and stem-cuttings salvage becomes the backup plan.
Normal lookalikes during rest: Adenium often loses leaves in winter and rests for several months with little or no water. That leaf drop is fine when the caudex stays hard and the mix is dry. Rot is the combination of soft base + wet soil, not bare branches alone.
Why Adenium gets root rot
Desert rose evolved for dry seasons and sharp drainage. It is not a tropical foliage plant that wants constantly moist peat. Missouri Botanical Garden notes that sharp soil drainage is required to prevent rots-standard bagged potting mix without grit is a common trigger indoors.
Dormancy watering is the usual trigger
When temperatures drop and the plant sheds leaves, root uptake nearly stops. UF/IFAS recommends withholding water during cold winter months and letting the plant rest three to four months. Watering on your normal summer schedule in that window leaves unabsorbed moisture around roots.
Growers often mistake leaf drop for thirst and water a dormant Desert Rose. That kindness is how root rot starts indoors. Match seasonal rhythm to the Adenium watering guide rather than a calendar reminder.
| Temperature zone | Adenium activity | Watering rule of thumb |
|---|---|---|
| Above 65°F (18°C), active leaves | Peak growth | Soak when mix is dry 5–7 cm down; Adenium light guide |
| 55–65°F, leaf drop beginning | Slowing uptake | Stretch intervals; water only when caudex deflates on dry soil |
| Below 55°F nights | Near or in dormancy | Withhold water; dry caudex deflation is the only trigger |
| Below 50°F | Cold stress risk | Keep dry; cold-damaged tissue rots easily if mix stays damp |
University of Arizona Extension adds that root rot sets in when plants are watered during dormancy, watered too early in spring, or kept in cold, wet soil-A. obesum shows cold stress below about 50°F and has little tolerance of freezing. Desert Botanical Garden stresses that adeniums overwintering below 50°F must stay dry regardless of pot size.
Poor drainage and culture triggers
Other Adenium-specific triggers:
- Heavy or peat-rich mix that stays wet for days after one drink - see soil guide
- Pots without drainage or saucers that hold standing water
- Oversized pots where a small root ball sits in a large wet zone
- Low light plus frequent watering-slow growth uses less water, so the same schedule becomes excessive
- Watering right after repotting before cut roots callus - follow repotting timing
Water molds such as Phytophthora and Rhizoctonia finish the job once roots are oxygen-starved, but the root cause is almost always culture, not random bad luck.
How to confirm the cause
Work through these checks in order:
The caudex squeeze test
Press the swollen base gently with dry fingers between thumb and forefinger:
- Firm, like a smooth gourd - rot is unlikely at the crown; check soil moisture and roots next
- Slight give but rebounds - early stress; unpot before the next watering
- Spongy, dents stay, or waterlogged feel - treat as rot; do not water hoping it plumps up
A thirsty Adenium wrinkles while staying firm. Rot collapses and often smells sour at the drainage holes.
Full confirmation checklist
- Soil moisture at depth - Dry 5–7 cm down with a firm caudex suggests underwatering. Wet deep mix with a soft caudex confirms trouble.
- Season and temperature - Is the plant leafless in cool months? Have you watered anyway? That pattern fits dormancy rot.
- Pot and mix - Drainage holes open? Mix gritty or dense peat? Saucer empty after watering?
- Smell and roots - Unpot if the base is soft or smell is sour. Rinse roots gently. Healthy tissue is firm and pale; rot is brown and collapses between fingers.
- Stem color - Blackening climbing from soil line means advanced rot, not simple underwatering.
If the pot is light, mix is dry throughout, and the caudex is firm but slightly wrinkled, underwatering may explain wilt better than rot-do not rush to soak a plant you have not inspected.
First fix for Adenium
Stop all watering and unpot the plant.
Lay the Adenium on newspaper, knock away wet mix, and identify where tissue turns from firm to mushy. That single inspection tells you whether you are treating rot, dormancy, or drought-everything else depends on it.
Do not fertilize, mist heavily, or repot into fresh mix until you have cut away decay and let wounds dry. Stacking fixes the same day stresses an already failing root system.
Step-by-step recovery
Once rot is confirmed, work in this order:
- Trim all decay - With clean, sharp scissors or a knife, cut mushy roots and caudex back to hard, healthy tissue. Keep cutting inward until you see firm white or green flesh, not brown jelly. Sterilize blades between cuts with rubbing alcohol.
- Treat and dry - Arizona Extension suggests spraying exposed roots with rubbing alcohol and leaving the plant unpotted for several days in bright shade with good airflow so cuts callus. Two to three days is a minimum; large caudex wounds may need a week or more.
- Discard old mix and clean the pot - Reusing soggy soil reintroduces pathogens. Scrub the container or use a fresh one with drainage holes.
- Repot dry into gritty mix - Use a loose, sandy or gravelly, well-drained mix with perlite, pumice, or coarse sand per the repotting guide. Do not water immediately-wait until the plant has callused and you see stable conditions (often five to seven days after repotting).
- First water lightly - When you do water, moisten the mix once and let it dry fully before the next drink. Judge by caudex firmness and mix dryness, not a calendar.
- Light and warmth - Place in bright light but avoid harsh midday sun on a stripped plant until new leaves appear. Keep temperatures above 55°F; cold wet roots rot again quickly.
- Hold fertilizer - Skip feed until new growth looks healthy for two weeks. Salt stress on damaged roots slows recovery.
If stems above the caudex are still firm, the plant can survive losing most of its roots. If rot has hollowed the entire base, take firm stem cuttings as backup before the last tissue fails-see the Adenium propagation guide for callus and rooting steps.
Optional fungicide after trim
Physical removal of mushy tissue and dry callus time matter more than spray. Some growers dust cut surfaces with cinnamon or apply a copper fungicide labeled for ornamentals to protect exposed flesh-optional, not a substitute for cutting to firm tissue. Do not drench wet mix hoping chemicals fix rot you left behind.
Recovery timeline
Stabilization (weeks 1–2): After trimming and dry repotting, the caudex should stop softening and may plump slightly as it uses stored water. No new watering until callus looks dry and corky.
First new growth (weeks 4–8): Leaf buds are the best sign of success during warm active growth-expect them in four to eight weeks, sometimes longer if recovery started in late winter. Old yellow leaves will not green up again-trim them for hygiene.
Long-term rebuild (months to a year): Full root mass and caudex size rebuild over several months to a year, not days. A severely carved caudex may never look as round as before, but a firm base and seasonal flowering still mark a saved plant.
Sample scenario: A dormant Adenium watered weekly in a 60°F room-trimmed to 40% healthy roots, unpotted three days, repotted dry into gritty mix, held above 72°F with bright light-often shows first leaf buds around week 5–6 if the caudex stayed firm throughout.
Worsening signs: caudex softens further after dry treatment, black streaks climb stems, or the plant collapses without new buds by mid-spring-those point toward tissue that cannot be salvaged. Shift to propagation salvage while upper stems are still firm.
Lookalike symptoms
| What you see | Often confused with | How to tell apart |
|---|---|---|
| Wilt on wet soil | Thirst | Wet mix + soft caudex = rot; dry mix + firm wrinkled caudex = underwatering |
| Leafless in winter | Root rot | Dormancy: hard caudex, dry soil. Rot: soft base, sour smell, wet mix |
| Black stem tips after cold snap | Root rot | Cold damage: firm caudex, dry lesions after exposure below 50°F; keep dry and warm |
| Spongy soil line only | Root rot alone | May be crown-focused-see crown rot if decay starts above roots |
| Temporary wilt after repot | Root rot | Repotting stress: firm base, no mushy roots; hold water briefly per repotting guide |
| Spotted leaves, firm caudex | Root rot | Anthracnose leaf spot-fix airflow and wet foliage, not root surgery |
Always pair above-ground wilt with a caudex squeeze test and root rinse-that combination separates rot from dormancy faster than leaf color alone.
What not to do
Do not water more because leaves look wilted while soil is already wet-that accelerates rot. Avoid standard peat-heavy potting mix without mineral grit. Do not feed during dormancy or immediately after root pruning.
Skip fungicide alone without removing mushy tissue and fixing drainage-chemicals do not restore oxygen to waterlogged roots. Do not repot into a much larger pot; extra wet soil volume slows drying. Do not leave the plant in a full saucer.
When cutting stems, wear gloves-Desert Rose is toxic to cats and dogs and sap irritates skin. If a pet chews trimmed tissue or sap, contact ASPCA Animal Poison Control (888-426-4435) or your veterinarian promptly. Wash tools and hands after handling.
Avoid stacking repotting, hard pruning, and fungicide on the same day.
How to prevent root rot next time
Match watering to season: soak and dry during hot active growth in full sun, then withhold water during cool rest when leaves drop per the watering guide. Allow soils to dry between waterings-if the mix is still damp 5–7 cm down, wait.
Use fast-draining succulent mix from the soil guide, pots with open drainage, and empty saucers after every drink. Move containers indoors before nights fall into the 40s°F. Quarantine new Desert Roses and press the caudex weekly during the growing season-early softness is easier to fix than a collapsed plant.
After any root surgery, follow repotting dry-callus timing before the first drink. During dormancy, treat caudex deflation on dry soil as the only watering trigger-not a calendar.
When to worry
Escalate immediately if the caudex dents under light pressure, stems blacken upward from the base, or inspection shows mostly mushy roots. Slow cosmetic leaf yellowing on a hard caudex in autumn can wait for a care tweak.
If more than half the caudex is soft after trimming, survival odds drop sharply-propagate firm upper stems while tissue is still healthy.
Salvage decision checklist:
- Caudex firm after trim → repot dry, wait for buds, follow timeline above
- One soft flank, rest firm → localized trim; see crown rot for soil-line detail
- More than half caudex soft → stem cuttings before collapse
- Hollow stems above caudex → discard plant; sterilize pot; do not reuse mix
A few yellow leaves on wet soil with early root mush and a still-firm caudex is manageable with aggressive trim-not a reason to discard the plant on day one.
For chronic re-rot after two thorough trims, contact your local cooperative extension office with photos before escalating to stronger fungicides.
When to use this page vs other Adenium guides
- Adenium watering guide - Use for routine moisture checks before assuming root rot is the main issue.
- Adenium problems hub - Browse all 40 common issues on this species.
- Overwatering on Adenium - Different entry point when symptoms overlap with root rot.
- Yellow Leaves on Adenium - Different entry point when symptoms overlap with root rot.
- Wilting on Adenium - Different entry point when symptoms overlap with root rot.