Best Pebbles for a DIY Pebble Tray
Compare pea gravel, river pebbles, and clay pebbles (LECA) for DIY humidity trays—size ranges, stability, porosity, and what to avoid.
Quick Answer: Best Pebbles for Most DIY Trays
For most DIY humidity trays, pea gravel is the safest default. It is cheap, stable under nursery and ceramic pots, easy to rinse, and explicitly recommended by Iowa State Extension for trays filled with pea gravel or pebbles. If appearance matters more than cost, small river pebbles (roughly ¼ to ½ inch / 6 to 13 mm) look cleaner on open shelves. If you want a lighter, more porous medium—or you already keep hydroponic supplies—clay pebbles such as LECA or Hydroleca are a valid third option supported by RHS guidance on moist gravel or clay granules.
This page is only about choosing and preparing stones. For tray assembly, water level, humidity limits, and a full build walkthrough, start at the DIY pebble tray hub.
How Pebble Choice Affects Tray Performance
Pebble type does not change whether a tray works. Tray geometry, water level, and placement do most of that. What pebble choice changes is stability, maintenance, refill frequency, and how annoying the tray is to live with. Those are the criteria worth shopping for.
Stability Under Different Pot Weights
A 4-inch plastic nursery pot sits securely on any of the three main materials. A 10-inch glazed ceramic planter is a different story. Pea gravel and small river stone lock together under weight because the pieces interlock. Clay pebbles are lighter and rounder, so heavy pots can shift if you bump the tray or if the layer is too shallow.
Use this simple rule: if the filled pot weighs more than about 5 lb (2.3 kg) or the base is wider than 8 inches, default to stone gravel unless you build a deeper, wider tray and keep the clay layer at least 1½ inches deep. In a LeafyPixels side-by-side check, a 9-inch ceramic pot wobbled on 1 inch of LECA but sat firm on the same depth of rinsed pea gravel.
Evaporation Surface and Refill Cadence
Evaporation depends mainly on exposed water surface and airflow, not stone chemistry. Still, porosity changes behavior. Clay pebbles absorb water into their pores, which can spread moisture across more surface area and dry the reservoir faster. Inert stone holds water only in the gaps between pieces, so the visible water line drops more slowly but the tray may need a deeper pebble layer to keep the pot safely above the water.
In the same editorial tray test—identical 10-inch plastic saucers, 1 inch of pebbles, water to ¼ inch below the stone tops, 72 °F forced-air room—LECA needed refilling every 2 to 3 days while pea gravel lasted 4 to 5 days before the water line fell below half the pebble depth. River pebbles fell between the two. Material choice will not transform room humidity; it mainly changes how often you top off the tray. For what trays can and cannot do to local humidity, see do pebble trays really increase humidity?.
Honest RH note: In our observation period, switching fill material in otherwise identical saucers did not produce a meaningful change in local relative humidity at pot level compared with changing tray width or water surface area. Porosity mainly shifts refill cadence and cleaning, not whether the tray replaces a humidifier. Tray geometry and placement dominate the humidity math.
Cleaning and Maintenance by Material
Stone pebbles rinse clean quickly and resist algae film better than porous clay when the tray gets good light and airflow. Clay pebbles can develop a greenish cast in bright windows and may need a full soak-and-scrub every two to three weeks in hard-water homes. Fine aquarium gravel traps silt in the gaps and turns into a maintenance chore within a week if you skip the initial rinse. Whatever you buy, plan on emptying the tray, scrubbing stones, and refilling with fresh water whenever you see slime, odor, or white mineral crust—not because the material failed, but because standing water always needs hygiene.
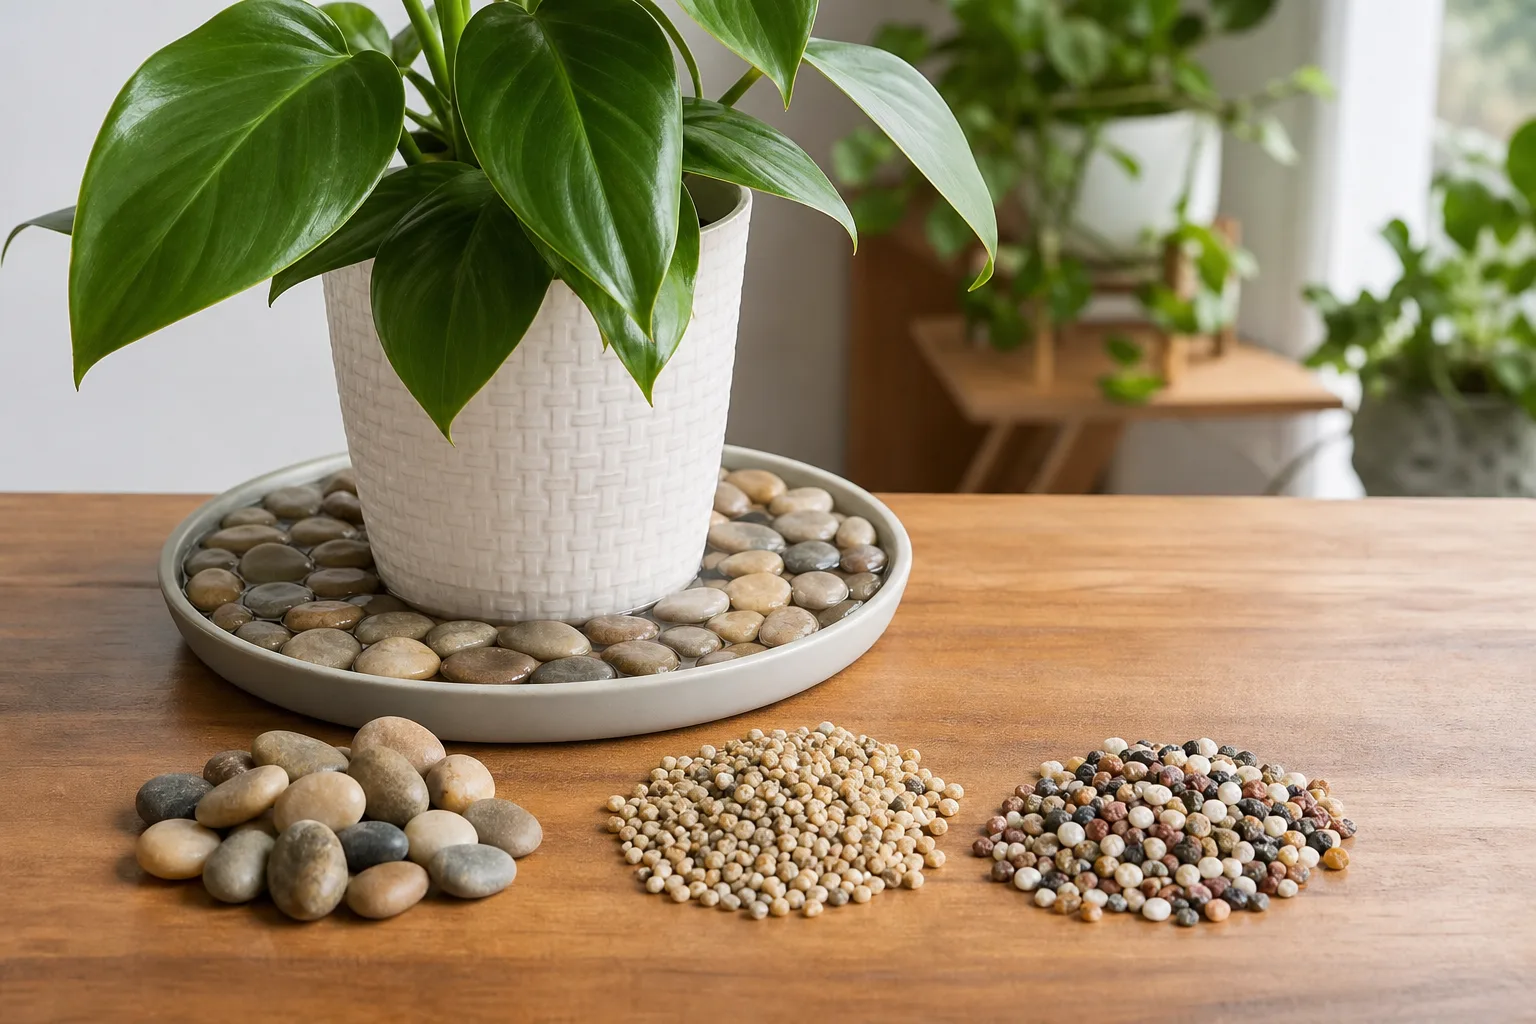
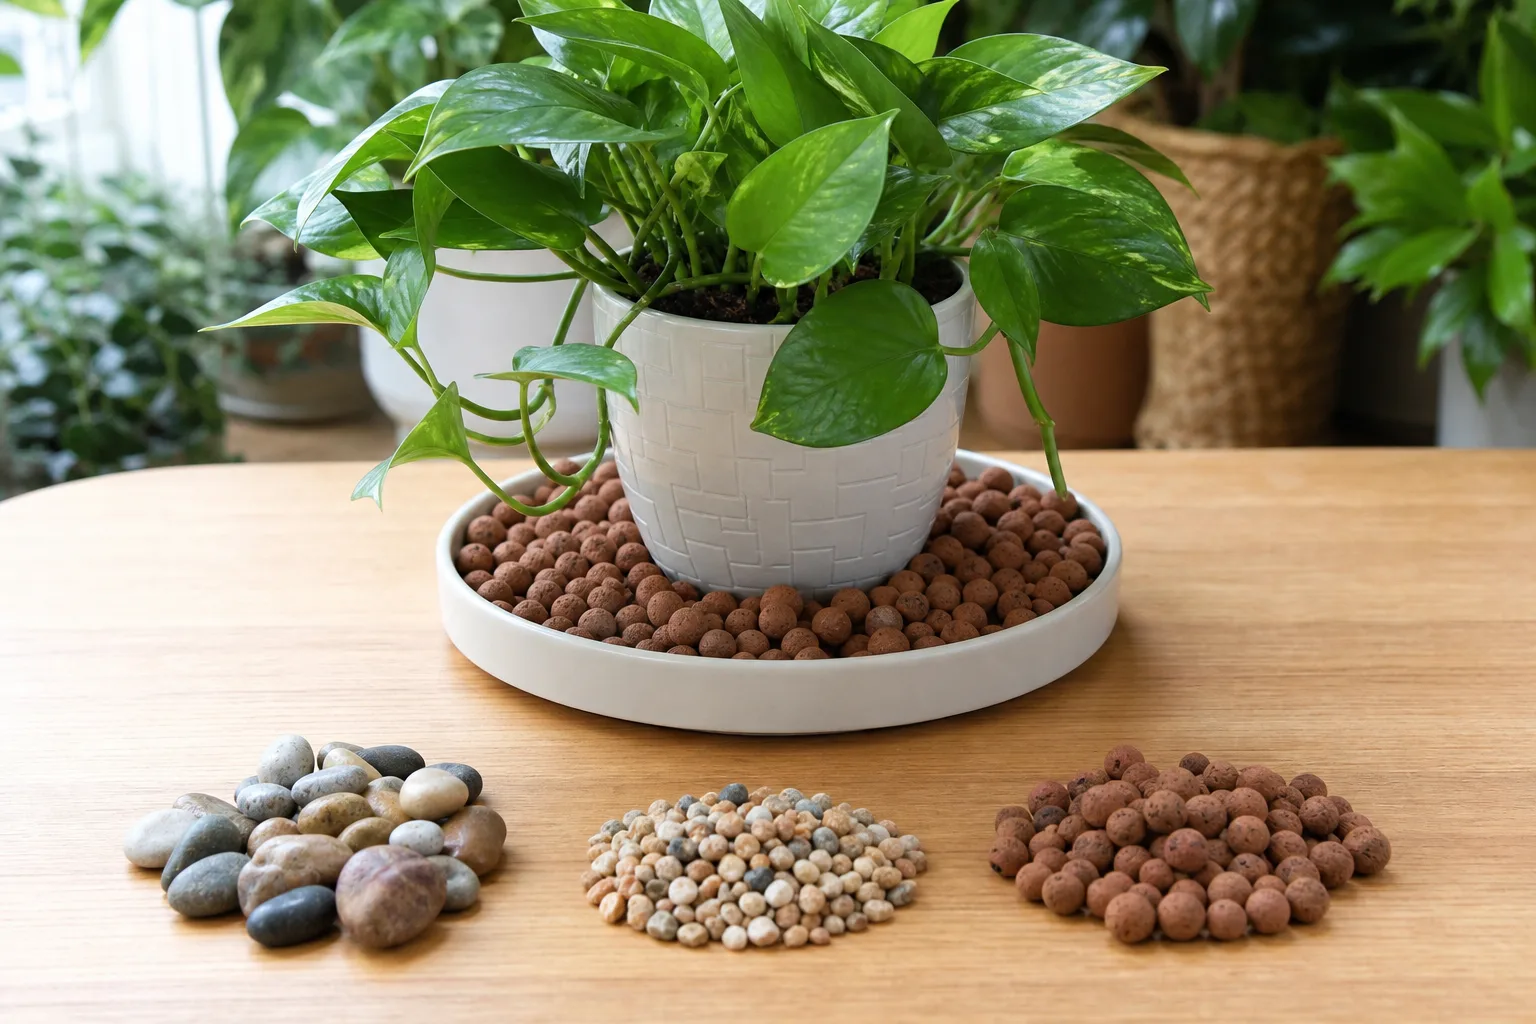
LeafyPixels Editorial Side-by-Side Saucer Test
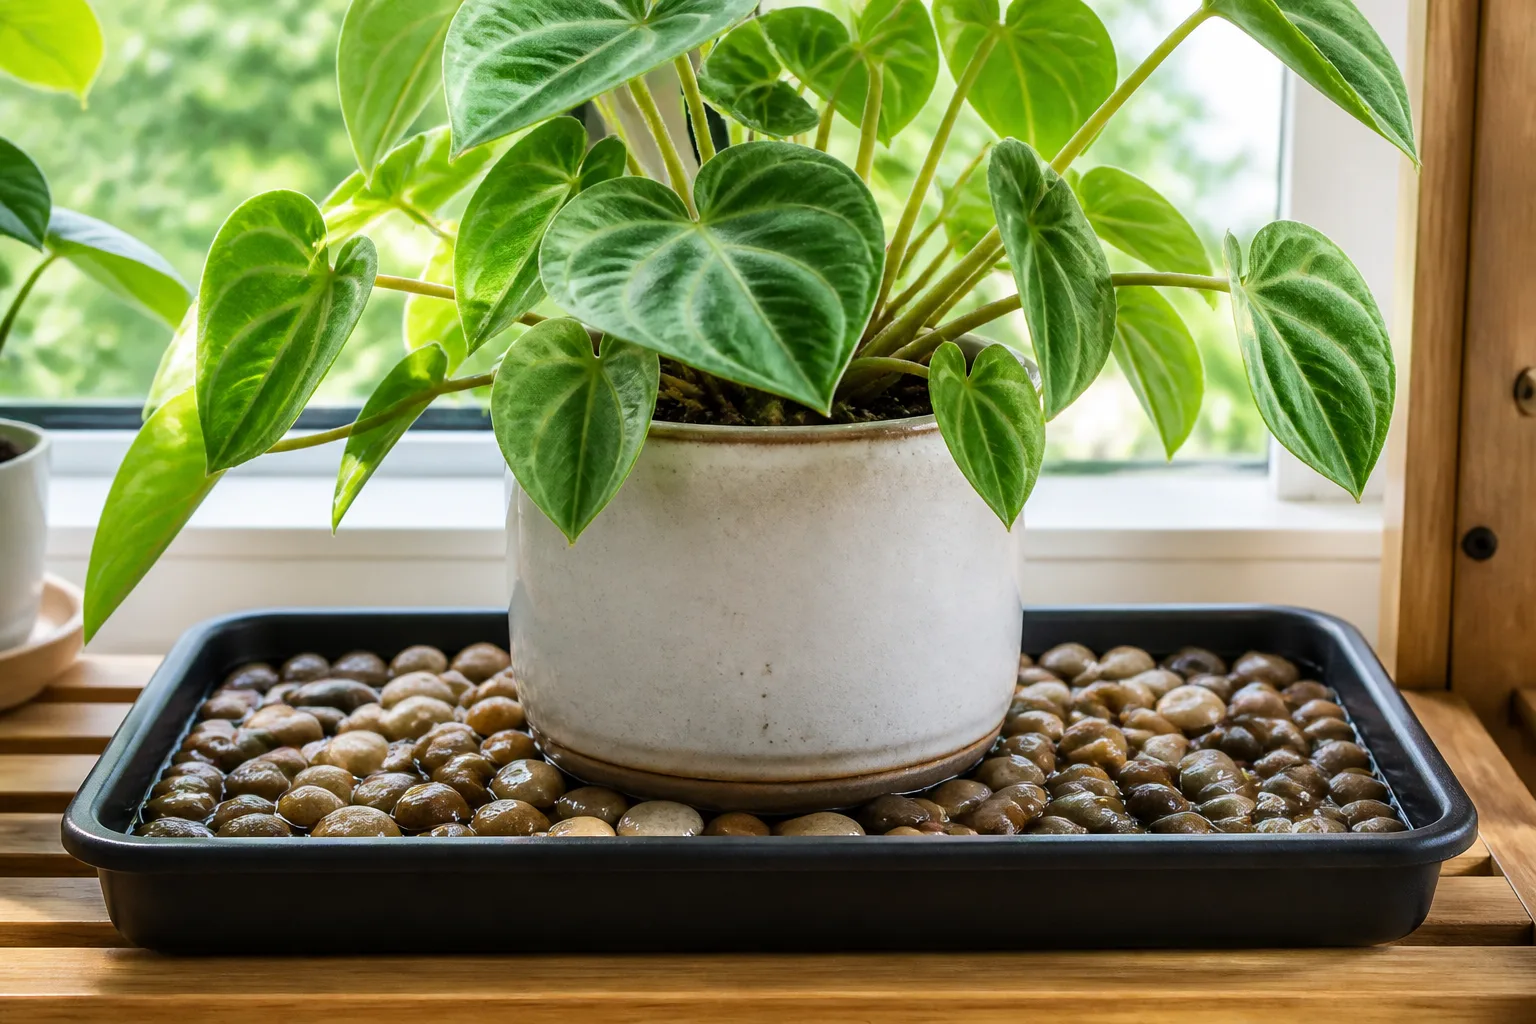
To compare refill cadence and stability without changing tray geometry, we ran three identical setups side by side over 14 days in March 2026 in a forced-air heated room held near 72 °F (22 °C).
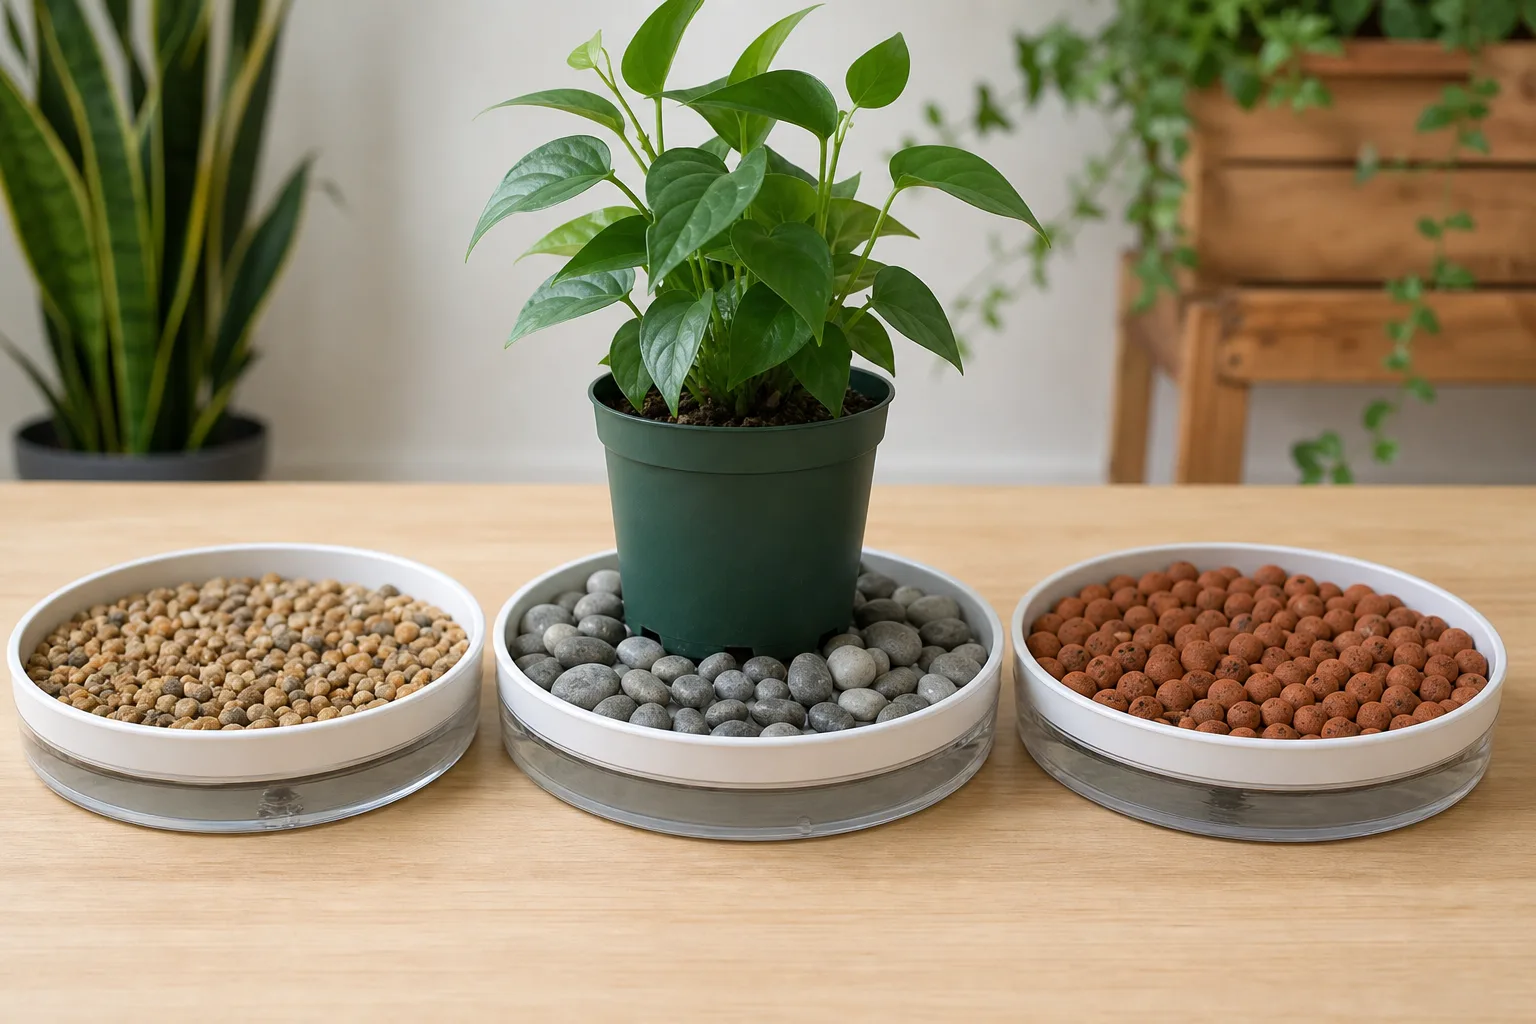
Editorial test setup (March 2026, 14-day observation): three 10-inch plastic saucers, each with a 1-inch pebble layer and water filled to ¼ inch below stone tops. Left: rinsed pea gravel. Center: ¼–½ inch river pebbles with a 6-inch nursery pot for scale. Right: rinsed LECA. A separate 9-inch glazed ceramic pot was placed on each fill to check wobble.
Refill cadence observed: LECA saucers needed water every 2 to 3 days; pea gravel lasted 4 to 5 days; river pebbles landed between the two. Stability observed: the 9-inch ceramic planter wobbled on 1 inch of LECA but sat firm on pea gravel and river stone at the same depth. These notes illustrate relative maintenance differences—they are not universal humidity measurements and your room may differ.
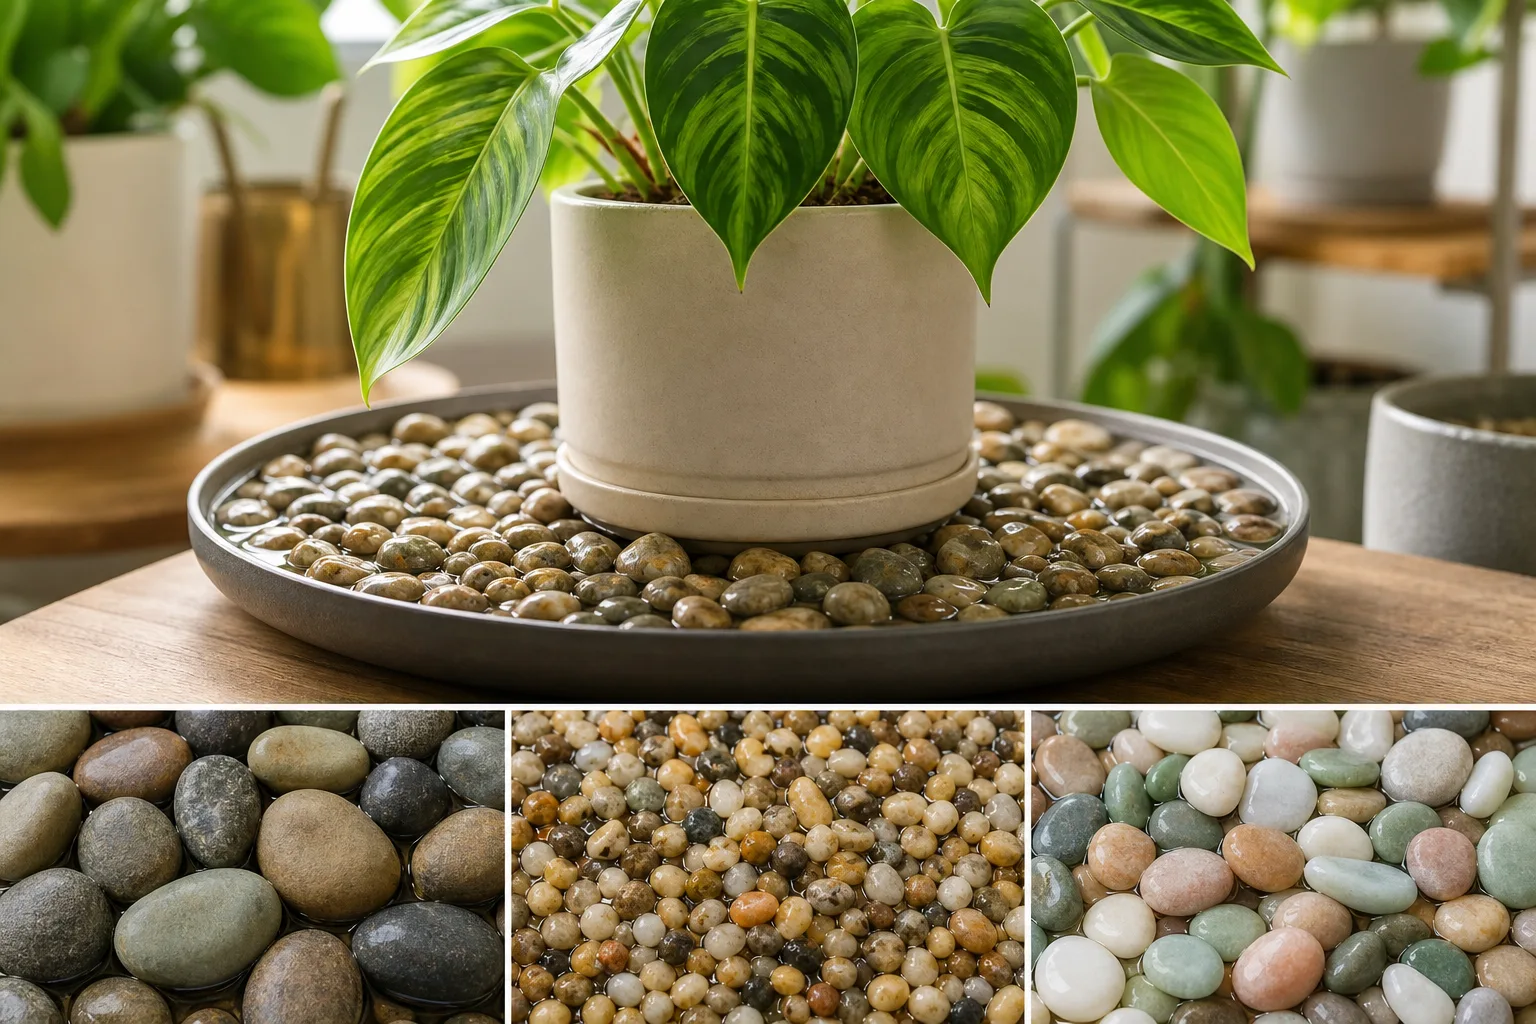
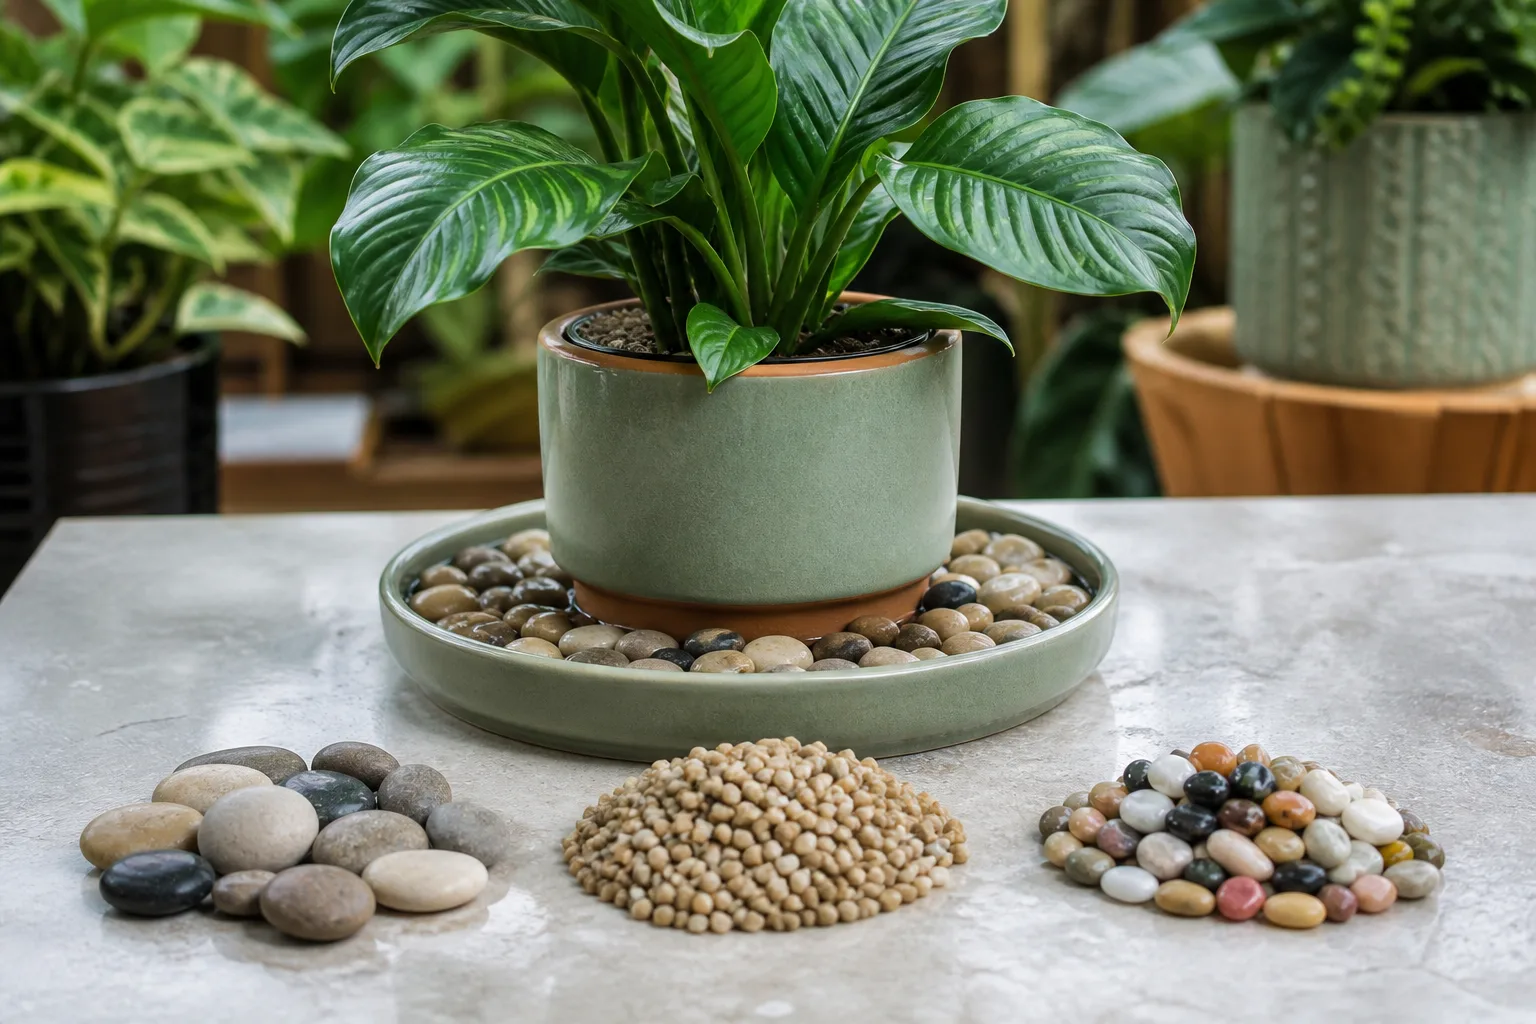
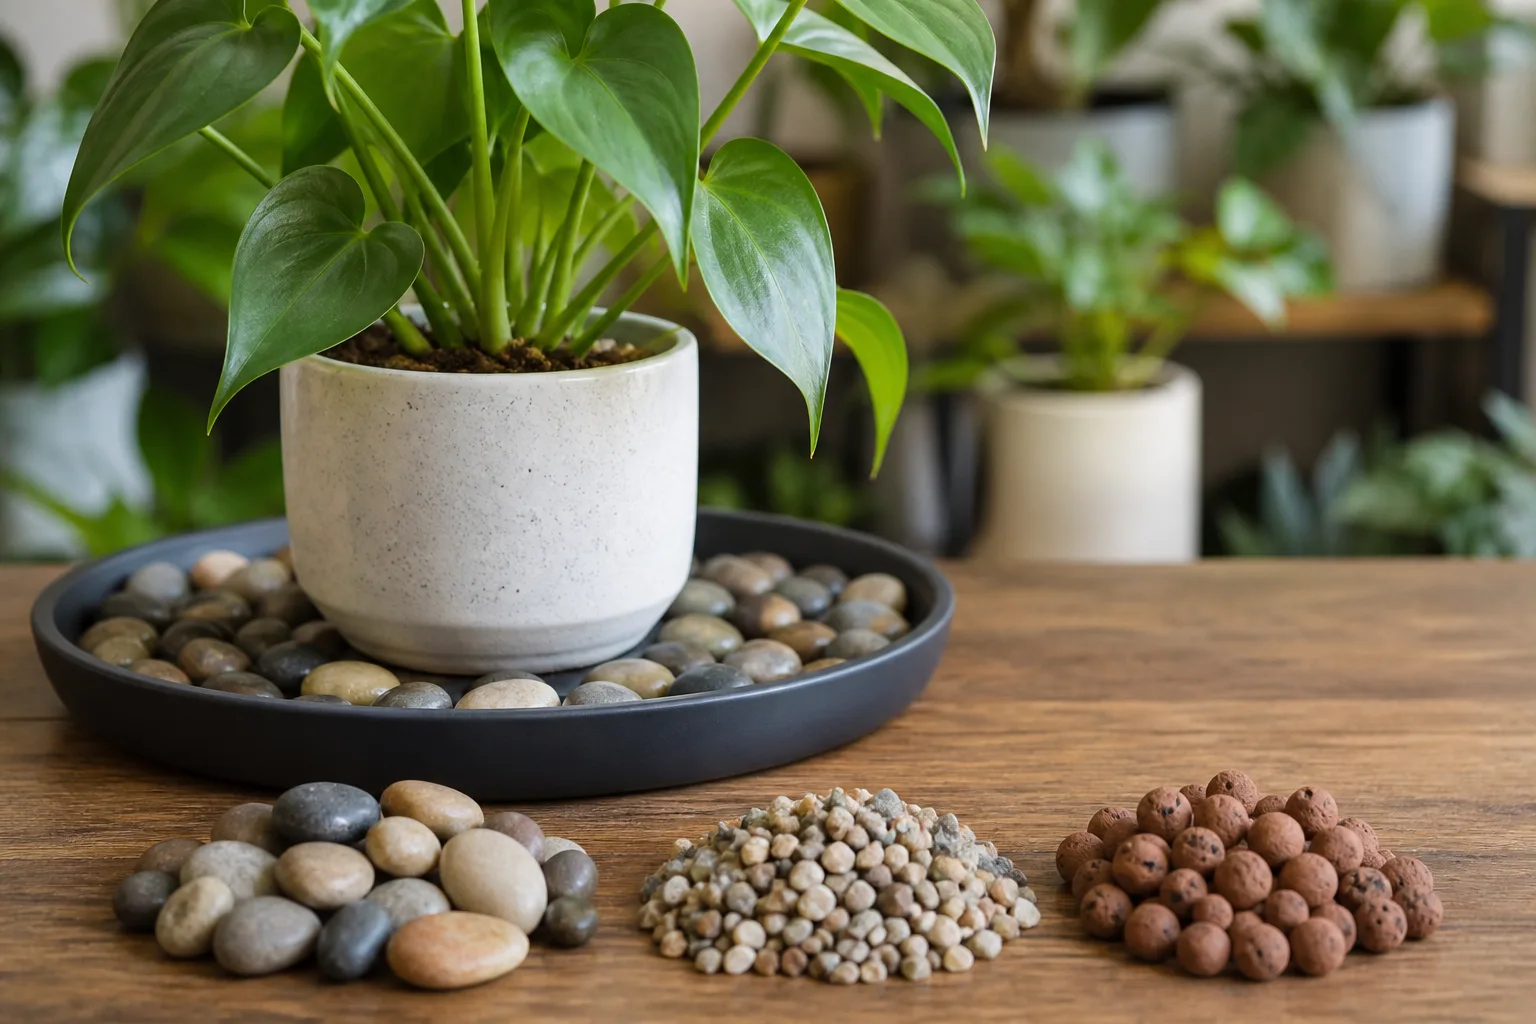
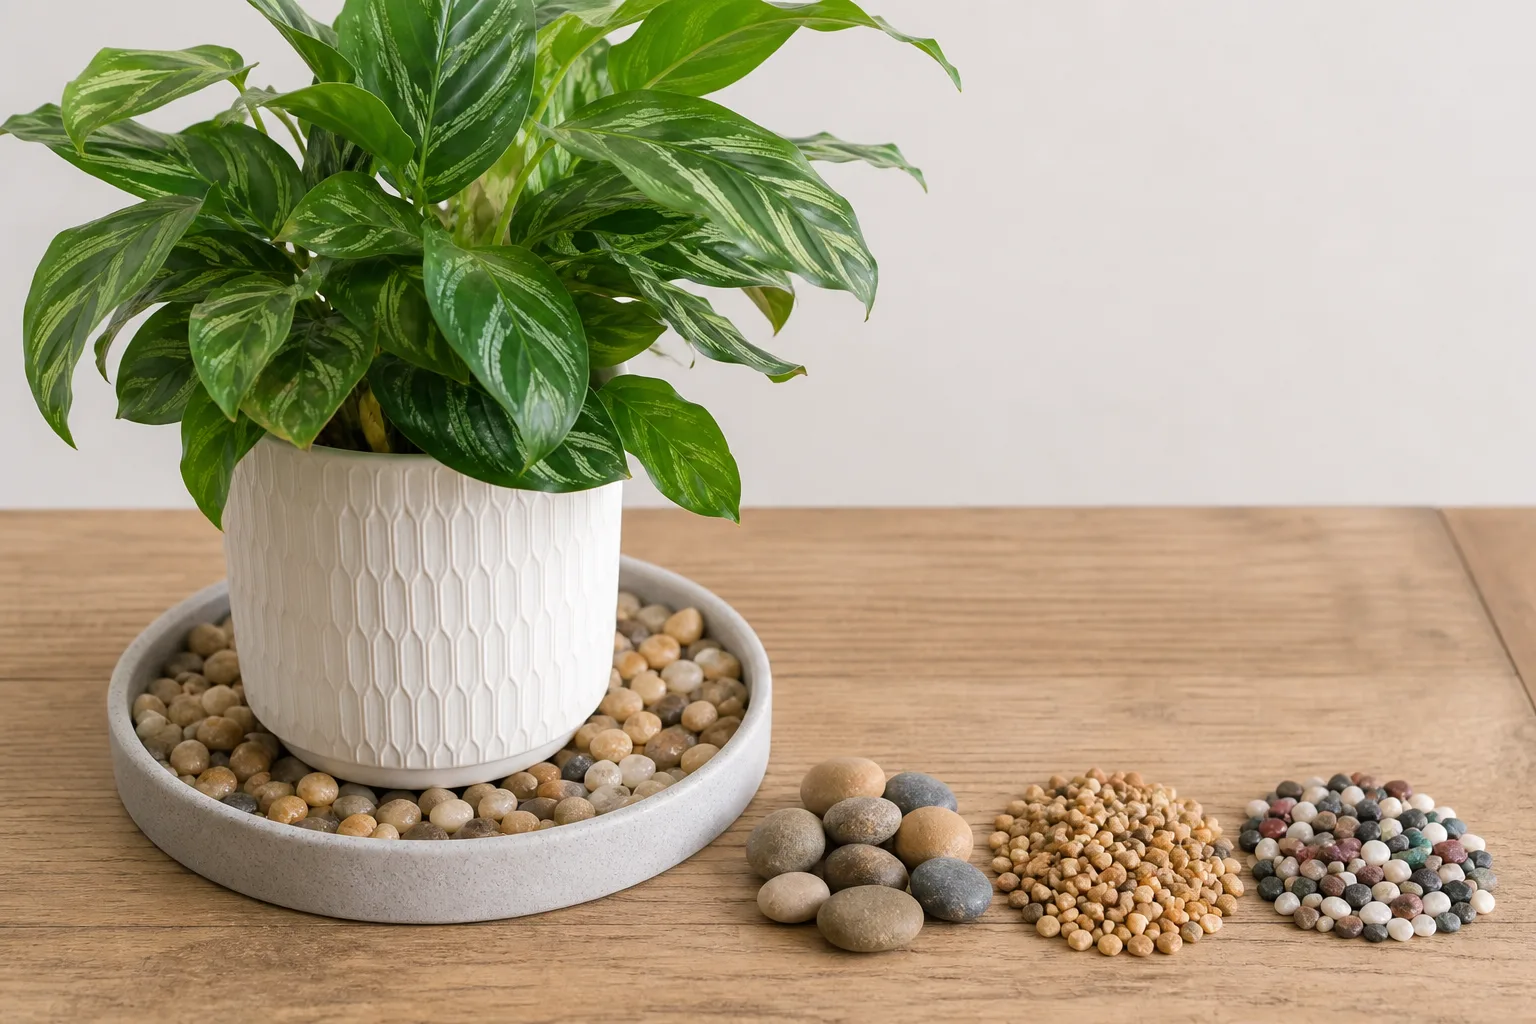
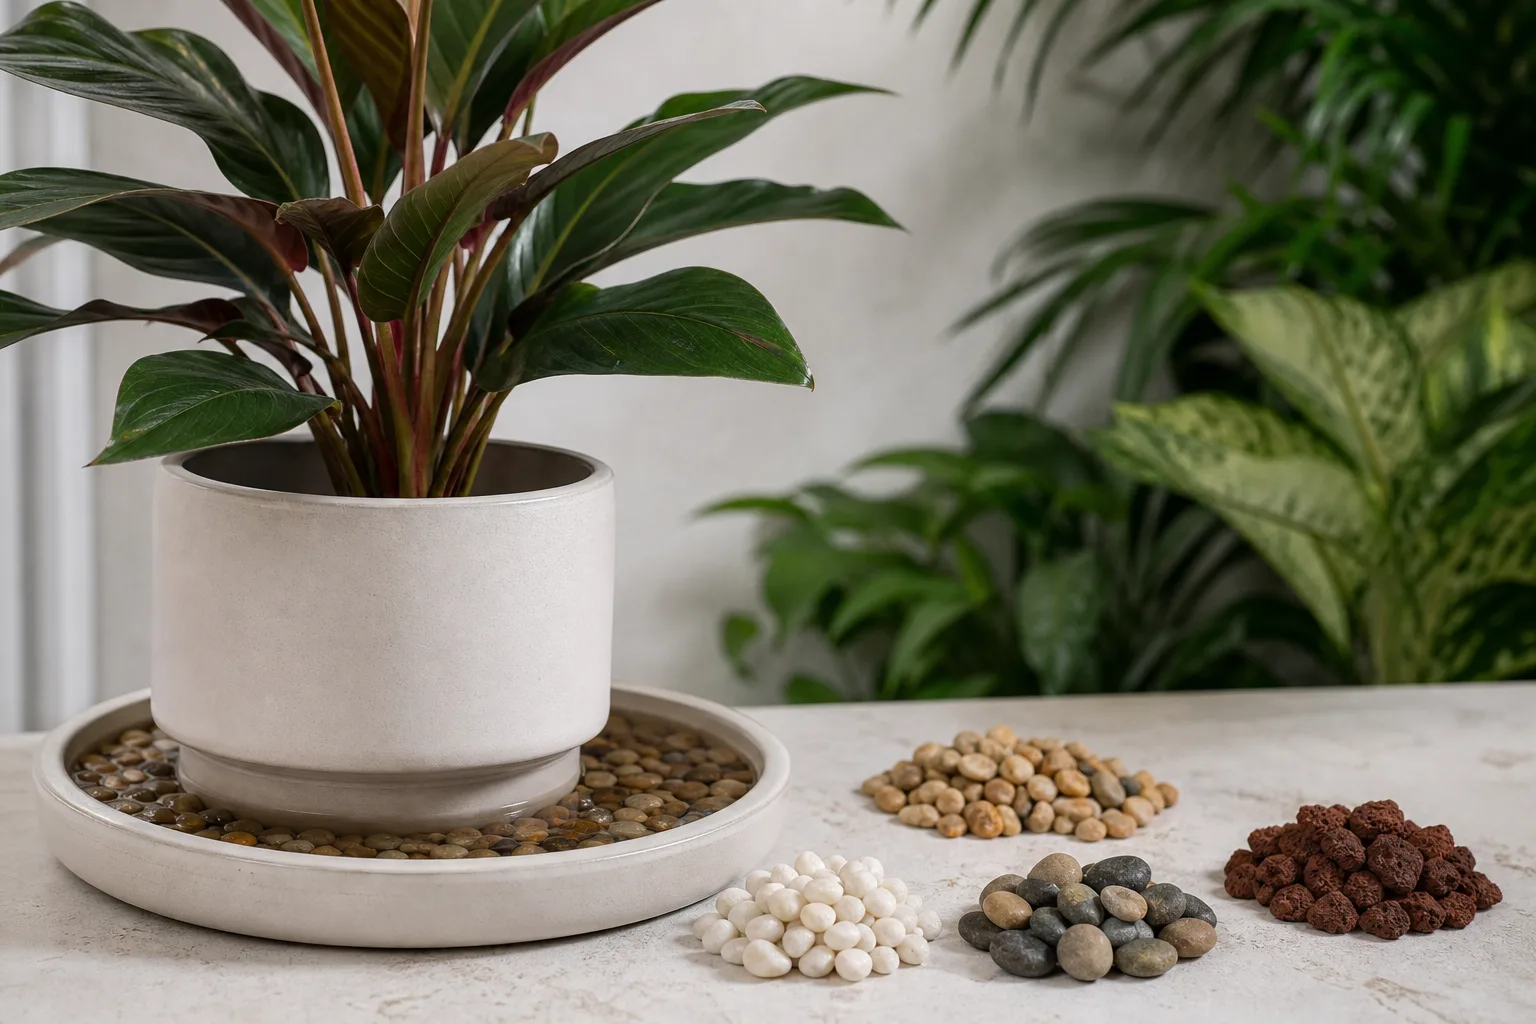
Comparison Table: Pea Gravel vs. River Pebbles vs. Clay Pebbles
| Material | Typical size | Best for | Strengths | Drawbacks | Approx. cost tier |
|---|---|---|---|---|---|
| Pea gravel | ¼–⅜ in. (6–10 mm) | Most functional DIY trays | Cheap, stable, easy to find at landscape yards | Plain look; bag dust needs rinsing | $ (bulk landscape bags) |
| River pebbles | ¼–½ in. (6–13 mm) | Visible trays on desks and shelves | Attractive, washable, good grip | Inconsistent mixes; oversized stones reduce stability | $$ (craft/garden bags) |
| Clay pebbles (LECA / Hydroleca) | ⅜–⅝ in. (8–16 mm) | Light pots, hydro growers reusing stock | Porous, lightweight, RHS-supported | Shifts under heavy pots; dries faster; higher bag price | $$–$$$ (hydro/houseplant shops) |
Pea Gravel — When to Choose It
If you want one bag and no second-guessing, buy pea gravel. Iowa State Extension specifically lists trays filled with pea gravel or pebbles as a standard humidity method, which is a strong signal that this is practical horticulture, not décor-store guesswork.
Pea gravel works because the pieces are small enough to form an even platform but large enough to leave air gaps for water and evaporation. Look for bags labeled pea gravel, pea pebbles, or #8 gravel at landscape suppliers. Avoid crushed stone or decomposed granite in the same aisle—those products are angular, compact tightly, and break down in wet trays.
Rinse bagged pea gravel until the runoff runs clear. Dust and fine silt cloud the tray water on day one and leave a grey film on pale saucers. For most 8- to 10-inch trays under a 6-inch pot, 2 to 3 lb (about 1 kg) of dry gravel after rinsing is enough for a 1-inch layer with a little spare for topping up after cleaning.
Choose pea gravel when function beats aesthetics, when the pot is medium to heavy, or when you are building multiple trays and do not want to overspend on decorative stone.
River Pebbles — When to Choose Them
River pebbles—sometimes sold as polished river rock, decorative pebbles, or bonsai top dressing—are the right pick when the tray sits in plain view. University of New Hampshire Extension describes clean pebbles or gravel as standard tray fill, and the smooth finish reads as intentional rather than improvised.
The catch is size consistency. Open a bag before you commit. If half the stones are golf-ball size, they will waste tray depth, reduce contact points, and wobble smaller pots. The sweet spot is ¼ to ½ inch (6 to 13 mm): large enough for stability, small enough to leave water space below the pot base.
River pebbles cost more per tray than bulk pea gravel but still beat specialty hydro media. Budget 3 to 4 lb (1.4 to 1.8 kg) for a decorative 12-inch tray with a 1- to 1½-inch layer. Choose river pebbles when the tray is part of the display—open shelves, desks, windowsills—and the pot is light to medium weight.
Clay Pebbles (LECA / Hydroleca) — When to Choose Them
Clay pebbles, sold as LECA, Hydroleca, expanded clay, or hydroton, are fired ceramic balls with porous walls. RHS houseplant guidance lists moist gravel or clay granules as a valid humidity-tray medium, and the porosity is the real difference from stone: clay absorbs water and releases it gradually across the ball surface.
That makes clay pebbles excellent under small and medium nursery pots, propagation cups, and lightweight cachepots. If you already use LECA for semi-hydro or cuttings, reusing a scoop in a humidity tray is reasonable. Hydroleca and generic LECA perform the same tray job; you do not need a semi-hydro-specific brand.
The trade-offs are weight and refill cadence. Clay is lighter, so heavy ceramics can shift. Porous balls also dry faster, which means more frequent top-offs in heated rooms. In the LeafyPixels side-by-side test described above, LECA needed water roughly twice as often as pea gravel in the same saucer—useful to know before you commit if you travel on weekends.
Choose clay pebbles when the pot is light, you want easier handling, or you already have a hydroponic bag open. Choose stone instead when the pot is heavy, wide, or sits in a high-traffic spot where bumping matters.
Pebbles and Fillers to Avoid
Not every bag in the garden or pet aisle belongs in a humidity tray. Skip materials that break down, leach color, shift pH, or compact when wet.
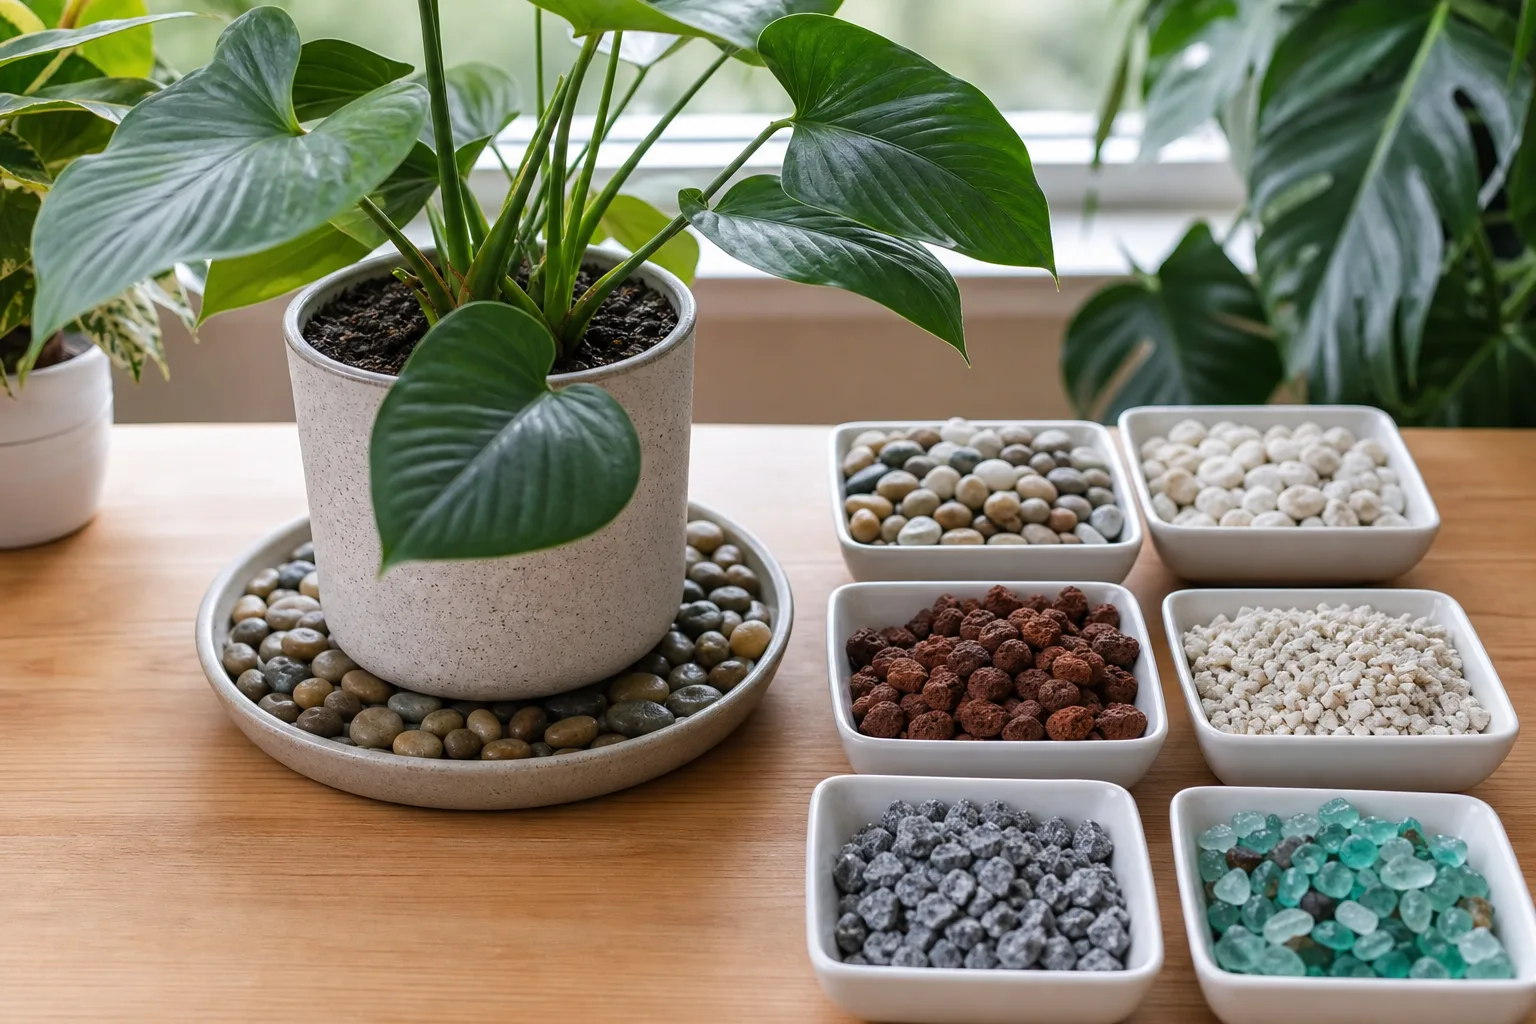
Very fine gravel or sand packs tight, traps debris, and can wick water upward toward the pot if the layer is too shallow. Oversized polished cobbles look dramatic but waste depth and reduce evaporation surface. Dyed decorative fillers—especially low-quality craft stones—may bleed color into standing water. Shell fragments, wood chips, moss, and bark decompose in wet trays and invite slime. Limestone, marble chips, and crushed coral (common in aquarium cichlid substrates) can raise water alkalinity over time; keep those out of plant trays unless you have a specific reason to buffer water chemistry.
Aquarium gravel can work if it is inert, rinsed, and medium-grained—not a fine planted-tank substrate and not a coral-based buffer. When in doubt, ask three questions: Is it inert? Can it be washed easily? Will it behave the same after weeks in shallow water? If any answer is shaky, pick pea gravel instead.
For setup mistakes that are not about stone choice—pot sitting in water, tray too small, expecting room-wide humidity—see how to set up a pebble tray and pebble tray FAQs.
Size, Depth, and Layout for Your Pot and Tray
The best pebble size is small to medium: big enough to support the pot and create air gaps, not so big that the pot teeters or so fine that the layer compacts. Tray depth and width still matter more than stone species for humidity, but stone size controls how much water the tray can hold below the pot without submerging it.
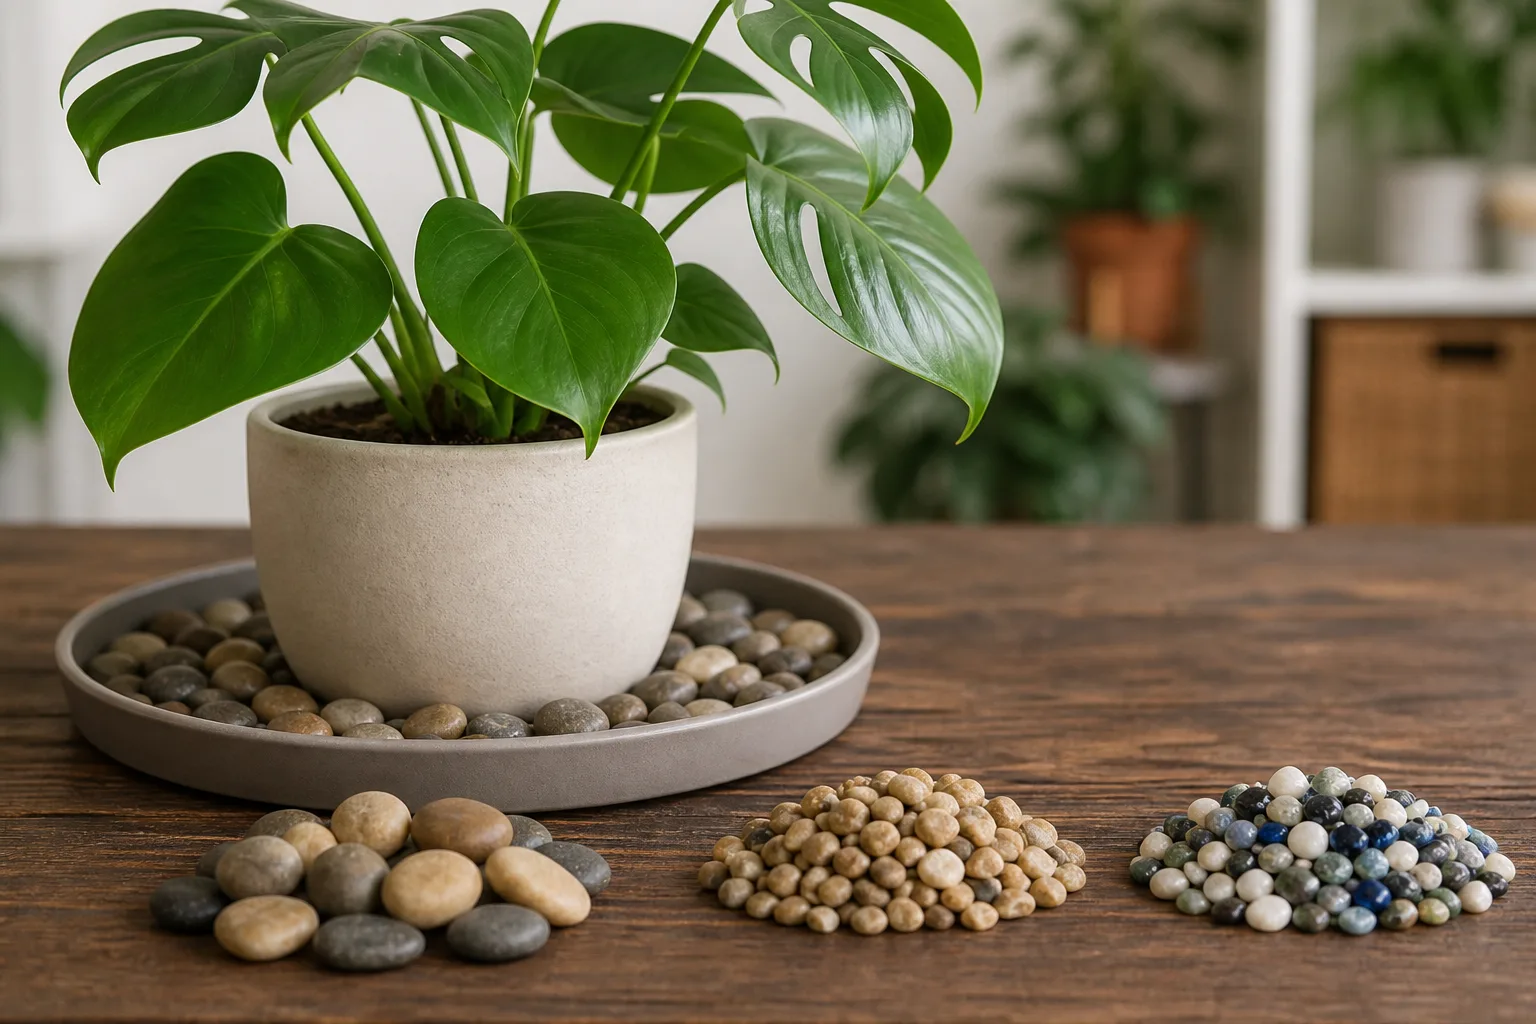
Measurable Size Ranges and Store Bag Labels
Use this chart when you are staring at shelf labels:
| Material | Target diameter | Store labels to look for | Skip |
|---|---|---|---|
| Pea gravel | ¼–⅜ in. (6–10 mm) | Pea gravel, #8 gravel, pea pebbles | Crushed rock fines, decomposed granite |
| River pebbles | ¼–½ in. (6–13 mm) | River rock, polished pebbles, bonsai gravel | Mixed cobble bags, “large decorative stone” |
| Clay pebbles | ⅜–⅝ in. (8–16 mm) | LECA, Hydroleca, expanded clay, hydroton | Fine clay aggregate, crushed terracotta shards |
| Aquarium gravel | ⅛–¼ in. (3–6 mm) | Natural aquarium gravel, inert quartz gravel | Coral substrate, painted gravel, ultra-fine sand |
Pebble layer depth: aim for 1 to 1½ inches (25 to 38 mm) in most saucers. Nebraska Extension recommends a tray 1 to 2 inches deep and 2 to 3 inches wider than the pot on each side—dimensions that leave room for this stone layer plus a shallow water reservoir. Spread stones level, not mounded in the center; an even bed distributes weight better than premium stone ever will.
Tray Cross-Section: Water Line and Pot Placement
Visual learners need one diagram: the pot must sit on dry pebble tops while water fills the gaps below those tops. Drainage holes stay above the reservoir—that is what keeps a humidity tray from becoming bottom watering.

Read the diagram left to right: a 1–1½ inch pebble layer fills a shallow saucer; water sits roughly ¼ inch below the highest stones; the pot base and drainage holes rest above the water line. Pebble material does not change this geometry—only whether the layer is deep and stable enough to maintain the gap.
Illinois Extension and Iowa State Extension both warn against letting the pot sit in standing water because roots held wet for long periods can suffocate and rot. If you are unsure whether your layer is tall enough, place the empty pot on dry stones first, add water slowly, and check from the side before you set a live plant on top.
Materials List and Pebble Prep Before First Use
You need less than you think, but the prep step is not optional.
Shopping list for one typical 6-inch pot on an 8- to 10-inch tray:
- Waterproof tray or saucer, 1–2 in. deep, 2–3 in. wider than the pot on each side
- 2–4 lb (1–2 kg) rinsed pebbles, gravel, or clay balls (material per sections above)
- Kitchen strainer or colander
- Optional: white vinegar for hard-water mineral film on the tray (not on the stones unless crusted)
- Optional: small mesh liner if your tray has a rough bottom and you want easier cleaning
How much to buy by pot diameter (1-inch pebble layer, one tray):
| Pot diameter | Tray width (min.) | Dry pebbles after rinse |
|---|---|---|
| 4 in. (10 cm) | 8 in. (20 cm) | 1–2 lb (0.5–1 kg) |
| 6 in. (15 cm) | 10 in. (25 cm) | 2–3 lb (1–1.4 kg) |
| 8 in. (20 cm) | 12 in. (30 cm) | 3–5 lb (1.4–2.3 kg) |
Numbered Rinse Protocol
- Empty the bag into a colander over a bucket or outdoors. Never rinse dusty gravel directly in a kitchen sink without a catch—the fines clog drains.
- Rinse under running water, stirring with your hand, until the runoff is clear—usually 2 to 4 minutes for bagged landscape gravel, 3 to 5 minutes for clay pebbles with factory dust.
- Optional soak: if the water still clouds after rinsing, soak stones in clean water for 30 minutes, drain, and rinse once more. Clay pebbles benefit most from this step.
- Drain fully before loading the tray. Wet stones are heavier and hide how deep the layer really is.
- Load the tray to your target depth, place the dry empty pot on top, and confirm the base sits above where the water line will be. Adjust depth before adding water.
After prep, assembly is straightforward: add water until it sits just below the top of the stones, set the potted plant on top, and confirm the drainage holes never touch water. RHS describes the same rule—pot above water, not in it. Full step-by-step with placement guidance lives on the DIY pebble tray hub and in how to set up a pebble tray.
After You Pick Pebbles: Short Assembly Reminder
Stone choice is step one. Assembly safety is step two, and it is the same no matter which material you bought: water below the pebble tops, pot base above the water line, wide stable tray. If you are deciding whether a tray is enough humidity for your room or whether you need a humidifier, that is a different question—answered on pebble tray vs. humidifier and indoor humidity and pebble trays, not here.
Related Guides
- DIY pebble tray hub — full build walkthrough, water line, and observation protocol after you have chosen stones.
- How to set up a pebble tray — tray width, depth, and placement once pebbles are prepped.
- Do pebble trays really increase humidity? — honest limits on what any stone fill can do.
- Pebble tray vs. humidifier — when to upgrade beyond a passive tray.
- Pebble tray FAQs — cleaning, refills, LECA, and generic tray questions after material selection.
- What is a pebble tray? — definitional hub if you are new to the concept.
Conclusion
The best pebbles for a DIY pebble tray are the ones that keep the pot stable, rinse clean, and tolerate weeks of wet-dry cycles without breaking down. For most builders, that means pea gravel first, small river pebbles when the tray is visible décor, and clay pebbles such as LECA or Hydroleca when the pot is light or you already stock hydro media. Buy ¼ to ½ inch (6 to 13 mm) stone, rinse until the water runs clear, load 1 to 1½ inches into a tray wider than the pot, and use the cross-section diagram to confirm the pot sits above the water line before you hand off to the DIY pebble tray hub for assembly.
Material choice mainly affects stability, cleaning, and refill cadence—not whether the tray replaces a humidifier. Pick inert, washable stone, prep it once, and save the humidity science for the guides that own that job.