How to Prune Portulaca (Moss Rose): When, Where & What
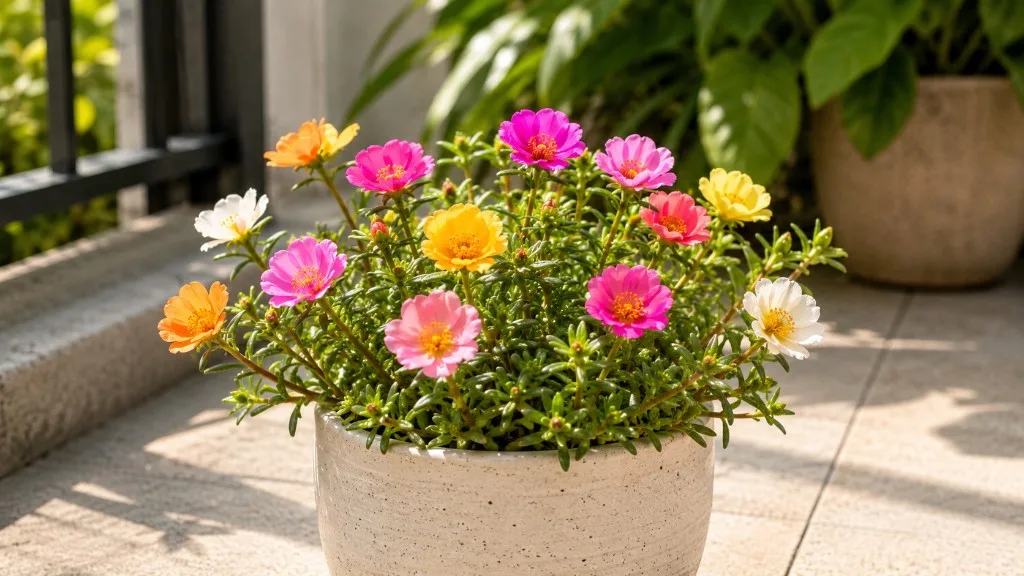
How to Prune Portulaca (Moss Rose): When, Where & What to Cut
How to Prune Portulaca (Moss Rose): When, Where & What to Cut
Quick Answer - Remove Damaged Stems First
First action: Snip out any soft, mushy, yellowing, or clearly dead stems at their base with clean, sharp scissors. On Portulaca grandiflora (moss rose), fleshy succulent tissue rots fast in wet soil - removing compromised stems before any cosmetic trimming stops rot from spreading through the mat. If stems feel hollow at the crown, read portulaca root rot and overwatering before shaping living tissue.
Only after damaged tissue is gone, decide whether the plant needs deadheading or a shape cut. Healthy portulaca in full direct sun often needs nothing beyond that cleanup. For full care context - watering rhythm, soil mix, and propagation - start with the portulaca overview.
Reviewed by LeafyPixels Review Board · Author: sai-ananth
What Pruning Does for Portulaca
Portulaca is a low, trailing annual that forms a dense mat roughly 8 inches tall and 1 foot wide, with ruffled flowers held above needle-like succulent leaves on brittle reddish stems. NC State Extension notes it has high drought and heat tolerance and needs full sun and well-drained sandy or rocky soil. Pruning is not a daily chore on Portulaca overview - but targeted cuts redirect energy, tidy a spreading mat, and restart growth when stems stretch.
Unlike woody shrubs, portulaca has no lignified framework to rebuild. Every cut works on soft, water-storing tissue that branches readily from leaf joints when warmth and sun are strong. Pruning cannot fix shade-induced legginess permanently; it buys time while you correct placement and light.
Self-Cleaning Flowers vs Optional Deadheading
Moss rose flowers are self-cleaning - spent blooms often drop on their own without blocking new buds. Proven Winners and Garden Design both note that deadheading is optional, not required for plant health.
You may still snip spent flower heads to tidy brown crusty blossoms, slightly extend the display, or reduce self-seeding. NC State Extension adds that deadheading deters self-seeding, while Wisconsin Extension states pinching or deadheading promotes greater flowering. If you want volunteers next year in gravel paths or rock beds, stop deadheading by late summer and let seed capsules ripen.
Sundial and Cloud-Tolerant Cultivars
Species-type moss rose closes flowers at night and on cloudy days. The Sundial series - and similar modern lines such as Sundance - are bred to open in cooler and cloudier weather, which can make mats look tidier without deadheading on overcast monsoon weeks. Deadheading remains optional on Sundial types; it is mainly a cosmetic or self-seeding choice, not a bloom-survival requirement.
Deadheading, Pinching, and Cutback Are Three Different Jobs
| Task | When | How much | Goal |
|---|---|---|---|
| Deadheading | Any bloom day | Individual spent blooms or short stalks | Tidier mat; fewer volunteers |
| Pinching | Early warm season | ½–1 inch off soft tips | Branching before stems elongate |
| Cutback | Mid to late summer | Up to ½ stem length on stretched shoots | Reset open, leggy mats |
Deadheading removes individual spent blooms or short flower stalks - light, frequent grooming during bloom season.
Pinching takes ½ to 1 inch off soft stem tips early in the season to break apical dominance and encourage side branching before stems elongate.
Cutback shortens entire leggy stems by up to one-third to one-half in midseason when the mat looks straggly, open in the center, or carries blooms only at stem tips. Wisconsin Extension recommends pruning or shearing midseason for a neater appearance and fuller regrowth.
Do not stack all three jobs in one session on a stressed plant. Work in order: damaged tissue out first, then optional deadheading, then shaping only if the plant still needs it.
What to Check Before You Cut
Scan the pot or bed in morning sun before touching shears:
- Stem texture - firm and plump is healthy; mushy, blackening, or collapsed sections need immediate removal
- Flower buds vs spent blooms - new buds look like small popcorn kernels; spent heads are papery, brown, or shriveled
- Stem spacing - widely spaced leaves on long bare stems usually mean insufficient direct sun, not just missed pinching
- Soil moisture - avoid heavy cuts into waterlogged or drought-shocked plants; see watering and soil drainage
- Pests - aphids cluster on tender tips; remove infested tips rather than shearing blindly through the colony
On the stem - what growers actually confuse: On a healthy reddish succulent shoot, the spent bloom sits as a dry, papery cup directly above the leaves. The next bud is a tight, glossy green bump the size of a popcorn kernel, often only 3–5 mm below or beside the faded flower. Snipping the papery cup without touching the kernel is the whole deadheading skill; removing the kernel by mistake is the most common cosmetic pruning error on moss rose.
If the mat looks full, blooms freely, and stems are firm, skip shaping entirely this week.
When to Prune Portulaca
Portulaca grows actively when soil is warm and days are bright - typically late spring through summer in most climates. Wisconsin Extension notes moss rose is frost tender and should be planted only after frost danger passes; in hot regions such as Indian terraces, sowing and active grooming often begin in March when nights stay consistently above about 25°C (77°F).
Emergency removal of rotting or pest-damaged stems is allowed any time - that is sanitation, not seasonal shaping.
Deadheading and light pinching happen whenever spent blooms bother you during the bloom season, ideally in cool morning or late-afternoon light.
Midseason cutback belongs in mid to late summer when stems stretch and the center thins - Proven Winners advises cutting leggy plants back by up to half their size at this stage to stimulate fresh growth and flowers.
Routine Grooming vs Midseason Cutback
Routine grooming is a few snips per week: dead flowers, one soft tip, one damaged leaf cluster. Midseason cutback is a deliberate reset - taking multiple stems down together because the whole mat has lost its cushion shape. Treat them as separate decisions on separate days if the plant looked stressed going in.
Worked example - terrace hanging basket: In mid-July on a west-facing rail, a 25 cm bowl with 40 cm (16 in) trailers had blooms only at the tips and a bare center. After a dry morning, each longest cascade was shortened by half, cutting ¼ inch above the lowest healthy leaf cluster on each stem. The basket stayed in full afternoon sun. New side shoots appeared along shortened stems in about 10 days; the mat looked cushion-shaped again by week four - typical for a healthy plant in warm, dry July weather, slower if monsoon cloud cover persists.
When Not to Prune
Hold off on cosmetic cuts when:
- Soil is saturated after heavy rain or overwatering
- Temperatures drop below about 10°C (50°F) - portulaca is frost-tender and slows sharply in cool weather
- The plant is wilting from root rot - fix drainage and soil and dry the root zone before trimming living tissue
- Midday sun is intense on a freshly shorn mat - early morning or late afternoon reduces stress on exposed cut surfaces
As a seasonal annual in many gardens, portulaca is often replaced each year rather than fall-pruned for winter structure.
The First Cut to Make
On a typical healthy plant, the first cut is not deadheading - it is removing any stem that fails the squeeze test. Pinch or snip mushy sections back to firm green tissue or to soil level if rot has reached the base.
If all stems are firm and the only issue is appearance, your first cut becomes optional deadheading: snip the spent flower just below the papery bloom, taking care not to remove nearby popcorn-shaped buds.
Save midseason cutback until you have walked the mat and confirmed the problem is length and openness - not rot, shade, or wet roots.
Where to Cut on Portulaca Stems
Portulaca leaves appear in small whorled clusters or alternate pairs along reddish succulent stems. New shoots emerge from these leaf joints - treat each cluster as a node.
Make shaping cuts ¼ inch (about 6 mm) above a healthy leaf cluster, angling slightly so water runs off the cut face. Avoid leaving long bare stubs above a node; they desiccate and look untidy on fleshy stems. Avoid cutting into the woody central tap area at the soil line unless removing the entire rotten stem.
For deadheading, cut just below the spent bloom, above the next bud or leaf cluster. Double-check that you are not removing a closed bud - new buds sit close to fading flowers and are easy to confuse on first pass.
How to Prune Portulaca Step by Step
- Sterilize tools - wipe scissors or bypass pruners with rubbing alcohol, especially if you recently trimmed a diseased plant
- Remove damaged stems - cut mushy, hollow, or pest-ridden sections back to firm tissue
- Deadhead if desired - snip spent blooms below the flower head, skipping stems that still carry tight buds
- Assess length - if stems trail with sparse leaves and flowers only at tips, plan a midseason cutback
- Cut back leggy stems - shorten each selected stem by up to one-third to one-half, always above a leaf cluster
- Step back - check that the mat still has enough foliage to shade its own crown
- Dispose of trimmings - bag and discard rather than composting if rot or pests were present
Work stem by stem on containers; shear lightly across the top of dense bed plantings only when the variety tolerates it and the mat is uniformly leggy.
How Much You Can Safely Remove
Portulaca recovers quickly in heat and sun but stores limited energy in each stem. Use these limits on a healthy, actively growing plant:
- Routine session: no more than one-third of total green foliage
- Midseason leggy reset: up to one-half of stem length on stretched stems, as Proven Winners and Garden Design recommend for straggly mats
- Emergency rot removal: take all affected tissue regardless of percentage - a smaller live plant beats a spreading crown rot
If the mat still looks bare after a hard cut, wait three to four weeks of warm growth before a second session. Repeated aggressive shearing into cool or wet weather produces thin, slow regrowth.
Pruning Leggy or Straggly Mats
Leggy portulaca - long stems, wide leaf spacing, flowers clustered at the ends - almost always grew in too little direct sun. NC State Extension specifies full sun (six or more hours of direct light daily). Pruning alone cannot hold a compact shape if the pot sits in shade; move it to a brighter light position before expecting cutback to last.
When light is adequate and stems still stretch by midsummer, shorten them before the mat collapses open in the center. Wisconsin Extension advises midseason shearing for neater form and fuller regrowth. Cut each long stem back by one-third to one-half, targeting the longest trailers first while leaving shorter side shoots to keep coverage.
In hanging baskets, trim the longest cascades evenly so weight stays balanced - avoid shearing one side hard while leaving the opposite trail untouched. In ground beds, focus on the outer ring that has outrun its planting zone; dense mats in open rock gardens can take a light uniform shear when every stem is equally stretched.
For chronic stretch despite good sun, see leggy growth for the full light-and-watering diagnostic.
Using Pruning Cuttings
Healthy stem pieces from midseason cutback root easily - portulaca is commonly propagated from 2–3 inch (5–8 cm) cuttings pressed into dry sandy mix. Wisconsin Extension notes that broken stem pieces will root when soil is moist enough.
Strip the lowest leaves, let cuts air-dry for an hour, then insert into well-draining medium per the portulaca propagation guide. Keep lightly moist and in bright sun. Do not reuse cuttings from mushy or rotting stems, from plants treated with systemic pesticides, or from mats with heavy aphid infestation - start fresh material from firm tips only.
Aftercare and Recovery
After moderate pruning, return the plant to full direct sun and resume your normal sparse watering rhythm - allow soil to dry fully between waterings. Portulaca is not a heavy feeder; hold off on fertilizer for one to two weeks after a substantial cut so you do not push soft, weak shoots.
If plants grew in lean soil and you removed more than one-third of foliage, a single very light balanced feed at half strength can support regrowth - Proven Winners suggests one light dose after a midsummer cutback. Skip feeding entirely if the plant was recently overwatered or shows rot stress.
Recovery Timeline
In warm, sunny conditions on a healthy mat, new side shoots typically appear within one to two weeks after pinching or moderate cutback - a typical terrace range in full summer sun, not a guaranteed calendar. A fuller mat shape often returns in three to five weeks when light and drainage stay favorable. Out-of-season or cool-weather cuts can stall regrowth for much longer - another reason to prune during active summer growth.
Signs Pruning Worked
- Fresh leaf clusters and flower buds forming just below cut points
- Stems firming up and regaining normal red-green color
- Mat filling inward rather than continuing to stretch
- New blooms opening on shortened stems within a few weeks
Signs Something Went Wrong
- Cut ends turning black and mushy - often dirty tools or pruning into already-rotting tissue; see root rot
- Whole stems collapsing after a hard cut - check for root rot or saturated soil
- Pale, stretched new growth - light is still insufficient despite the trim
- No regrowth after four weeks in cool weather - wait for warmth or accept the plant as end-of-season
Mistakes to Avoid
- Deadheading every bud by mistake - learn the difference between papery spent blooms and tight popcorn-shaped buds
- Shearing a shaded plant harder each week - fix sun first; repeated cutback without brighter light produces thinner stems
- Pruning into wet soil conditions - crown and stem rot spread fast on succulent tissue
- Leaving rot in the mat - one mushy stem can take down neighboring shoots in a dense planting
- Cutting below the lowest leaf cluster - bare stem stubs on portulaca heal slowly and invite desiccation
- Composting diseased trimmings - bag and discard instead
Handling and Pet Safety
Portulaca is toxic to cats and dogs. ASPCA Poison Control lists portulaca species as toxic, with soluble oxalates in Portulaca grandiflora. Cats are especially at risk - the ASPCA notes portulaca ingestion can cause kidney failure in cats . Wear gloves when handling sap and cut tissue, wash hands after pruning, and bag trimmings where pets cannot reach them. Do not leave clippings on the ground in pet-accessible terraces or balconies.
If a pet chews stems or flowers, contact your veterinarian immediately and call the ASPCA Animal Poison Control Center at (888) 426-4435 (fee may apply) for guidance.
When to use this page vs other Portulaca guides
- Portulaca overview - Start here for whole-plant context before deep-diving this topic.
- Portulaca problems hub - Jump to symptom-specific fix guides when this care topic does not resolve the issue.
- Leggy Growth on Portulaca - Escalate here when pruning adjustments are not enough.
- Plant Leaning on Portulaca - Escalate here when pruning adjustments are not enough.
- Slow Growth on Portulaca - Escalate here when pruning adjustments are not enough.
Related Portulaca guides
- Portulaca overview
- Portulaca watering
- Portulaca light
- Portulaca soil
- Portulaca propagation
- Portulaca fertilizer
- Leggy Growth on Portulaca
- Plant Leaning on Portulaca
- Slow Growth on Portulaca
- Portulaca problems
Bottom Line
Remove damaged stems first, deadhead only if you want tidier mats or fewer volunteers, and save midseason cutback for genuinely leggy growth in warm weather - then match every shaping cut to a leaf cluster above dry, sunny soil.