Root Rot on Echeveria: Causes, Checks & Fixes
Quick answer
Root rot on Echeveria starts when wet soil suffocates roots-often from calendar watering through winter or heavy mix in a dim room. First step: stop watering, unpot, and inspect roots. Trim mushy tissue, callus cuts 3–7 days, then repot into gritty dry mix. If the crown is soft, behead the firm rosette above rot and reroot.
Root Rot on Echeveria: Causes, Checks & Fixes
This guide covers root rot on Echeveria. See also the general Root Rot guide, watering, and light pages for this plant.
Root Rot on Echeveria: Causes, Checks & Fixes
Quick answer
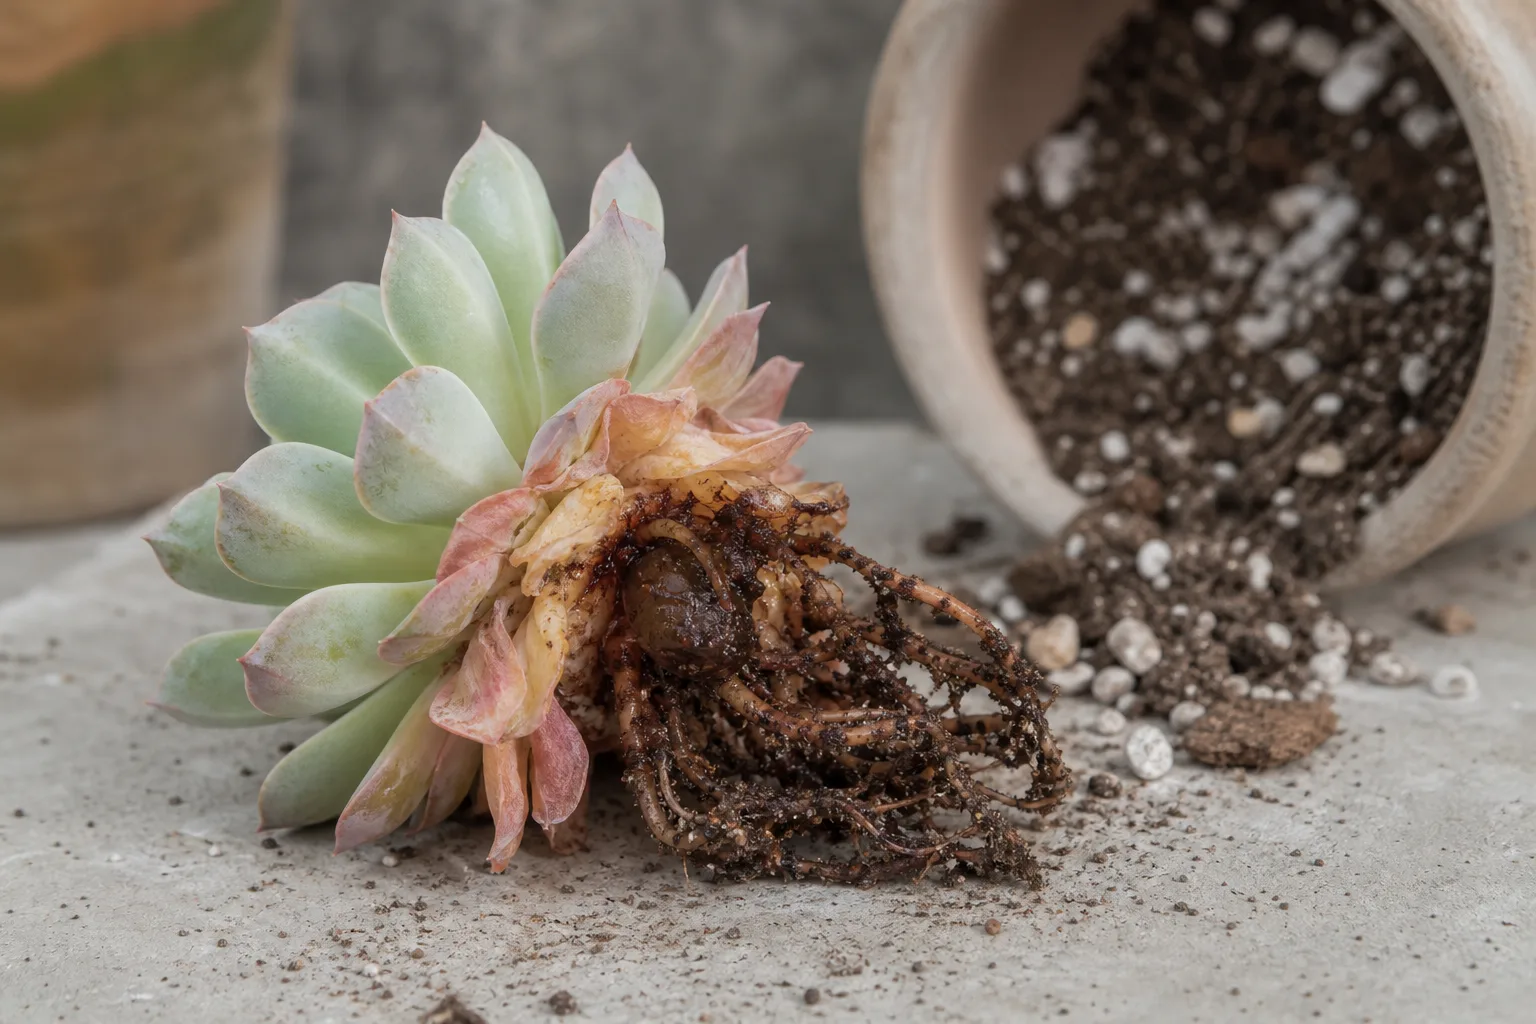
Root rot on Echeveria is not a mysterious fungus you catch from the air-it is what happens when the root zone stays wet too long for a drought-adapted rosette succulent. Echeveria stores water in thick overlapping leaves and expects a full soak followed by a full dry-down. When mix stays saturated, roots lose oxygen, decay, and stop moving water upward. The rosette then shows damage that started underground days earlier: soft translucent lower leaves, a sour smell, and eventually a collapsing stem base.
First step: stop watering and unpot the plant today. Do not fertilize, mist, or repot into fresh wet mix on day one. Knock the echeveria out gently, brush away wet soil, and inspect root colour and firmness. If roots are mushy, trim to clean tissue, callus 3–7 days, and repot into dry gritty mix. If the crown is still firm but roots failed, that trim-and-repot path is enough. If rot has climbed into the stem, behead the healthy rosette above the mush line and reroot it as a cutting.
For early wet-soil triage before roots fail, see overwatering on Echeveria. For the full soak-and-dry rhythm that prevents rot, see the watering guide.
Why Echeveria gets root rot
Echeveria evolved in semi-arid highlands where rainfall arrives in bursts separated by long dry spells. Indoors, rot appears when care mimics constant moisture instead of that wet-dry cycle where soil fully wets then dries completely before the next drink. The most common triggers on this genus are predictable once you know rosette succulent biology.
Soak-and-dry mismatch and winter overwatering
Calendar watering is the leading cause. A schedule that felt right every ten days in summer becomes a slow drowning by December when growth slows and soil stays damp for weeks. Echeveria enters semi-dormancy in cool, short days and needs far less water than during active spring growth. Continuing summer frequency through winter is the single most common winter rot trigger on indoor collections.
Heavy peat-based potting soil compounds the problem. Typical potting soil retains too much water, risking root rot. Echeveria needs fast-draining gritty mix-one part organic material to two parts mineral amendments like perlite and coarse sand-so water moves through rather than pooling.
Crown moisture traps on tight rosettes
Rosette geometry works against you. Overlapping leaves form a cup that holds droplets, especially when top watering hits the center or bottom watering leaves the pot in a tray too long. Water pooled at the crown in a cool dim room evaporates slowly and invites stem rot at the soil line-the fatal endpoint on tight forms like Echeveria elegans. That pattern often pairs with low light: weak growth uses less water, so the same drink sits longer. Dim corners plus frequent watering rot the stem base even when roots looked fine a week earlier. If stretch is also present, read not enough light on Echeveria alongside this page.
Oversized pots create a hidden trap. Extra soil volume stays wet long after a properly sized container would have dried, which is functionally identical to overwatering.
What root rot looks like on Echeveria
On rosette succulents, root rot rarely announces itself with generic houseplant yellowing alone. Watch for this progression:
Root Rot symptoms on Echeveria - compare with healthy tissue on the same plant.
- Soft, mushy, or translucent lower leaves - healthy echeveria leaves are firm and opaque; overwatered succulents develop soft and mushy leaves and stems as rotting cells turn glassy and squash easily between fingers
- Yellow-green or blackening at the leaf base - colour change starts on oldest leaves where they meet the stem; tissue feels wet and may detach with light pressure
- A sour or musty smell from the pot - anaerobic decomposition in waterlogged mix
- A heavy pot that stays heavy for weeks - saturated mix does not lose weight
- Stem-base softness - dark mushy patch at soil line creeping upward means rot has passed the roots
- Crown collapse - the center rosette feels wet, brown, or unstable; this is more urgent than root damage alone because it threatens the only growing point
- Leaves that fall off at a touch while soil is still damp - classic advanced overwatering on succulents
Early rot can look like thirst because the plant wilts when roots fail-symptoms are often confused for underwatering and more water is added-but the pot is heavy and mix is cool and damp at depth, not light and bone dry.
Lookalikes: underwatering vs. early overwatering
| Signal | Root rot (confirmed or likely) | Underwatering | Early overwatering (not yet rotted) |
|---|---|---|---|
| Pot weight | Heavy for days or weeks | Noticeably light | Heavy right after watering, may still dry normally |
| Leaf texture | Soft, translucent, mushy at base | Wrinkled but firm | Firm leaves; soil just wet too long |
| Soil smell | Sour or musty | Neutral | Neutral unless stagnant |
| Roots on inspection | Brown, black, slimy | Pale and firm; may be sparse | Pale and firm |
| First fix | Stop water; trim; callus; dry repot | Deep soak when dry throughout | Pause watering; check drainage |
If soil is dry two inches down, the pot is light, and leaves are wrinkled but firm, suspect underwatering instead. If soil is wet but roots are still pale and firm, treat as overwatering triage before rot advances.
How to confirm the cause
Work through these checks in order before Echeveria repotting guide into new mix:
- Pot weight and smell - Lift the container. Chronic heaviness plus sour odor strongly suggests rot. Empty any saucer and confirm drainage holes are open.
- Leaf squeeze test - Pinch the lowest leaves. Mushy translucent tissue on wet soil points to rot; firm wrinkled leaves on dry soil point away.
- Crown check - Touch the stem at the rosette base. Soft darkening on saturated mix is urgent crown involvement.
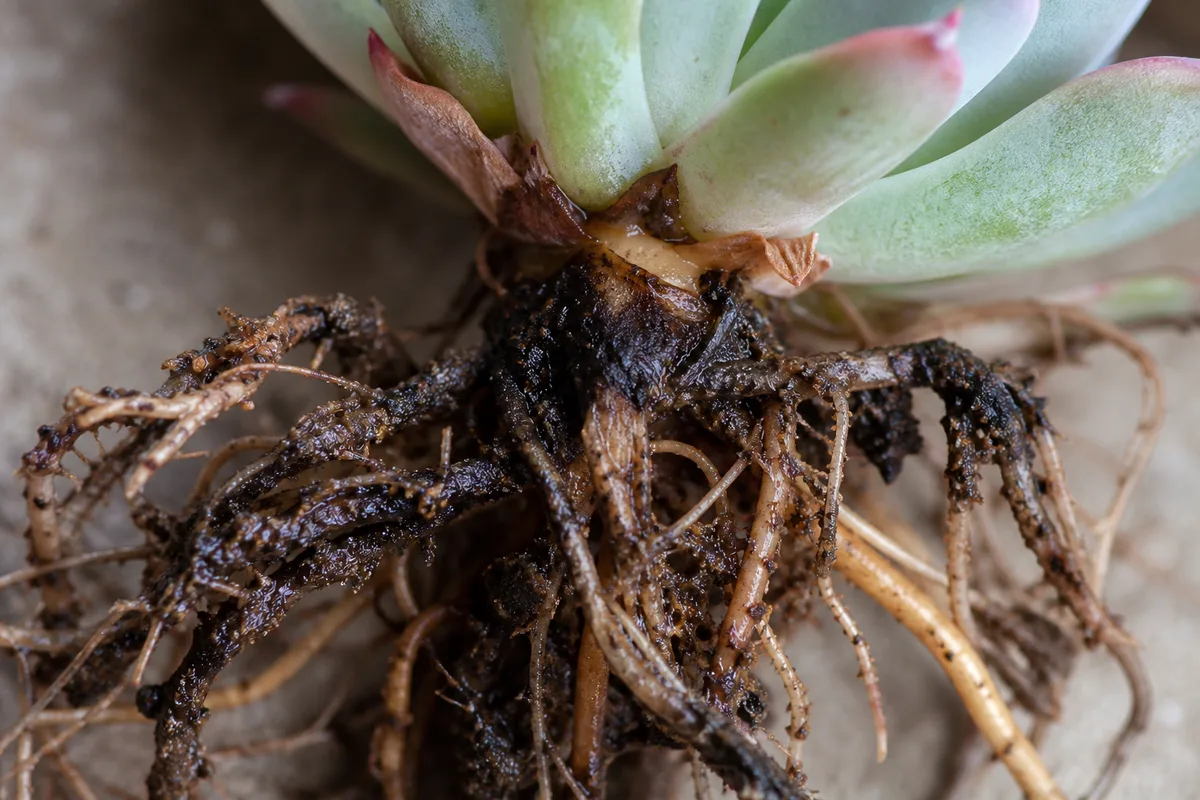
- Unpot and inspect roots - Slide the plant out and brush away wet mix. Healthy echeveria roots are pale tan to white and firm. Rotted roots are dark, soft, and may slide off the inner core like a sleeve.
- Stem line inspection - Look for brown mushy tissue climbing above the soil line. Rot confirmed in the stem changes your rescue path from root trim to beheading.
If roots are firm and pale but soil was merely wet too long, you may only need to dry the existing mix-see the overwatering page. If any root mass is mushy, treat as confirmed rot and proceed to rescue.
First fix for Echeveria
Stop watering and unpot the plant to inspect roots-today, before any other intervention.
Do not pour more water because leaves look wilted. Wilt on wet soil often means roots cannot absorb water because they are decaying-a pattern that tricks growers into adding more water and makes rot worse.
Mild cases: stop watering, trim rot, callus, repot gritty
When the crown is still firm and only part of the root mass has failed:
- Unpot and expose roots - Remove all wet mix so you can see the full root ball and stem base.
- Trim every soft, dark, or slimy root - Use a clean sharp blade sterilized with rubbing alcohol. Cut back to firm pale tissue. Sterilize between cuts.
- Remove mushy lower leaves - They will not re-firm; clearing them improves airflow at the stem base.
- Callus 3–7 days - Place the trimmed plant in dry shade with good air movement. Cut surfaces must dry and seal before soil contact.
- Repot into dry fast-draining mix - Use a clean pot with a drainage hole, ideally unglazed terracotta sized 1–2 inches wider than remaining roots. Do not water at repotting.
- First drink after 5–7 days - Water moderately so mix moistens without flooding. Resume soak-and-dry only when soil is dry throughout the root zone.
Advanced cases: behead healthy rosette, callus, reroot
When rot has entered the lower stem but the rosette head is still firm:
- Cut above all mushy tissue - Sterilize your blade. Slice through firm stem only, leaving at least a few centimetres of clean stem below the rosette if possible. If you must remove most of the plant to reach clean tissue, switch to leaf propagation.
- Discard rotted base and used soil - Do not compost infected mix or stems.
- Callus the cutting 3–7 days - Dry shade, no soil contact until the wound is sealed.
- Set on dry succulent mix - Some growers rest the cutting in an empty pot to hold the rosette upright while roots form over one to four weeks. Plant once you see root nubs.
- Water lightly only after roots appear - Then transition to normal soak-and-dry.
Total loss: leaf propagation salvage
If the crown is soft or rot consumed the stem, remove every firm healthy leaf from the remains. Let leaf bases callus 2–3 days, then lay them on dry mix. The bare stem stub may still produce offsets if tissue was not fully compromised. This is salvage, not guaranteed recovery-but echeveria leaves root reliably when rot has not reached them.
Recovery timeline
Mild root trim cases often stabilize within one to two full dry-down cycles after repot-roughly two to four weeks indoors depending on light and pot material. Watch for new white root tips and firmer upper leaves, not re-greening of old mushy foliage. Damaged lower leaves rarely recover in place; trim them once the plant firms up.
Beheaded reroots take longer: callus (3–7 days), root initiation (1–4 weeks), then gradual return to normal watering. New compact growth at the crown is the success signal.
Severe crown rot without firm salvage tissue is usually fatal for the original rosette. Propagated leaves or offsets become the recovery path.
What not to do
Do not keep watering because leaves look wilted while soil is already wet-that deepens rot.
Do not repot into dense garden soil, peat-heavy indoor mix, or a larger pot “to help drying.” Extra soil volume stays wet longer.
Do not skip the callus step. Wet cut tissue against moist mix invites immediate re-infection.
Do not fertilize a rotting plant. Roots cannot use nutrients until they regrow.
Do not mist the rosette or pour water into the leaf cup.
Do not assume every yellow leaf means rot-check pot weight, leaf texture, and roots together.
How to prevent root rot next time
Prevention on Echeveria is mostly watering discipline aligned with rosette biology:
- Soak-and-dry only - Only water when the compost starts to feel dry, never leave them sitting in water; drain fully, empty saucers within 30 minutes, then wait until the entire root zone dries again. Full rhythm: Echeveria watering guide.
- Cut winter frequency sharply - Every 21–28 days or longer in cool dim months; never keep a summer calendar through January.
- Use gritty fast-draining mix - Commercial cactus blend amended with extra perlite or pumice; avoid spongy peat-heavy soil.
- Right-size pots - 1–2 inches wider than the root ball; terracotta speeds dry-down.
- Keep water off the crown - Top water at the inner pot edge; limit bottom-watering tray time to 15–30 minutes.
- Match water to light - Dim rooms dry slowly; check soil at depth, not the calendar.
- Inspect during every water check - Catch heavy pots and translucent lower leaves before crown collapse.
When to worry
Treat as same-day urgent when:
- The crown feels wet, brown, or unstable
- The stem base is dark and mushy and spreading upward
- Most roots are black and slimy on inspection
- Lower leaves detach at a touch on saturated soil
Mild firm-root cases with only a few dark roots trimmed away are manageable with patience-not emergencies, but do not delay the unpot inspection.
Conclusion
Root rot on Echeveria is a wet-soil failure mode, not bad luck. The rosette tells you late: translucent mushy lower leaves and sour soil mean roots failed underground first. Stop watering, inspect, trim to firm tissue, callus, and repot into dry gritty mix-or behead and reroot when stem rot outruns the roots. Old damaged leaves will not heal in place; judge success by firm new growth and white root tips. Align every future drink with soak-and-dry, winter slowdown, and fast drainage, and this genus becomes far more forgiving than its reputation suggests.
Related guides: Overwatering · Watering · Not enough light · Echeveria overview
When to use this page vs other Echeveria guides
- Echeveria watering guide - Use for routine moisture checks before assuming root rot is the main issue.
- Echeveria problems hub - Browse all 16 common issues on this species.
- Overwatering on Echeveria - Different entry point when symptoms overlap with root rot.
- Yellow Leaves on Echeveria - Different entry point when symptoms overlap with root rot.
- Wilting on Echeveria - Different entry point when symptoms overlap with root rot.