Brown Tips on Aloe Vera: Causes, Checks & Fixes
Quick answer
Brown tips on Aloe Vera usually come from underwatering, sudden sun scorch, or fluoride and mineral salts in tap water. First step: press an outer leaf and probe soil two inches down-if the mix is bone dry and leaves feel thin, soak once; if tips browned after a window move, pull back from harsh sun; if soil is dry on schedule but tips keep crisping, switch to filtered or rainwater.
Brown Tips on Aloe Vera: Causes, Checks & Fixes
This guide covers brown tips on Aloe Vera. See also the general Brown Tips guide, watering, and light pages for this plant.
Brown Tips on Aloe Vera: Causes, Checks & Fixes
Quick answer
Brown tips on Aloe Vera (Aloe vera) are almost always environmental stress, not disease-dry, papery margins on thick succulent leaves that otherwise store water well. The three most common triggers indoors are underwatering during active growth, sun scorch after a sudden move to brighter light, and fluoride or mineral buildup from tap water on a plant that is otherwise watered correctly.
First step: run the leaf-and-soil test before you change anything. Press an outer leaf between your fingers and push a skewer two inches into the mix. Bone-dry soil with thin, slightly wrinkled but firm leaves → one deep soak, then resume soak-and-dry per the watering guide. Firm healthy leaves with dry crispy tips on the window-facing side after a recent move → pull back from harsh afternoon sun and acclimate slowly-see light guidance. Firm leaves, brown tips only, soil dry on your normal schedule, white crust on the pot rim → switch to rainwater, distilled, or filtered water and flush accumulated salts.
Make one correction at a time so you can read the plant’s response over the next week. Brown tip tissue itself will not re-green; watch new pups and center leaves for proof the fix worked.
What to look for: Drought tips feel papery and thin on slightly puckered outer leaves; scorch shows tan or bleached patches on one sun-facing side after a recent move; mineral burn leaves firm plump blades with dry tips only and often a white chalky rim on the pot.
What brown tips look like on Aloe Vera
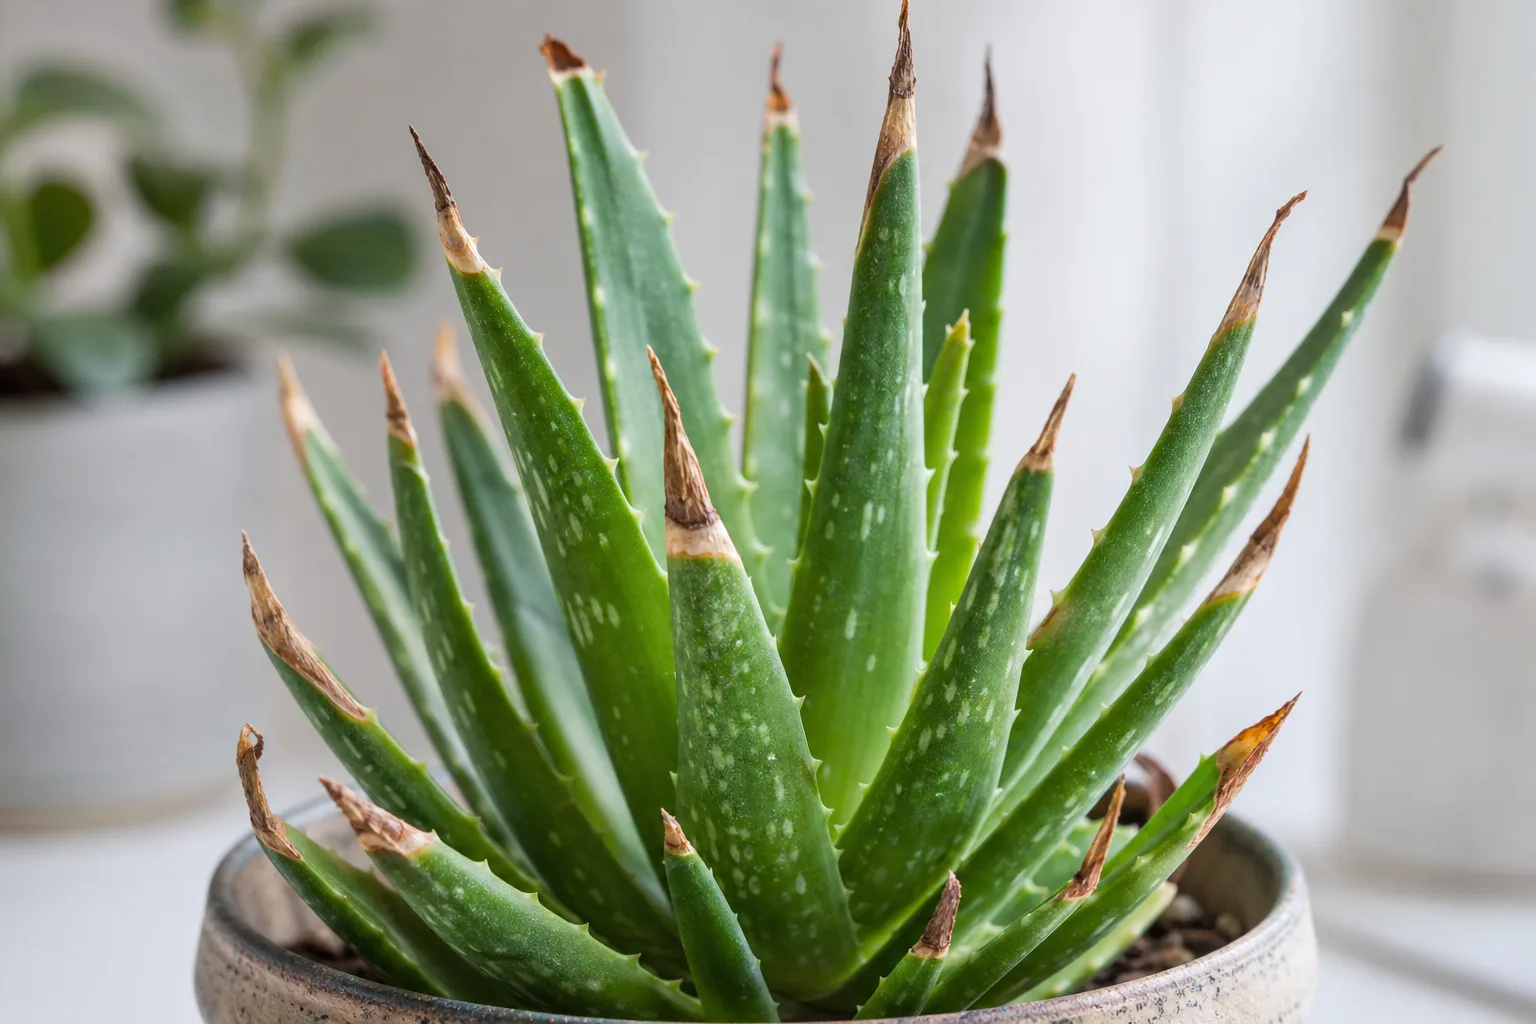
On aloe, tip burn shows up on the oldest, outer leaves first-the tissue aloe can afford to sacrifice when water or salts stress the plant. Healthy aloe leaves are plump, firm, and slightly rigid; tip damage changes only the margins, not the whole leaf-unless a separate problem like rot is involved.

Brown Tips symptoms on Aloe Vera - compare with healthy tissue on the same plant.
Underwatering pattern:
- Dry, papery brown tips or margins that feel crispy, not mushy
- Thin or slightly puckered leaves-especially outer ones-while the rosette may still stand upright
- Very light pot when lifted; mix dusty dry two inches down or deeper
- Browning that progresses slowly over weeks of missed water, not overnight
Sun scorch pattern:
- Dry, tan, or bleached patches on leaves that faced the light source-often outer leaves on the sunny side
- Sudden appearance within one to three days of moving the pot to a south or west window, outdoors, or closer to glass-or after lowering a grow light to within a few inches of the rosette
- Rest of the leaf stays firm and plump; damage is directional, not random
- Sometimes reddish-bronze stress color on edges before tips crisp fully
Fluoride and mineral burn pattern:
- Brown dry tips only while the rest of the leaf looks healthy and firm-no overall thinning or curling
- White or chalky crust on the pot rim, soil surface, or terracotta walls-unglazed terracotta often shows a salt band halfway up the pot where moisture wicks and evaporates
- Tips persist or worsen despite correct dry-down watering on your normal schedule
- Often affects multiple leaves evenly rather than one sun-facing side; pups may tip first because small offsets transpire faster relative to their root volume
Not tip burn-rule these out first:
- Soft, yellow, translucent leaves starting at the base → overwatering or root rot
- Fine stippling with webbing on leaf undersides → spider mites
- Whole-leaf collapse overnight → see wilting and check whether soil is wet or dry
Aloe stores water in its thick leaves, so margins brown first when the plant draws from leaf reserves or when salts accumulate at the transpiring edges-terminal tissue fails before the gel-filled center does. Because of that gel storage, outer tips can stay green for days after the root zone has gone bone dry; do not wait for widespread wrinkling before you soak.
Why Aloe Vera gets brown tips
Underwatering during active growth
Aloe is drought-tolerant and built for long dry spells, but during spring and summer growth in a sunny window it still drinks steadily. When the root zone stays dry too long, the plant pulls water from leaf tips-the most expendable tissue-producing dry brown margins while outer leaves thin slightly.
Common triggers: watering on memory instead of soil checks, fear of overwatering after a past rot scare, surface-only sprinkles that never wet the root ball, small terracotta pots in hot windows that dry in a week, or applying a winter watering schedule during active summer growth. Full drought mechanics and soak technique live on the underwatering page.
Sun scorch after light changes
Aloe loves bright light, but sudden exposure to intense direct sun-especially after a dim winter indoors-burns leaf cells before protective pigments build up. Tips and sun-facing surfaces dry out first because they are the most exposed and least buffered.
Moving a pot to a south-facing sill, placing it outdoors in full afternoon sun without acclimation, leaving water droplets on leaves in direct sun, or dropping a grow light too close can all produce crisp brown or bleached patches within days. Unlike drought, scorch hits one side of the rosette and follows a recent location or light change. Indoor south windows after a dim winter are a classic trigger: leaves formed in lower light lack the pigments to handle harsh midday rays until they acclimate.
Fluoride and mineral buildup from tap water
Standard tap water is fine for most aloes, but fluoride in tap water can cause brown leaf tips that mimic underwatering on an otherwise well-watered plant. Minerals concentrate at leaf margins as water transpires; fluoride sensitivity shows as dry crispy tips on firm leaves with no wrinkling.
Letting tap water sit 24 hours removes chlorine but does not remove fluoride-rainwater, distilled, or reverse-osmosis water is the reliable fix when tips keep returning despite correct soak-and-dry rhythm. White crust on the pot rim is your clue that salts are accumulating; on unglazed terracotta, salts often appear as a white band where the porous wall wicks moisture and leaves minerals behind-plastic pots may show crust only on the soil surface and rim. The Aloe Vera watering guide covers water-quality choices in detail.
Overwatering and root stress (lookalike)
Chronic overwatering usually causes soft, mushy, yellowing leaves from the base up-not dry crispy tips alone. But owners who see brown and assume drought sometimes add more water, worsening rot. If soil has been wet for a week and the base feels soft, you are not dealing with tip burn from dryness. Stop watering and inspect roots per overwatering guidance before trimming anything.
Misting will not fix aloe tip burn. Aloe tolerates dry indoor air and does not require extra humidity; raising humidity treats the wrong problem and can leave moisture in the crown that invites rot in cool rooms.
How to confirm the cause
Work through this six-step checklist before you soak, move, or repot:
- Leaf feel - Press an outer leaf. Thin, puckered, firm-but-flat = drought. Firm and plump with tips only brown = scorch or water quality. Soft and squishy = wet roots, not tip burn.
- Soil moisture at depth - Push a skewer two to three inches down. Dusty dry throughout confirms drought; damp deep mix with brown tips suggests rot or fluoride on a wet schedule, not thirst.
- Pot weight - Lift the container. Feather-light with dry tips = underwatering. Heavy with wilted or yellowing lower leaves = overwatering lookalike.
- Light history - Did you move the plant to a brighter spot or adjust grow lights in the last week? Sun-facing damage on outer leaves only = scorch.
- Water source and crust - White mineral rim with firm leaves and correct dry-down = tap-water salts or fluoride. No crust but chronic dryness = underwatering.
- New growth check - Inspect the center rosette and newest pups. Clean new leaves with only old outer tips brown = cosmetic stress you can correct. Distorted or collapsing center growth = escalate beyond this page.
Lookalike symptoms
| What you see | Likely cause | How to tell apart | Urgency |
|---|---|---|---|
| Dry papery tips, thin outer leaves, dusty dry soil | Underwatering | Pot very light; improves after one deep soak | Low-fix within a few days |
| Crispy patches on sun-facing leaves only, sudden onset | Sun scorch | Follows window move, outdoor placement, or grow-light change; firm leaf body | Low-shade and acclimate; watch new leaves |
| Brown tips only, firm leaves, white pot crust, soil dry on schedule | Fluoride / mineral burn | No leaf thinning; tips persist despite correct watering | Low-switch water and flush salts |
| Soft yellow base, wet soil, sour smell | Overwatering / rot | Mushy tissue, not dry crispy margins-see root rot | High-stop watering today; inspect roots |
| Fine dots + webbing on undersides | Spider mites | Tap test over white paper; not limited to leaf tips | Medium-treat before spread |
| Reddish edge color in cool bright room | Cold or stress tint | Often reversible; not always dead tissue | Low-warm and observe |
| Crown softening while soil stays wet | Advanced root failure | Center leaves collapse inward; base smells | Emergency-same-day root-rot protocol |
First fix for Aloe Vera - match one action to your diagnosis
Do not stack soak, repot, fertilizer, and a new window position on the same day. Pick the path that matches your checklist result:
If underwatering fits: Give one thorough soak until water runs from the drainage holes, let the pot drain fully, empty the saucer, and do not water again until the mix is completely dry two inches down. One drink fixes drought; daily watering swings into rot.
If sun scorch fits: Move the pot back from harsh afternoon sun or filter direct rays with sheer curtain. Acclimate gradually over one to two weeks if you want brighter light long term-add an hour of morning sun per few days rather than jumping to a south sill. Do not overwater “to help sunburn recover.”
If fluoride or mineral burn fits: Switch to rainwater, distilled, or reverse-osmosis water for the next several waterings. Flush the soil by running plain water through the pot two or three times until it runs clear from the drainage hole, letting it drain fully between passes. Hold fertilizer until new growth looks normal.
If overwatering lookalike fits: Stop watering. Let soil dry completely before reassessing. Do not trim healthy leaves hoping to “reset” the plant-fix roots first.
Recovery timeline - what success looks like
Underwatering: Outer leaves often firm within 24–72 hours after a proper soak. Brown tips stay brown permanently. Expect plumper pups and clean new center growth within two to six weeks during active season.
Sun scorch: Existing burned patches do not heal. New leaves and pups emerging after light correction should be fully green within three to six weeks. If every new leaf opens with burn marks, the spot is still too hot-or the grow light is still too close.
Fluoride / minerals: Tips on old leaves remain cosmetic. After two to four soak cycles with low-salt water and an optional soil flush, new growth should emerge without brown margins. Persistent tipping on every new pup despite a water switch means salt load or fluoride exposure still needs attention-flush again in spring or repot into fresh mix if crust returns within weeks.
When to worry: Crown softening, base smell, black mushy roots, or brown spreading into firm leaf centers while soil stays wet-switch to root rot guidance immediately. Tip burn alone on outer leaves with a firm center is rarely urgent.
What not to do
- Do not add more water when tips are brown but soil is already wet-overwatering leads to root rot on aloe, not drought.
- Do not fertilize a stressed aloe to “green up” tips; salts worsen margin burn and soft growth invites pests.
- Do not mist leaves hoping to fix crispy tips-aloe does not need humidity therapy, and wet crowns in cool rooms risk rot.
- Do not repot on day one unless roots are mushy or soil has failed-tip burn is usually a care-rhythm fix, not a container fix.
- Do not stack Aloe Vera repotting guide, heavy pruning, and water-source changes the same week-you will not know which change helped.
- Do not place a sunburned plant in deep shade to recover-aloe still needs bright light; just remove the scorching afternoon intensity.
How to prevent brown tips next time
- Water by soil, not calendar - Allow soil to dry between waterings, then soak deeply; roughly every two to three weeks in summer and every four to six weeks in winter for most indoor pots, adjusted to your light and pot size per the watering guide.
- Acclimate light changes - Move toward brighter windows incrementally; aloe handles bright light but not sudden harsh afternoon jumps. After winter indoors, treat a south-window move like outdoor hardening: filter midday rays for one to two weeks before full exposure. When moving summer aloe outdoors, start in bright shade for several days, then add morning sun in stages-full afternoon sun without acclimation burns leaves formed under glass.
- Use better water if tips recur - Rainwater or distilled for fluoride-sensitive plants; flush salts in spring if white crust builds up.
- Weight the pot weekly - Learn the difference between wet and dry for your specific container; faster than guessing from leaf tips alone.
- Inspect pups during each water check - New offsets show stress early; outer-leaf tips are often the last visible stage of a weeks-old problem.
- Trim dead tips only when fully dry - Cosmetic snips are optional; fixing the cause matters more than scissors.
Pet safety when trimming damaged Aloe leaves
Aloe vera is toxic to cats and dogs-the plant contains saponins and anthraquinones that can cause vomiting, lethargy, and diarrhea if pets chew leaves or trimmed pieces. The inner gel is widely used topically by humans, but the whole leaf is not a pet-safe snack.
When you trim brown tips or remove dried outer leaves, discard clippings in a closed bin rather than leaving them on the floor. Wash hands after handling cut edges-the bitter yellow latex just beneath the skin is the most irritating layer. Place pots on shelves out of reach if cats bat leaves off windowsills.
If a pet ingests aloe, contact your veterinarian or ASPCA Animal Poison Control at (888) 426-4435. This page is horticultural guidance, not veterinary advice.
Related Aloe vera problems
Brown tips overlap with several other stress signals on the same plant:
- Underwatering on Aloe Vera - thin puckered leaves and bone-dry soil
- Overwatering on Aloe Vera - soft mushy base, wet mix
- Aloe Vera light requirements - sun scorch and acclimation
- Aloe Vera watering guide - soak-and-dry method and tap-water quality
- Root rot on Aloe Vera - when crown softens on wet soil
- Aloe Vera overview - full care hub and symptom cross-reference
Conclusion
When the pot is light, soil is dusty dry two inches down, and outer leaves feel thin but firm, give one deep soak and wait a week before changing anything else. When tips browned on the sun-facing side after a window or grow-light move, pull back from harsh afternoon rays and acclimate over one to two weeks-do not add extra water. When leaves stay firm with dry tips only and white crust rims the pot, switch to low-salt water and flush salts-sitting tap water overnight will not remove fluoride. When soil stays wet and the base feels soft or the crown collapses, stop watering and open root-rot guidance today-more water will not fix brown tips caused by failing roots. Old margins never re-green; success is clean new pups and a firm center rosette within two to six weeks.
FAQs
Should I cut off brown tips on Aloe vera?
You can trim fully dried, papery tips with clean scissors for cosmetic reasons-the dead tissue will not re-green. Cut only the brown portion and let the cut edge air-dry for a day before watering. Do not remove whole leaves unless the base is mushy or the leaf is mostly dead; healthy firm tissue below the tip still stores water for the plant.
Does letting tap water sit overnight fix aloe brown tips?
No for fluoride. Resting tap water off-gasses chlorine but does not remove fluoride or most dissolved minerals. If firm leaves keep tipping despite correct soak-and-dry watering and you see white crust on the pot, switch to rainwater, distilled, or reverse-osmosis water for several cycles and optionally flush the soil.
Is aloe tip burn the same as root rot?
No. Tip burn produces dry, papery brown margins on firm leaves while the rosette center stays rigid. Root rot starts with soft, yellow, translucent tissue at the base on wet soil and often smells sour. Brown tips on outer leaves with a firm center and dry mix are cosmetic stress; crown softening with wet soil needs root rot protocol the same day.
Will damaged Aloe Vera leaves recover from brown tips?
No-the browned tissue is dead and will not turn green again. Recovery shows in plumper existing leaves within days after a drought soak, or in clean new pups and center growth over two to six weeks once light and water quality are corrected. Judge success by new growth, not by old leaf tips.
Are brown tips on Aloe vera toxic to cats if they chew the leaves?
Aloe vera is toxic to cats and dogs-the plant contains saponins and anthraquinones that can cause vomiting, lethargy, and diarrhea if ingested. Keep trimmed brown leaf pieces off the floor and place pots out of reach if pets chew plants. Contact your veterinarian or ASPCA Poison Control at (888) 426-4435 if you suspect ingestion.
When to use this page vs other Aloe Vera guides
- Aloe Vera watering guide - Use for routine moisture checks before assuming brown tips is the main issue.
- Aloe Vera problems hub - Browse all 16 common issues on this species.
- Low Humidity on Aloe Vera - Different entry point when symptoms overlap with brown tips.
- Underwatering on Aloe Vera - Different entry point when symptoms overlap with brown tips.
- Overwatering on Aloe Vera - Different entry point when symptoms overlap with brown tips.