Not Enough Light on Venus Flytrap: Causes, Checks & Fixes
Quick answer
Not enough light on Venus flytrap shows as small pale traps on long floppy petioles, fading red interior color, and hard lean toward the brightest window. First step: move the pot to six or more hours of direct sun outdoors, or add a white LED grow light 6–12 inches above traps for 12–16 hours daily.
Not Enough Light on Venus Flytrap: Causes, Checks & Fixes
This guide covers not enough light on Venus Flytrap. See also the general Not Enough Light guide, watering, and light pages for this plant.
Not Enough Light on Venus Flytrap: Causes, Checks & Fixes
Quick answer
A Venus flytrap (Dionaea muscipula) in chronic dim light does not wilt like a fern-it stays green just long enough to fool you while building small pale traps on long floppy petioles, losing red interior pigment, and leaning hard toward the brightest window. That pattern is insufficient light, not a mysterious “carnivore mood.”
First step: increase photons today-one change only. Outdoors from spring through fall, place the pot where it receives six or more hours of direct sun on a clear day. Indoors year-round, put the rosette on the glass of your brightest south-facing window and run a white full-spectrum LED 6 to 12 inches above the traps for 12 to 16 hours daily on a timer unless you have verified strong intensity at leaf level.
Do not fertilize, repot, or change watering rhythm before fixing light. Distilled or rainwater and the tray method still apply-see our Venus flytrap watering guide-but light is the throttle for trap size, color, and how fast the plant uses water.
This page diagnoses confirmed or suspected insufficient light: trap morphology, confirmation checks, first fix, and recovery markers. For proactive placement, lux targets, and grow-light specs, see the Venus flytrap light guide. For stretch-focused symptom detail, see leggy growth on Venus flytrap.
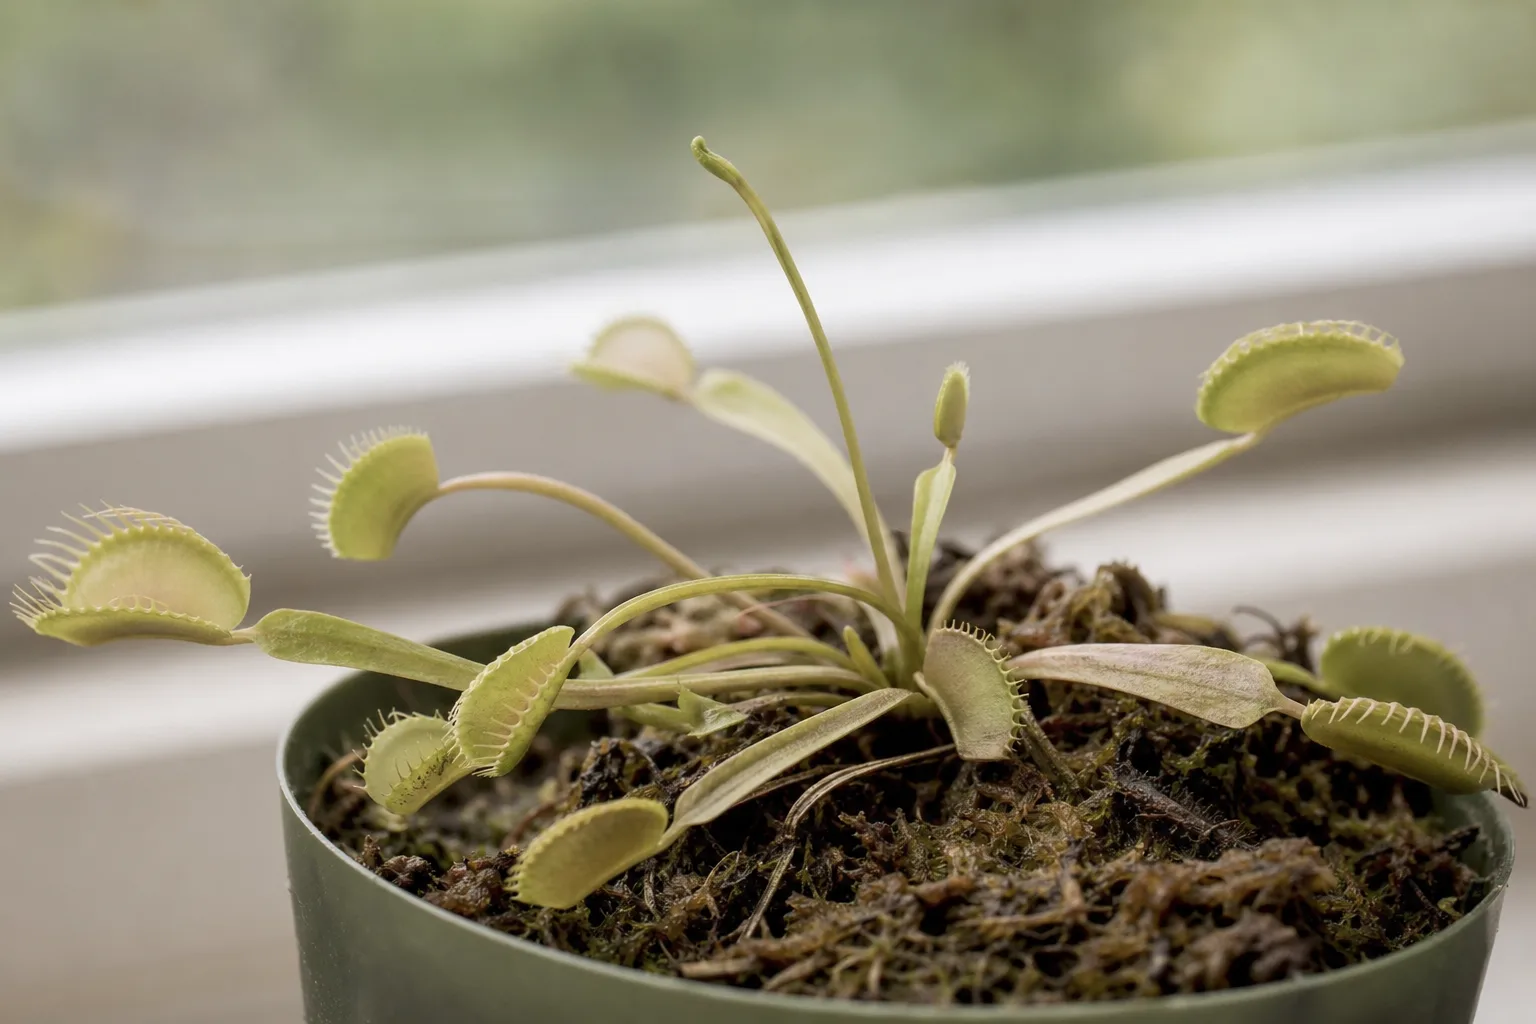
What not enough light looks like on Venus flytrap
Low-light stress on Dionaea shows up in trap form and pigment, not generic “fading leaves.” Watch the newest traps, not old ones blackening from normal senescence.
Not Enough Light symptoms on Venus Flytrap - compare with healthy tissue on the same plant.
Typical insufficient-light signs:
- Small traps-often fingernail-sized or smaller-on long, thin petioles that lift traps far above the rosette as the plant searches for photons
- Pale green traps with little or no red interior on cultivars that should show anthocyanin color when well lit
- Floppy, weak petioles that droop toward the soil or window-light-starved leaves lack the stiffness of healthy spring growth
- Hard lean toward the brightest direction within one to two weeks of placement
- Slow or sluggish trap closure when triggered, sometimes followed by rapid blackening because the trap lacked reserves
- Reduced new-leaf rate-fewer replacements as older traps senesce and die
- Soil that stays wet longer because the dim plant transpires slowly, pairing dangerously with tray watering if you do not adjust
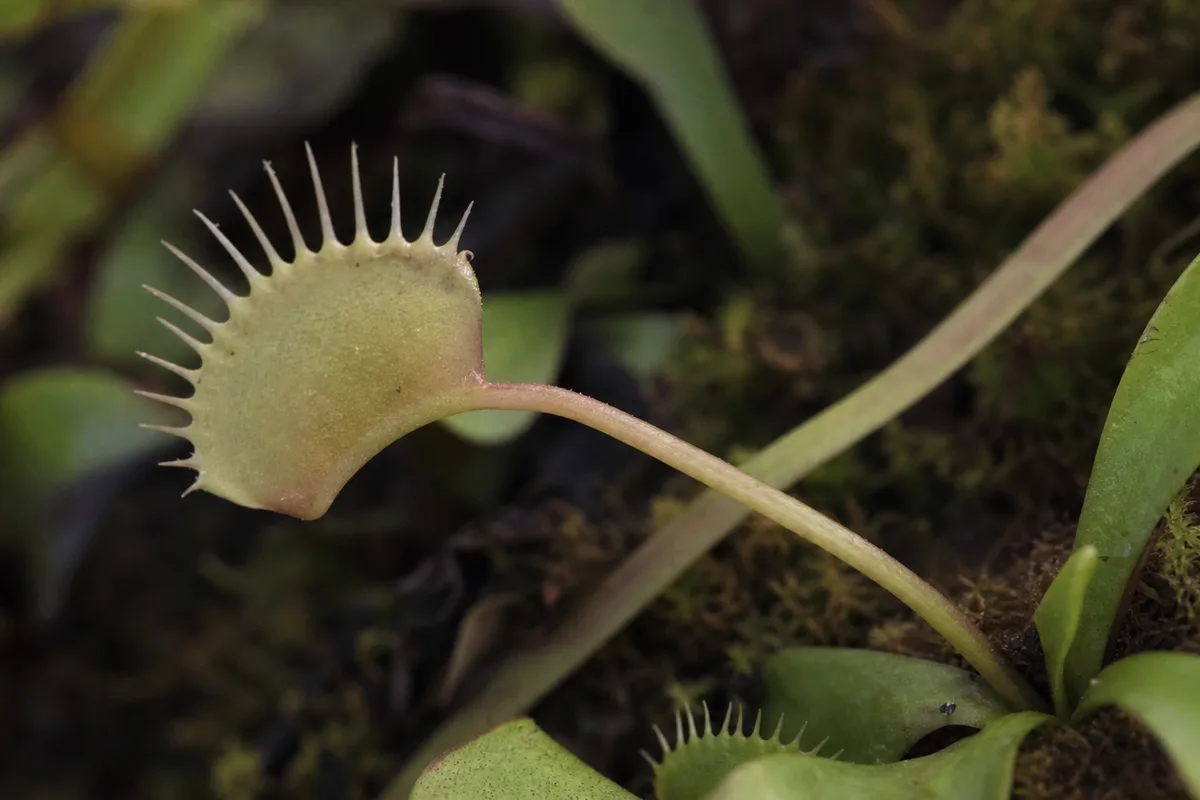
What adequate light looks like for comparison:
- Compact rosette with short, firm petioles and traps in the normal mature range-roughly 0.5 to 1.5 inches on healthy adult plants depending on cultivar
- Red or pink trap interiors on many varieties when daily photons are high enough
- Snappy trap closure on healthy new leaves
- Steady trap replacement through the active growing season
Judge only traps produced after any light change. Old elongated petioles and pale jaws do not repair themselves even when conditions improve.
Why Venus flytrap runs out of light indoors
Venus flytraps evolved in open, nutrient-poor Carolina bogs with unfiltered sun for most of the day-not on a kitchen shelf under a plastic cup. The International Carnivorous Plant Society states the plant needs at least six hours of direct sunlight every day and starts declining immediately if it does not get enough light. NC State Extension classifies the species under full sun-six or more hours of direct sunlight daily.
Several home situations push gift-shop flytraps into chronic under-lighting:
Plastic-cup terrarium trap. Nursery cups protect plants during shipping; they are not long-term culture. Trapped humidity with weak overhead light produces soft, pale growth.
“Bright” rooms that fail at trap level. Human eyes adapt to dim interiors. A spot that looks fine from across the room may deliver far too few photons at the rosette-especially on a table two feet below the window frame.
East-, west-, or north windows without supplementation. A south-facing sill with the pot on the glass is the minimum serious indoor attempt. Most other exposures need a grow light in winter or year-round at mid and high latitudes.
Winter daylight loss. Shorter days and lower sun angle cut exposure even when the pot never moved. Marginal summer placement becomes a crisis by February.
Seasonal leaf confusion. Venus flytraps produce naturally long, upright spring leaves with less red color-that is normal seasonal morphology. Light-starved leaves are pale, floppy, and appear regardless of season. Stiff upright spring leaves differ from weak etiolated ones that droop to the soil surface.
Low light also slows water use. A dim flytrap keeps peat moist longer, which raises rhizome rot risk when tray depth stays unchanged after you finally add sun-always recheck moisture when photons increase.
How to confirm insufficient light
Work through these checks before Venus Flytrap repotting guide, fertilizing, or treating for pests:
-
Trap-size test - Compare the newest trap to your cultivar’s expected mature size. Systemically small traps on every new leaf strongly suggest photon deficit, not a single bad trap.
-
Petiole strength test - Gently lift a new leaf. Floppy, drooping petioles on pale traps confirm light starvation. Stiff upright petioles with modest length may be normal spring growth instead.
-
Red-interior check - On red cultivars, fading or absent anthocyanin inside traps is a classic low-light signal. There is no safe fertilizer shortcut-increase light, not nutrients.
-
New-growth-only rule - Individual older traps blacken after several feedings or months-that is normal senescence. Every new trap arriving small, pale, and stretched is systemic light failure. Do not cut healthy photosynthetic leaves thinking they are flower stalks; see no flowers if a tall center stem appears.
-
Rotate test - Turn the pot 180° and mark the window side. After one week, new growth should lean back toward the glass. Strong phototropism confirms the plant is actively seeking more light.
-
Hours of direct beam - Count how many hours unfiltered sun hits the trap surfaces on a clear day. Fewer than six hours outdoors-or no direct beam indoors-confirms insufficient exposure without supplementation.
-
Soil dry-down speed - Press the top of the peat. Mix that stays soggy for ten days or more in a warm room with no new firm traps may pair low light with overwatering. Check crown firmness before assuming light alone-see overwatering and root rot if the rhizome is soft.
-
Rule out lookalikes - Pale traps with webbing or stippling suggest spider mites in dry indoor air. Mushy black crown with sour smell is rot, not light. Slow growth in an otherwise bright window may be normal species pace-see slow growth when light checks pass.
Confirmed insufficient light fits when small pale traps on long floppy petioles cluster on new growth, direct sun hours are below six outdoors or unsupplemented indoors, and watering with pure water has been reasonable.
First fix for Venus flytrap
Increase light intensity today-and change nothing else for two weeks.
Pick one path based on your setup:
Outdoor path (spring through fall, after last frost): Move the pot to open direct sun for six or more hours daily. Use distilled, rain, or reverse-osmosis water only; keep the tray 1 to 2 cm deep. Plastic or glazed pots reduce root heating in full sun.
Indoor path: Place the rosette on the sill, touching the glass of the brightest south window and mount a white full-spectrum LED 6 to 12 inches (15 to 30 cm) above the tallest trap, running 12 to 16 hours daily on a timer. Target roughly 15,000 to 25,000 lux at trap level-about 25 actual watts of white LED per 25 cm (10 inch) growing area.
If the plant lived under nursery shade or a dim shelf for weeks, acclimate over 7 to 14 days rather than jumping to all-day patio sun:
- Days 1–3: morning direct sun only, or full sun with light shade cloth
- Days 4–7: increase direct hours toward midday
- Days 8–14: full target exposure if new traps show firm growth without bleaching
After moving:
- Do not fertilize-ever, on a stressed flytrap
- Do not repot unless mix is clearly failing
- Recheck tray depth every few days; brighter light usually means faster dry-down-empty the saucer briefly if peat stays waterlogged
If no window or fixture passes a basic intensity check, add the LED before waiting for decline. Details on wattage, distance, and hot-climate shade adjustments live in the light guide.
Step-by-step recovery
Once photons increase, follow this sequence:
Week 1–2: Acclimate and observe
Watch whether new petioles arrive firmer and shorter than the previous generation. Some older traps may blacken as the plant reallocates energy-normal if the crown stays firm.
Adjust tray watering to match faster transpiration: 1 to 2 cm standing water during active growth, but pour off excess if the crown sits in constant sogginess after light increases.
Week 3–6: Evaluate new traps only
Ignore old stretched leaves. The second and third traps produced after the upgrade should show noticeably larger laminae and better interior color if light was the limiter.
Rotate the pot a quarter turn at each tray refill so traps develop evenly rather than leaning hard one direction.
Month 2 onward: Structural honesty
Improved light preserves the rhizome and supports active trap replacement. Old pale traps and elongated petioles stay cosmetically damaged. If the crown was already mushy before the light fix, open the root rot guide-light alone cannot salvage decayed tissue.
For stretch-heavy symptom detail and phototropism, cross-check leggy growth with the scope note that leggy pages focus on etiolation morphology while this page covers full insufficient-light diagnosis and confirmation.
Recovery timeline
| Stage | What to expect |
|---|---|
| 1–2 weeks | Lean may slow; new petioles may arrive slightly firmer if acclimation succeeded |
| 2–4 weeks | First post-fix trap shows shorter petiole and improved color vs. previous generation |
| 4–8 weeks | Second and third new traps approach normal size range for cultivar if light is adequate |
| 2–3 months | Predictable wet/dry rhythm under new intensity; steady trap replacement in active season |
| Ongoing | Old stretched leaves remain; judge success by new trap form, not repaired old tissue |
Traps that were already small and pale before the fix do not enlarge or redden retroactively. Recovery means the problem stops repeating on every new leaf.
Lookalike symptoms
| What you see | Likely cause | First check |
|---|---|---|
| Small pale traps on long floppy petioles, window lean | Insufficient light | Trap-size test + direct sun hours |
| Long stiff upright petioles in early spring only | Normal seasonal leaf form | Petiole strength; compare with FAQ on leggy growth |
| Single old trap blackening; new traps firm and sized | Normal trap senescence | New-growth-only rule |
| Mushy black crown, sour smell, wet peat | Root rot / overwatering | Crown firmness; see overwatering and root rot |
| Pale traps with fine webbing, stippling | Spider mites | Leaf undersides in dry indoor air |
| Small traps, correct light, no new leaves for months | Dormancy approaching or rhizome stress | Season, crown firmness, overview |
| Slow growth but compact red traps in bright window | Normal species pace | See slow growth |
Leggy growth vs. not enough light: Both stem from photon deficit. Use this page when you need to confirm light is the root cause before acting. Use leggy growth when long reaching stems and window lean are your primary complaint and you already suspect stretch.
Mistakes to avoid
- Leaving the plastic cup on indefinitely - Remove the dome; add real sun or LED instead.
- Jumping from a dim shelf to unfiltered west patio sun in one day - Traps bleach and crisp. Acclimate over 7 to 14 days.
- Fertilizing a pale, stalled rosette - Flytraps live in nutrient-poor bogs; do not fertilize stressed plants.
- Keeping tray depth unchanged after a major light upgrade - Faster photosynthesis means faster water use and faster dry-down; stagnant deep water rots crowns.
- Judging recovery on old traps - Only new leaves tell the truth.
- Assuming rotation fixes a north room - Spinning a pot in a dim hallway produces symmetrically weak traps. Fix intensity first.
- Waiting for traps to “grow back” to full size - They will not. Act while the rhizome is still firm.
- Using tap or bottled drinking water to “help” a tired plant - Mineral burn compounds light stress. Use distilled, rain, or RO water only.
How to prevent low light next time
- Default placement: Outdoor full sun when climate allows; otherwise south sill on the glass plus white LED from day one
- Photoperiod consistency: Timer at 12 to 16 hours indoors-manual on-off habits are less harmful than chronic underlighting but more stressful than a stable schedule
- Seasonal check: Retest trap color and petiole length each November before winter short days; extend LED hours or move outdoors next spring promptly after frost
- Rotate weekly at tray refill so traps stay symmetrical
- Track new trap size on each leaf-systemic shrinkage means brighten immediately
- Adjust tray rhythm when moving between indoor and outdoor culture-outdoor sun dries peat faster
Venus flytraps do not grow well as typical houseplants without strong direct light-they require more light than a typical windowsill provides. Survival on a dim sill for months is not the same as adequate culture-the ICPS warns decline begins immediately when photons run short.
When to worry
Insufficient light alone is rarely fatal overnight, but chronic deficit paired with wet peat kills rhizomes. Worry when:
- The crown is soft, black, or foul-smelling - treat as root rot immediately, not light alone
- No firm new trap in six to eight weeks after a verified light upgrade-recheck fixture distance, wattage, and hours before assuming the rhizome is spent
- Every trap blackens within days of opening while the crown stays firm-may indicate severe prior starvation; maintain strong light and proper water but accept that recovery takes multiple leaf generations
- Winter dormancy confusion - traps naturally die back in cold rest; do not panic-prune a resting rhizome. Confirm dormancy rules on the overview before forcing summer light on a sleeping plant
A rosette with firm white rhizome, no rot smell, and only early pale stretch is recoverable. Increase photons, match tray water to the new growth rate, and evaluate new traps only-knowing old ones will not regain size or red color.
Venus flytrap hub: overview · light guide · leggy growth · watering · overwatering · slow growth
When to use this page vs other Venus Flytrap guides
- Venus Flytrap watering guide - Use for routine moisture checks before assuming not enough light is the main issue.
- Venus Flytrap problems hub - Browse all 18 common issues on this species.
- Leggy Growth on Venus Flytrap - Different entry point when symptoms overlap with not enough light.
- Slow Growth on Venus Flytrap - Different entry point when symptoms overlap with not enough light.
- Yellow Leaves on Venus Flytrap - Different entry point when symptoms overlap with not enough light.