Polka Dot Plant Repotting: When, How & Mistakes
Polka Dot Plant Repotting: When, How & Mistakes
Polka Dot Plant Repotting: When, How & Mistakes
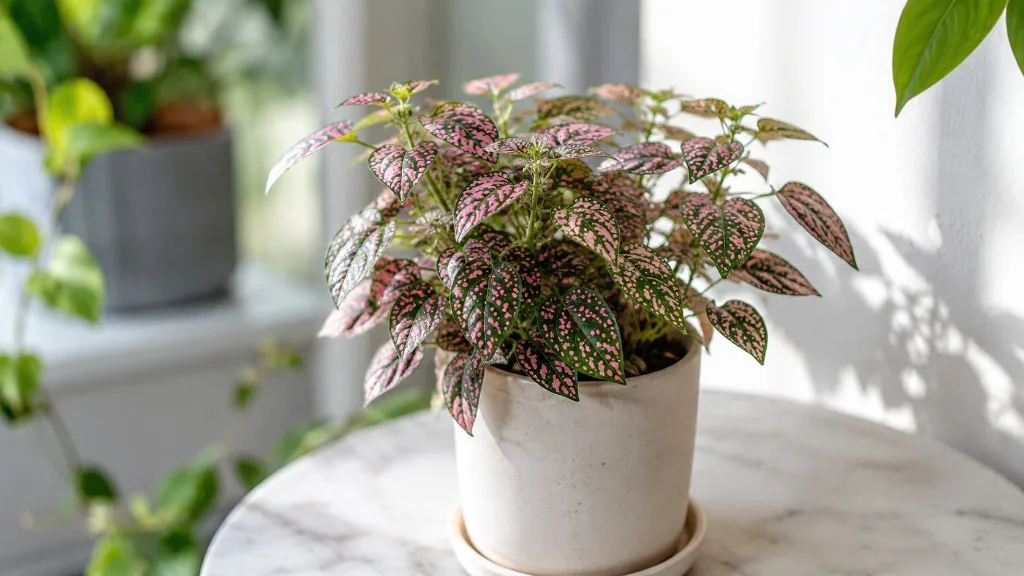
Polka dot plant (Hypoestes phyllostachya) is one of those houseplants that looks adorable in a 10 cm nursery pot and then, six months later, wilts between waterings while roots poke through the drainage holes. That is not neglect - it is biology. This Madagascar native is a rapidly growing, mounding herb with shallow fibrous roots that exhaust small pots quickly and recover poorly when disturbed in dry air. Repotting is how you restore drainage, replace depleted mix, and give those roots room to support the speckled foliage you bought the plant for.
Done at the right moment - one pot size up, fresh airy mix, steady humidity - a polka dot plant repot is usually boring in the best way: a day of mild adjustment, a week of careful watering, and then new patterned leaves. Done in an oversized container, with roots stripped bare, or in the middle of a dry winter heating season, the same job can leave you staring at collapsed stems while you wonder whether a plant that cost five dollars is worth the rescue effort. This guide covers when to repot, how to do it step by step, and the mistakes that turn a routine upgrade into a recovery project.
Reviewed by LeafyPixels Review Board · Author: sai-ananth · Last updated 2026-06-15
Why Polka Dot Plant Repotting Is Different
Generic houseplant repot advice - “every two or three years, go one size up” - describes a slow philodendron, not a polka dot plant pushing new nodes every week in bright kitchen light. Hypoestes behaves more like coleus or other fast foliage herbs: the root zone is the bottleneck long before the calendar says it is time for a change. Treating it like a slow grower is how you end up with repeated wilting, faded leaf colour, and a plant that looks tired despite faithful watering.
Fast growth and shallow fibrous roots
NC State Extension lists polka dot plant with a rapid growth rate and a dense, mounding habit that typically reaches roughly 30–60 cm tall and wide indoors when pinched regularly. The root system matches that pace - shallow, fibrous, and quick to circle a small pot. LeafyPixels grower data for Polka Dot Plant overview notes that shallow roots stress quickly when the mix dries or when the plant is root-bound; wilting between waterings is often a root-volume problem, not a watering-schedule problem.
The Royal Horticultural Society advises repotting every two or three years once roots fill the container - a baseline for an established plant in a reasonably sized pot. For a fresh nursery specimen in a 10–12 cm pot, plan on a first upgrade within 6–12 months if growth is vigorous. The calendar is a reminder to inspect roots, not a command to wait three years regardless of what you see at the drainage holes.
Humidity and leaf color after root disturbance
Polka dot plants need moderate to high humidity to keep leaf edges crisp; in dry air, tips brown and speckling fades. Repotting disturbs fine root hairs that absorb water - the same hairs that keep leaves turgid between drinks. Without humidity support during recovery, even a correctly executed repot can look like failure: limp stems, brown margins, and washed-out pink or red patterning. Target 50–70% relative humidity for the first two weeks after repotting using a pebble tray, grouping with other plants, or - for small specimens - a clear humidity dome or terrarium environment.
Temperature matters too. RHS recommends keeping hypoestes above 12°C (54°F) at minimum, with best performance around 18–27°C (65–80°F) during recovery. Cold, wet mix after a winter repot is a common rot trigger; warm, stable indoor conditions let roots colonize fresh soil faster.
What fresh soil and extra root room actually fix
Repotting solves three problems that all show up as leaf symptoms if you ignore them long enough. First, roots eventually circle the inside of a pot, compressing into a dense mat that cannot absorb water or oxygen efficiently - especially dangerous on a species whose watering rhythm depends on shallow roots reaching the top centimetre of mix quickly. Second, even good potting compost breaks down over time: peat and coir compress, perlite crumbles, and the pore spaces that keep roots breathing disappear. Third, salts from tap water and fertilizer accumulate at the root zone, which can scorch fine hairs and show up as pale or brown-tipped leaves even when you water carefully.
Fresh mix restores structure - the air pockets and drainage speed that compacted old soil lost months ago. Extra root room lets new white tips spread outward instead of spiraling, which directly improves the plant’s ability to take up water after each drink. You will notice the difference in how the pot behaves: a root-bound polka dot plant often dries out in hours and then wilts dramatically between waterings, not because you are underwatering on Polka Dot Plant on purpose but because the root mat is so dense that water runs through channels without wetting the whole mass evenly.
Top-dress versus full repot for fast growers
Full repot - removing the plant, loosening outer roots, and replacing essentially all old mix - is appropriate when roots are bound, mix is compacted or sour, or you are correcting rot. Top-dressing - scraping out the top 2–3 cm of old mix and replacing it with fresh blend without disturbing roots - is a gentler mid-season option when drainage is still acceptable but salts have built up on the surface. Top-dressing in early spring can buy vigorous polka dot plants two or three months if the bottom is not yet circling, but it will not solve a dense root mat hugging the drainage holes. For nursery-starter pots, assume full repot is the default first move; top-dressing is for established plants in correctly sized containers that merely need a surface refresh.
When Polka Dot Plant Needs Repotting
The clearest sign is visual: roots emerging from drainage holes or circling the surface when you slip the plant partway out of the pot. Less obvious but equally reliable signals include water that runs straight through without absorbing, a plant that wilts hours after a thorough watering, and growth that stalls even though light and feeding have not changed. When two or more of these appear together during active growth, repotting is usually the right move.
Do not repot simply because one lower leaf yellowed. Yellowing can mean overwatering on Polka Dot Plant, cold drafts, or natural aging. Repotting a plant already stressed for unrelated reasons adds another variable. Confirm that the root zone is the bottleneck before you commit to the work.
Root-bound and drainage signals
Lift the pot and inspect the bottom first. Roots peeking through holes mean the plant has used the volume it was given. Slide the plant out gently - if the root ball holds a perfect pot-shaped mold with little visible mix on the sides, you are looking at classic root-binding. For polka dot plant, the root mat is often shallow but dense, hugging the bottom third of the container rather than diving deep.
Fast drainage sounds positive until you realize water is bypassing the root mass because channels opened along the pot wall. If you water thoroughly and the pot feels light again within an hour, the mix may be spent. Slow drainage combined with sour smell or mushy stems points to root rot - repot immediately with trimming, not next spring.
Growth and leaf symptoms tied to root stress
Stunted new growth is a late-stage signal. Polka dot plant normally pushes fresh speckled leaves regularly when conditions are adequate. When new leaves arrive smaller, greener, or less patterned than older ones, depleted or compacted soil is a prime suspect - especially if you have fertilized faithfully but the mix no longer holds nutrients effectively.
Top-heavy wobble - where colourful foliage outweighs the root anchor - is another clue common in nursery pots left too long. Repeated wilting despite surface-dry checks matching the watering guide often means the shallow root mass cannot access moisture fast enough in a crowded pot. Repotting with fresh mix frequently resolves wilting within one to two new leaf cycles, provided humidity and light stay appropriate.
Best Time of Year to Repot Polka Dot Plant
Timing matters because Hypoestes recovers fastest when it is already geared for growth. Spring through early summer is the safest window for most indoor growers. Rising temperatures and lengthening days trigger active shoot and root development, so the plant can colonize fresh mix before autumn slowdown.
Repot on an ordinary indoor day - you need stable warmth and bright indirect light, not greenhouse perfection. Morning repotting gives the plant a full day of even conditions before overnight temperature drops.
Spring and early summer windows
During active growth, polka dot plant can show new firm leaves within two to four weeks after a well-executed repot. Roots begin exploring fresh mix almost immediately if temperatures are warm and the soil stays evenly moist but not soggy. This is also the best season to combine repotting with pinching if you want a bushier shape, because the plant has energy to branch from multiple nodes after the move - see the pruning guide for technique.
If you missed spring, early summer still works. Avoid repotting during the hottest week of the year if your home lacks air conditioning and the plant sits in a sun-adjacent window. Heat plus transplant stress produces more wilting than the same repot in moderate conditions.
When winter repotting is still justified
Winter repotting is a backup plan, not a default. Growth slows, days are short, and disturbed roots sit in wet mix longer because the plant is not pulling water actively. Skip winter repotting if the plant is merely slightly tight but still producing occasional new leaves.
Repot in winter only when delay would clearly harm the plant: severe root-binding with repeated wilting, active root rot requiring trimming and fresh mix, or a cracked pot. If you must repot then, use a modest size increase, keep temperatures above roughly 18°C, provide bright indirect light, and water more cautiously - let the top centimetre dry slightly further between drinks until new growth appears.
Tools, Pot Size and Soil Mix
Gather supplies before you unpot so shallow roots spend minimal time exposed. You need a new container, fresh mix, clean scissors, a hand trowel, and optionally a chopstick for settling soil. Work over a tray or newspaper - fine roots break easily.
Choosing the right pot size
Choose a pot only 2–5 cm (1–2 inches) wider in diameter than the current one, with drainage holes. Jumping to a much larger pot keeps excess soil wet around a small shallow root system and commonly leads to rot or prolonged wilting. Match depth roughly to the previous pot; polka dot plant does not need a deep cache for taproots it does not have.
Missouri Botanical Garden notes that hypoestes grows well in small pots or grouped displays and prefers well-draining conditions - oversized containers work against that biology. Terrarium specimens may need top-dressing and root trimming rather than a larger jar; moving to a bigger terrarium is the exception, not the rule.
The repot mix for Hypoestes
Use the mix defined in the soil guide: standard peat-free or general potting compost plus 15% perlite and 10% worm castings, slightly moisture-retaining but airy, pH 5.5–7.0. Do not reuse old mix - it loses structure and may carry salt buildup or pathogens. Avoid unamended cactus mix (too dry for this species) and heavy garden soil (compacts and suffocates shallow roots).
Pre-moisten the new mix until it feels like a wrung-out sponge before you place the root ball. Dry mix pulled against roots creates air pockets that stay dry for weeks.
Mix ingredients in a tub before you repot rather than layering them in the pot. Dry blending distributes perlite evenly and prevents the “drainage layer of gravel at the bottom” mistake - water does not sit in distinct layers; it moves through the whole column according to pore structure. A handful of worm castings per liter of mix is plenty; overloading organic matter holds moisture longer than shallow roots need in dim rooms.
Terrarium and dish-garden repot constraints
RHS notes that hypoestes is an ideal terrarium plant because enclosed glass keeps humidity high. Repotting inside a sealed terrarium is awkward; the practical approach is to lift the plant out, refresh mix in a shallow container matched to the root ball, trim circling roots if needed, and return it to the same or slightly larger jar. Do not jump to a deep container - shallow roots spread wide, not deep. If multiple colour varieties share one dish garden, repot the whole grouping only when every plant shows root pressure, or divide in spring per the propagation guide rather than disturbing one neighbour repeatedly.
Step-by-Step: How to Repot Polka Dot Plant
Follow this numbered workflow for a typical nursery-pot upgrade (for example, 10 cm to 12 cm):
- Water lightly the day before so the root ball holds together but is not soggy. Saturated roots tear more easily.
- Prepare the new pot with a shallow layer of fresh mix and confirm drainage holes are open.
- Tip the plant out by supporting the base and inverting. If it resists, run a knife around the pot wall - never yank by the stems.
- Inspect roots. White and firm is healthy. Trim brown mushy sections with clean scissors. Tease circling roots at the bottom and sides gently - do not bare-root the plant.
- Place the root ball so the crown sits at the same depth as before. Burying stems encourages rot on this soft herb.
- Backfill with fresh mix, tapping the pot and using a chopstick to settle soil around the sides without compacting the center.
- Water lightly until a small amount drains. Discard cachepot water immediately.
- Move to bright indirect light - not direct sun - and set up humidity support (pebble tray, dome, or bathroom shelf) for 10–14 days.
- Hold fertilizer for at least four weeks per the fertilizer guide. Fresh mix and disturbed roots do not need extra salts.
- Resume normal watering when the top 1–2 cm dries, following the watering guide rhythm - lighter at first, then normal as new growth appears.
For a worked example: a 10 cm nursery polka dot plant with roots circling the bottom upgrades to a 12 cm pot with roughly 2 cm of fresh mix below and around the intact root ball. Total time on the bench: 15–20 minutes. Recovery: mild wilt for 2–5 days, new speckled leaves in 2–4 weeks.
Preparing the root ball without bare-rooting
The goal of root teasing is to redirect growth, not to destroy the root ball. Polka dot plant relies on fine root hairs for water uptake; washing every particle of old soil away strips those hairs and extends recovery time unnecessarily. Keep most of the original root mass intact while freeing the outer circling layer. If roots are densely matted at the bottom, you may slice 1 cm off the lowest edge with a clean knife to stimulate new white tips - avoid removing more than one-third of total root mass unless you are rescuing rot.
Center the plant so it stands without wobbling. A wobbly repot usually means insufficient backfill beneath the root ball or a pot that is too tall for the shallow root depth. Add mix under the ball, not just around the sides, until the plant sits firmly. The first watering settles mix and closes small air pockets; if the soil level drops noticeably, top up before roots grow into empty space.
Common Mistakes to Avoid
Most repot failures on polka dot plant trace back to container size, root handling, or dry air - not mysterious species quirks.
Oversize pots and wet soil
A large pot holds moisture around roots the plant cannot use yet. The result is often root rot before the foliage fills the new space. One pot size up is the safe rule for shallow-rooted fast growers. If you already jumped too large, water only when the top 2–3 cm is dry, ensure maximum drainage airflow, and consider tipping back into a correctly sized pot if wilting persists beyond three weeks.
Bare-rooting shallow roots
Stripping all old soil from fine fibrous roots removes the root hairs that absorb water. Keep most of the original root ball intact; tease only the outer circling layer. This matters more for polka dot plant than for woody houseplants because the root mass is shallow and the plant wilts visibly within hours if hairs are damaged and humidity is low.
Other mistakes to skip: fertilizing immediately after repot (burns tender roots), repotting during a bloom spike when energy is diverted upward (pinch flowers first per RHS), and placing the plant in direct sun during recovery (fades speckling and scorches soft leaves).
Recovery Timeline and Humidity After Repot
Mild transplant shock - slight wilt, one or two dropped leaves - usually clears within 1–2 weeks on polka dot plant if humidity and temperature are adequate. Full root re-establishment takes 4–6 weeks in warm, bright conditions. New speckled leaves are the clearest success signal; older damaged leaves will not regain pattern but should not continue declining.
Raise humidity for the recovery window: pebble tray with water below pot level, grouping pots together, or relocating to a steamy bathroom during shower hours. Avoid radiators and HVAC vents that strip moisture. If wilting persists beyond three weeks with sour soil smell or spreading yellowing, unpot and inspect for rot or an oversized container rather than waiting indefinitely.
Adjust watering after repot: fresh mix holds moisture differently than exhausted soil. Check the top 1–2 cm with your finger rather than assuming the old schedule still applies. The overview guide covers how polka dot plant fits into a broader care routine if you are new to the species.
Pinching and Shape After Repot
Repotting gives roots room; pinching gives the plant shape. RHS recommends pinching shoot tips and removing flowers to encourage bushiness and prevent leggy growth. After repot, wait until the plant shows one set of new firm leaves - usually 10–14 days - before pinching if the plant was healthy going in. If the plant was already leggy before repot, pinch the tallest stems at repot time so energy redirects to lower nodes once roots stabilize.
Repotting alone will not restore compact form on a post-flowering leggy plant. You need pinching or cuttings. Flowering is a signal that the plant is shifting lifecycle; removing spikes promptly keeps foliage colourful longer. For detailed pinching schedules, see the pruning guide.
Pet and Child Safety During Repot Work
The ASPCA lists Hypoestes phyllostachya as non-toxic to cats, dogs, and horses, though large ingestions may cause mild vomiting or diarrhea. Non-toxic does not mean repot mess is safe - keep pets away from spilled mix, trimmings, and unstable pots on the bench. Contact your vet if symptoms persist after ingestion.
Conclusion
Polka dot plant repotting is not a three-year calendar event - it is a response to fast growth and shallow roots outgrowing small pots, especially nursery containers. Inspect roots in spring, go one size up with the defined soil mix, keep humidity near 50–70% during recovery, and pinch after the first new leaves to preserve compact speckled form. Skip oversize pots, bare-rooting, and winter repotting unless the plant is clearly suffering. When new patterned foliage returns within a month, the repot worked; when wilting lingers, check pot size, moisture, and root health before changing light or fertilizer again.
When to use this page vs other Polka Dot Plant guides
- Polka Dot Plant overview - Start here for whole-plant context before deep-diving this topic.
- Polka Dot Plant problems hub - Jump to symptom-specific fix guides when this care topic does not resolve the issue.
- Root Rot on Polka Dot Plant - Escalate here when repotting adjustments are not enough.