How to Propagate Polka Dot Plant: Water Cuttings Guide
How to Propagate Polka Dot Plant: Water Cuttings Guide
How to Propagate Polka Dot Plant: Water Cuttings Guide
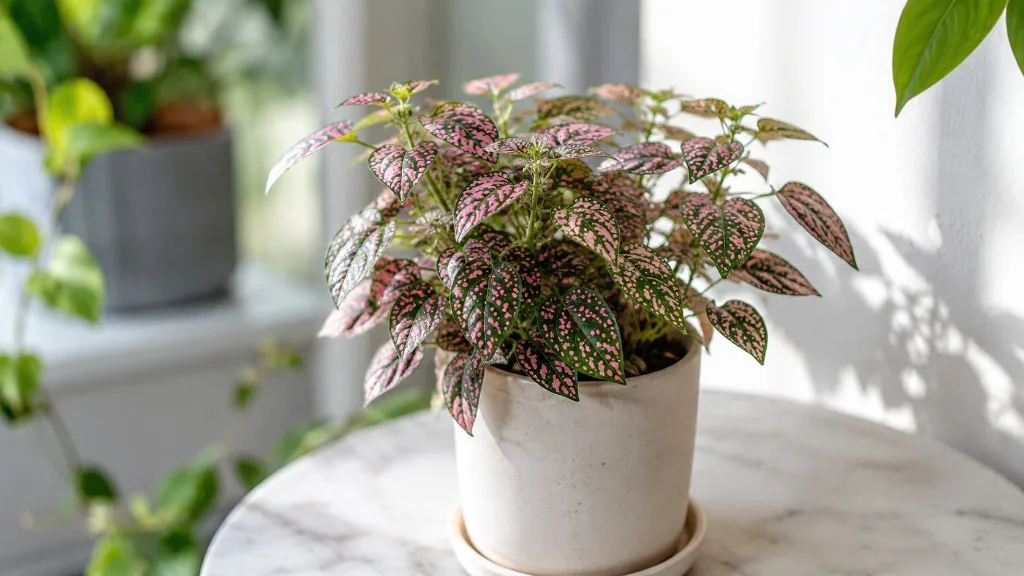
Polka dot plant propagation is the practical way to keep pink, red, and white speckles in your home after the parent pot fades. Hypoestes phyllostachya - the freckle face or measles plant sold in vivid nursery flats - is an herbaceous Acanthaceae perennial from Madagascar that grows fast, roots easily from soft stems, and often declines once it finishes flowering indoors. The North Carolina Extension Gardener Plant Toolbox lists stem cuttings and seed as recommended propagation strategies; for most houseplant growers, stem cuttings in water are the fastest path to a true color copy of the parent. Seeds work but produce variable spotting, and division suits only mature multi-stem clumps.
The workflow that succeeds most often at home: pinch a bushy parent, take a 3–4 inch tip cutting with two nodes, strip lower leaves, place the bottom node in a clear jar of room-temperature water in bright indirect light, refresh the water every few days, and pot into moist mix once roots reach about an inch long. At typical indoor warmth of 18–27°C (65–80°F), visible roots often appear in 7–14 days. This guide walks through that process step by step, plus soil rooting, seed sowing, pinching strategy, color preservation, salvage propagation after flowering, and what to do when cuttings rot or stall.
Guide by sai-ananth. Reviewed against NC State and RHS Hypoestes profiles by LeafyPixels Review Board.
Why Propagate Before the Parent Declines
Indoors, polka dot plant is often a short- to medium-term display plant, not a decades-long specimen. The Missouri Botanical Garden Plant Finder notes that gardeners frequently remove flower spikes because they detract from the foliage - and there is a stronger indoor reason. Once the plant commits heavily to lilac tubular flowers on upright spikes and sets seed, vegetative growth often slows and the whole pot can look tired within weeks. Propagation is insurance: you clone healthy tissue while the parent still has firm green stems and vivid variegation, then rotate fresh rooted cuttings into display pots as older plants finish their cycle.
That lifecycle context changes timing. Do not wait until the parent is yellowing, fully flowered, and leggy to take your only cutting. Start when stems are firm, leaves are hydrated, and you have not yet let multiple flower spikes mature. If you see the first spike, snip it, pinch the tip, and take two or three backup cuttings the same week. The goal is not infinite lifespan on one root ball - it is uninterrupted color on your shelf.
Best Propagation Methods Compared
All viable methods for Hypoestes phyllostachya are vegetative or seed-based; there are no offsets, rhizomes, or succulent leaf pads to pull. The RHS growing guide lists division of large clumps, seed sowing, softwood stem-tip cuttings in compost, and water rooting on a bright windowsill. Here is how they compare for typical indoor growers.
| Method | Best for | Timeline (warm, bright home) | Color match to parent |
|---|---|---|---|
| Water stem cuttings | Beginners, visual rooting progress | Roots in 7–14 days; pot-up ~2–3 weeks | True clone |
| Soil stem cuttings | Dry air, less transplant shock | Roots in 10–14 days under humidity cover | True clone |
| Division | Mature multi-stem clump in spring | Immediate if roots intact | True clone |
| Seed | Experimentation, mixed containers | Germination 1–2 weeks; variable spotting | Variable |
Stem Cuttings in Water
Water propagation is the default recommendation because polka dot plant stems are soft, node-rich, and root quickly when submerged. NC State Extension instructs placing the cutting in water in a bright location - roots form soon after. You can watch progress daily, catch rot early, and pot only when root mass is obvious. The trade-off is a short acclimation period when moving to soil; keep humidity up for the first week after pot-up.
Soil Cuttings and Division
The RHS growing guide recommends softwood stem-tip cuttings about 5 cm (2 inches) long, severed just below a pair of leaves, inserted into moist peat-free compost and kept humid in a propagator or sealed clear bag until rooted. That method suits homes with chronically dry air where open water evaporates too fast. Division works in spring when a pot holds several stems with intertwined roots - separate gently so each piece has three or more stems, then pot individually. Skip division on a single-stem nursery liner; take tip cuttings instead.
Growing from Seed
Seed is legitimate but slower and less predictable for color. The RHS growing guide says to sow in spring onto moist compost, press seeds gently without covering because light stimulates germination, then prick out seedlings - noting that spotting intensity from seed can be variable. Cornell Home Gardening lists germination at 70–75°F (21–24°C) with emergence around 14 days. Use seed when you want a mixed tray of pinks and whites, not when you must replicate a specific cultivar.
When to Propagate Polka Dot Plant
Propagate during active growth - roughly spring through early autumn indoors - when light and warmth support cell division at the cut surface. The RHS growing guide specifies softwood cuttings in spring and summer; seed sowing also targets spring. Avoid taking cuttings from a plant in shock: just shipped, recently repotted with torn roots, drought-wilted, or fighting root rot on Polka Dot Plant. Stabilize the parent first using the watering and light guides, then propagate from the healthiest stems.
Pre-flowering material roots fastest. Stems with firm leaves and no open flower spikes have more energy for root initiation than stems already allocating resources to blooms. If spikes appear, remove them before cutting. You can propagate a plant that has flowered once, but expect slower rooting if lower leaves are yellowing and the base is weakening - take tip growth from the still-green upper section only.
Tools and Clean Setup
Gather supplies before you cut so stems do not sit out and wilt.
- Sharp scissors or snips sterilized with 70% isopropyl alcohol
- Clear glass or jar for water propagation - narrow openings support the stem upright
- Room-temperature water - tap is fine if you change it regularly; avoid hot or icy water
- Small pot with drainage holes and moist soil mix for pot-up
- Optional: clear plastic bag or humidity dome for soil cuttings or post-pot-up week
- Label if you are running multiple cultivars - pink and white root at similar speeds but you will want to track color
Work on a clean counter. Because the ASPCA lists polka dot plant as non-toxic to cats and dogs, propagation jars on a kitchen counter are safer than many colorful tropicals - still keep curious pets from knocking glasses over or chewing wet stems.
Water Stem Cutting Step by Step
This is the core procedure most readers need. Follow the steps in order; skipping node contact or leaving submerged leaves is what causes most failures.
Choose Material and Pinch the Parent
Select a stem with at least two nodes and healthy pink-, red-, or white-splashed leaves. Avoid woody, brown, or flowering-only spikes. One week before cutting, pinch the parent tip if the plant is leggy - NC State Extension recommends pinching leggy plants back to the second or third node to maintain compact form, and that same pinching session generates ideal cutting material. Water the parent the day before so stems are turgid, not drought-stressed.
How Deep to Submerge the Node
The most common water-propagation mistake on polka dot plant is submerging leaves or burying multiple nodes so upper foliage sits in stagnant water. Roots emerge from nodes - the slight bumps where opposite leaves attach - not from leaf tissue. Use this depth guide:
CORRECT (roots, no rot):
  [leaf] [leaf]  ← dry above waterline
  -------- water surface --------
  ● node         ← only bottom node submerged (~1 cm / ½ inch)
  |
  stem

WRONG (leaf rot):
  [leaf] submerged ← turns mushy in 2–4 days
  -------- water surface --------
  ● node
Submerge one node only, roughly ½ inch (1 cm) below the surface. If the jar is shallow and the next leaf pair would touch water, use a taller vessel or trim the cutting shorter while keeping two nodes on the stem above the waterline for backup re-cut if rot starts.
Cut, Strip Leaves, and Place in Water
- Identify a node - the slight bump where leaves attach opposite along the green stem.
- Cut just below a node with a clean angled or straight snip. Aim for a 3–4 inch (8–10 cm) tip cutting.
- Remove lower leaves on the bottom one or two nodes so nothing sits underwater - submerged leaves rot and foul the water within days.
- Leave two to four small leaves at the top for photosynthesis while roots form.
- Place the jar in bright indirect light - an east windowsill or a few feet back from south glass with a sheer curtain. Submerge only the bottom node per the depth guide above.
- Change the water every 3–5 days, or sooner if it smells, clouds, or grows slime. Rinse the stem briefly if biofilm forms.
Dated grow log at ~22°C (72°F): A pink-splashed 4-inch tip cutting taken Monday, 3 June shows first white root bumps by day 7–10 (10–13 June), measurable inch-long roots by day 14–18 (17–21 June), and is ready to pot by day 21 (24 June) when several roots hold the stem upright in the jar. Cooler rooms above 18°C still work but may add a week; dim rooms slow both rooting and color on new leaves.
When Roots Are Ready to Pot Up
Pot when roots are at least 1 inch (2.5 cm) long and preferably branched - not just a single hair-like tip. The RHS growing guide top tip: once cuttings have grown plenty of roots in water, pot them up. Use a small container with drainage, pre-moisten the mix, make a hole with a pencil, set the cutting so the former waterline sits at soil level, and firm gently around the stem. Water lightly to settle, then place in the same bright indirect light. Hold fertilizer for two to three weeks until you see new top growth. A loose clear bag over the pot for five to seven days raises humidity and eases the water-to-soil transition.
Salvaging Cuttings from a Flowering Parent
You missed the pre-flowering window - the parent is blooming, lower leaves are yellowing, and the base looks tired. Salvage is still possible if upper stems remain green and firm. Cut only from the top third of the plant, above any mushy or hollow stem tissue. Remove every open flower spike from both parent and cutting so energy shifts back toward rooting. Take three or more backup cuttings; salvage material roots more slowly and fails at higher rates than pre-flower stems.
Strip extra leaves on salvage cuttings - keep just one or two small leaf pairs so the weakened stem is not transpiring heavily while roots are absent. Run salvage jars in the warmest bright spot you have, often a bathroom windowsill where humidity is higher. If one cutting rots, re-cut the next node up on a sibling rather than waiting weeks on a single attempt. Once rooted, treat salvage clones like nursery-fresh plants: bright indirect light, weekly pinching, and immediate flower-spike removal so the new generation does not repeat the decline cycle.
Seed Sowing Step by Step
Choose seed propagation when you want multiple seedlings for a terrarium or mixed color bowl, accepting variable variegation.
- Fill a shallow tray or small pots with moist peat-free seed compost or fine potting mix.
- Surface-sow in spring - scatter seeds and press gently into the surface without burying. Light is required for germination per RHS seed guidance.
- Cover with a clear lid or plastic wrap to hold humidity at 70–75°F (21–24°C) per Cornell Home Gardening.
- Place under bright indirect light or a grow light - not direct sun that overheats the dome.
- Mist or bottom-water to keep the surface evenly moist, not soggy.
- Expect seedlings in 1–2 weeks; the first cotyledon leaves are green, and true leaves show spotting on the second set - matching NC State’s note that color appears on the first true leaves.
- Prick out when seedlings have two to three true leaves into individual small pots. Increase light gradually so spotting intensifies.
Rooting Environment: Light, Humidity, and Temperature
Rooting is not passive waiting - three environmental factors control speed and success.
Light: Bright indirect exposure drives photosynthesis in the remaining leaves while roots form. Too dim, and rooting stalls, stems stretch, and new growth emerges pale green. Too much direct sun through glass heats the water and scorches leaves. The RHS genus guide lists 18–27°C comfort and plenty of light for best leaf colour - apply the same to propagation stations.
Humidity: Hypoestes prefers humid air; the RHS growing guide recommends terrariums or steamy bathrooms because dry air browns leaf edges. Open-room water propagation still works in average homes, but a bathroom windowsill with bright light often outperforms a dry living room. After pot-up, humidity matters even more - pebble trays or a five-day bag cover reduce wilting.
Temperature: Keep cuttings above 12°C (54°F) minimum; the RHS growing guide sets that floor for the genus. Rooting is fastest in the 65–80°F (18–27°C) band per the RHS genus guide. Cold window ledges in winter slow rooting enough that beginners assume failure and discard viable cuttings too early.
Aftercare for New Propagated Plants
Newly potted cuttings need steady, boring care for the first month. Keep the mix evenly moist but not waterlogged - follow the surface-dry check rhythm in the watering guide. Avoid repotting again for at least six weeks unless roots circle the pot aggressively. Do not fertilize until new speckled leaves unfurl; then feed at half strength per the fertilizer guide.
Resume weekly pinching as soon as the stem has three to four nodes of new growth. Polka dot plant does not stay compact without pinching; the pruning guide covers the full schedule. Remove any flower spikes immediately on young clones - you are extending foliage life, not breeding seed on a backup plant.
If lower leaves yellow while the top stays firm, check that the pot is not staying wet in low light. Leggy new growth means the propagation station was too dim - move to brighter indirect light before the internodes lengthen.
Keeping Pink Speckles on Rooted Cuttings
Cuttings are genetic clones - a pink-splashed parent yields a pink-splashed child - but color intensity still depends on light after rooting. The University of Florida IFAS fact sheet notes that variegated foliage coloration responds to light level; the RHS growing guide warns that deep shade greens the leaves and harsh sun fades pigments. Rooted cuttings in dim corners often push solid green new leaves even though the parent was vivid at purchase.
Place new plants where they receive medium to bright indirect light most of the day - the same placements recommended in the light guide. Judge success on the newest leaf pair, not older leaves from the cutting. Pink, red, and white cultivars all root similarly; Hippo and Confetti series cuttings follow the same water protocol as classic pink-green forms.
Signs Propagation Is Failing
| Symptom | Likely cause | Fix |
|---|---|---|
| Mushy stem at waterline | Submerged leaves or stagnant water | Re-cut above firm tissue; fresh water; strip all submerged foliage |
| Sour or cloudy water | Bacterial bloom | Change water; wash jar; cut ¼ inch off stem end |
| Cutting shrivels, no roots | Low humidity, hot sun, or weak parent | Move to bright indirect light; take a new cutting from healthier stem |
| Blackened nodes | Rot from deep submersion | Shorten cutting; only one node underwater |
| Roots form but plant collapses after pot-up | Dry air shock or soggy mix | Humidity tent five days; verify drainage and surface-dry watering |
| White roots but no new leaves after 4 weeks | Too dim or too cold | Increase light and warmth; check roots are white, not brown |
When a cutting fails, discard it early and restart from clean material. Trying to salvage a mushy stem for weeks usually contaminates the water jar for the next attempt.
When Not to Propagate
Propagation is a backup plan, not emergency surgery. Do not propagate as your first response to severe root rot, active mealybug or aphid colonies, or a parent that is mostly yellow with soft stems - you will clone the problem. Stabilize or discard the parent, treat pests, and take cuttings only from visibly clean upper growth if any firm tissue remains.
Skip propagation during the first two weeks after a major repotting or after repeated drought wilts; let the root zone recover so cuttings taken from the canopy are not draining a stressed system. If the only healthy tissue is a single two-inch tip on a dying base, propagate that tip - but recognize you are salvaging, not multiplying a thriving plant.
Conclusion
Polka dot plant propagation is straightforward when you match the method to the biology: soft herbaceous stems, nodes that root in water within one to two weeks at room temperature, and a short indoor lifespan that makes cloning worthwhile before flowering decline. Take 3–4 inch tip cuttings with two nodes, submerge only the bottom node, pinch the parent for bushier regrowth, keep jars in bright indirect light at 18–27°C, change water every few days, and pot when roots reach about an inch. Seeds and soil cuttings are useful alternates; water cuttings remain the easiest entry point for preserving pink, red, and white speckles on a true genetic copy.
Start while stems are firm and pre-flowering, give rooted plants enough light to keep new leaves patterned, and pinch weekly so each generation stays compact. Because the ASPCA classifies polka dot plant as non-toxic to cats and dogs, you can root cuttings on an open counter with less worry than many tropicals - though you should still keep jars stable and out of reach of curious chewers. For pinching, light, and leggy-parent recovery, see the pruning, light, and leggy growth guides. Propagate early, propagate often, and treat each rooted cutting as the next display pot before the last one fades.
Reviewed by LeafyPixels Review Board, 2026-06-15. Propagation steps checked against NC State Extension and RHS Hypoestes growing guidance.
When to use this page vs other Polka Dot Plant guides
- Polka Dot Plant overview - Start here for whole-plant context before deep-diving this topic.
- Polka Dot Plant problems hub - Jump to symptom-specific fix guides when this care topic does not resolve the issue.