How to Propagate Oxalis Triangularis: Division and Seed
How to Propagate Oxalis Triangularis: Division and Seed
How to Propagate Oxalis Triangularis: Division and Seed
How Oxalis Triangularis Spreads in Nature
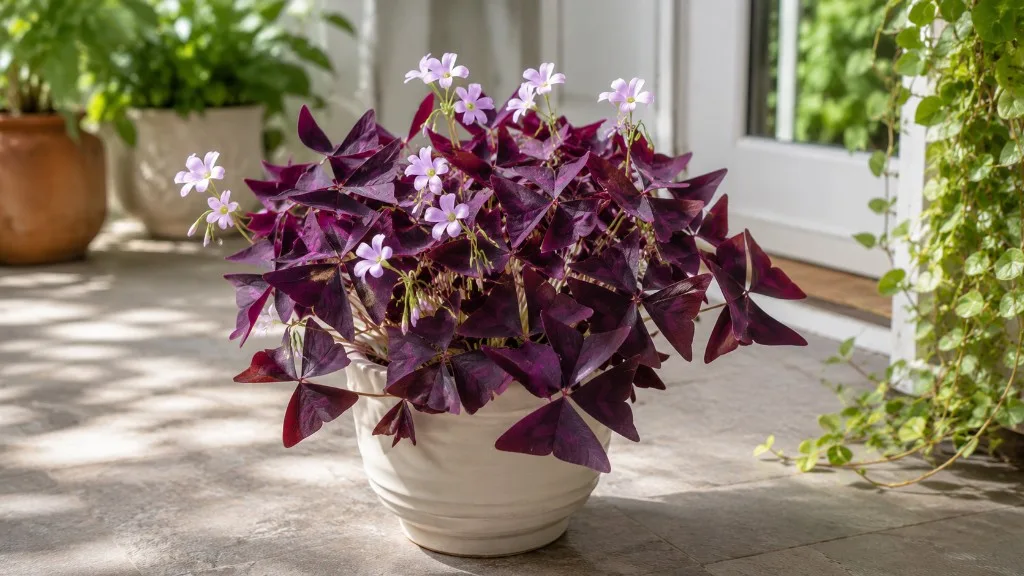
Oxalis triangularis - the plant most people call purple shamrock or false shamrock - is a tuberous perennial geophyte native to South America, especially Brazil. In the wild it survives seasonal stress by retreating into underground corms (often described as bulbs or tubers in casual houseplant guides) and re-emerging when warmth and moisture return. Over time a single plant does not stay single for long. The mother corm produces smaller offsets - sometimes called cormels - and short connecting tissue that builds into a dense cluster beneath the soil line.
That natural habit is the entire story of oxalis triangularis propagation indoors. You are not coaxing roots from a detached leaf the way you might with a pothos or philodendron. You are separating pieces of a storage-organ system that already contains the buds, energy reserves, and - in many cases - active roots needed to restart growth. NC State Extension describes division during dormancy or at the start of the active season as the standard propagation route, with propagation by dividing the rhizome or breaking off scale leaves.
The plant’s famous nyctinasty - triangular purple leaves folding at night and opening by day - is unrelated to propagation, but it signals that you are working with a living, responsive organism rather than a static foliage stick. Healthy corms push firm new stems quickly once conditions suit them. Weak or rotting corms sit in damp soil and decline quietly until the whole pot smells wrong. Propagation succeeds when you respect that biology instead of forcing the plant into methods designed for stem-rooting species.
Understanding Corms, Rhizomes, and Offsets
Before you cut or pull anything apart, it helps to know what you are actually looking at in the root zone. Oxalis triangularis stores food and dormant buds in scaly, pinecone-shaped corms - modified stem bases, not true bulbs in the onion sense, though the practical advice is the same. Fine roots emerge from the base of these corms, and older plants often show connecting rhizome-like tissue between adjacent corms in a cluster. Houseplant guides sometimes use “bulb,” “tuber,” and “corm” interchangeably for Oxalis Triangularis overview; what matters for propagation is that each viable piece includes intact corm tissue with at least one growth point, not a loose fragment of dead scale.
Corm offsets - the small cormels clustered around a larger mother corm - are genetically identical copies of the parent. They may be no larger than a pea when you first notice them, but given a season of good light and restrained watering they swell and produce full-sized foliage. A division at repot time might mean splitting a dense cluster into two or three multi-corm sections, each with roots attached, or it might mean teasing off individual cormels for separate pots. The scale differs; the underlying principle does not.
Healthy corms feel firm, show clean tan to brown outer scales, and resist gentle pressure. Mushy, blackened, or hollow-feeling corms are past saving - discard them rather than planting rot into fresh mix. If you unwrap a root ball and find more corms than you expected, that is normal for a mature purple shamrock and a sign that periodic division keeps the plant vigorous rather than overcrowded.
Choosing the Best Propagation Method
The easiest way to propagate oxalis triangularis is corm cluster division at repot time, ideally when the plant is dormant or just waking from dormancy. NC State Extension lists division as the recommended propagation strategy for this species. Separating individual corm offsets is nearly as reliable but slower to reach full display size, since tiny cormels have less stored energy and may need a full growing season before they look like the parent plant.
Active-growth division - splitting a leafy plant mid-season because the pot is crowded or you want to share divisions with a friend - works and is commonly done, but expect more transplant droop and a longer recovery window. The foliage may collapse for several days while roots re-establish; that is stress, not necessarily failure, as long as the corms stay firm and the soil is not waterlogged.
Seed propagation sits in a different category entirely. It is viable for advanced growers who accept slower timelines and uncertain outcomes with named cultivars, many of which are vegetatively propagated clones that may not come true from seed. Leaf and petiole cuttings, despite appearing in some casual blog posts, produce inconsistent results at best because a detached leaf lacks the corm bud tissue required to build a new plant. Water propagation is equally mismatched to this species - corms rot in standing water rather than rooting the way stem cuttings do.
| Method | Reliability | Speed to full plant | Best timing | Difficulty |
|---|---|---|---|---|
| Cluster division at repot | Very high | Fast (weeks) | Dormancy or early active growth | Easy |
| Individual corm offsets | Very high | Moderate (one season) | Dormancy or at repot | Easy |
| Active-growth division | High | Fast but stressed | Spring–early summer | Easy–moderate |
| Seed | Moderate (fresh seed) | Slow (months to a year) | Spring sowing | Advanced |
| Leaf or water cuttings | Low | Unreliable | Not recommended | Misleading |
If you own one healthy pot and want more plants without buying new corms, start with repot-time division. Reserve seed for when you deliberately want to experiment, have a known seed source, or are working with species-level stock rather than a specific purple cultivar.
When to Propagate Oxalis Triangularis
Timing for oxalis triangularis propagation is less about a fixed calendar date and more about where the plant sits in its growth cycle. The strongest window is late dormancy through early active growth - typically late winter into spring in the Northern Hemisphere, though indoor plants follow room conditions more than outdoor seasons. During dormancy the foliage has died back or yellowed, metabolic activity is low, and corms tolerate handling with minimal shock. Just as new pale shoots begin to emerge from the soil surface is equally good; you can see where growth is heading and avoid burying active crowns too deeply.
You can also divide during a scheduled repot in active growth, especially if the plant is root-bound, the pot dries unevenly, or you see corms pushing against the container walls. Choose a period when the plant has been well watered in the days prior - not soggy, not desert-dry - and when you can place divisions in Oxalis Triangularis light guide with some gentle morning sun afterward. Avoid dividing during heat stress, immediately after shipping, or while the parent is recovering from root rot on Oxalis Triangularis or severe underwatering on Oxalis Triangularis. Propagation multiplies healthy plants; it does not rescue dying ones.
Indoor purple shamrock plants may enter dormancy once or twice a year when light drops or watering slips, even without you planning it. Foliage yellows, stems collapse, and the pot looks empty for two to six weeks before new growth returns. That involuntary dormancy is an gift for propagation - the plant has already paused, and you can unpot, divide, and replant without fighting active transpiration from a full leaf canopy. If your plant never goes fully dormant, spring repot division still works; just expect a brief wilt period while roots settle.
Tools and Materials You Will Need
Propagation for this species is tool-light but hygiene matters. Gather a clean sharp knife or scissors (wiped with 70% isopropyl alcohol), a hand trowel, and several small pots with drainage holes sized to the divisions you plan to make - usually 10–15 cm (4–6 inches) for multi-corm sections and 8–10 cm (3–4 inches) for individual offsets. Terracotta dries faster than glazed ceramic, which helps prevent corm rot on freshly planted material; plastic works if you adjust watering downward.
For the growing medium, use standard indoor potting mix amended with 20–25% perlite for drainage. Oxalis triangularis corms rot quickly in heavy, water-retentive peat mixes that stay wet for days. Target a slightly acidic to neutral pH around 6.0–7.0; exact pH tuning is rarely necessary if drainage is good. Have labels ready if you are splitting cultivars or experimenting with seed - purple and green forms look similar when dormant.
Optional but useful: a soft brush to remove old soil from corm clusters without tearing roots, newspaper or a tray to work over, and a clear humidity dome only if you are sowing seed (not for established corm divisions, which need airflow more than extra humidity). Gloves are optional; the plant contains oxalates and the ASPCA lists Oxalis spp. as toxic to cats, dogs, and horses, so wash hands after handling if you have cats or dogs that chew plants.
Method 1: Dividing Bulb Clusters at Repot Time
Dividing bulb clusters at repot is the method most home growers should default to. It combines propagation with routine maintenance - refreshing depleted mix, inspecting corms for rot, and giving each section room to grow - so you solve two problems in one session. The goal is not to create the maximum number of tiny pieces but to produce a few vigorous divisions, each with multiple healthy corms and a functional root system.
Signs Your Plant Is Ready to Divide
A purple shamrock ready for division usually tells you in advance. The pot may be root-bound, with corms visible near the drainage holes or the soil surface heaving upward. Water may run straight through dry pockets while other areas stay wet, a sign that the corm mass has outgrown the container. Growth can stall even under good light because crowded corms compete for space and nutrients. If you planned a repot anyway because the mix has broken down - turning dense, sour-smelling, or hydrophobic - treat that as your propagation trigger even if the plant still looks fine above soil.
During dormancy, readiness is simpler: foliage has died back and you can unpot without tearing living leaves. Active-growth readiness shows as multiple crown points pushing from the soil, indicating several corm clusters sharing one pot. You do not need a massive mother plant to divide; even a two-year-old specimen often hides a surprising number of cormels beneath a modest leaf display.
Step-by-Step Division During Repot
Start by watering lightly one to two days before if the plant is in active growth, so the root ball holds together without being mud. Slide the plant from its pot and brush or rinse away loose old mix until you can see the corm cluster clearly. Working over a tray, gently tease corm groups apart with your fingers first - most clusters separate along natural fracture lines with minimal force. Use a clean knife only where tissue resists gentle pulling, and cut through connecting rhizome tissue rather than crushing corms.
Discard every mushy, odoriferous, or shriveled-dry corm on sight. Each division you keep should include at least two to three firm corms and a portion of roots; larger divisions recover faster and look presentable sooner. Trim broken roots cleanly with sterilized scissors, but do not bare-root the entire mass unless rot forces you to - leaving some original soil around roots reduces transplant shock. Pot each division immediately; corms should not sit exposed on the counter for hours.
Choose a new container one size up from what each division needs - roughly 2–5 cm wider in diameter than the corm mass - rather than one oversized pot for everything. Oversized pots hold excess moisture around small root systems and are the most common reason freshly divided oxalis triangularis rots instead of rooting. After potting, water lightly once to settle mix around roots, then wait until the top 2–3 cm of soil approaches dry before watering again.
Potting Depth and Spacing for Divided Clumps
Planting depth matters more for this species than many houseplant guides suggest. Set corms so the top of the largest corm sits roughly 2.5–4 cm (1–1.5 inches) below the soil surface, with the narrow, pointed end oriented upward when you can identify it. Oxalis triangularis is forgiving if a corm lands sideways - it often rights itself - but consistent upward orientation speeds even emergence. Burying too shallow exposes corms to drying and temperature swings; burying too deep delays shoot emergence and keeps moisture against scales longer than necessary.
Space multiple corms in one pot 3–5 cm (1–2 inches) apart if you are starting a fuller display intentionally. Single-corm divisions belong in small individual pots where you can control moisture precisely. Firm the mix lightly around corms without compacting it into a brick; aeration prevents the anaerobic conditions that precede rot. Place pots in bright indirect light with some direct morning sun - matching mature plant preferences - and expect new shoots within two to four weeks under typical indoor warmth of 15–24°C (60–75°F), as Michigan State University Extension notes for stored corms replanted about 1 inch beneath the soil.
Method 2: Separating Corm Offsets
Corm offsets are the small replica corms forming around an established mother. Separating them is propagation at a finer scale: more pots, smaller initial plants, and slightly longer wait times, but the same high success rate when corms are firm and planted correctly. This method suits growers who want to trade or gift single starter plants, fill out a shallow bowl arrangement, or rescue crowded cormels before they compete themselves into slow growth.
Finding and Handling Cormels
When you unpot a mature false shamrock, look for pea-sized or smaller corms clustered at the base of larger ones, sometimes connected by thin tissue, sometimes already loose. These cormels may lack visible roots; that is acceptable if the corm itself is plump and unscarred. Very tiny offsets - smaller than a chickpea - can be planted but may stay dormant longer or produce thread-thin first shoots that need patience.
Handle cormels by the body, not by tugging attached roots from the mother corm. If a cormel resists separation, leave it attached to a larger piece rather than tearing the basal plate. Damaged growth points on corms rarely recover. After separation, let large cut surfaces dry for two to six hours on a paper towel in shade if you had to knife through shared tissue; small naturally detached cormels can go straight into mix.
Inspect offsets under the same rules as cluster divisions: firm texture, no black spreading lesions, no sour smell. A healthy offset may look insignificant compared to the showy purple foliage it will eventually produce; that size mismatch surprises first-time propagators but is normal for geophytes.
Planting Individual Offsets
Pot each offset in a small container with excellent drainage, using the same perlite-amended mix as mature plants. Plant one cormel per pot unless you deliberately want a fuller starter clump, because singles make moisture management easier. Depth follows the same 2.5–4 cm below surface guideline; tiny corms may sit slightly shallower but should not rest on the surface where they desiccate.
Water sparingly after planting - enough to moisten the mix, not to saturate it repeatedly while no leaves are transpiring. The first sign of success is a thin purple stem pushing through soil, often before roots feel anchored if you tug gently (and you should not tug often). Offsets may take three to six weeks to show top growth if they are small or the room is cool; warmth and consistent bright light shorten that window. Do not fertilize until the new plant has several open leaves and the pot dries on a normal rhythm.
Method 3: Growing From Seed for Advanced Growers
Growing oxalis triangularis from seed is the slowest and least predictable home propagation route, which is why it belongs in the advanced category rather than the default recommendation. It rewards patience and careful environmental control, and it teaches how the species reproduces sexually - but many indoor plants never set seed, and hybrid or clonal cultivars may not breed true, meaning seedlings can differ in leaf color, size, or vigor from the parent you know.
Seed Viability and Cultivar Expectations
Viable seed comes from pollinated flowers on plants that are genetically capable of setting seed. Many commercially sold purple shamrock pots are vegetative clones propagated by corm division at the grower level; they flower indoors but may not produce fertile seed without cross-pollination between genetically distinct plants. If you collect seed from your own plant, treat it as an experiment with unknown genetics unless you controlled pollination.
Fresh seed germinates best. Older seed or seed stored warm and dry for months may still sprout but at lower rates. NC State Extension lists seed as a recommended propagation strategy alongside division, though home growers most often divide corms for reliable purple clones.
Set expectations clearly: seedlings may take a full growing season to resemble mature corms in leaf size, and purple foliage intensity can develop slowly. Seed propagation is for curiosity, breeding interest, or bulk starting - not for duplicating a prized cultivar you already own. For that, divide corms.
Sowing, Germination, and Seedling Care
Sow in spring when ambient temperatures stay above 15°C (60°F) and days are lengthening. Use fine seed-starting mix or potting mix sifted to remove large chunks, pre-moistened so it holds together when squeezed without dripping. Scatter seeds 2–3 cm apart and cover lightly with 3–6 mm (⅛–¼ inch) of mix - oxalis seed wants darkness at the soil interface, not buried deep. Mist the surface and cover the tray with a clear dome or plastic wrap to hold humidity.
Maintain 70–75°F (21–24°C) bottom heat if possible with a heat mat; germination commonly takes two to four weeks, though some lots sprout in a week and others take five. Open the dome daily for a few minutes to exchange air and prevent mold. Keep the surface consistently moist but not waterlogged - a spray bottle beats heavy pouring at this stage. Once seedlings show two true leaves, remove the dome and move them to bright indirect light, thinning weaker duplicates if multiple sprouted in one cell.
Transplant seedlings into individual small pots when they are large enough to handle, treating them like tiny corm plants: excellent drainage, light watering, no fertilizer for the first month. Harden off gradually from dome conditions; sudden full sun scorches delicate new leaves. Seed-grown plants are satisfying but unhurried - compare that timeline to corm division, which gives you a recognizable plant within weeks, and choose accordingly.
What Not to Try: Leaf Cuttings and Water Propagation
Leaf cuttings for oxalis triangularis propagation appear in scattered forum posts and occasionally in generic houseplant articles, but they are not a dependable primary method. A detached triangular leaf can produce adventitious roots in moist soil or water under humid conditions, yet it lacks the corm bud tissue needed to generate a stem, new leaves, and a storage organ. You may end up with a rooted leaf that persists for weeks before rotting, or with nothing at all. Stem sections with a partial corm base occasionally succeed - that is essentially a tiny division, not a true leaf cutting - but petiole-only attempts waste time.
Water propagation fails for the same structural reason and adds rot risk. Corms and corm clusters submerged or sitting in standing water soften and decay rather than rooting like pothos nodes. If you see photos of “purple shamrock in water,” look closely: successful cases usually involve solid corm tissue at the base, not a leaf floating alone. For consistent results, keep corms in barely moist, airy mix after division.
Also skip propagation as a panic response to yellowing leaves, root rot, or pest infestation. Stabilize or discard affected tissue first; only propagate from firm, healthy corms that show no sign of fungal damage. Sharing divisions is generous; sharing hidden thrips or bulb rot is not.
First-Month Aftercare for New Plants
Newly propagated oxalis triangularis needs steadier, simpler care than a mature specimen tolerates. Light should match established plants: bright indirect exposure with some direct morning sun, avoiding harsh midday rays on a division that may temporarily lack full leaf cover. Temperature in the 15–24°C (60–75°F) range supports root activity; cold windowsills below 13°C (55°F) slow recovery and encourage dormancy you did not plan.
Watering is the skill that separates success from rot. After the initial settling drink, let the top 2–3 cm of mix dry before watering again - roughly every five to eight days in active growth, adjusted for pot size and humidity. Divisions without much leaf surface use less water than a full canopy; when in doubt, wait an extra day. Nearly stop watering if a division enters dormancy and foliage dies back; the corm is resting, not requesting daily moisture.
Hold fertilizer for at least four to six weeks or until new growth is clearly self-sustaining. Fresh mix usually carries enough nutrient for small starts, and salt buildup from eager feeding burns tender new roots. Average household humidity 40–50% suffices; misting leaves is unnecessary and can encourage fungal spotting. Do not repot again during the first month unless you discover rot - let roots anchor undisturbed.
Success looks like firm new stems, unfolding triangular leaves with normal purple color (given adequate light), and a pot that begins drying on a predictable rhythm. Mild post-division droop for two to five days is normal, especially after active-growth splits; leaves should recover orientation unless corms are rotting. New growth is a better indicator than daily digging to inspect roots.
Troubleshooting Failed Propagations
When oxalis triangularis propagation stalls, the cause is usually moisture, depth, or starting material - not mysterious bad luck. Mushy corms mean too much water, poor drainage, or damaged tissue planted before callusing. Unpot, trim soft areas back to firm tissue if any remains, dust with cinnamon or simply discard if rot is advanced, and restart with healthy offsets rather than salvaging borderline corms indefinitely.
No emergence after four to six weeks suggests corms planted too deep, kept too cold, or dormant for another cycle. Gently scrape away a little top mix to check depth; if corms are firm, patience and warmth may be all that is needed. Completely shriveled corms indicate underwatering during a period when slight moisture was required - a rare mistake compared to overwatering on Oxalis Triangularis but possible in very hot, dry rooms with tiny pots.
Yellowing new leaves on an otherwise established division often trace to overwatering or low light, not failed propagation. Adjust those two variables before assuming the division failed. Pests transferred at division - especially fungus gnats in old wet mix - show up as sudden soil activity; replace the top layer or repot into clean mix if infestation is early.
If every corm in a batch rots, examine your pot size, mix, and watering cadence honestly before blaming the plant. Oxalis triangularis forgives many sins once established but punishes wet feet during the vulnerable weeks after division. Starting over with fewer, larger divisions in smaller pots beats repeating the same waterlogged setup.
Conclusion
Oxalis triangularis propagation is straightforward when you work with the plant’s corms instead of against them. Divide bulb clusters at repot time during dormancy or early active growth for the fastest, most reliable results. Separate corm offsets when you want more individual starters from a mature cluster. Treat seed as a rewarding but slow path for advanced growers who accept genetic variability. Plant firm corms 2.5–4 cm deep in well-draining perlite-amended mix, water sparingly until new growth proves the roots are working, and skip leaf cuttings and water jars that work on other houseplants but not on this one.
If your purple shamrock is healthy and crowded, your next scheduled repot is the propagation moment you already needed. Split cleanly, pot modestly, give bright light and restrained water, and you will likely have multiple thriving plants within a month - no special equipment required, just an understanding of what lies beneath the soil.
When to use this page vs other Oxalis Triangularis guides
- Oxalis Triangularis overview - Start here for whole-plant context before deep-diving this topic.
- Oxalis Triangularis problems hub - Jump to symptom-specific fix guides when this care topic does not resolve the issue.