How to Repot Purple Shamrock: Timing, Pots, and Corm
How to Repot Purple Shamrock: Timing, Pots, and Corm Division
How to Repot Purple Shamrock: Timing, Pots, and Corm Division
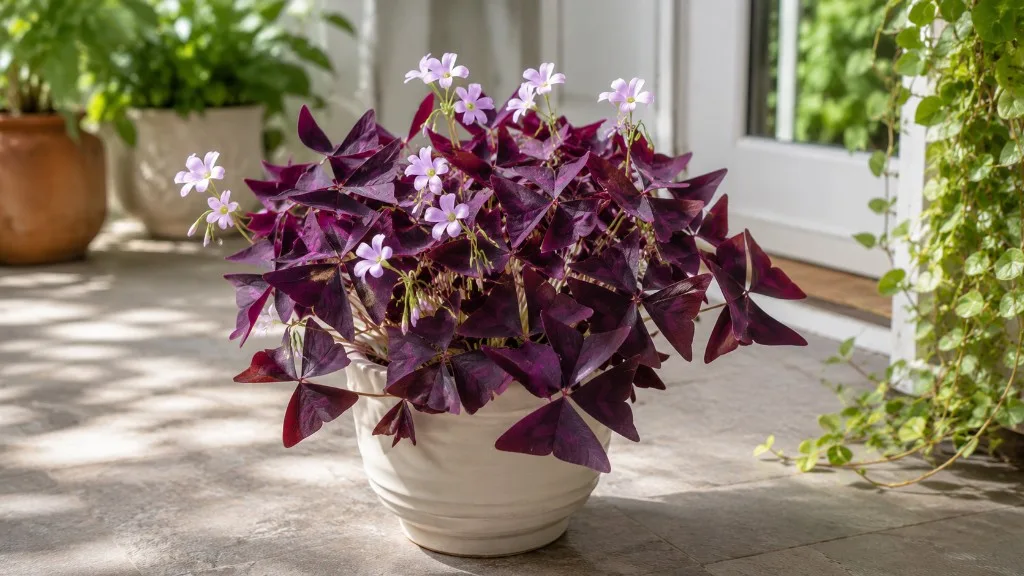
Oxalis triangularis, the purple shamrock or false shamrock, is one of those houseplants that looks delicate and behaves like a small underground engine. The triangular purple leaves fold and unfold with the light, the pink flowers appear on thin stems, and then - often without warning - the whole plant yellows, collapses, and vanishes above the soil line. That last part sends new growers into a panic, but it is usually dormancy, not death. The plant is resting on its corms, the small bulb-like storage organs that actually run the show. Repotting Oxalis triangularis is less about freeing circling fibrous roots and more about refreshing the soil around those corms, giving crowded offsets room to spread, and matching container shape to the way this Brazilian forest-floor species actually grows. Get the timing wrong and you fight the plant’s calendar for weeks. Get the pot wrong and the corms sit in cold, wet soil they never colonize. This guide covers the full repotting workflow: spring after dormancy wake-up, dividing crowded corms, choosing a shallow wide pot, and the dormancy timing notes that keep purple shamrock from becoming a recurring rescue project.
Why Repotting Oxalis Triangularis Is Different From Other Houseplants
Most repotting advice assumes a plant with a vertical root ball - fiddle-leaf figs, pothos, peace lilies - where you slide the root mass into a slightly taller pot and tease out circling roots. Oxalis triangularis breaks that template. It stores energy in corms clustered just below the soil surface, sends roots outward rather than deep, and multiplies by producing daughter corms and cormels around the parent. A mature pot is often less “root-bound” in the classic sense and more corm-crowded: dozens of firm nodules packed shoulder to shoulder, competing for the same depleted mix. Repotting here is three jobs at once. You refresh a mix that has compacted or salt-loaded over one to two years. You decide whether the clump stays together or gets divided into new pots. And you reset planting depth, because burying corms too deep is one of the fastest ways to delay spring emergence or invite rot.
The shallow root habit matters indoors. In its native range across Brazil and other parts of South America, Oxalis triangularis grows on the rainforest floor under dappled light - a low, spreading plant, not a deep taprooted specimen. Indoors, that translates to preferring horizontal space over vertical depth. A tall, narrow pot looks elegant on a shelf, but the lower half often stays wet long after the surface dries, which is exactly the condition corms hate. Repotting purple shamrock is therefore as much a container geometry decision as a soil decision.
Corms, Not Fibrous Roots
A corm is a compressed stem base that stores starch and water for the next growth cycle. On Oxalis triangularis, healthy corms feel firm, like a small boiled potato or a large pea, with a slightly pointed top and a broader base. Each corm can push up its own cluster of stems and leaves. Over time, the parent produces offsets connected by thin stolons or simply packed adjacent in the pot. When you unpot a two-year-old purple shamrock, you are often looking at a lattice of corms rather than a single central root crown.
That structure changes every repotting rule. You do not need a deep pot to “give roots room downward.” You need a wide, breathable zone near the surface where corms can sit at the correct depth - roughly 1 to 1.5 inches (2.5 to 4 cm) of mix above the top of the corm, with the pointed end facing up. Planting deeper than about 2 inches (5 cm) consistently slows emergence in horticultural guides and increases rot risk because the corm sits in soil that stays damp too long. Shallow planting without enough cover dries the corm out. The repot is your chance to correct depth across the whole clump, not just the one corm you can see at the surface.
When to Repot Oxalis Triangularis
Purple shamrock does not need annual repotting on a rigid calendar, but it does need attention on a seasonal rhythm tied to dormancy and active growth. Most indoor plants benefit from repotting every one to two years, or sooner when the pot is visibly overcrowded with corms, water runs straight through without absorbing, or new growth is stunted despite good light. For Oxalis triangularis specifically, the repotting window is narrow and worth respecting: late winter through early spring, as the plant wakes from dormancy or just before new shoots appear.
The Best Window: Late Winter Through Early Spring
The strongest timing for repotting Oxalis triangularis is at the end of dormancy or in the first weeks of spring growth - typically late February through April in the Northern Hemisphere, though your local indoor climate matters more than the calendar date. At this stage, corms have rested, energy reserves are replenished, and the plant is about to push new foliage. Division and fresh mix at wake-up minimize the idle time between repotting and visible recovery. NC State Extension recommends propagating by dividing the rhizome at repot time, with late winter (end of dormancy) and early spring (first new growth) as the ideal windows.
You can also repot during active growth in late spring to early summer if you missed the dormancy window - say, you bought a full plant in May and it is already root- or corm-crowded. The plant is robust then and recovers well, though you disturb more foliage and use more of the year’s energy than a dormant-season repot would. What you want to avoid is repotting as dormancy begins in late summer or fall, or mid-dormancy in early winter when the corms are resting and any unnecessary moisture or handling increases rot odds without giving you faster recovery.
Think of it as two green lights and two red lights. Green: late dormancy, just before shoots; early spring with tiny pink nubs visible; late spring repot at purchase if crowded. Red: mid-dormancy with no growth planned for months; peak summer heat stress; autumn as leaves yellow and the plant shuts down voluntarily.
Signs Your Plant Is Ready for a New Pot
Calendar timing gets you only partway there. The plant also signals when the current container is failing. Crowded corms pushing against the pot walls or lifting the soil surface are a clear cue - you may see multiple growth points competing in a pot that looked fine six months ago. Water that channels down the sides of the root ball and out the drainage hole within seconds, while the center stays dry, means the old mix has collapsed and the corm mass has displaced soil. Salt crust on the surface, sour-smelling mix, or slow drainage after a normal watering all point to a refresh, even if the plant still looks okay above ground.
Growth signals matter too. If spring arrives and shoots are smaller, paler, or fewer than last year despite Oxalis Triangularis light guide and appropriate watering, the corm cluster may be exhausted in depleted mix. Conversely, if the plant dries out within a day or two of every watering in a small pot, it may simply be underpotted - a common situation with fast-multiplying corms. Two or more of these signs together mean repotting is overdue. One sign alone might have another cause - low light stretches stems, overwatering on Oxalis Triangularis yellows leaves - so read the whole plant before you unpot.
Understanding Dormancy and Repotting Timing
Dormancy is the feature that makes Oxalis triangularis repotting different from repotting a philodendron in June. Purple shamrock cycles through active growth and rest indoors, often triggered by shorter days, cooler room temperatures, or simply the plant’s internal clock after months of continuous growth. Some plants go dormant in late summer or fall; others rest in winter. The foliage dies back, stems collapse, and the pot looks empty. The corms remain alive below the surface.
What Dormancy Looks Like Indoors
During dormancy, all or most leaves yellow and drop, stems wilt, and the plant stops responding to normal watering. This is not necessarily underwatering on Oxalis Triangularis, disease, or your fault - it is the corm pulling resources back underground. The correct response during active dormancy is to reduce watering dramatically, move the pot to a cooler, dimmer spot (roughly 50–65°F / 10–18°C is often cited as comfortable for resting corms, above freezing), and wait. Do not fertilize. Do not repot unless you have an emergency such as rot smell or a pot cracking from corm pressure.
End-of-dormancy looks different: the soil has been mostly dry for weeks, old stem bases are brittle and can be brushed away, and you may see small pink or white bumps at the soil surface - the first new shoots. That transition, late winter into early spring, is the premium repotting slot. You can lift the corms, divide, replant in fresh mix at correct depth, and place the pot back in bright indirect light. If shoots are already 1–2 inches tall, you can still repot, but handle the fragile new stems carefully and expect a brief pause while the corms re-anchor.
Why Mid-Summer and Mid-Dormancy Are Poor Choices
Repotting mid-dormancy - say, December when the plant has been leafless for six weeks and will not grow until March - adds moisture and disturbance without a recovery pathway. Fresh mix around resting corms that you then water “because that’s what you do after repotting” is a classic rot setup. If you must handle the plant then, dry repot: same mix refresh, minimal handling, no watering until spring shoots appear.
Mid-summer repotting during active heat and full foliage is viable for a healthy plant but stressful. Oxalis triangularis can enter early dormancy when temperatures stay above 80°F (27°C) for extended periods or when light drops. Michigan State University Extension notes that shamrock exposed to temperatures above 80 degrees can wilt and go dormant. Reserve summer repotting for clear emergencies: confirmed root or corm rot (mushy corms, sour soil), a pot so overcrowded that new growth has stopped entirely, or a nursery plant in waterlogged peat that cannot wait until spring.
Choosing a Shallow, Wide Container
The pot shape for Oxalis triangularis is not a minor aesthetic choice. Because corms spread outward and sit shallow, the ideal container is ** wider than it is deep** - a bulb pan, azalea pot, or low bowl with drainage holes often outperforms a standard tall nursery pot of the same volume. A 4–6 inch (10–15 cm) diameter pot suits a single clump or a modest division; larger displays that keep multiple corms together may need 8–10 inches (20–25 cm) of width while still staying relatively shallow - 4–5 inches (10–13 cm) deep is often enough.
Pot Size and Depth Rules
When sizing up, follow the one-step rule: increase diameter by only 1–2 inches (2.5–5 cm), not jump from a 4-inch pot to a 10-inch pot. Oxalis corms do not quickly colonize a large volume of unused soil. That empty, wet zone is where Pythium-style rots start. If the clump is crowded but you do not want a wider pot, divide corms into two or more containers instead of overpotting a single mass.
Depth has a hard ceiling tied to corm planting: after repotting, the top of the corm cluster should sit roughly 1 to 1.5 inches below the final soil surface. If your pot is very deep, fill the bottom with free-draining mix (never stones-only “drainage layers,” which do not work as advertised) and position the corms in the upper half. A shallow wide pot lets you achieve correct depth without wasting vertical space that would only hold stagnant moisture.
Drainage holes are mandatory. A decorative cachepot without holes is fine only as an outer sleeve; the plant itself lives in a draining inner pot. Oxalis corms rot quickly in standing water. After watering, empty saucers so the pot never sits in runoff.
Terracotta vs. Plastic for Corm Health
Unglazed terracotta pulls moisture through its walls, which helps prevent the surface-adjacent corm zone from staying soggy. It suits growers who tend to overwater or keep purple shamrock in moderate humidity. The trade-off is faster drying - you check moisture more often during active growth.
Plastic retains moisture longer and weighs less, which helps if you move pots to follow light or rotate for even growth. It works well for growers in dry homes who already wait for the top 2–3 cm of mix to dry between waterings. Glazed ceramic behaves similarly to plastic unless it is unglazed.
Neither material fixes bad drainage. A plastic pot with excellent mix and a careful watering hand outperforms terracotta filled with heavy peat that compacts after six months. Match material to your watering habits, not to Instagram aesthetics.
The Right Soil Mix for Oxalis Triangularis Repotting
Purple shamrock wants fast, predictable drainage with enough organic matter to hold a little moisture near the corms without waterlogging them. Heavy garden soil, moisture-retentive tropical blends, and straight peat without amendment are poor fits. A slightly acidic to neutral pH around 6.0–7.0 matches most quality potting mixes without requiring adjustment in typical indoor setups.
A Reliable Drainage-Focused Recipe
A mix that works reliably across climates starts with standard peat- or coco-based houseplant potting soil amended with 20 to 30 percent perlite, coarse sand, or pumice. NC State Extension recommends a loamy potting mix with good drainage for Oxalis Triangularis overview.
For a single repot, blend 3 parts potting mix + 1 part perlite in a bucket until uniform. Moisten slightly so the mix clumps when squeezed but does not drip. Optionally add a small portion of pine bark fines or orchid bark - roughly 10 percent of the total volume - to slow compaction over the next year or two. Avoid more than trace cocopeat in already humid homes; avoid straight cactus grit with no organic hold, which dries corms at the surface between waterings.
If you prefer bagged products, buy a quality all-purpose indoor mix and cut in extra perlite rather than using unamended mix straight from the bag. Most commercial blends are too dense for corm health long term. Refresh completely at repot - do not reuse old mix from a rotted or overcrowded pot unless you sterilize and restructure it, which is rarely worth the effort for a inexpensive soil volume.
How to Divide Crowded Corms During Repotting
Division is not optional maintenance on a fast-multiplying Oxalis triangularis - it is how you manage overcrowding, propagate new plants, and keep a single pot from turning into a crowded tangle of weak stems. The best time to divide aligns with repotting: end of dormancy or early spring, when corms are accessible and either dormant or just sprouting.
Inspecting, Separating, and Discarding
Unpot the clump and brush away loose old mix with your fingers or a soft brush. Work over a tray or newspaper - small cormels drop easily. Examine each corm: firm and plump means keep; soft, mushy, shriveled, or moldy means discard. Rot spreads in tight clusters, so one bad corm left behind can reinfect fresh mix.
Separation is usually by hand. Gently pull clusters apart along natural lines where stolons connect parent to offset. If a connection is stubborn, use sterilized scissors or a knife to cut the stolon, not the corm body. Each division needs at least one healthy corm; larger sections with three to five corms establish faster and look fuller in a display pot. Single tiny cormels grow, but they take longer to produce a showy plant.
Space divided corms 1.5 to 2 inches (4–5 cm) apart in a wide shallow pot if you want a dense future clump, or 3 to 5 cm if you want longer before the next division. Orient each corm pointed end up - if you cannot tell, plant on the side at correct depth; the corm will self-correct, though emergence may lag slightly. Never bury deeper than 1.5 inches of mix above the corm top; the 2-inch maximum depth rule from bulb-planting guides is a hard ceiling, not a target.
Step-by-Step Oxalis Triangularis Repotting
With timing, pot, mix, and division logic settled, the physical repot is straightforward. Move slowly - corms are tougher than leaves but softer than woody roots.
Removal, Placement, and First Watering
Gather supplies: shallow pot with drainage, fresh mix, small trowel, chopstick for settling soil, sterilized scissors, mesh or coffee filter for the drainage hole, watering can.
Optional pre-watering: If the plant is in active growth with leaves, water lightly one day before so the clump holds together. If the plant is fully dormant and dry, skip pre-watering.
Remove the plant: Tip the pot, support the soil mass, and slide it out. If stuck, run a knife around the inner rim. Do not pull living stems - dormant pots lift by the soil block alone.
Inspect and divide as described above. Trim only dead stem bases and rotted corm tissue; leave healthy corm mass intact.
Prepare the new pot: Cover the drainage hole with mesh. Add enough mix to the bottom so that when corms are placed, the top of the cluster will sit 1 to 1.5 inches below the rim after backfilling.
Set corms: Place divisions pointed end up, same orientation they grew before if visible. Backfill with mix, tapping the pot gently to settle without compacting. A chopstick works mix into gaps between corms. Leave about 1 inch (2.5 cm) of headspace below the rim for watering.
First watering - this is where dormancy timing matters:
- Fully dormant corms with no shoots: Do not water. Place in bright indirect light and warm room temperatures (60–75°F / 15–24°C). Water moderately only when new growth is clearly visible, usually within 2 to 4 weeks.
- Corms with emerging shoots: Water once, thoroughly, until a little runs from drainage holes. Let the pot drain completely. Then follow normal soak-and-dry rhythm - allow the top 2–3 cm to dry before the next drink.
- Active plant with full foliage (late spring repot): Water thoroughly once, keep in bright indirect light avoiding harsh afternoon sun for 7–10 days, and avoid fertilizing for 3–4 weeks.
Hold fertilizer until new growth is established and the plant has been in fresh mix at least a month during active growth. Fresh potting soil already contains starter nutrients; corms do not need a push while re-rooting.
Post-Repot Care and Recovery
Recovery expectations depend on whether you repotted at wake-up or during full growth. Spring dormant repots often show new triangular leaves within 2 to 4 weeks under good light. Active-growth repots may pause for 1 to 2 weeks - older leaves may wilt slightly while corms re-anchor - then resume.
Keep the plant in bright indirect light with some morning direct sun if available; purple coloration deepens with adequate light. Rotate the pot weekly for even growth. Do not mist as a humidity fix; it does little indoors and keeps foliage wet unnecessarily.
Watch for rot after repot: soft corms, soil that stays wet for days, or a sour smell mean you overwatered dormant corms or used too deep a pot. If caught early, unpot, cut away mushy tissue, air-dry an hour, and replant in dry mix with delayed watering.
Pet note: Oxalis species contain oxalates; the ASPCA lists Oxalis as toxic to pets if ingested in quantity. Keep repotting mess and discarded corms away from curious dogs and cats.
Connecting repotting to the rest of care keeps the plant stable. After recovery, return to regular watering when the top of the mix dries - roughly every 5 to 8 days in active growth, nearly stopped during the next dormancy. Repotting resets the soil clock; it does not replace good light or correct seasonal watering. Plan the next repot or division for one to two years out, or sooner if corms crowd the surface again.
Conclusion
Repotting Oxalis triangularis rewards you when you work with its corm biology and dormancy rhythm, not against them. The best window is late winter through early spring, as the plant wakes from dormancy or just as new shoots appear - not mid-dormancy in a dark corner, and not on a hot August afternoon unless rot or overcrowding forces your hand. Use a shallow, wide pot with drainage, go up only 1 to 2 inches in diameter, and refresh mix with potting soil plus 20 to 30 percent perlite. Divide crowded corms by hand at repot time, discard anything soft, plant 1 to 1.5 inches deep with the pointed end up, and withhold water on fully dormant corms until growth returns. Active plants get one thorough watering, a week of gentle light, and no fertilizer for a month. Done this way, purple shamrock fills its pot with deep purple foliage, survives the next dormancy cycle without drama, and gives you offsets to expand your collection or share - all from a repot that takes twenty minutes once you understand what the corms actually need.
When to use this page vs other Oxalis Triangularis guides
- Oxalis Triangularis overview - Start here for whole-plant context before deep-diving this topic.
- Oxalis Triangularis problems hub - Jump to symptom-specific fix guides when this care topic does not resolve the issue.
- Root Rot on Oxalis Triangularis - Escalate here when repotting adjustments are not enough.