Root Rot on Chrysanthemum: Causes, Checks & Fixes
Quick answer
Root rot on Chrysanthemum usually starts when shallow fibrous roots sit in saturated mix-especially foil-wrapped autumn gift mums watered daily in cool rooms. First step: stop watering, empty any saucer or wrapper runoff, and unpot today to check whether roots are firm or mushy.
Root Rot on Chrysanthemum: Causes, Checks & Fixes
This guide covers root rot on Chrysanthemum. See also the general Root Rot guide, watering, and light pages for this plant.
Root Rot on Chrysanthemum: Causes, Checks & Fixes
Quick answer
Root rot on Chrysanthemum (Chrysanthemum × morifolium) almost always traces to shallow fibrous roots sitting in saturated mix-not a random disease strike. Florist and garden mums have a dense, mounded habit with a vulnerable crown at the soil line. When drainage fails or watering outpaces evaporation, those surface roots lose oxygen and decay. Autumn gift mums in foil-wrapped pots are the most common indoor failure: cool rooms slow dry-down while daily watering to preserve blooms keeps the root zone wet.
First step: stop watering, empty any saucer or decorative wrapper runoff, and unpot the plant today. You need to see whether roots are firm and pale or brown and mushy before repotting, pruning, or fertilizing. Waiting for the surface to dry on its own rarely saves a mum once the crown has gone soft.
For the full moisture-check workflow, see our Chrysanthemum watering guide. Early wet-soil stress without advanced decay overlaps with overwatering-this page covers confirmed rot and crown failure.
For related Chrysanthemum care, see Chrysanthemum overview, Yellow Leaves on Chrysanthemum, Wilting on Chrysanthemum, Mold on Soil on Chrysanthemum.
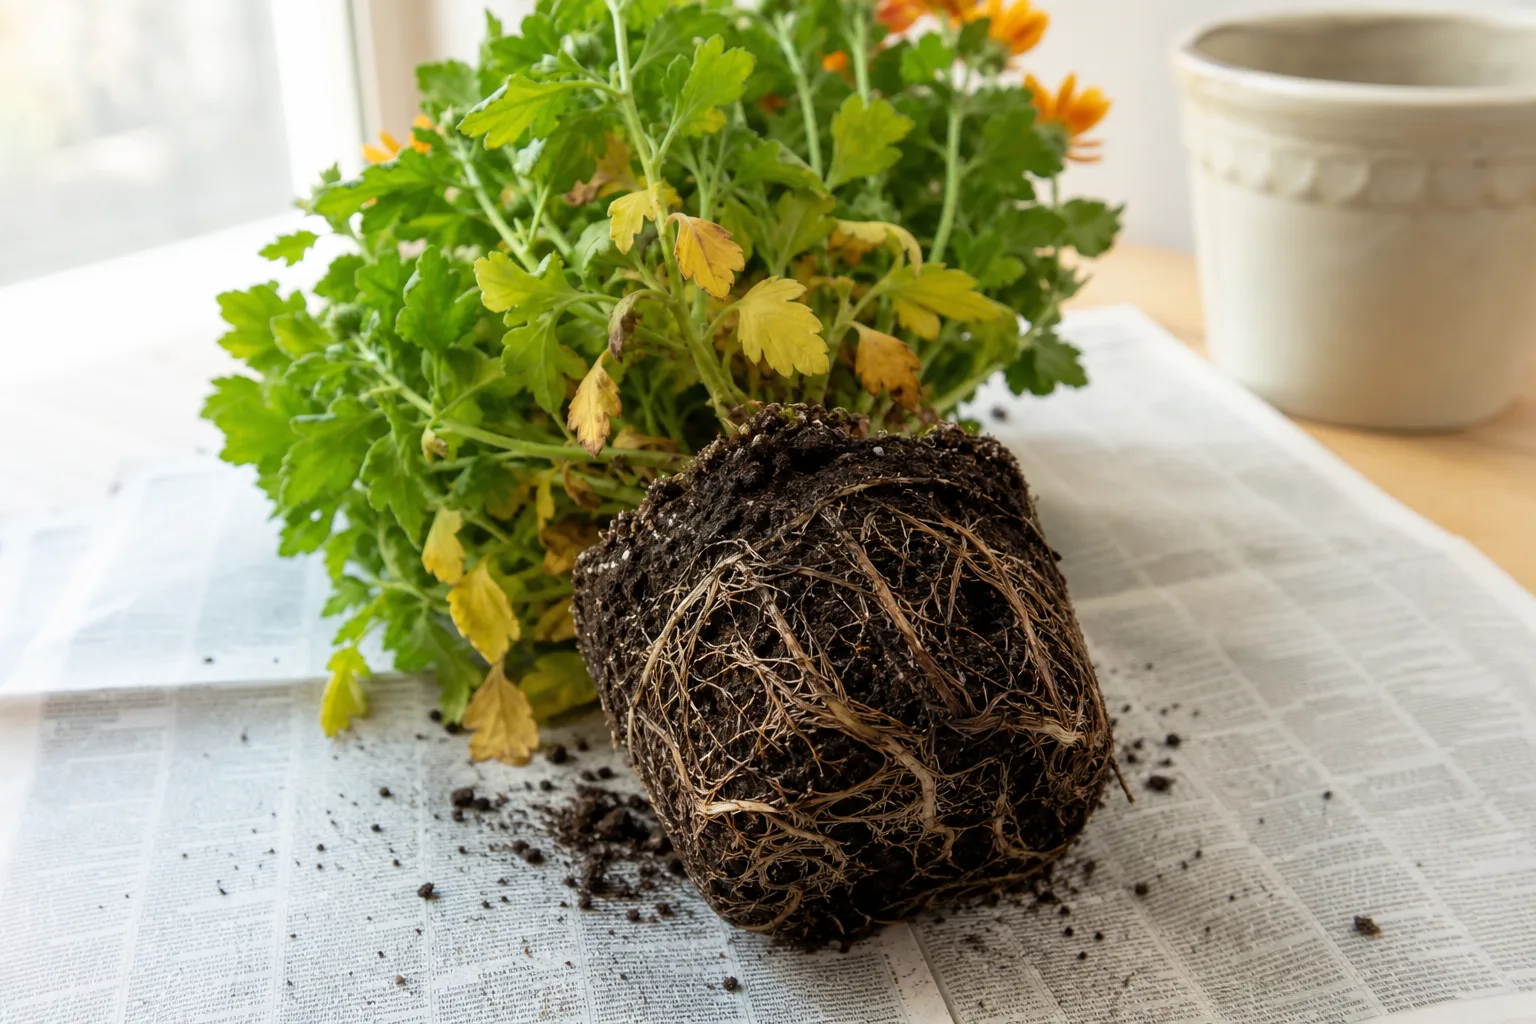
What root rot looks like on Chrysanthemum
Brown, translucent rotted roots slip off the central core - contrast with firm pale healthy tissue on the same root ball.
Above soil, rot mimics thirst on a plant that still has damp mix. Lower leaves yellow first, then droop or wilt even though the pot feels heavy-because damaged roots cannot move water upward. Open blooms may collapse while upper foliage still looks acceptable briefly. A sour or swampy smell from the drainage hole is a strong clue on potted mums.
The decisive checks are crown firmness and roots below soil. Healthy chrysanthemum tissue at the crown feels solid when you press lightly where stems meet the mix. Rot shows as:
- Soft, collapsing tissue at the soil line
- Lower leaves yellowing in a wave while the mix stays wet
- Limp foliage that does not perk after the pot has been damp for days
- Brown or mushy stems spreading up from buried bases
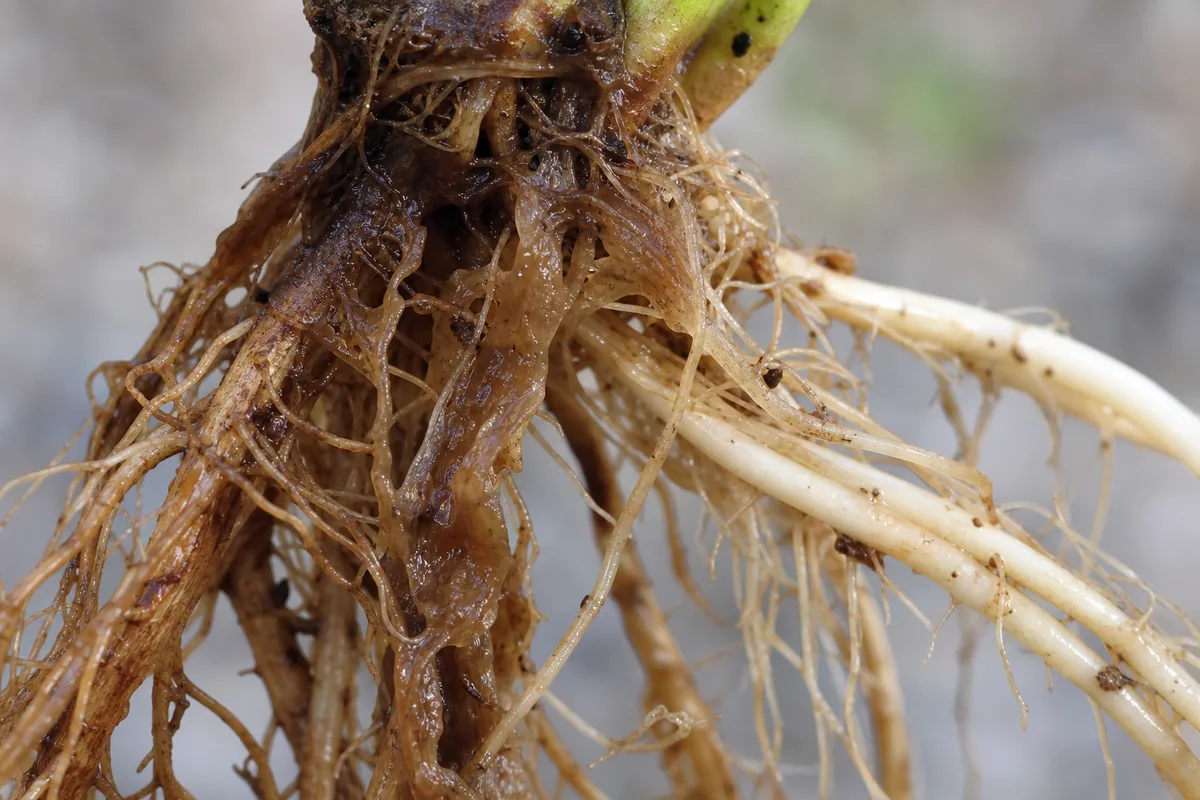
- Blackened outer root tissue that slips off, leaving a thin central strand
Below soil, infected roots turn brown, translucent, or slimy instead of firm and whitish. On mums, the outer cortex of smaller roots can peel away easily-a pattern growers call rat-tailing when Pythium is involved.
Normal lookalikes: Chrysanthemums naturally shed older lower leaves occasionally on a firm plant. That single yellow leaf with dry upper soil and a light pot points to age or underwatering on Chrysanthemum-not rot. Rot is limp leaves plus wet mix plus soft roots or crown, not one cosmetic blemish alone.
Why Chrysanthemum gets root rot
Chrysanthemums are cool-season bloomers with shallow, fibrous roots that need steady moisture during display but cannot tolerate wet feet. The same biology that makes porch mums spectacular in October makes them vulnerable when culture keeps pore spaces filled with water.
Shallow roots and saucer saturation
Fibrous roots sit close to the soil surface in containers. They absorb water quickly when mix is evenly moist and aerated, but they suffocate when the upper zone stays saturated. A mum in a 10-inch display pot can lose most of its functional root mass in days if a saucer, foil sleeve, or cachepot holds standing water against the root ball. Clemson HGIC notes that overwatering causes yellowing leaves that blacken and drop, while drought produces woody, stunted growth-the wet-soil pattern is the rot pathway.
Autumn pot mums in cool indoor rooms
Store-bought mums in October often arrive in small nursery pots inside decorative foil. The wrapper looks polished on a porch step but frequently blocks drainage holes or traps runoff. Cool autumn air slows evaporation, so growers who water every morning to keep blooms fresh can keep the root zone wet for a week without realizing it. NC State plant pathology reports that Pythium root rot on mums peaks in late summer through autumn when soil moisture stays high and roots function poorly.
Heavy mix, blocked drainage, and bloom-pressure watering
Retail pot mums are often rootbound in peat-heavy mix when purchased. Dense soil plus a dome of flowers creates uneven dry-down-surface peat can look acceptable while the core holds water. Watering on a calendar instead of checking the top 2 cm dry rule keeps the shallow root zone saturated through the bloom window mums need moisture most.
Opportunistic pathogens such as Pythium, Rhizoctonia, and Fusarium colonize oxygen-starved roots, but the root cause is almost always culture-poor drainage, excess moisture, and blocked runoff-not bad luck.
Root rot vs. overwatering vs. underwatering on mums
| Signal | Root rot (confirmed) | Overwatering (early) | Underwatering |
|---|---|---|---|
| Pot weight | Heavy, cool days after watering | Heavy; may feel sloshy at base | Light; lifts easily |
| Top 2 cm of mix | Wet for many days | Wet; surface may crust while core holds water | Dry; crumbly at depth |
| Lower leaves | Yellow, limp, may blacken | Yellowing; still firm crown often | Wilted, may crisp at edges |
| Crown at soil line | Soft or collapsing | Firm on inspection | Firm |
| Root inspection | Brown, slimy, sour smell | Firm white roots; wet mix only | Firm roots; dry ball |
| Bloom response | Buds collapse despite wet soil | Blooms may droop; roots still functional | Flowers wilt; perks after one drink |
| First action | Stop water; unpot; trim decay | Stop water; dry top layer; improve drainage | Water thoroughly once; resume checks |
If you are unsure, unpot before adding more water. Mums wilt on wet soil when roots fail-not when they are thirsty.
How to confirm the cause
Work through these checks in order:
- Pot weight - Lift the container. A heavy, cool pot days after watering suggests saturated mix. A light pot with wilt may mean drought instead.
- Moisture at depth - Press a finger or wooden skewer into the top 2 cm per our watering guide. Cold, clinging mix with a limp plant points to excess moisture.
- Smell - Sour odor at the drainage hole strongly supports rot.
- Wrapper and saucer - Peel back foil or lift from cachepots. Standing water in the sleeve is rot fuel on shallow roots.
- Crown firmness - Press gently where stems meet soil. Soft tissue means unpot immediately.
- Roots - Knock the plant out gently. Rinse roots under lukewarm water. Healthy tissue is firm and pale; rot collapses between fingers or peels away from the core.
- Season context - Autumn indoor display with daily watering in a cool room is high-risk; adjust expectations before repotting into the same wet setup.
If the pot is light, the upper mix is dry, and leaves are slightly wilted but the crown is firm, underwatering may explain symptoms better than rot-water thoroughly once after inspection, then resume dry-down checks.
First fix for Chrysanthemum
Stop all watering and unpot the plant.
Lay the mum on newspaper, knock away wet mix, and identify where tissue turns from firm to mushy. That single inspection tells you whether you are treating rot, overwatering, or normal leaf drop-everything else depends on it.
Do not fertilize, mist heavily as a humidity fix, or repot into fresh mix until you have cut away decay and understand how much healthy crown remains. Stacking fixes the same day stresses an already failing root system.
Step-by-step recovery
Once rot is confirmed and the crown is still firm enough to work with, proceed in this order:
- Trim all decay - With clean, sharp scissors, cut mushy roots and any soft stem base back to firm, healthy tissue. Keep cutting inward until you see solid white or tan flesh, not brown jelly. Sterilize blades between cuts with rubbing alcohol.
- Rinse and assess the crown - Remove old contaminated mix from remaining roots. Note how much of the root mass remains; losing more than half makes recovery slow and uncertain.
- Discard old mix and clean the pot - Reusing soggy soil reintroduces pathogens. Scrub the container or use a fresh one with drainage holes. Remove foil wrappers that trap water.
- Repot into airy, well-drained mix - Use commercial potting mix amended with perlite per our soil guide. Choose a pot sized to the trimmed root mass, not dramatically larger. See repotting steps for technique after bloom if the display season still matters.
- Water once lightly to settle - After repotting, moisten the mix once and let excess drain fully. Empty the saucer within thirty minutes. Do not keep the root zone constantly wet during recovery.
- Bright light and airflow - Move to the brightest location the plant tolerates-Chrysanthemum light guide outdoors or a sunny window for indoor recovery. Gentle airflow helps mix dry evenly. Water at the base without wetting foliage to reduce fungal pressure on recovering tissue.
- Hold fertilizer - Skip feed until new basal shoots look healthy. Salt stress on damaged roots slows recovery on shallow-rooted mums.
If the main stems are still firm but roots were mostly lost, the plant can recover from a severe root prune. If rot has hollowed the crown, attempt basal shoot cuttings from any firm side shoots before the last tissue fails.
Recovery timeline and what to expect
Stabilization often takes one to two watering cycles after trimming and repotting-during that window the crown should stop softening and the pot should dry on a predictable cycle.
New shoots from the base or center are the best sign of success; expect them in two to four weeks during warm autumn porch conditions, sometimes longer if recovery started in a dim, cool indoor room. Old yellow leaves will not green up again-snip them once the plant is stable. Open blooms on a rescued display mum may be sacrificed; foliage recovery matters more than saving every flower.
Full root mass rebuilds over several weeks to months, not days. Judge success by firm crown tissue and fresh green basal growth, not by restoring the original bloom dome.
Worsening signs: crown softens further after dry repotting, stems blacken upward from the base, or no new growth appears within four weeks-those point toward tissue that cannot be salvaged.
What not to do
Do not water more because leaves or blooms look wilted while soil is already wet-that accelerates rot on mums. Avoid dense garden soil or water-retentive mix without amendments. Do not feed immediately after root pruning.
Skip fungicide alone without removing mushy tissue and fixing drainage-chemicals do not restore oxygen to waterlogged roots. Do not repot into a much larger pot; extra wet soil volume slows drying around shallow roots. Do not leave the plant in a full saucer or foil-lined cachepot after watering.
Do not mist foliage as a humidity fix when roots are rotting in wet soil-that adds leaf wetness without solving saturation at the crown. Do not assume winter dormancy will heal rot on a potted mum held indoors; damaged roots do not recover without trim, drainage fixes, and corrected watering.
How to prevent root rot next time
Match watering to how fast your pot dries in your light and season. Allow the top 2 cm of mix to dry before the next drink during active bloom display-often every one to two days in sun, or every two to three days in cool autumn weather, but only when checks confirm dryness.
Use well-drained mix, pots with open drainage, and empty saucers within thirty minutes of watering. Remove or vent foil gift wrappers so runoff never pools against the root ball. Avoid upsizing pots “for growth” while the plant is still in a short display season-a slightly tight root ball in a right-sized pot dries more predictably than a small root mass swimming in extra mix.
Quarantine new porch mums and lift the pot daily during your first two weeks-early heaviness is easier to fix than a collapsed crown. Cross-check overwatering symptoms if yellow leaves appear before roots turn mushy.
When to discard vs. propagate from basal shoots
Attempt salvage when:
- The crown feels firm under light pressure
- At least one-third of the root system remains firm after trimming
- Stems are still green and pliable above the soil line
- You can repot into open drainage with corrected watering habits
Discard or replace when:
- The crown dents or collapses at the soil line
- Stems blacken upward despite dry repotting
- More than seventy percent of roots were mushy with no firm basal shoots
- Sour smell returns within a week of trim and repot in the same wet setup
If firm basal shoots remain on an otherwise failing mum, take cuttings from healthy side stems before discarding the parent. That is often the most realistic rescue for a foil-wrapped gift plant that arrived rootbound and overwatered through October.
Conclusion
Root rot on Chrysanthemum is a drainage and timing problem on shallow roots-not a mystery disease. Confirm it with wet mix versus firm crown and roots, stop water, cut decay, repot airy, and hold fertilizer until new basal growth appears. Autumn gift mums fail fast when foil wrappers trap water and cool rooms slow dry-down; prevention is daily moisture checks, not calendar watering. For broader mum culture context, see our overview.