Overwatering on Cabomba: Aquarium Stem Rot & Wet Substrate
Quick answer
Cabomba cannot be overwatered in the houseplant sense-it lives fully submerged. Overwatering here means excess moisture and poor oxygen at buried nodes: mushy lower stems, translucent whorls, and needle clouds. First step: trim all mushy tissue, remove decay from the tank, and float or replant firm tops at 1–2 inches depth with lower leaves stripped.
Overwatering on Cabomba: Aquarium Stem Rot & Wet Substrate Fixes
This guide covers overwatering on Cabomba. See also the general Overwatering guide, watering, and light pages for this plant.
Overwatering on Cabomba: Aquarium Stem Rot & Wet Substrate Fixes
Quick answer
Cabomba does not live in a pot of drying soil. Cabomba caroliniana (Carolina fanwort) is a fully submerged stem plant whose fan-shaped leaves in whorls absorb nutrients from the water column. When aquarists search “Cabomba overwatering,” they usually mean excess moisture and poor oxygen at buried nodes-not a watering schedule.
First step: trim every mushy or translucent section back to firm green stem, remove that tissue from the tank immediately, and float or replant only the healthy top with lower leaves stripped and nodes buried 1–2 inches (2.5–5 cm). Decaying fanwort fouls water within hours and can spike ammonia in small aquariums.
This guide is for submerged aquarium and turtle-tank culture only. For planting depth and substrate texture, see best substrate for Cabomba. For flow, debris, and water-change discipline, see Cabomba water parameters. For overlapping rot diagnosis, see Cabomba stem-base rot.
Why “overwatering” means something different for Cabomba
Houseplant overwatering keeps roots in saturated, low-oxygen potting mix. Cabomba cannot dry out-it must stay underwater. The aquarium analogue is localized oxygen starvation where stems meet substrate: buried leaves rotting in anaerobic sediment, compacted fine sand trapping gas, detritus packed into fine whorls, or stagnant pockets behind filter blasts.
C. caroliniana evolved in slow-moving freshwater ponds and quiet streams. Its soft stems and delicate whorls rot faster than tougher aquarium stems when buried too deep, coated in mulm, or shocked by sudden parameter shifts. The plant is primarily a water column feeder-substrate matters for anchoring and node oxygen, not for “how often you water.”
Red C. furcata melts faster in hard water or marginal light, so wet-substrate damage often appears alongside color loss. Green Cabomba tolerates more variation but still fails when healthy mid-stem whorls sit buried in the anaerobic layer.
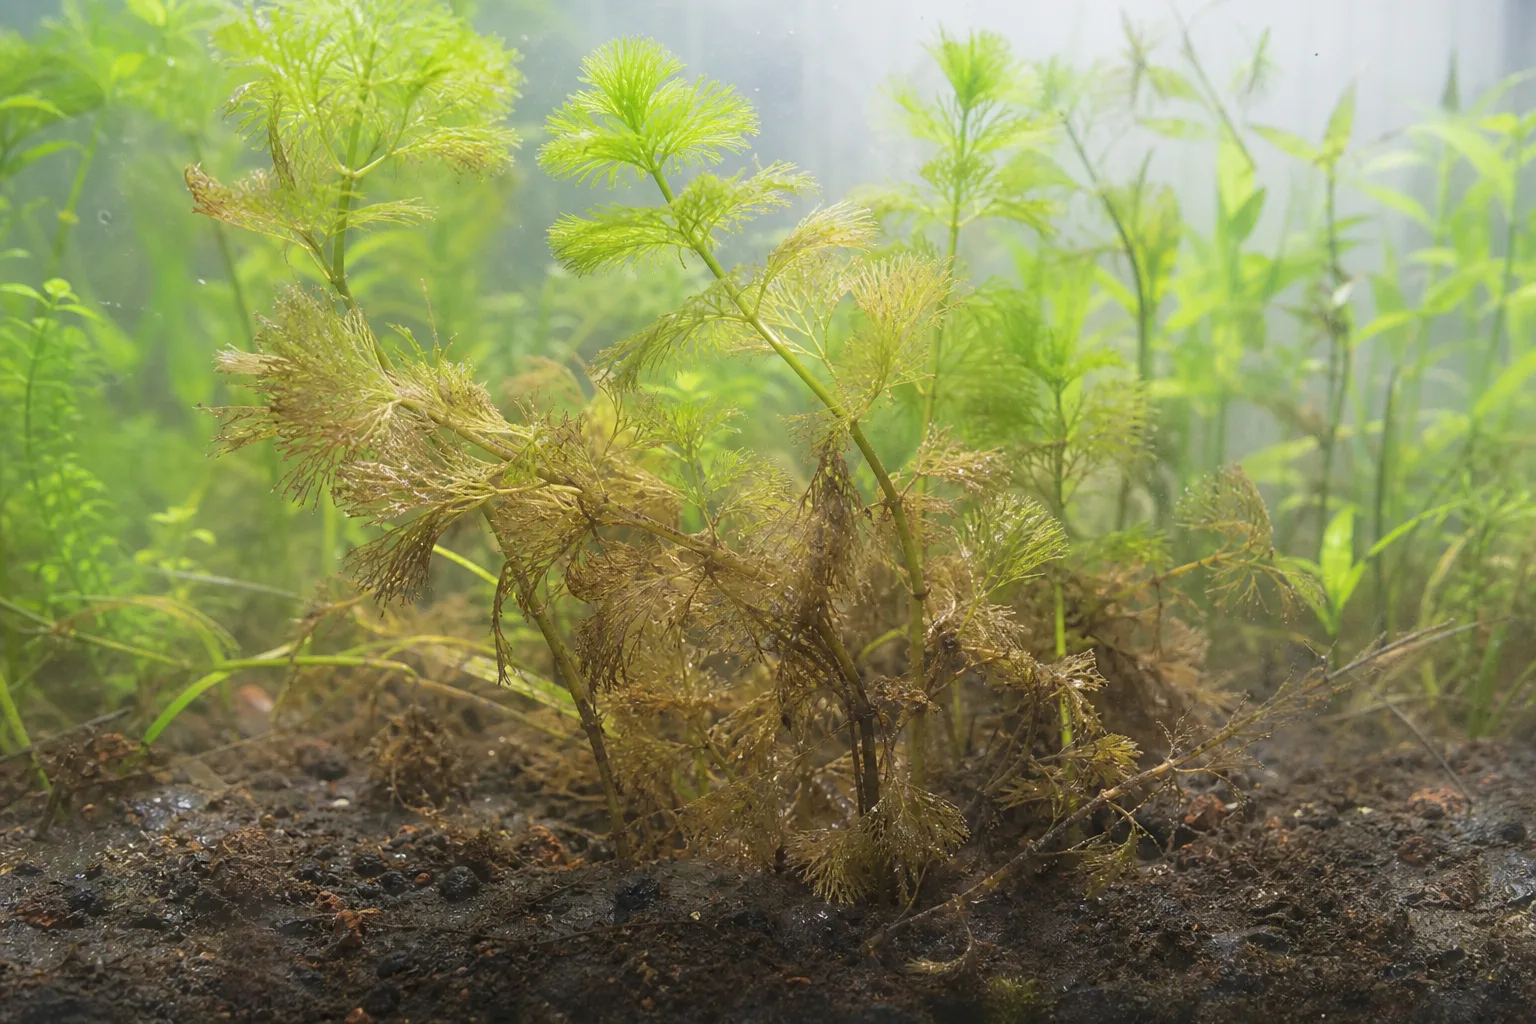
What wet-substrate damage looks like on Cabomba
Healthy anchored Cabomba shows bright green, firm whorls from substrate to tip. Excess moisture at the base follows a bottom-up pattern:
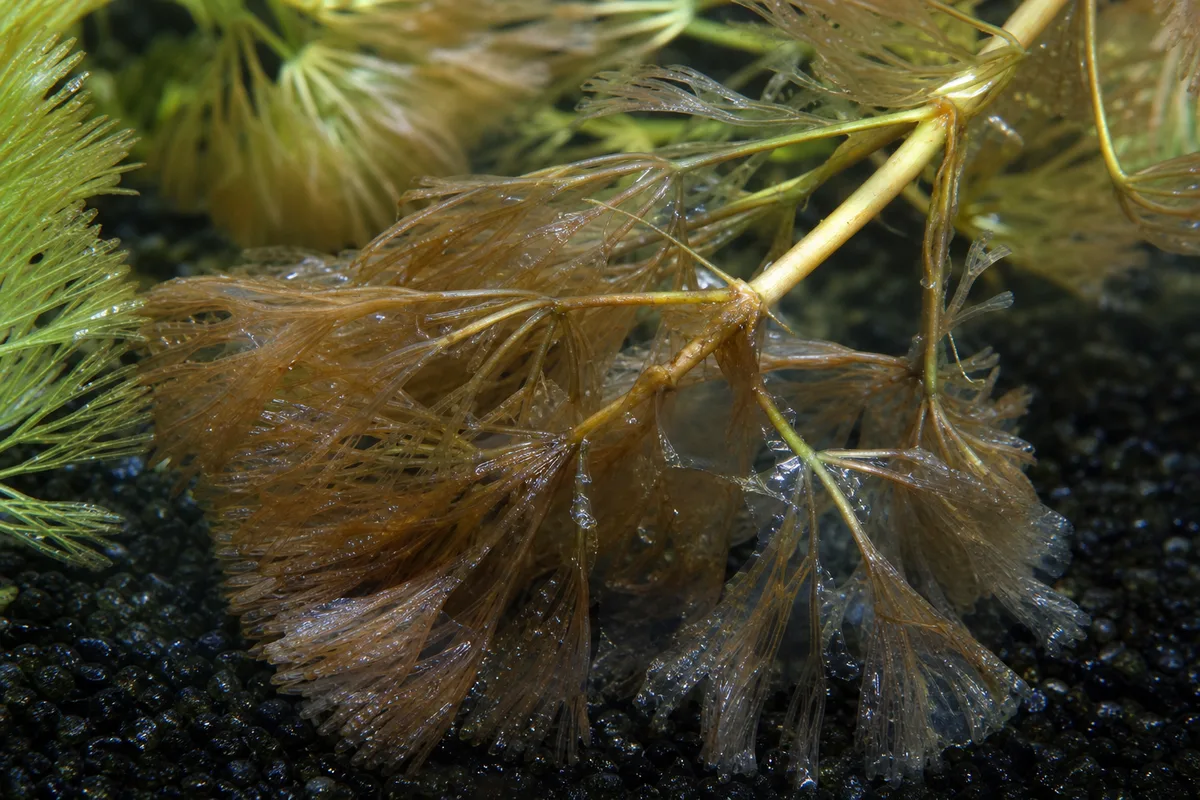
Overwatering symptoms on Cabomba - compare with healthy tissue on the same plant.
- Translucent or glassy lower whorls - tissue turns see-through before browning; needles detach at the lightest touch
- Mushy stem at the substrate line - buried section feels soft; gentle squeeze releases slime
- Cloud of shed needles - fine debris clogs filter sponges and coats neighboring plants
- Floating after replanting - buoyant stems pop up when anchor tissue fails
- Sour smell when lifted - anaerobic breakdown at buried leaves or rubber-band crush points
- Bare stem climbing upward - rot strips lower leaves while the tip may stay green briefly
Early damage can look like a single pale whorl at the gravel line two to three days after planting. Advanced failure shows more than half the stem transparent with only a short green tip.
Wet substrate vs. transition melt vs. light shedding vs. water-change shock
| Pattern | Timeline | Base tissue | Tip tissue | Fix direction |
|---|---|---|---|---|
| Wet substrate / buried rot | Days to 1–2 weeks after deep planting or debris buildup | Mushy, translucent, sour smell | May stay green briefly | Trim, float, replant shallow; fix flow and depth |
| Transition melt | First 5–14 days after purchase | Old emersed leaves mushy; stem often firm beneath | New submerged whorls forming | Trim melt only; stable parameters; wait |
| Light-starvation shedding | Weeks of bare base, long internodes | Firm but leafless stalk | Small crown at top | Increase PAR; top and replant - see leggy growth |
| Water-change shock | 24–72 hours after large or cold change | Lower whorls pale; stem may stay firm | Tips may look normal initially | Phased 25–30% changes; match temperature within 2°F |
| Copper medication damage | 24–72 hours after treatment | Uniform decline | Whole plant affected | Stop copper-containing meds; remove dead tissue |
If melt continues climbing past the bottom two whorls after day seven in a stable tank, treat as wet-substrate rot or parameter failure-not normal acclimation.
Why Cabomba develops wet-substrate problems
Buried stems and leaves in anaerobic sediment
The standard planting target is 1–2 inches of bare stem with 2–3 nodes covered and the first whorl above the substrate (soil guide). Burying leaves or healthy mid-stem whorls traps them in low-oxygen sediment; decay travels upward through Cabomba’s soft tissue. Deep planting in compacted fine sand accelerates node failure.
Cabomba produces adventitious roots from buried nodes, but those roots need oxygenated contact-not waterlogged, decaying leaf tissue.
Anaerobic substrate pockets
Fine sand beds deeper than 3 inches can compact and develop stagnant zones. Overcrowded stem bases in one planting cluster compete for flow. Terrestrial potting mix or garden dirt decomposes underwater, clouds water, and is never appropriate in a fish tank.
Debris-clogged whorls and filter blast
Cabomba’s fine fan leaves trap detritus. Strong filter outlets pack mulm into lower whorls, block light, and create rot-prone pockets-mimicking “wet soil” anaerobia at the stem base. Moderate, diffuse circulation is part of prevention (watering guide).
Excessive or mismatched water changes
Large single changes-especially with cold, hard, or pH-mismatched source water-shock fine-leaved stems. A neglected tank “reset” with 70% replacement often triggers needle drop within 48 hours even when nitrate was the original problem. Phased 25–30% changes with matched temperature are safer.
Rubber bands and crushed bases
Store bunches arrive rubber-banded. Planting without removing the band crushes tissue and kills the lower section within days. Coarse gravel above 5 mm grips poorly; repeated deep replanting of failing tissue worsens rot.
How to confirm the cause in your tank
Work through these checks in order:
- Stem squeeze test - Pinch the lowest whorl above the substrate. Firm green tissue supports transition melt or light shedding; slime confirms wet-substrate rot.
- Planting depth audit - Pull one stem gently. More than 2 inches buried, or buried leaves present, confirms a planting error.
- Band and crush check - Inspect the base for rubber-band marks or metal-clip creases.
- Flow direction - Note whether filter output hits the Cabomba wall. Brown detritus on the outlet side points to debris rot, not nutrient deficiency.
- Substrate smell - Lift a stem and sniff the planting hole. Sour anaerobic odor confirms decay at nodes.
- Water-change history - Recent large or cold changes within 72 hours shift diagnosis toward shock.
- Parameter log - Match temperature within 2°F on changes; test GH if melt persists (water parameters guide).
- Medication history - Cabomba is sensitive to copper in many ich treatments and algaecides.
Confirmed wet-substrate damage: mushy base, sour smell, decay climbing stem, or deep burying with buried leaves. Suspected only: pale lower whorls without slime-trim, shallow replant, and recheck in 48 hours.
First fix for Cabomba
Trim all mushy or translucent tissue back to the highest firm green whorl, remove every trimmed piece from the tank, and float the salvage top near the light-or replant immediately at 1–2 inches depth with lower leaves stripped.
Use sharp aquascaping scissors. One clean cut beats crushing soft stem with dull blades. Place removed tissue in a cup, not back in the water.
If the green top is at least 4–6 inches with several whorls:
- Strip leaves from the bottom 2–3 inches
- Float near the light 3–7 days until white root initials show at nodes, or replant directly in fine gravel, sand, or aquasoil at 1–2 inches depth
- Space stems 1–2 inches apart; avoid metal clips on soft tissue
- Use a ceramic ring or small stone only if the stem floats-remove once anchored (usually 10–14 days)
Do not replant rotten bases “to give it one more chance.” Do not bury deeper to stop floating. Do not dose fertilizer as the first response to mushy tissue.
After salvage, skim shed needles, check filter intakes, and test ammonia if a large mass melted at once.
Recovery timeline
48 hours: Decay spread stops when mushy tissue is gone and nothing rotten remains in the tank.
3–7 days floating: Root initials appear at nodes on healthy tops in bright, stable water.
1–2 weeks replanted: Anchored stems resist gentle upward tug; new green whorls emerge from tips.
2–4 weeks: A thinned stand refilled from replanted tops looks like a background wall again if PAR and water quality support growth.
Lower sections do not regenerate on bare rotted stubs-discard naked bases and propagate from tops (pruning guide). Judge success by firm new whorls and stable anchor, not by saving every old needle.
What not to do
Do not apply houseplant advice-no “stop watering,” no unpotting, no letting “soil surface dry,” no drainage-hole checks, no fungus-gnat treatments for potting mix. Cabomba lives fully submerged.
Do not leave decaying stems or shed needles in the tank to “compost.” They spike organics and clog filters.
Do not plant deeper when stems float. Fix depth, substrate texture, and anchors instead.
Do not use terrestrial potting soil, garden dirt, or fertilizer-rich houseplant mix in an aquarium.
Do not perform a single 50–70% water change to “fix” neglected chemistry after a melt event-use phased changes with matched parameters.
Do not release trimmings into ponds or drains-C. caroliniana spreads by fragmentation and is a documented invasive aquatic plant in many regions. Discard dried material in sealed trash.
How to prevent wet-substrate problems on Cabomba
Prevention is planting discipline plus water hygiene:
- Strip lower leaves; bury 1–2 inches only - follow the substrate and planting depth guide
- Remove rubber bands before planting - separate bunches into individual stems
- Use fine gravel, sand, or aquasoil - avoid coarse stone unless using cups or float-first establishment
- Keep moderate diffuse flow - aim outlets away from background stems (flow guidance)
- Trim melt immediately - weekly observation beats calendar guessing
- Acclimate new stems - float or drip-match temperature and GH before planting
- Change water in phased 25–30% sessions - match temperature within 2°F; test GH in hard-water cities
- Top and replant before bases go bare - shading from overgrown canopies mimics rot-prone lower stems
Green Cabomba in a bright, clean community tank with correct planting depth rarely shows wet-substrate damage without a mechanical mistake. Red Cabomba needs tighter light, CO₂, and soft-water alignment from day one.
When to worry
Escalate when melt climbs more than two whorls per day, ammonia or nitrite rises after a large die-off, or filter intakes clog with shed needles during the same session you trimmed rot. Small tanks and turtle tubs have less dilution capacity-remove decay aggressively.
Fish-health note: decaying plant mass consumes oxygen and releases ammonia. A full stand melting at once can stress livestock even when the problem is “only” plant tissue. Remove debris before adjusting meds or adding fish.
If every stem fails after shallow replanting in a stable tank, step back to the Cabomba overview and verify light intensity, species ID (green vs. red), and whether the tank matches submerged culture at all.
Salvage is realistic when at least 4 inches of firm green stem remains. A completely transparent bunch with no firm whorls is discard-and-replace-not a long rescue attempt.
Conclusion
Cabomba “overwatering” in aquariums is excess moisture and poor oxygen at buried nodes-driven by planting depth, buried leaves, debris in whorls, anaerobic substrate, water-change shock, and occasionally copper or parameter failure-not houseplant pot care. Confirm with a stem squeeze and planting audit, then trim mushy tissue, clean the tank, and float or replant healthy tops at 1–2 inches with stripped lower nodes. Link planting to the soil guide, flow and changes to the watering guide, and ongoing salvage to the pruning guide. Prevent recurrence with shallow planting, fine substrate, diffuse flow, phased water changes, and prompt melt removal before organics foul your filter or spike ammonia.
When to use this page vs other Cabomba guides
- Cabomba watering guide - Use for routine moisture checks before assuming overwatering is the main issue.
- Cabomba problems hub - Browse all 16 common issues on this species.
- Root Rot on Cabomba - Different entry point when symptoms overlap with overwatering.
- Yellow Leaves on Cabomba - Different entry point when symptoms overlap with overwatering.
- Wilting on Cabomba - Different entry point when symptoms overlap with overwatering.