Spider Mites on Bird's Nest Fern: Causes, Checks & Fixes
Quick answer
Spider mites on Bird's Nest Fern thrive in warm, dry indoor air-they stipple broad glossy fronds and weave fine webbing at the nest rim, often mistaken for low-humidity browning alone. First step: isolate the plant and hold white paper under a frond while you tap; moving specks confirm mites before you mist the crown.
Spider Mites on Bird's Nest Fern: Causes, Checks & Fixes
This guide covers spider mites on Bird's Nest Fern. See also the general Spider Mites guide, watering, and light pages for this plant.
Spider Mites on Bird's Nest Fern: Causes, Checks & Fixes
Quick answer
Spider mites on Bird’s Nest Fern (Asplenium nidus) are tiny sap-sucking arachnids that explode in warm, dry indoor air-the opposite of what this tropical epiphyte needs. They leave yellow or white stipple dots across broad, glossy fronds and fine silk webbing where fronds meet the central nest, often misread as low-humidity brown tips alone.
First step: isolate the plant and run a white-paper tap test on frond undersides. Moving specks confirm active mites; uniform crispy margins without stipple or webbing point to dry air or salt burn instead.
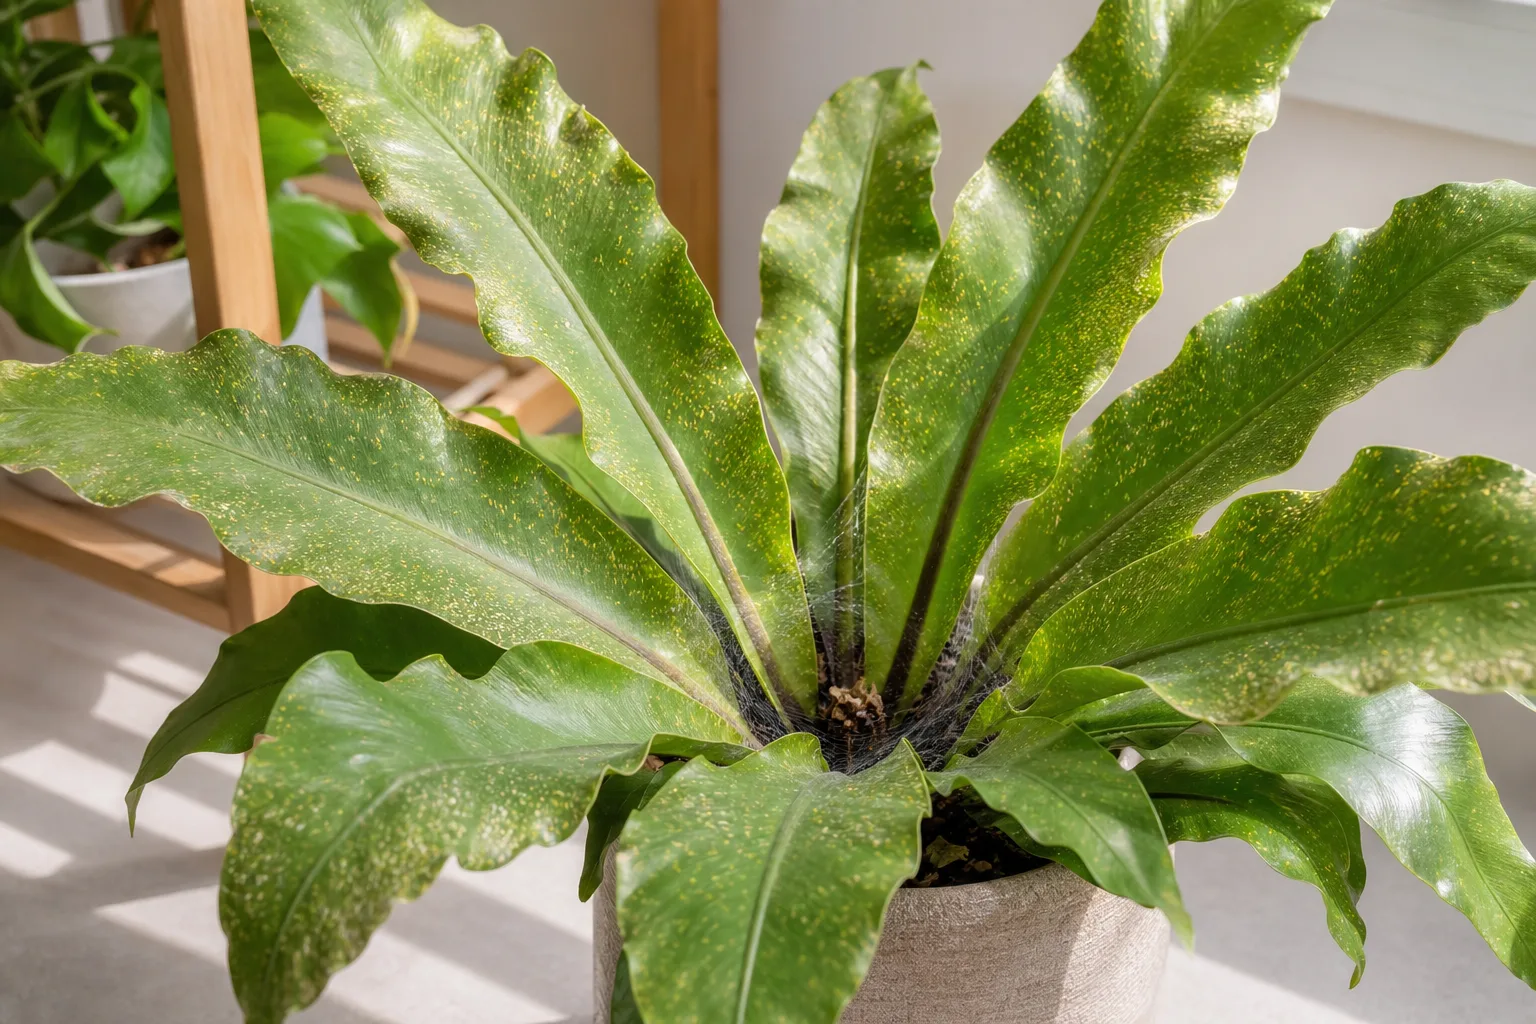
Unlike divided ferns such as Boston fern, Bird’s Nest Fern carries single undivided fronds with a large surface area-mites spread across whole blades, and rinsing must protect the central rosette cavity where new growth emerges. Treat undersides where mites feed, not just the stipple you see on top.
What spider mites look like on Bird’s Nest Fern
Healthy Bird’s Nest Fern fronds are glossy, wavy, and solid green from base to tip. Mite damage breaks that pattern in specific ways:
Spider Mites symptoms on Bird’s Nest Fern - compare with healthy tissue on the same plant.
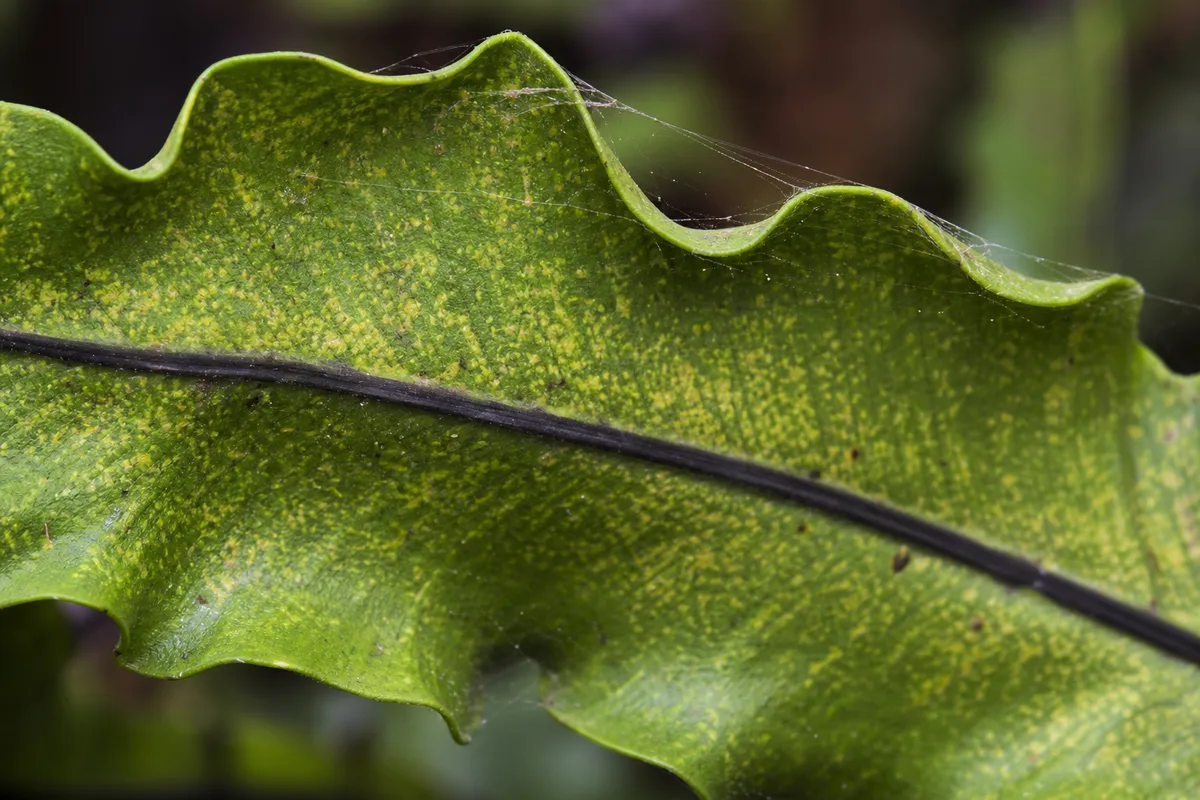
- Stippling - Pale yellow, white, or bronze pinprick dots scattered across the frond surface where mites pierce cells with needle-like mouthparts
- Webbing - Fine silk threads at the frond base, nest rim, or between overlapping fronds-classic spider mite sign
- Dull, bronzed fronds as feeding continues across the broad leaf blade
- Crisp edges on heavily infested fronds when mite pressure combines with dry air
- Mites themselves - Barely visible yellowish or greenish dots; confirmed when they crawl on white paper after a tap test
On this species, stippling shows clearly on smooth, undivided fronds-there are no small pinnae to hide damage. That makes early spotting easier than on lacy ferns, but also means a single frond can carry thousands of mites across its full width.
Do not confuse the fern’s normal brown sporangia lines on mature frond undersides with pests. Those lines run in herringbone rows from midrib to margin, are stationary, and are not accompanied by webbing or stipple on the upper surface.
Spider mites vs. lookalike symptoms
| Sign | Spider mites | Low humidity alone | Thrips | Mineral or soap residue |
|---|---|---|---|---|
| Pattern | Random stipple dots on frond face | Even brown margins, moist soil OK | Silvery streaks or scrapes | Uniform film after spray |
| Webbing | Fine silk at frond bases | None | None | None |
| Paper tap test | Moving specks | No insects | Fast slender insects | No insects |
| Progression | Spreads between fronds weekly | Stable if RH unchanged | New streaks on fresh growth | Wipes off with damp cloth |
| Crown | Usually firm | Usually firm | Usually firm | Usually firm |
Both mites and low humidity often coexist in winter-treat confirmed mites and raise humidity per the low-humidity guide. If you fix air moisture but stipple and webbing persist, pests are still active.
Why Bird’s Nest Fern gets spider mites
Spider mites are common indoor pests that reproduce rapidly in warm, dry conditions. On Bird’s Nest Fern, three plant-specific factors stack the odds:
1. Winter heating strips humidity the fern needs. Clemson HGIC notes that humidity in houses is very low during winter and ferns need extra attention in that season. Central heat can drop rooms to 20–35% RH while furnaces run-exactly when two-spotted spider mites thrive. A fern beside a heat vent or sunny winter window loses leaf moisture faster than roots in moist soil can replace it.
2. Broad fronds give mites large feeding territory. Each undivided frond offers a continuous undersurface for colonization. Mites concentrate on frond undersides and nest-rim junctions where airflow is still and humidity is lowest-check those zones first during inspection.
3. Epiphytic biology makes dry air a double stressor. In nature, Bird’s Nest Fern grows as an epiphyte whose rosette traps humid forest air. Indoors, that microclimate is gone. NC State Extension notes the species does not tolerate dry conditions-a stressed fern in dry air is easier prey even when watering is correct.
Outbreaks also start on newly purchased plants, ferns summered outdoors, or neighbors in a dry room. Mites travel on hands, tools, and air currents between houseplants.
How to confirm the cause
Work through these checks before you spray anything:
- White-paper tap test - Hold white paper beneath a suspect frond and tap the underside sharply. Slow-moving specks confirm mites; repeat on two or three fronds at different heights.
- Webbing check - Use a hand lens or phone macro mode at frond bases and the nest rim. Fine silk distinguishes mites from thrips or humidity damage.
- Stipple pattern - Random dots across the frond face vs. even margin browning from dry air alone.
- Humidity read - Hygrometer below 40% RH at foliage height supports mite risk; above 50% makes mites less likely but does not rule them out if webbing is present.
- Soil moisture cross-check - Press the top inch near the pot edge. Moist soil with stippled fronds points to pests or dry air, not underwatering. Very dry soil with limp fronds suggests underwatering instead.
- Neighbor scan - Inspect other houseplants within a few feet. Mites in dry rooms often spread to multiple species.
- Recent changes - New plant without quarantine? Moved off a sunny glass shelf? Heating season started? Any raises the odds of a true mite diagnosis.
If you find no stipple, no webbing, and no moving specks after two inspections a week apart, reconsider low-humidity tip burn, mealybugs in the crown, or natural sporangia lines before committing to a multi-week treatment cycle.
First fix for Bird’s Nest Fern
Isolate the plant and rinse frond undersides with lukewarm water-without flooding the central rosette.
Move the pot away from other plants. Then, working frond by frond:
- Tilt the pot so water runs down each frond’s underside and off the leaf tip, away from the nest center
- Rinse one frond at a time under lukewarm running water in a sink, or wipe undersides with a damp cloth
- Hold the frond base gently so you do not tear the glossy tissue
- Let the plant drain on its side briefly so no water pools in the crown cavity, then return it to Bird’s Nest Fern light guide
This matches the crown-dry rule from Clemson HGIC’s Bird’s Nest Fern watering guidance-water along the outer edge for routine care, and the same caution applies to pest rinses. Flooding the nest during aggressive washing overlaps with overwatering and crown-rot risk on this species.
Physical rinsing knocks down mite populations without chemicals and is the safest opening move on a fern where insecticides are typically damaging.
Recheck in three to four days. One rinse rarely ends a mite cycle if eggs remain on frond undersides.
Step-by-step recovery
If manual rinsing does not keep populations down, escalate in this order:
1. Repeat crown-safe rinses every three to five days
Commit to at least two weeks of scheduled underside washes. Mites reproduce quickly; repeat applications at short intervals are needed because soap and water sprays have no residual activity after drying.
Simultaneously raise humidity to 50% or higher with a humidifier or pebble tray-cultural improvement slows reinfestation and supports the fern while you treat. See the low-humidity guide for targets and setup.
2. Spot-test insecticidal soap on one outer frond
Bird’s Nest Fern has fragile glossy foliage and NC State notes susceptibility to chemical sprays. Before broad application:
- Choose a product labeled for houseplants and mites, not dish detergent
- Spray one older frond at the outer ring and wait 24–48 hours
- If that frond shows burn, browning, or collapse, stop soap and return to rinsing only
When the spot test passes, apply soap lightly to frond undersides where mites sit. Spray must contact mites directly-residue after drying has no effect. Repeat every five to seven days until you find no live mites for two consecutive checks.
3. Consider horticultural oil only after soap fails
Horticultural oils can control mites but carry higher phytotoxicity risk on ferns. Apply in the morning at room temperature, avoid hot sun, and never spray a drought-stressed plant. Test one frond first, same as soap.
4. Trim only heavily webbed outer fronds
If an outer frond is more web than green, cut it at the base with clean scissors to drop mite reservoirs. Do not shear healthy fronds for cosmetic reasons-the plant needs foliage to recover. Never cut into the crown itself.
5. Hold fertilizer until new growth is clean
Resume light monthly feeding only after two weeks with no live mites and no new stipple. Feeding while pests are active produces more tissue for them to colonize.
6. Wash hands and tools between plants
UMN Extension recommends washing hands and tools after handling infested plants so mites do not spread on clothing or watering cans.
Recovery timeline
With consistent crown-safe rinses and improved humidity, mite counts should drop within one week and stippling should stop spreading within two weeks.
Clean new fronds emerging from the center are the best recovery signal. Expect that within two to four weeks after treatment starts, depending on room temperature and how thoroughly you cleared frond undersides. Old stippled tissue on mature fronds will not re-green-watch the nest, not the outer ring.
Call the infestation controlled when you complete two weekly inspections with zero live mites, no fresh webbing, and no new stipple on emerging growth. Maintain isolation one more week after that before returning the plant to its usual spot.
What not to do
Do not flood the central rosette during rinses or soap sprays. Standing moisture in the nest invites crown rot-the same failure mode covered on the overwatering and root rot pages.
Do not assume low humidity alone if webbing and stipple are present. Raising RH helps prevention and recovery but does not replace mite removal when pests are confirmed.
Do not use pyrethrin sprays, systemic insecticides, or full-strength neem drenches as a first response. UF/IFAS warns that insecticides are typically damaging to ferns, and many products labeled for insects do not control mites.
Do not apply soap or oil in hot direct sun or on drought-stressed plants-glossy fronds can show phytotoxicity quickly.
Do not return the plant to the collection after a single rinse. Mites disperse on air currents and shared tools; isolation protects neighbors including aphids-prone and mealybug-prone houseplants in the same room.
Do not blast fronds with forceful water that tears the broad glossy tissue. Targeted underside rinses beat shower pressure on this species.
Bird’s Nest Fern care cross-check
While treating mites, keep baseline care steady-big swings in light, water, or humidity add stress on top of feeding damage.
| Care factor | During mite treatment |
|---|---|
| Water | Along pot edge when top inch is dry; never into nest - watering guide |
| Humidity | 50–70% RH at foliage height; humidifier preferred - low humidity |
| Light | Bright indirect; avoid new direct sun on stressed fronds |
| Fertilizer | Hold until two weeks mite-free |
| Isolation | Until two clean weekly inspections plus one buffer week |
A fern that is properly watered and humid is better able to push clean new fronds once mites are gone.
How to prevent spider mites next time
- Quarantine new plants for at least two weeks before placing them near your fern
- Run a humidifier in winter when heating drops RH below 50%-prevention beats repeated rinses
- Inspect frond undersides weekly during heating season, especially on plants near windows or vents
- Keep the fern off heat registers and sunny glass that dries air locally
- Wipe dust from fronds occasionally so stipple shows early against the glossy surface
- Check neighbors after bringing outdoor plants indoors for the season
Because Bird’s Nest Fern is non-toxic to cats and dogs, you can isolate and rinse it on a kitchen counter-but wash hands after handling soap or oil, and keep pets from chewing treated foliage until sprays have dried.
When to worry
Escalate care if:
- Webbing covers most fronds and new fiddleheads stop emerging for more than a month despite two weeks of rinses
- Stippling spreads to every frond while humidity is already above 50%-soap or oil spot-testing may be necessary
- The crown feels soft or smells sour after repeated wet treatments-suspect crown rot overlapping with mites; inspect drainage and rosette moisture before more sprays
- Mites appear on multiple plants at once-treat the collection systematically and improve room humidity
A mature Bird’s Nest Fern with firm roots and several healthy outer fronds can survive a bad mite outbreak if the center keeps producing clean growth after treatment. If the nest collapses or stops unfurling entirely while fronds yellow from the base up, root or crown problems may have joined the pest issue-inspect before assuming more rinses will help.
For severely webbed plants with no clean new growth after a full treatment cycle, discarding may be more practical than risking your entire collection-UMN Extension notes that throwing away heavily infested plants avoids exposing neighbors to the same problem.
When to use this page vs other Bird’s Nest Fern guides
- Bird’s Nest Fern watering guide - Use for routine moisture checks before assuming spider mites is the main issue.
- Bird’s Nest Fern problems hub - Browse all 16 common issues on this species.
- Low Humidity on Bird’s Nest Fern - Different entry point when symptoms overlap with spider mites.
- Slow Growth on Bird’s Nest Fern - Different entry point when symptoms overlap with spider mites.