Ajwain Plant Soil Mix: Best DIY Recipe and What to Buy
Ajwain Plant Soil Mix: Best DIY Recipe and What to Buy
Ajwain Plant Soil Mix: Best DIY Recipe and What to Buy
Quick Answer: The Soil Mix That Works Every Time
A reliable ajwain plant soil mix is 2 parts garden loam, 1 part well-rotted compost, and 1 part coarse sand or perlite, kept in a container with drainage holes and a pH between 6.0 and 7.5. NC State Extension’s Plant Toolbox lists the same neutral pH range of 6.0–8.0 and a Good Drainage requirement, while UF/IFAS Gardening Solutions echoes the well-drained soil preference for Cuban oregano. That single recipe covers most balcony, terrace, and ground plantings across India, Southeast Asia, and similar climates. The reason it works is not magic; it is the balance between three things an ajwain root system demands: drainage, organic nutrition, and steady moisture without saturation.
The most common reason an ajwain plant struggles is not a pest, not the weather, and not a missing fertilizer. It is soil that holds water around the roots for too long. Trachyspermum ammi, the true seed-producing ajwain, and Plectranthus amboinicus, the leaf herb often called Indian borage and sold as “ajwain plant” in Indian nurseries, both rot quickly when the root zone stays wet. Plectranthus amboinicus is classified by Singapore’s NParks FloraFaunaWeb as a succulent plant with moderate water needs, which is the entire reason the soil must drain first. Build the soil for drainage first, and the rest of the plant’s needs fall into place.
What “Good Ajwain Soil” Actually Means
A good ajwain soil is loose enough that water flows through it in seconds, rich enough that the plant does not need weekly feeding, and stable enough that it does not collapse into a compacted mass after a few waterings. If you scoop a handful of moist mix and squeeze it, it should hold its shape briefly, then crumble when you poke it. If it stays glued into a ball, drainage is poor. If it falls apart instantly and feels gritty with no organic matter, it is too lean.
A working ajwain mix also smells earthy, not sour. Sour, swampy, or stagnant-smelling mix is a sign of anaerobic conditions, exactly the environment that invites root rot on Ajwain Plant pathogens like Rhizoctonia solani, which is a documented and serious problem in ajwain fields. The remedy is the same as the prevention: more grit, more drainage, less water retention.
Ajwain vs Indian Borage: A Necessary Disambiguation Before You Mix
The phrase “ajwain plant” gets used for two different species, and the soil recipe has to be matched to the plant in front of you. Trachyspermum ammi is the true ajwain, a small annual umbellifer 60–90 cm tall in the carrot family Apiaceae grown for its pungent seeds. It wants a well-drained sandy loam, neutral to slightly alkaline pH around 6.5 to 7.5, and it does not enjoy the rich, moisture-retentive mixes that leafy herbs prefer.
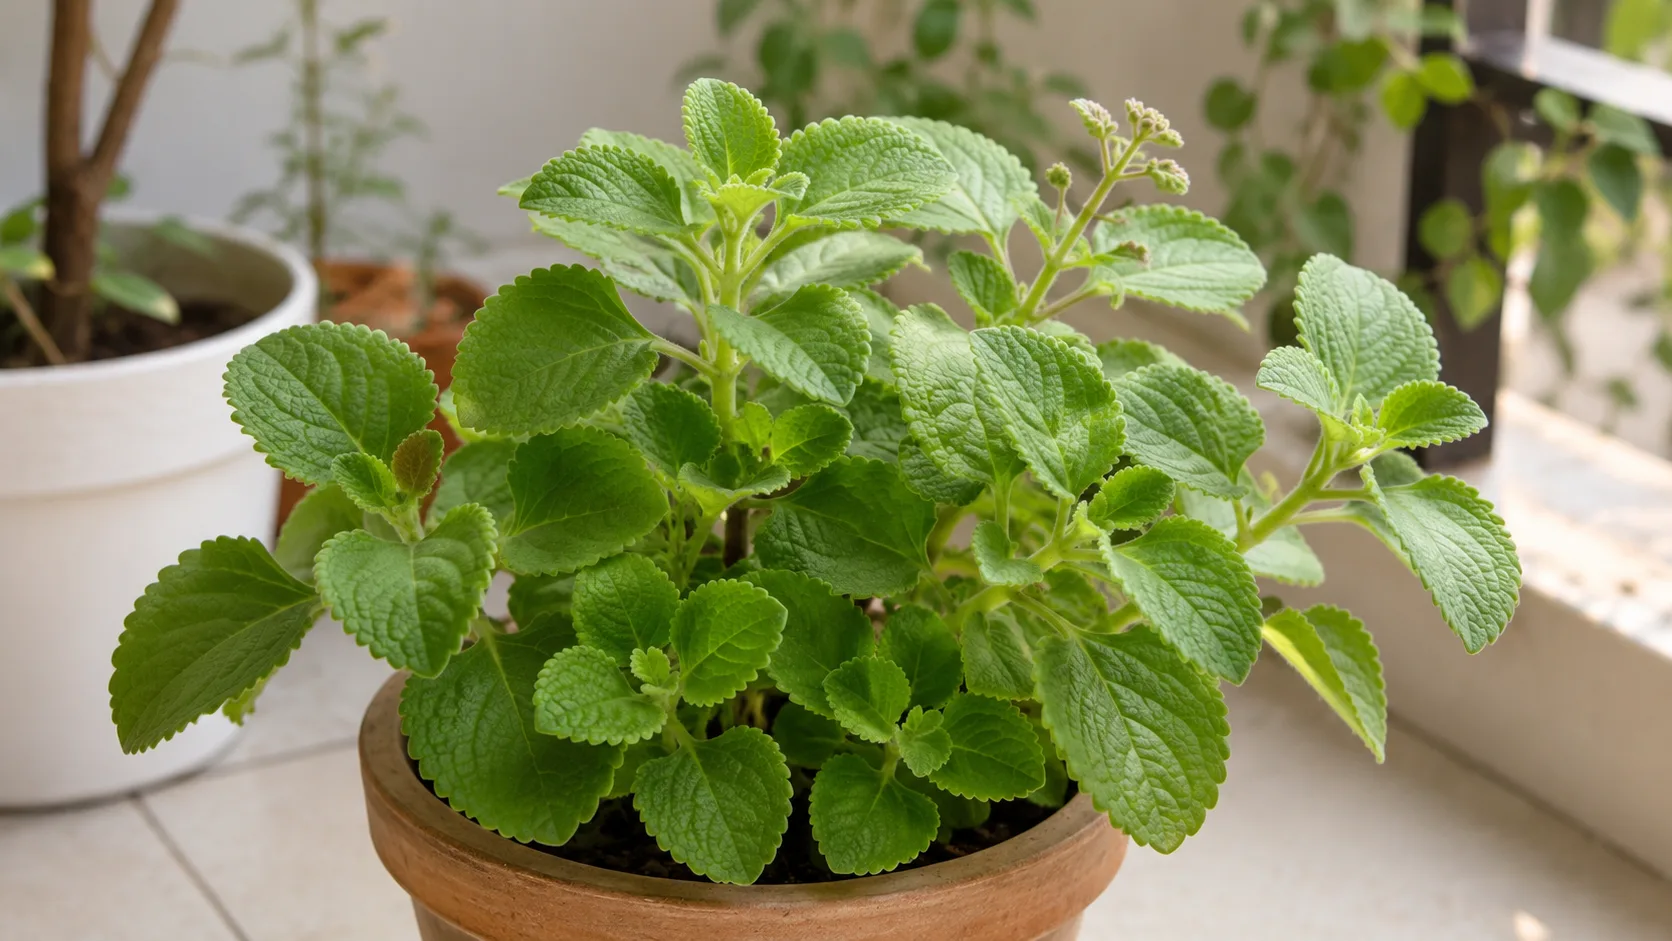
Plectranthus amboinicus, often sold in Indian nurseries as “ajwain plant,” “karpooravalli,” “patharchur,” or “Indian borage,” is a completely different plant in the Lamiaceae mint family. It has thick, succulent-like leaves with a strong oregano-like aroma, and it is grown for kitchen use of its leaves, not for seed. Its preferred mix is also well-drained and slightly acidic to neutral, but it tolerates richer organic mixes than true ajwain, and it is more sensitive to drought because of its fleshy leaves.
For both, the 2:1:1 garden loam to compost to sand/perlite recipe is a safe starting point. If you are growing true ajwain from seed and want maximum essential-oil yield, lean slightly more toward drainage by bumping the sand or perlite fraction up to 30 percent. If you are growing Indian borage as a kitchen herb, lean slightly toward compost and add a little more perlite for aeration rather than grit for dryness.
The Best DIY Soil Mix for Ajwain Plant (2:1:1 and Friends)
The classic, field-tested blend for ajwain is 2 parts garden loam, 1 part compost, 1 part coarse sand or perlite. This ratio appears consistently in Indian herb-cultivation literature and matches what university extension services recommend for well-drained herb beds in warm climates. The garden loam gives body and slow-release minerals. The compost supplies organic nutrition and supports beneficial microbes. The sand or perlite is the drainage engine that keeps the root zone oxygenated.
If you want to scale up to a wheelbarrow or a large tub, the volume math is straightforward. For every 10 liters of finished mix, use about 5 liters of garden loam, 2.5 liters of compost, and 2.5 liters of coarse sand or perlite. Mix dry first, then lightly moisten so the dust settles and the ingredients hold together.
Ingredient Breakdown: Garden Loam, Compost, Coarse Sand or Perlite
Garden loam is the mineral backbone. Loam holds a balance of sand, silt, and clay particles, drains well, and retains enough moisture that roots do not dry out between waterings. A good loam feels soft in the hand, breaks into crumbs rather than slabs, and does not turn into a sticky paste when wet. If you do not have access to clean loam, a quality bagged potting mix without water-retaining crystals can substitute, although it will be lighter and may need a small amount of garden soil added for weight and cation exchange.
Compost is the nutrient engine. Well-rotted compost, farmyard manure, or vermicompost supplies slow-release nitrogen, phosphorus, potassium, and a wide spectrum of micronutrients. Peer-reviewed work on ajwain has shown that vermicompost at 50 percent of the recommended nitrogen dose, combined with nitrogen-fixing bacteria like Azospirillum, increases seed yield, essential oil content, and thymol concentration compared with chemical fertilizers. The compost fraction should smell earthy, dark, and crumbly. If it still smells of ammonia or has not broken down, leave it another few weeks; immature compost can scorch tender roots.
Coarse sand or perlite is the drainage engine. Coarse sand (builder’s sand or river sand, not fine play sand) opens up pore spaces and lets water move through quickly. Perlite, the white volcanic popcorn sold at every garden store, does the same job while being lighter and more uniform. Either works. The choice usually comes down to local price and whether the pot needs to be light enough to move. Perlite floats to the top over time, while sand stays mixed in.
The 50/30/20 Variant for Drier Climates and Hot Terraces
In hot, dry balconies or sandy-soil regions, ajwain benefits from a slightly different ratio: 50 percent sandy loam, 30 percent compost, and 20 percent perlite or coarse sand. This version leans harder into drainage to compensate for fast water loss in heat, and it slightly increases the organic fraction to keep the plant fed through dry stretches. It is also the preferred starting point for Indian borage grown in small terracotta pots, which dry out faster than plastic.
In humid coastal or monsoon climates, swing the ratio the other way and add 5 to 10 percent more perlite or coarse sand on top of the 2:1:1 baseline. The goal is to keep the mix open and aerated so that even heavy rainfall drains through within minutes rather than pooling around the roots.
Step-by-Step: Mixing One Batch at Home
Start by sifting the garden loam through a 5 mm mesh to remove stones, twigs, and clods. Sifting is not strictly required, but it gives a more uniform mix and prevents air pockets in the pot. Measure out 2 parts of this sifted loam into a clean tub, wheelbarrow, or large bucket. Add 1 part well-rotted compost, breaking up any clumps with your hands. Add 1 part coarse sand or perlite last, because it tends to float when you mix dry.
Mix the ingredients dry with a trowel or your hands until the color is reasonably uniform, with no streaks of pure compost or pure sand. Lightly sprinkle water over the surface until the mix is just barely damp, like a wrung-out sponge. The mix should hold together when you squeeze a handful, but no water should drip out. Let it sit for 10 to 15 minutes so the moisture distributes evenly, then pot up.
Avoid adding extra “just in case” ingredients on top of this recipe. A small handful of vermicompost blended in is fine. A fistful of bone meal is fine for true ajwain grown for seed. But piling on slow-release fertilizer, water-retaining crystals, and multiple compost types at once usually creates a mix that is either too rich, too salty, or too water-retentive for ajwain’s taste.
Soil pH for Ajwain Plant: The Slightly Acidic to Neutral Sweet Spot
Ajwain grows best when the soil pH is between 6.0 and 7.5, with the sweet spot for most cultivars falling between 6.5 and 7.0. This range is slightly acidic to neutral, leaning toward slightly alkaline at the upper end. It is also the same range recommended for Indian borage by the North Carolina Extension Gardener Plant Toolbox (neutral pH 6.0–8.0) and by general herb-cultivation guidance from multiple university extensions.
Why pH matters is not abstract chemistry. Below 6.0, phosphorus becomes less available and micronutrients like iron and manganese can become toxic in some soils. Above 7.5, iron, manganese, and zinc start to lock up, and you begin to see yellowing between the veins of new growth even when the soil technically contains plenty of those nutrients. For an ajwain plant grown for aromatic leaves or seed, that means weaker flavor and lower oil yield, since the same essential-oil pathways depend on adequate micronutrient uptake.
To check pH, use a basic soil pH test kit or a digital probe. Mix a small amount of your potting soil with distilled water at a 1:1 ratio, stir, let it settle, and dip the probe in. For a quick read, a strip-style kit is enough. If pH is below 6.0, add a light dusting of dolomitic lime (about 1 tablespoon per 4-liter pot) and remix. If it is above 7.5, work in a small amount of elemental sulfur or simply refresh with a higher proportion of peat-based potting mix in the next Ajwain Plant repotting guide. Recheck after a couple of weeks, because pH adjustments are slow.
Perlite vs Coarse Sand vs Vermiculite: Which One to Reach For
All three are common soil amendments, and each has a job. For ajwain, perlite or coarse sand is the better default, while vermiculite is a poor fit. The reason is drainage. Perlite is expanded volcanic glass that creates permanent air pockets and does not absorb much water. Coarse sand does the same job and adds weight, which helps tall plants stay upright. Vermiculite is a hydrated mica mineral that holds several times its weight in water and releases it slowly; it is closer to a sponge than a drainage aid, and that is the opposite of what ajwain roots need.
| Amendment | Drainage | Weight in pot | Water retention | Best use for ajwain |
|---|---|---|---|---|
| Perlite | Excellent | Very light | Low | All-purpose ajwain mix, especially in plastic and fabric pots |
| Coarse sand | Excellent | Heavy | Low | Terracotta pots, windy balconies, ground beds |
| Vermiculite | Low to moderate | Light | High | Seed-starting only, not in the main ajwain mix |
| Coco coir | Moderate | Light | Medium | Compost substitute for moisture-loving herbs, not for ajwain |
| Pumice | Excellent | Medium | Low | Long-term container mixes where perlite breaks down |
For most home growers, perlite is the safest pick because it is cheap, sterile, and consistent. Use coarse builder’s sand when you want the pot to feel heavy and stable, or when you are amending a ground bed that needs grit. Skip vermiculite entirely in the main ajwain mix, because its water retention tends to push the root zone toward the saturated, low-oxygen conditions that ajwain hates.
Container Soil vs Ground Soil: Different Problems, Same Core Recipe
Whether you grow ajwain in a 6-inch pot on a kitchen windowsill or in a 1-meter raised bed on a terrace, the core mix stays the same: loam, compost, and drainage grit in roughly 2:1:1. What changes is what you have to watch for. Containers dry faster, hold less buffer for mistakes, and have a sharp transition between moist and dry. Ground beds have more stable moisture but worse natural drainage in clay-heavy soils, and they can become compacted under foot traffic.
For containers, choose a pot at least 6 to 8 inches deep for true ajwain and 6 to 8 inches wide for Indian borage. Drainage holes are non-negotiable. A single hole is not always enough; two to four holes spread across the base reduce the risk of one hole getting blocked and waterlogging half the pot. Avoid the temptation to put a layer of stones at the bottom; this is a long-standing myth that actually raises the water table inside the pot and makes drainage worse, not better.
For ground beds, focus on improving the existing soil. Spread 2 to 3 inches of compost over the surface, fork it in to a depth of 6 to 8 inches, and mix in coarse sand or perlite at roughly one part sand to four parts native soil. If the native soil is heavy clay, plan on building raised beds at least 15 cm tall and filling them with the 2:1:1 mix rather than trying to “fix” the clay in place.
Why Garden Soil Alone Fails in a Pot
Garden soil is heavy. In a container, it compacts under its own weight and under the force of repeated watering, squeezing out the air pockets that roots need. Within a few weeks, a pure garden-soil pot becomes a dense, slow-draining mass that stays wet at the bottom and crusts over at the top. Roots suffocate, beneficial microbes stall, and the door opens to fungal pathogens.
A loose, compost-amended mix with perlite or sand stays open precisely because those inorganic particles do not break down. They hold the structure of the mix while the organic fraction supplies nutrition. This is also why experienced growers insist on a dedicated potting mix for containers rather than scooping soil out of the backyard.
Why Heavy Clay Soil Is the Wrong Choice for Ajwain
Heavy clay soil is the single most common reason ajwain plants fail in-ground. Clay particles are tiny, plate-like, and they pack tightly together. Water moves through clay slowly, oxygen moves through clay even more slowly, and roots either drown or rot. Ajwain is a documented victim of root rot caused by Rhizoctonia solani, a fungal pathogen that thrives in exactly the wet, low-oxygen conditions that clay creates.
There is also a tempting fix that makes clay worse: adding sand to clay. When fine sand is mixed into clay in small amounts, the result is often a concrete-like substance. The clay fills the spaces between sand grains and binds the whole mass into a hardpan. To actually improve clay, you need to add organic matter, not sand. Compost, well-rotted manure, leaf mold, and similar materials wedge between clay particles, separate them, and create pore space. The improvement is real, but it is also slow. Plan on top-dressing with 2 to 3 inches of compost every year for several years before clay becomes genuinely loose.
For ajwain specifically, the practical advice is simple. If your ground is heavy clay, do not plant ajwain in the ground at all. Grow it in a raised bed at least 15 cm tall filled with the 2:1:1 mix, or in a container with drainage holes. The plant will reward you with stronger aroma, denser growth, and far fewer disease problems than it would in amended-but-still-clay soil.
Organic Matter, Compost, and the Flavor Question
Ajwain grown for kitchen use or for seed is often judged by the strength of its aroma. Soil fertility, especially the organic-matter fraction, plays a real role in that. Plants grown in nutrient-poor soils tend to push out smaller, less aromatic leaves as a survival strategy. Plants grown in well-balanced, organically rich soils invest in fuller essential-oil production, including the thymol and carvacrol compounds that give ajwain its distinctive bite.
The good news is that ajwain is not a heavy feeder. A 2:1:1 mix with one-third compost provides enough slow-release nutrition for an entire growing season for true ajwain, and for several months of active growth in Indian borage. Over-fertilizing, especially with high-nitrogen synthetic feeds, actually reduces essential-oil content and pushes the plant toward leafy growth at the expense of flavor concentration. Peer-reviewed work on ajwain has repeatedly shown that vermicompost combined with Azospirillum inoculation produces higher thymol and better oil quality than urea-based chemical fertilization at the same nitrogen level.
A practical organic-matter plan looks like this. Mix compost into the soil at potting or bed-preparation time at the 2:1:1 ratio. Top-dress with a 1 cm layer of compost or vermicompost every 6 to 8 weeks during active growth. Stop or sharply reduce feeding in the cooler months when growth slows. If leaves start to yellow despite fresh compost, check pH before adding fertilizer; the most common “fertilizer deficiency” in ajwain is actually a pH lockout.
How to Refresh the Soil of an Established Ajwain Plant
Container soil does not stay fresh forever. Watering slowly leaches nutrients, organic matter decomposes, and perlite or sand gradually migrates to the bottom. After 8 to 12 months, the mix in a pot is usually due for a refresh, even if the plant itself is not ready for a bigger pot.
The simplest refresh is partial. Slide the plant out, tease off the bottom third of the old mix with a chopstick or your fingers, and shake loose any heavily root-bound sections. Refill the pot with fresh 2:1:1 mix, reposition the plant at the same depth, water thoroughly, and let it recover in Ajwain Plant light guide for a week. This works for healthy plants that just need a nutrient reset.
The fuller refresh is a full repot. Move the plant into a pot one size up if it is root-bound, otherwise into a clean pot of the same size with all-new mix. Inspect the roots as you go; healthy ajwain roots are pale and firm, while rotting roots are brown, mushy, and smell sour. Trim any soft sections with clean scissors, dust cuts with a little cinnamon or a labeled fungicide if you prefer, and repot into the new mix. Wait two to three weeks before fertilizing.
For ground beds, refresh means top-dressing. Each spring, add 2 to 3 cm of compost over the bed, scratch it into the top few centimeters of soil with a hand fork, and water it in. Avoid deep digging once ajwain is established, because the relatively shallow root system does not appreciate disturbance.
What to Buy: Ready-Made Mixes That Already Work
If you would rather not mix your own, several commercial categories work for ajwain out of the bag or with a single tweak. The key is to read the ingredient list, not just the marketing.
A high-quality organic herb potting mix with perlite or pumice listed on the bag is the closest one-step option. These mixes are typically peat- or coir-based with compost and perlite, pH-adjusted to 6.0 to 7.0, and ready to use. Most major garden brands carry a version. They work for both true ajwain and Indian borage without modification, although adding 10 to 20 percent extra perlite improves drainage in humid climates.
A cactus and succulent mix is an interesting option for true ajwain in hot, dry conditions, because it is built around aggressive drainage. It is too lean for Indian borage and too low in organic matter for ajwain grown for kitchen herb use, but it can be brought up to ajwain standards by blending in 30 to 40 percent compost or worm castings by volume.
A standard indoor potting mix works only after amendment. Plain indoor mixes hold too much water for ajwain roots. Cut them with 25 to 30 percent perlite or coarse sand to bring the drainage into the right range, and add a small handful of compost per liter of mix to bump up the organic content. This is the most common store-bought option and the one that benefits most from a single, well-chosen additive.
Whichever bagged mix you pick, avoid those that contain water-retaining crystals or hydrogel beads. They are marketed as a convenience, but they keep the root zone wetter than ajwain can tolerate, especially in plastic pots. Also avoid “moisture control” mixes with high peat content and no perlite. They are formulated for ferns and African violets, not for Mediterranean and semi-arid herbs.
Common Soil Mistakes That Kill Ajwain Plants
Most ajwain soil problems come from a short list of repeated mistakes. Knowing them in advance is the difference between a thriving plant and a slowly declining one.
The first mistake is using garden soil straight in a pot. As covered above, garden soil compacts in containers, suffocates roots, and creates a slow-drowning situation. Always amend or substitute with a dedicated mix.
The second is adding sand to clay ground. The instinct is reasonable, the result is concrete-like. Improve clay with organic matter, not sand, and only after years of patient top-dressing. Better still, build raised beds.
The third is overwatering on Ajwain Plant on top of a moisture-retentive mix. Even a well-built ajwain mix can be overwatered. The fix is to let the top 2 to 3 cm of soil dry between waterings and to water only when the pot feels light. Self-watering pots and cachepots that hold standing water underneath the pot are a common silent killer for ajwain.
The fourth is over-amending with fertilizer. Especially in rich compost-heavy mixes, additional synthetic fertilizer pushes the plant into leafy, low-aroma growth and can build up salts that burn roots. Trust the compost.
The fifth is ignoring pot size and depth. True ajwain has a taproot-like structure and dislikes being cramped, while Indian borage spreads laterally. A 6-inch-deep pot is the minimum for either; a 10- to 12-inch pot gives both room to settle in and develop stronger flavor.
The sixth is never refreshing the soil. A pot of mix that looked perfect at planting becomes compacted and depleted within a year. Either refresh annually or repot every 18 to 24 months. Skipping this is the most common reason a two-year-old ajwain plant “just stopped growing” for no obvious reason.
Conclusion
The right ajwain plant soil mix is a forgiving thing to build, but it is also unforgiving of shortcuts. Two parts garden loam, one part compost, and one part coarse sand or perlite, kept at a pH of 6.0 to 7.5 in a container with drainage holes, gives both true ajwain and Indian borage what they need to grow vigorously and produce strongly aromatic leaves or seed. Lean a little more toward drainage in humid climates, a little more toward compost in hot dry ones, and top-dress with compost once or twice a season rather than reaching for synthetic fertilizer.
If you are starting from scratch, mix a small batch of the 2:1:1 recipe this week, pot up either a true ajwain seedling or a small Indian borage cutting, and watch how the soil behaves over the next month. If the pot drains within a few seconds of watering, the surface dries in two to three days, and the plant pushes out new growth without yellowing, the recipe is working. If the pot stays wet or the plant stalls, adjust the drainage fraction first, the compost second, and pH third, in that order.
The reward for getting the soil right is a plant that needs very little from you beyond sunlight, occasional water, and a yearly refresh. Aroma gets stronger, growth gets denser, and root rot stays where it belongs: in clay-heavy ground beds, not in your ajwain pot.
When to use this page vs other Ajwain Plant guides
- Ajwain Plant overview - Start here for whole-plant context before deep-diving this topic.
- Ajwain Plant problems hub - Jump to symptom-specific fix guides when this care topic does not resolve the issue.
- Root Rot on Ajwain Plant - Escalate here when soil adjustments are not enough.
- Mold on Soil on Ajwain Plant - Escalate here when soil adjustments are not enough.