Ajwain Plant Propagation: Stem Cuttings in Water and Soil
Ajwain Plant Propagation: Stem Cuttings in Water and Soil, Step by Step
Ajwain Plant Propagation: Stem Cuttings in Water and Soil, Step by Step
The first cutting you take from an ajwain plant will tell you almost everything you need to know about how forgiving this herb is. Snip a healthy 4–6 inch stem, drop it into a glass of water, and within 10–18 days you may see white root nubs pushing out of the submerged node. The same cutting pushed into a moist, well-draining mix usually roots just as quickly, often with a thicker root system, and almost always with less rot. Both methods work. The trick is knowing which one to pick for your conditions, your timeline, and the cutting material in front of you.
This guide walks through ajwain plant propagation end to end: how to identify the right stem, where to cut, how to root it in water, how to root it in soil or perlite, when to use a leaf-bud cutting, when to divide a mature clump, when seed propagation makes sense, and how to care for the new plant until it is established. It is written for home gardeners growing ajwain on a windowsill, a balcony, or a kitchen herb corner, and it leans on the same propagation principles used by university horticulture programs and the Missouri Botanical Garden’s home-gardener guidance.
What “Ajwain Plant” Actually Means - And Why It Changes the Method
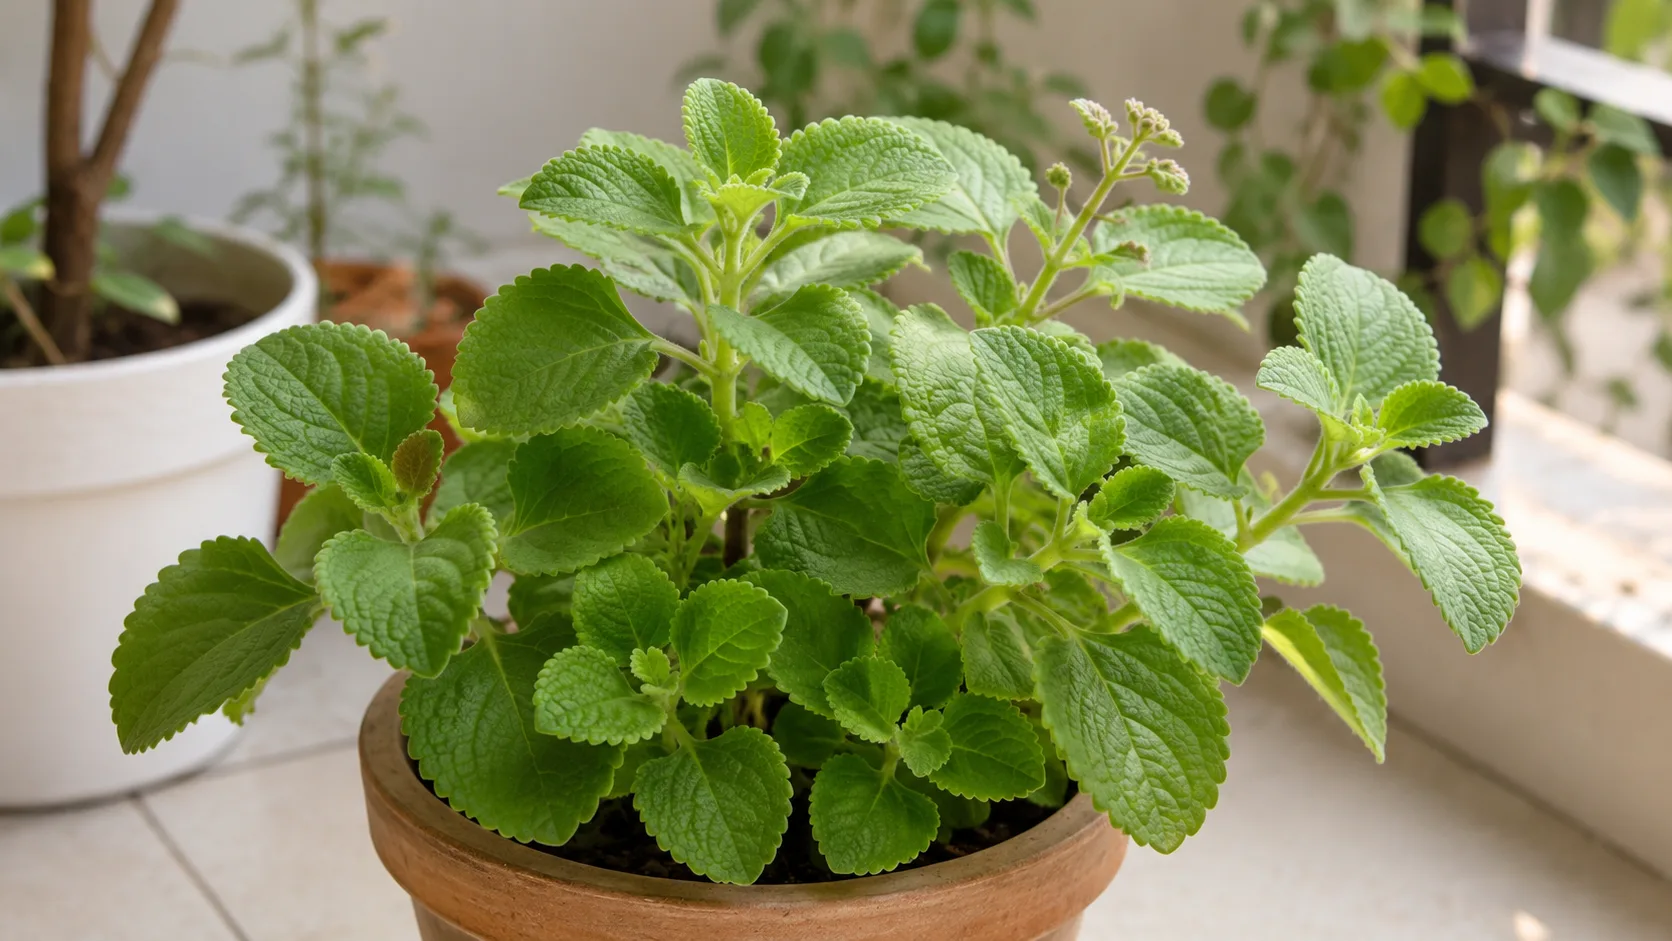
Before taking a single cutting, it helps to be clear about which plant you are propagating. The herb sold across India as “ajwain plant” in nursery pots is almost always Plectranthus amboinicus (also called Coleus amboinicus), a semi-succulent, fuzzy-leaved perennial in the mint family (Lamiaceae). It is also widely called Indian borage, Cuban oregano, country borage, Spanish thyme, or Mexican mint. It is the plant whose leaves you chew on for a sore throat or drop into a hot dal for flavor.
The true ajwain - the source of carom seeds used in Indian breads, pickles, and digestion remedies - is Trachyspermum ammi, a small annual herb in the carrot family (Apiaceae) that grows 30–90 cm tall, has feathery foliage like dill, and is propagated almost exclusively by seed. You will not usually propagate Trachyspermum ammi from stem cuttings in a home setting, and most home-garden propagation advice for “ajwain” refers to Plectranthus amboinicus.
This matters for two reasons. First, the method you choose depends on the species. Second, expectations about rooting speed and success rates change with the species. Plectranthus amboinicus is a soft-stemmed tropical that roots aggressively from almost any healthy node; Trachyspermum ammi does not respond to typical stem-cutting methods, and growers rely on fresh seed. Everything below applies to the home-garden “ajwain plant” (Plectranthus amboinicus) unless explicitly noted. A short seed method for true Trachyspermum ammi is included at the end for completeness.
The Two Best Propagation Windows in a Year
Timing matters more than most beginners expect. A healthy cutting taken at the wrong time of year will sit for weeks, throw out a single weak root, or rot before it ever roots. The two reliable windows for ajwain plant propagation are spring to early summer in temperate regions, and the monsoon season in South Asia. The first runs from mid-spring through early summer, roughly from when night temperatures stay above 15°C (59°F) until the hottest weeks of summer. The plant is in active growth, the stems are firm and green, the days are long enough to support photosynthesis without stress, and the air is humid enough to keep cuttings from desiccating. The Missouri Botanical Garden’s water-rooting guide notes that soft-stemmed tropicals like begonias, coleus, and ivies root best when cuttings are taken in active growth and kept in bright, indirect light - the same principle that drives spring and early summer success for ajwain.
In India, Bangladesh, Sri Lanka, and similar South Asian climates, the monsoon months of June through September offer a second strong window. Warm temperatures, high humidity, and natural cloud cover mimic the conditions a propagation dome would otherwise provide, so cuttings root quickly and the medium stays evenly moist. Gardeners in these regions often get faster results in the monsoon than they do in the dry heat of May. Avoid propagating in deep winter, in the peak of summer in dry climates, or when the parent plant is flowering heavily. Cuttings taken from a stressed, dehydrated, or flowering plant root slowly and often fail. If you must propagate out of season, plan to use a humidity dome, a heat mat set to around 21–24°C, and grow lights - but expect the success rate to drop.
Tools, Mediums, and Hormones You Actually Need
You do not need a laboratory to root an ajwain cutting, but a few pieces of clean, well-chosen equipment will lift your success rate sharply.
Cutting and sanitation tools
Use a sharp, sterilized blade - bypass pruners, a grafting knife, or a fresh razor all work. Wipe the blade with 70% isopropyl alcohol or a 1:9 bleach-to-water solution between cuts, especially if you are moving from one plant to another. Dirty blades are a leading cause of stem rot in propagation. Have a clean tray, a few small pots (4–6 inches in diameter) with drainage holes, labels, and a clear plastic bag or humidity dome ready. A spray bottle for misting and a small stake to hold the bag off the cutting are also useful.
Rooting mediums compared: water, soil, perlite, sand
Each medium has a real trade-off.
Water is the most beginner-friendly because you can see the roots form, but it is the least reliable for Plectranthus amboinicus. The stems are semi-succulent and prone to rot when fully submerged for long periods, and the transition from water roots to soil roots can shock the cutting. Expect a meaningful failure rate.
A peat-perlite mix (roughly 50% peat or coco peat and 50% perlite) is the most forgiving soilless option. It holds moisture around the cutting without staying wet, gives the new roots air, and is light enough to handle delicate new growth. The University of Nebraska–Lincoln Extension specifically recommends an equal-parts peat-and-perlite blend as a high-quality rooting medium, and notes that perlite’s porous structure reduces the risk of root rot on Ajwain Plant while supporting healthy root development.
Coarse, washed sand (horticultural or builder’s sand, not play sand) drains very fast and works well in warm, humid climates. It is a traditional choice for semi-succulent cuttings because the rapid drainage prevents the stem base from sitting in moisture.
A standard sterile potting mix amended with 30–40% perlite is a reasonable third option if you do not have pure perlite on hand. Avoid garden soil, which compacts, holds too much water, and often carries pathogens that attack fresh cuttings.
Rooting hormone is optional for ajwain. Plectranthus amboinicus roots readily without it, and many home growers skip it entirely. That said, a light dusting of a talc-based rooting hormone containing 0.1–0.3% indole-3-butyric acid (IBA) - products like Hormex #1, Hormodin 1, or Rootone - can speed rooting by 3–7 days and is worth using on older, slightly woody, or slow-to-strike cuttings. The Washington State University Extension’s propagation guide notes that liquid or water-soluble IBA at 500–1,500 ppm is the typical concentration range for softwood and herbaceous cuttings, while talc-based products at 0.1–0.8% IBA are the practical choice for home gardeners.
Picking the Right Stem: What to Cut and What to Leave
Most propagation failures start with a bad cutting. The cutting material matters more than the medium, the hormone, or the temperature. A weak, woody, or flowering cutting will struggle in any setup.
Choose a stem that is healthy, firm, and green - not soft and floppy, not brown and woody, and not currently in flower. The ideal stem is 4–6 inches long (10–15 cm), about the thickness of a pencil or slightly thinner, and has at least 2–3 visible nodes. Avoid stems that have already pushed flowers or flower buds; once a stem shifts to reproductive growth, its root-forming potential drops sharply. NC State Extension’s guide on leaf, cane, and root cuttings makes the same point generally: take cuttings from healthy, vigorous, actively growing material, not from tired or flowering stems.
Make the cut with a sterilized blade just below a node - the slightly swollen joint on the stem where leaves and small buds attach. Roots emerge most easily from this location, and cutting just below it leaves the maximum amount of rooting tissue exposed. Once the cutting is off the parent plant, strip the leaves from the bottom one to two thirds of the stem, leaving two to four leaves at the top. Removing the lower leaves is non-negotiable: any leaf that ends up below the waterline or below the soil surface will rot, and that rot will spread to the stem. If the remaining top leaves are large, cut each leaf in half horizontally to reduce water loss without removing the photosynthetic tissue entirely.
Optional: let the cut end dry and callus for 1–2 hours in a shaded, airy spot before planting. Callusing is not strictly necessary for ajwain, but it reduces the risk of rot in humid setups, and several experienced ajwain growers recommend it.
How to identify a node on an ajwain stem
A node is the place on the stem where leaves, branches, or aerial roots emerge. On Plectranthus amboinicus, nodes are usually easy to spot: look for a slightly swollen ring around the stem, the joint where a pair of leaves attaches, or a faint vertical line on the stem that marks where a previous leaf once grew. The space between two nodes is called the internode - it is smooth and round, and it will not produce roots. A 4–6 inch cutting from a healthy ajwain stem will usually carry 3–5 nodes, which is more than enough.
How to Root Ajwain Cuttings in Water (Step by Step)
Water propagation is the most familiar method for first-time propagators. For ajwain, it works best as a short, observation-friendly method rather than a long-term rooting strategy.
When water works and when it doesn’t
Water works well for short trials, classroom demonstrations, and quick visual checks - you can watch the first root nubs appear. It works less well for Plectranthus amboinicus as a long-term rooting system because the stems are prone to rot, water holds less oxygen than an airy mix, and water roots are slightly different structurally from soil roots, so the transition to a pot can be more stressful. Singapore’s National Parks Board classifies Coleus amboinicus as a succulent with “moderate water” needs, and the species’ semi-succulent stems are prone to rot if fully submerged for long periods. If you do root in water, plan to pot up promptly once roots are 1–2 inches long, and be ready for some losses.
Step-by-step water method
- Take a 4–6 inch cutting from a healthy, non-flowering stem, cutting just below a node. Remove the leaves from the lower half of the cutting, leaving 2–4 leaves at the top.
- Optional: dip the cut end in a talc-based rooting hormone, tapping off the excess.
- Fill a clean, clear glass or jar with room-temperature water. If you are using tap water in a hard-water area, let it sit overnight so chlorine can off-gas.
- Place the cutting in the glass so that the bottom 1–2 inches - covering at least one or two nodes - are submerged, and no leaves are under water. A narrow-necked bottle or a piece of cling wrap with a small hole can hold the cutting upright without letting the leaves touch the water.
- Put the glass in a spot that gets bright, indirect light - a north- or east-facing window, or 30–50 cm under a grow light on a 12–14 hour cycle. Avoid direct sun, which can cook the cutting through the glass.
- Change the water every 2–3 days. Stagnant water loses oxygen, grows bacteria, and is the leading cause of rot in water propagation. Fresh water also keeps the cut end clean and visible.
- Watch for small white nubs at the submerged nodes within 10–18 days. Most ajwain cuttings in water will show first signs of rooting in the second week. Some cuttings take three weeks or more, especially in cool conditions.
- When the new roots are 1–2 inches long and you can see secondary branching starting, pot the cutting into a small container with a moist, well-draining potting mix. Water it in, keep it in bright, indirect light for another 7–10 days, and avoid fertilizer for at least a month.
If at any point the submerged portion turns brown, soft, or slimy, or the water smells sour, the cutting is rotting. Cut above the rot with a sterilized blade, re-trim the leaves, and start over in fresh water or switch to soil/perlite.
How to Root Ajwain Cuttings in Soil or Perlite (Step by Step)
For most home gardeners, soil or perlite is the safer default. It mimics the natural rooting environment of the plant, produces sturdier roots, and avoids the water-to-soil transition shock that water-rooted cuttings experience.
Why soil or perlite is the safer default
The University of Nebraska–Lincoln Extension’s propagating-house-plants guide observes that some plants root easily in water, but perlite, vermiculite, or a peat-perlite mix “generally gives more satisfactory results” for a wider range of species. Perlite’s porous structure holds a small amount of moisture around the base of the cutting while letting excess water drain and keeping oxygen available to the developing roots. The result is a denser, more branched root system in the same time window, and a much lower rot rate.
Step-by-step soil/perlite method
- Prepare your medium first. Moisten a 50:50 peat-and-perlite blend, or pure perlite, or a coarse washed sand, until it is evenly damp - like a wrung-out sponge, not dripping.
- Fill a 4–6 inch pot with drainage holes with the medium, or use a seedling tray with cells at least 3 inches deep. Pre-moistening prevents the dry mix from wicking moisture away from the cutting.
- Take a 4–6 inch cutting from a healthy, non-flowering stem, cut just below a node, and strip the lower leaves. If you are using rooting hormone, dip the bottom 1 cm of the stem in water, then in the talc, then tap off the excess.
- Use a pencil, dibber, or your finger to make a hole in the medium deep enough to bury at least two nodes - typically 2–3 inches deep. Inserting the cutting into a pre-made hole prevents the hormone (if used) from rubbing off and avoids compacting the medium around the stem.
- Place the cutting into the hole, firm the medium gently around the stem so it stands upright, and water lightly to settle everything.
- Cover the pot with a clear plastic bag, a propagation dome, or an inverted clear bottle with the cap off. The cover should not touch the leaves - use a small stake or a chopstick to hold the plastic away. This mini-greenhouse keeps humidity around 80–90%, which dramatically reduces wilting and speeds root formation.
- Place the setup in bright, indirect light at roughly 21–24°C. A heat mat set to the same range is helpful in cool rooms. Avoid direct sun, which will cook the cutting under the cover.
- Open the cover once a day for 5–10 minutes to refresh the air and reduce fungal pressure. Mist the inside of the cover lightly if the medium looks dry on the surface.
- After 10–14 days, give the cutting a very gentle tug. If you feel resistance, roots are forming. Most ajwain cuttings in a peat-perlite mix will root in 2–4 weeks, with some vigorous cuttings rooting in as little as 10 days.
- When the cutting resists the tug and is pushing visible new leaf growth at the top, remove the cover for progressively longer periods over 3–5 days to harden it off. Then transplant to its final pot or garden position, water in, and continue with normal care.
Leaf-Bud Cuttings: A Space-Saving Backup Method
If you have a long, healthy ajwain stem but want to make the most of it, you can take leaf-bud cuttings from the leftover sections. A leaf-bud cutting uses a single node with one attached leaf and a short piece of stem above and below it - typically 2.5–4 cm of stem total. NC State Extension’s propagation guide describes this method as a way to multiply limited cutting material, and notes that it works well on trailing or sprawling plants like ajwain’s relatives in the mint family.
To take a leaf-bud cutting, slice the stem into segments so that each segment has one leaf and one axillary bud (the small bump where the leaf joins the stem). Dip the lower cut end in rooting hormone, insert it into a moist peat-perlite mix so that the bud is buried about 1 cm deep and the leaf is exposed above the medium, then cover with a humidity dome and treat it like a stem cutting. Leaf-bud cuttings typically root in 3–4 weeks and produce a smaller plant at first, but they are an excellent way to turn one long stem into three or four new plants.
This method is also useful if a long stem has bent or broken off the parent plant. Rather than discarding the broken piece, trim it into leaf-bud sections and root each one.
Dividing a Mature Ajwain Plant
When a mature Plectranthus amboinicus has grown into a wide, multi-stemmed clump - common after a year or two in a large pot or a garden bed - division is often faster, easier, and more reliable than cuttings. You are separating an already-rooted plant into smaller already-rooted plants, so you skip the rooting stage entirely.
Water the parent plant thoroughly the day before dividing. This hydrates the plant, softens the soil, and reduces transplant shock. The next day, gently lift the entire root ball out of the pot or dig around the plant in the garden, staying 15–20 cm away from the center to avoid slicing through thick roots. Shake or wash off excess soil so you can see the natural divisions in the root mass.
Using a sterilized knife, pruners, or your hands, separate the root ball into sections. Each section should have at least 2–3 healthy stems and a generous share of roots. Replant each division immediately into a prepared pot or garden spot at the same depth it was growing before, spacing divisions 30–45 cm (12–18 inches) apart in the garden to give each new plant room to spread. Water in well, keep the soil consistently moist for the next 2–3 weeks, and provide bright, indirect light or partial shade while the divisions re-establish.
The best time to divide is in spring or early summer in temperate climates, or at the start of the monsoon in South Asia - the same windows you would use for cuttings. Avoid dividing in deep winter or in the peak of summer, when the plant is already under stress.
Seed Propagation: When It Applies and When It Doesn’t
If your “ajwain plant” is the common Plectranthus amboinicus sold as a kitchen herb, seed propagation is not a practical option. The plant flowers only intermittently, the seeds are not commonly available, and stem cuttings root so reliably that seed is unnecessary.
If you are growing true Trachyspermum ammi - the carom seed spice - seed propagation is essentially the only home option. Sow fresh seed directly into a prepared bed or a deep pot, because the species develops a delicate taproot that dislikes transplanting. Press the seeds into the surface or cover them with no more than 0.5–1 cm of fine soil, keep the medium evenly moist, and maintain a temperature around 20–30°C. A peer-reviewed study published in the International Journal of Current Research found that germination is best at a sowing depth of 0–1 cm and that alluvial or sandy loam soils support faster, more uniform emergence. Germination typically occurs in 7–14 days, with the seed heads maturing 60–70 days after sowing. In India and Pakistan, the traditional sowing window is September to November, though spring sowings are possible in cooler parts of the country.
For the home gardener, the practical takeaway is this: cuttings are for Plectranthus amboinicus; seeds are for Trachyspermum ammi. If a recipe or neighbor hands you a “seed” of what they call ajwain, it is most likely a Trachyspermum ammi seed, and you should treat it accordingly.
Aftercare: Watering, Light, and Fertilizer for New Cuttings
A rooted cutting is not yet a plant. The first 4–6 weeks after rooting - and the first 1–2 weeks after transplanting to a larger pot - are when most new ajwain plants are lost. The aftercare is straightforward but does require restraint.
Watering: Keep the medium consistently moist but never soggy. For cuttings in small pots, this often means a light watering every 2–3 days, depending on the temperature and humidity. Stick a finger into the top 1 cm of the medium; if it feels dry, water. If it feels damp, wait. Soggy medium is the single most common cause of cutting failure after the rooting stage.
Light: Keep newly potted cuttings in bright, indirect light for the first 2–3 weeks. A north- or east-facing window, a spot 30–50 cm under a fluorescent or LED grow light, or a sheltered porch with filtered sun all work. Direct sun at this stage causes leaf scorch and excessive water loss because the root system is not yet large enough to keep up with transpiration. Once you see steady new leaf growth, gradually increase the light exposure over 1–2 weeks until the plant is in its final light position.
Fertilizer: Do not fertilize for at least 4–6 weeks after transplanting, and do not fertilize cuttings that are still rooting. The propagation medium usually has enough nutrients to support the first stage of growth, and excess fertilizer can burn tender new roots. When you do start feeding, use a balanced liquid fertilizer diluted to half strength and apply it no more than once every 2–3 weeks during active growth. A high-phosphorus fertilizer at half strength is often recommended for newly transplanted material because phosphorus supports root recovery.
Humidity: For the first week after transplanting, a loose plastic cover or a daily mist will help the cutting transition out of its high-humidity rooting environment. Open the cover progressively over 3–5 days to harden the plant off.
Hardening off before outdoor planting: If you started the cutting indoors and want to move it outside, harden it off over 7–10 days. Place it outside in a sheltered, shaded spot for an hour on the first day, then increase the outdoor time and light exposure by 1–2 hours per day. After a week to ten days, the plant should be able to handle its final outdoor position.
Common Mistakes and How to Save a Struggling Cutting
Even with the right method, a meaningful share of cuttings will struggle. The mistake list is short, and most of it comes down to moisture, hygiene, and patience.
Rotting stem in water: The water turned cloudy, the stem feels slimy, or the leaves are yellowing. This is the most common problem. Cut above the rot with a sterilized blade, re-trim the leaves, and either refresh the water in a clean glass or - better - switch to a peat-perlite mix.
Wilting cutting under the humidity dome: The cutting is losing more water than its emerging roots can replace. Check that the dome is actually holding humidity (you should see condensation), that the medium is damp, and that the cutting is not in direct sun. If the leaves are still firm and the stem is not mushy, the cutting is fine and just needs a few more days. If the leaves have gone limp and papery, the cutting is likely lost; take a fresh one and check your setup.
Cutting not rooting after 4 weeks: Almost always a temperature, light, or cutting-quality problem. Confirm the medium is at 21–24°C, the light is bright but indirect, the cutting has at least one node buried, and the original cutting was green and firm rather than woody or flowering. Start over with a fresher cutting if needed.
White fuzzy growth on the medium: Usually a harmless saprophytic fungus, but in a closed humidity dome it can also signal poor air circulation. Remove the dome for 10–15 minutes twice a day for a few days, and the fungus typically disappears. If it does not, or if the cutting itself develops fuzzy growth, the cutting is likely going to rot and should be discarded.
Transplant shock after potting up: The cutting wilts, drops leaves, or stops growing for 1–2 weeks after being moved to a larger pot. This is normal. Keep the medium evenly moist, hold off on fertilizer, provide Ajwain Plant light guide, and resist the urge to overwater. Most cuttings recover within 2–3 weeks and push new growth.
Premature fertilizer: Brown leaf tips, crispy edges, or a sudden slowdown in growth within a few days of feeding. Flush the pot with plain water and hold off on fertilizer for at least a month. The University of Nebraska–Lincoln Extension and the Missouri Botanical Garden both emphasize that fresh cuttings and recently potted plants should not be fertilized until they show active new growth.
If a cutting fails completely, the right response is to start over with cleaner material rather than to nurse a rotting piece. Take a fresh 4–6 inch cutting from the parent plant, sterilize your tools and pot, and try again. Most home gardeners who struggle with ajwain propagation on the first try succeed on the second or third attempt, and the parent plant will usually provide more than enough material.
Conclusion
Ajwain plant propagation is one of the most reliable ways to multiply a useful kitchen herb, and the right method depends more on your conditions and patience than on any single technique. For most home gardeners growing Plectranthus amboinicus, a 4–6 inch stem-tip cutting rooted in a moist peat-perlite mix under a humidity dome is the safest, fastest path - expect roots in 10–18 days and a transplant-ready plant in 3–4 weeks. Water propagation works for short observation runs but carries a higher rot risk and a more stressful transition to soil. Leaf-bud cuttings let you stretch a single stem into several plants. Division is the right choice for a mature, multi-stemmed clump, and seed propagation is essentially limited to true Trachyspermum ammi rather than the Plectranthus amboinicus sold as the kitchen ajwain plant. NC State Extension confirms that Plectranthus amboinicus is most commonly propagated by stem cuttings, since it rarely sets consistent seed in cultivation.
Pick the cleanest, greenest, non-flowering stem you can find, cut just below a node, bury at least one node in a well-draining medium, keep humidity high and light bright but indirect, and resist the urge to water, fertilize, or check roots for at least two weeks. The plant will do the rest. Within a month you will have a new ajwain plant that is genetically identical to the parent - a free, healthy, and reliably productive addition to your kitchen, balcony, or herb garden.
When to use this page vs other Ajwain Plant guides
- Ajwain Plant overview - Start here for whole-plant context before deep-diving this topic.
- Ajwain Plant problems hub - Jump to symptom-specific fix guides when this care topic does not resolve the issue.