Zebra Plant Propagation: Stem Cuttings Guide
Zebra Plant Propagation: Stem Cuttings Guide
Zebra Plant Propagation: Stem Cuttings Guide
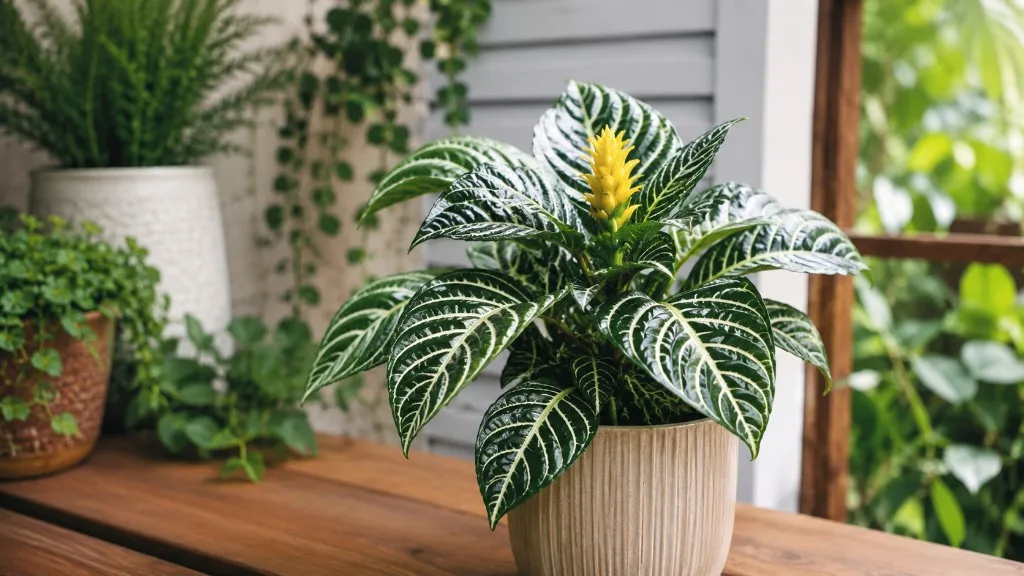
Zebra plant propagation succeeds or fails on three details that generic houseplant guides treat as footnotes: a cutting must carry living nodes, you should start in spring when the parent is actively growing, and the setup needs a high humidity dome that stays managed, not sealed shut. Aphelandra squarrosa - the glossy-leaved tropical sold as saffron spike zebra - evolved in the humid understory of Brazil’s Atlantic Forest, where severed stem tips restart only when moisture in the air matches moisture at the wound. Indoors, that environment does not happen by accident. You build it deliberately around a 10–15 cm (4–6 inch) stem cutting with two or more nodes buried in lean mix, enclosed under clear plastic or a propagation dome, and kept in bright indirect warmth until roots form.
This is not the same plant as Calathea zebrina or succulent Haworthia “zebra” lookalikes, and the methods do not transfer. Aphelandra is an Acanthaceae shrub with thick, veined foliage and dramatic yellow bracts when conditions align. Its cuttings wilt within days without sustained humidity above roughly 60% around the leaves - a dome is the difference between a rooted clone and a limp experiment. The workflow below walks through node selection, spring timing, dome construction, ventilation to prevent mold, realistic rooting timelines, hardening off, and the mistakes that cause most home failures.
Why Zebra Plant Stem Cuttings Need a Node
A node is the swollen joint on a stem where leaves attach and where dormant buds can activate into roots or new shoots. For zebra plant propagation, the node is non-negotiable: it contains the meristematic tissue that converts a detached piece of stem into an independent plant. Without at least one buried node in contact with moist, airy medium, a cutting may stay green for a while and then decline because it has no pathway to generate roots or a growing tip.
Stem tip cuttings are the standard home method because they combine multiple nodes, existing leaves for limited photosynthesis, and a terminal bud that can continue upright growth once roots support it. NC State Extension recommends stem cutting as the primary propagation strategy, noting that stems removed during post-flowering pruning can propagate additional plants. Division during Zebra Plant repotting guide works on mature multi-stem specimens, and water rooting is sometimes attempted, but soil propagation under a humidity dome remains the highest-success route for most readers. The ASPCA lists Aphelandra squarrosa as non-toxic to cats, dogs, and horses, which makes sharing rooted cuttings with pet-owning friends straightforward - though sap can irritate sensitive skin, so gloves during cutting are sensible.
What a Node Looks Like on Aphelandra squarrosa
On a healthy zebra plant stem, nodes appear as slightly raised rings where a leaf petiole meets the stem, often with a fine line or subtle swelling visible if you run a fingernail along the internode. Each node can theoretically produce roots when buried; the segment between two nodes - the internode - roots less reliably on its own. When selecting material, aim for a cutting that includes at least two nodes: one will sit below the mix surface where roots initiate, and one remains above with leaves attached to sustain the cutting while it roots.
Leaves themselves are large, dark green, and boldly veined - that ornamental foliage is exactly why the plant desiccates fast without a dome. A zebra plant leaf transpires heavily in typical indoor air, and a rootless cutting cannot replace lost water. Nodes solve the long-term problem; the dome solves the short-term water budget until roots take over. If you are unsure whether you captured a node, look for the C-shaped scar left after removing a lower leaf; that scar marks the node plane where you should cut or bury.
Why Leaf-Only Cuttings Fail
A single zebra plant leaf with petiole attached but no stem node rarely becomes a full plant. Some Acanthaceae species can produce callus at a petiole base under laboratory conditions; in home propagation, leaf cuttings typically yellow and rot without ever sending up a shoot. If a stem breaks and you salvage only a leaf, compost it rather than investing weeks in a doomed jar of water.
The same rule disqualifies internode-only sections - a bare stem length with no node at either end. It cannot root from the middle of the segment in normal home setups. Always verify that your cutting includes stem tissue with visible nodes before you sanitize tools and open the dome. When in doubt, take a slightly longer tip cutting with three nodes instead of gambling on a short piece that looks tidy but lacks buried meristem tissue.
When to Propagate Zebra Plant in Spring
Timing for zebra plant propagation is less about superstition and more about metabolic momentum. Aphelandra pushes its strongest new growth when days lengthen, temperatures stay in the 18–24°C (65–75°F) range, and the parent plant is not spending all its reserves on flowering or recovery from stress. Spring through early summer aligns with that rhythm in most Northern Hemisphere homes. Propagation during a cold, dim winter is possible with supplemental heat and light, but rooting slows, dome mold risk rises, and wilt recovery takes longer - match your effort to the season when you can.
Avoid taking cuttings immediately after shipping, repotting, pest treatment, or a bout of root rot on Zebra Plant on the parent. Each of those states depletes the donor plant and increases the odds that cuttings carry hidden weakness. Wait until new growth looks firm and evenly colored for two to three weeks before you harvest stem tips.
Why Spring and Early Summer Work Best
Spring is the ideal window because the parent plant is exiting any winter slowdown and entering active cell division. Warmer substrate temperatures - ideally around 21–24°C (70–75°F) at the pot - accelerate root initiation at buried nodes. A seedling heat mat under the propagation tray is one of the highest-return tools for this tropical; it speeds rooting by days or weeks compared with a cool windowsill.
Early summer remains viable if your home does not overheat. Avoid mid-summer propagation directly above radiators or in rooms that exceed 27°C (80°F) for long stretches; excessive heat in a sealed dome cooks cuttings and encourages anaerobic mix. A practical spring trigger: the parent shows fresh terminal growth with new leaves unfurling cleanly, and you have finished any post-bloom cleanup pruning - those trimmed stems are often perfect propagation material you would otherwise discard.
Post-bloom pruning is an underused spring opportunity. After the yellow bract display fades, many growers cut back leggy stems to encourage bushiness. Each removed tip with two nodes is a free cutting; NC State Extension advises cutting back stems and leaves to leave about two rows of leaves per stem - process them the same day into domes rather than composting viable tissue.
Signs Your Parent Plant Is Ready
Before you cut, inspect the donor plant for firm stems, rich green leaves without widespread yellowing, and no sticky honeydew suggesting scale or aphids. Check the root zone indirectly by how the pot dries: if mix approaches dry on a predictable rhythm and the plant is not chronically wilted, roots are likely healthy enough to spare tip material. Weak, floppy stems from chronic overwatering on Zebra Plant or root loss often fail even under ideal domes because internal reserves are already depleted.
Also consider aesthetics. Removing more than one-third of visible stem length at once can leave a sparse parent until side shoots fill in. Stagger propagation across two sessions two weeks apart if you want both new plants and a full display plant. If the parent recently moved windows or was repotted, wait three to four weeks so it exits transplant shock before you add cutting stress on top.
How to Take Zebra Plant Stem Cuttings
Taking the cutting is brief work that rewards slow precision. Gather sharp pruning shears or scissors, 70% isopropyl alcohol for sterilization, a clean work surface, labels if running multiple batches, and your pre-moistened mix and dome ready before the first cut. You are harvesting living tissue, not trimming dead foliage - treat it like minor surgery.
Work in the morning when the parent is fully hydrated if possible, not after a week of drought stress. A well-watered parent the day before cutting yields plumper stems; avoid soggy roots by checking that the parent pot is not waterlogged.
Choosing the Right Stem
Select a non-flowering stem tip or a side shoot that has not recently exhausted itself on bract production. Flowering stems can root, but they root slower because energy went into bloom. The ideal cutting is 10–15 cm (4–6 inches) long with two or three nodes and two or three healthy leaves remaining at the top after you strip the lower foliage.
Run a finger along the stem: it should feel firm, not papery or squishy. Avoid segments with brown soft spots, mechanical crush damage, or widespread chlorosis. Mid-stem tips with active growth points root faster than woody basal sections near the soil line. If your plant is leggy after winter, spring tip cuttings simultaneously propagate and reshape the parent - a dual benefit worth planning for in March or April.
Making the Cut Below a Node
Cut just below the lowest node you intend to bury, at a 45-degree angle so water sheds off the wound face rather than pooling on a flat horizontal slice. One clean snip; sawing crushes cells and invites bacterial entry. Sterilize blades between cuts if you take multiple tips or previously trimmed diseased tissue elsewhere.
Remove lower leaves so no foliage sits below the future soil line or touches wet mix inside the dome - buried leaves rot quickly and contaminate the medium. Leave two or three leaves at the top for photosynthesis. If leaves are very large and touch the dome walls, roll a piece of paper towel into a loose collar or use a small stake to keep them off plastic; leaf-to-plastic contact is a common rot entry point.
Let the cut end air-dry in warm shade for one to two hours before planting. Aphelandra is not a succulent; it does not need a week-long callus, but a brief dry period reduces immediate rot when the node enters moist mix. Do not rinse the cut under tap water; move directly from drying to planting within the same session when possible.
Preparing Cuttings Before Planting
Optional rooting hormone containing indole-3-butyric acid (IBA) can nudge slow batches but is not required for zebra plant propagation when nodes, dome humidity, and warmth align. If you use powder hormone, dip the moistened cut end lightly, tap off excess, and plant immediately. Liquid concentrates work at label dilution; skip hormone entirely if you prefer organic methods - success still depends far more on the dome than on hormone brand.
Inspect the cutting one last time: at least one node will sit below the mix surface, no damaged leaf tissue remains on the buried section, and the upper leaves look turgid. Label the pot with date and method if you propagate several cultivars or run comparison batches. Aphelandra squarrosa ‘Dania’ and ‘Apollo’ types propagate the same way genetically identical to the species unless you are working with an unstable sport - clones preserve variegation and bract intensity from the parent.
If upper leaves look slightly soft already, mist the air inside the future dome, not the cut face, and plant promptly. Delay increases wilt before roots exist. The preparation phase should take minutes, not hours, once the dome environment is waiting.
Building Your High Humidity Dome Setup
The high humidity dome is the centerpiece of zebra plant propagation - not an optional aesthetic extra. Tropical understory cuttings lose water through stomata faster than they can absorb without roots; enclosing them raises relative humidity around leaves to 60–75%, slowing transpiration while still allowing gas exchange if you vent correctly. A sealed environment without airflow breeds mold; an open room without enclosure breeds wilt. Your goal is a managed microclimate, not a forgotten plastic bag steamed shut for three weeks.
Choose a small pot - 7–10 cm (3–4 inches) - with a drainage hole for each cutting. Tiny pots dry on a useful rhythm: moist enough for root initiation, not so large that the mix stays waterlogged in the center while the surface looks dry. Clear plastic domes sold for seed starting work well; a clear plastic bag supported on bamboo stakes over the pot is equally effective and costs nothing. The cover must be transparent so you can monitor wilt and mold without daily unpotting.
Dome Options and Ventilation Rules
Commercial propagation domes with adjustable vents are ideal because you can crack airflow incrementally during hardening off. A bag setup needs manual venting: prop the bag open for two to four hours daily once condensation coats every interior surface continuously, or if you smell mustiness. Remove the cover entirely for a few hours if gray mold appears on mix or leaf edges - wipe affected tissue with a dry cloth, improve airflow, and reduce watering frequency slightly.
Keep plastic off the leaves. Stakes or a wire hoop should hold the bag or dome ceiling above the foliage by several centimeters. Leaves pressed against wet plastic develop brown patches and rot within days. If condensation drips onto leaves constantly, vent longer or move the setup slightly farther from a cold window where temperature swings exaggerate dew formation.
Place the domed pot in Zebra Plant light guide - an east window or several feet back from south glass. Direct sun on a enclosed cutting overheats the chamber and scorches tissue. If light is weak, roots may take longer but wilt is still the first enemy; prioritize humidity stability over chasing maximum light through sealed plastic.
Heat, Light, and Placement Inside the Dome
A seedling heat mat set to maintain substrate near 21–24°C (70–75°F) dramatically improves rooting speed for Aphelandra. Place the mat under the tray, not inside the bag; electronics and water vapor are a poor mix. Combine bottom heat with ambient room temperatures above 18°C (65°F); cold rooms defeat the mat and slow metabolism at the node.
Inside the dome, aim for even light without hot spots. Rotate the pot a quarter turn every few days if light arrives strongly from one direction, preventing lopsided leaf orientation. Do not fertilize inside the dome during rooting; salts in fertilizer can burn tender callus tissue before roots exist. Plain moist mix and humidity do the work until you see resistance at the base or new pale growth at the tip.
Watering under the dome means keeping mix consistently lightly moist, not soggy. Check moisture at the drainage hole edge with a finger: the top centimeter may dry slightly between checks while the node zone stays damp. Overwatering in a closed system is the fastest route to blackened nodes and sour mix - when in doubt, vent and wait rather than adding more water.
Rooting Medium and Planting Depth
Zebra plant cuttings root best in a lean, soil-less mix that holds moisture around the node while staying airy. A proven formula is 50% perlite and 50% peat moss or fine coco coir - no heavy garden soil, no water-retentive bark chunks that stay cold and wet in a small pot. Pre-moisten the mix until it holds together when squeezed but does not drip; fill the pot and poke a pilot hole with a pencil.
Insert the cutting so the lowest node sits 2–3 cm (about 1 inch) below the surface and the angled cut end is fully buried. Firm the mix gently around the stem without compacting it into concrete. If a second node sits at soil level, that is acceptable; burying two nodes can increase root mass but do not push the stem so deep that upper leaves sit below mix. Set the dome in place immediately after planting - every minute of open-air exposure counts against a tropical cutting.
Some growers add a quarter-strength balanced liquid feed only after roots are clearly active; until then, plain water or lightly moist mix alone is safer. If mix surfaces grow green algae in bright light, reduce watering slightly and vent more; algae is usually cosmetic at this stage but signals excess surface moisture.
Rooting Timeline and Success Signals
Patience with realistic expectations prevents premature abandonment of healthy cuttings. Roots typically develop in four to six weeks under warm, bright, domed conditions - NC State Extension notes that stem cuttings obtained during pruning ensure continuity for this short-lived houseplant - sometimes faster with heat mats in spring, sometimes slower in cool rooms. Visible new leaf expansion may take eight to twelve weeks even when roots already exist underground. A firm, green cutting that has not wilted is often succeeding quietly; lack of instant top growth is not automatic failure.
The first above-ground success signal is turgid leaves that recover overnight after slight midday softness. Persistent limp foliage after a week under a proper dome suggests a missing node, rot at the buried section, or a parent-derived weakness - investigate by gently unpotting only if wilt worsens, because disturbing roots too early breaks fragile initials.
After roughly week three, you may feel ** slight resistance** on a very gentle tug - not a yank. Resistance confirms anchoring roots. Alternatively, watch for new pale green growth at the terminal bud or a subtle thickening of the stem base above the mix line. Either sign means the cutting is transitioning from survival mode to active growth.
If nothing changes for eight weeks in a cold dim room, improve warmth and light before declaring failure. Verify the node was buried, the dome was vented to prevent mold, and the mix was moist but not wet. A cutting that turned black at the base needs trimming back to firm green tissue, re-drying an hour, and replanting in fresh mix - sometimes a second attempt succeeds when the first node rotted from overwatering.
Hardening Off and Aftercare for New Plants
Once roots are active and new growth appears, harden off gradually rather than removing the dome in one step. Over three to five days, increase vent opening duration daily until the cutting tolerates open air without wilt. Abrupt removal shocks leaves accustomed to saturated humidity and can cause tip browning even on rooted plants.
After hardening, treat the young zebra plant as a seedling-equivalent for four to eight weeks. Light stays bright indirect; water when the top centimeter of mix approaches dry, typically every five to ten days depending on pot size and season. Fertilizer can begin at quarter strength monthly once a second flush of new leaves hardens - not before. Do not repot into a large decorative container immediately; upsize one pot size at a time so roots colonize mix evenly.
Humidity can step down toward normal indoor levels 40–60% after hardening, though Aphelandra always appreciates higher humidity than desert cacti. A pebble tray or grouping with other tropicals helps without returning to a sealed dome. Quarantine new propagations from your main collection for two weeks if pests ever troubled the parent; aphids and spider mites transfer on cuttings silently.
When roots circle the starter pot - often two to four months after rooting - move to a standard well-draining peat-perlite potting mix in the next size container. Match the Zebra Plant watering guide you use for mature zebra plants: evenly moist but never waterlogged, with the top inch drying between thorough drinks.
Division as a Secondary Propagation Method
Division suits mature zebra plants with multiple stems and a crowded root ball during spring repotting, not as a first choice for beginners who want one new plant from a single tip. Unpot the parent, gently tease apart rooted sections so each division retains several stems, healthy roots, and multiple leaves, then plant each section in fresh mix at the same depth it grew before. Water thoroughly once, keep humidity high for the first week with a loose bag tent if leaves wilt, and avoid fertilizer until new growth resumes.
Division propagates faster than cuttings when it works because each section already has roots - establishment may take two to four weeks versus four to six for cuttings. The trade-off is stress on the parent and the skill required to avoid tearing fragile roots. If your goal is a single backup plant or a gift cutting, stem tips under a dome remain simpler and less risky to the display specimen.
Do not divide a plant actively fighting root rot or pest infestation; stabilize first, then propagate from clean regrowth or cuttings taken above the problem zone.
Common Zebra Plant Propagation Mistakes
Most zebra plant propagation failures trace to humidity, node placement, or moisture discipline - not mysterious bad luck.
Wilting within days almost always means no dome, a dome touching leaves, or a room too dry and hot with vents forgotten. Re-enclose immediately, stake leaves away from plastic, and confirm the node is buried in moist mix. Brief wilt recovery is possible if tissue has not crisped.
Black mushy stem bases mean overwatering in a closed system or planting before a brief dry period on the cut. Trim to firm tissue, replant in fresh dry-ish mix, vent daily, and water less aggressively.
Mold on mix or leaves signals insufficient venting. Open the dome daily, wipe mold gently, reduce watering, and ensure light is bright but not scorching inside sealed plastic.
No roots after two months in a cold room often reflects temperature, not dead tissue. Add bottom heat, improve light, and confirm two nodes were present - single-node cuttings with one leaf sometimes limp along slowly.
Propagating from a weak parent produces weak clones. Fix the donor’s watering, light, or pest issues first.
Confusing species leads to wrong methods - Calathea zebrina propagates by division of rhizomes, not Aphelandra stem tips. Confirm the botanical name Aphelandra squarrosa on the tag before you invest in dome setup.
Skipping spring timing is not always fatal but stacks odds against you in winter. If you must propagate off-season, commit to heat mat, supplemental light, and longer wait times without interpreting slow progress as failure on week five.
Conclusion
Zebra plant propagation is straightforward once you respect the plant’s Atlantic Forest biology. Stem tip cuttings with at least two nodes, taken in spring from healthy non-flowering growth, planted in lean perlite-peat mix, and enclosed under a vented high humidity dome with warm bright indirect light - that combination is the repeatable formula home growers need. Roots in four to six weeks and new top growth in eight to twelve weeks are normal timelines; a firm green cutting under a proper dome is often succeeding even before you see roots.
If you remember only three rules, make them these: never propagate without a buried node, never skip the humidity dome during rooting, and vent the dome daily to prevent mold while keeping leaves turgid. Master those, and Aphelandra squarrosa becomes a plant you can multiply confidently after bloom pruning each spring - sharing pet-safe, boldly veined specimens rooted from your own healthy parent rather than hoping store-bought luck carries the season.
When to use this page vs other Zebra Plant guides
- Zebra Plant overview - Start here for whole-plant context before deep-diving this topic.
- Zebra Plant problems hub - Jump to symptom-specific fix guides when this care topic does not resolve the issue.