Exposed Roots on Maidenhair Fern: Causes, Checks & Fixes
Quick answer
Exposed roots on Maidenhair Fern usually mean soil erosion, a root-bound pot, or creeping rhizomes sitting too high. First step: cover drying fine roots with fresh airy moist mix and water from the pot rim - repot only if roots are mushy, circling, or the plant wobbles.
Exposed Roots on Maidenhair Fern: Causes, Checks & Fixes
This guide covers exposed roots on Maidenhair Fern. See also the general Exposed Roots guide, watering, and light pages for this plant.
Exposed Roots on Maidenhair Fern: Causes, Checks & Fixes
Quick answer
Exposed roots on Maidenhair Fern usually trace to soil erosion, a root-bound pot, or creeping rhizomes sitting above a collapsed mix - not a mysterious wilt. First step: cover any drying fine roots with fresh airy moist mix and water from the pot rim, then decide whether top-dressing is enough or a repot is needed.
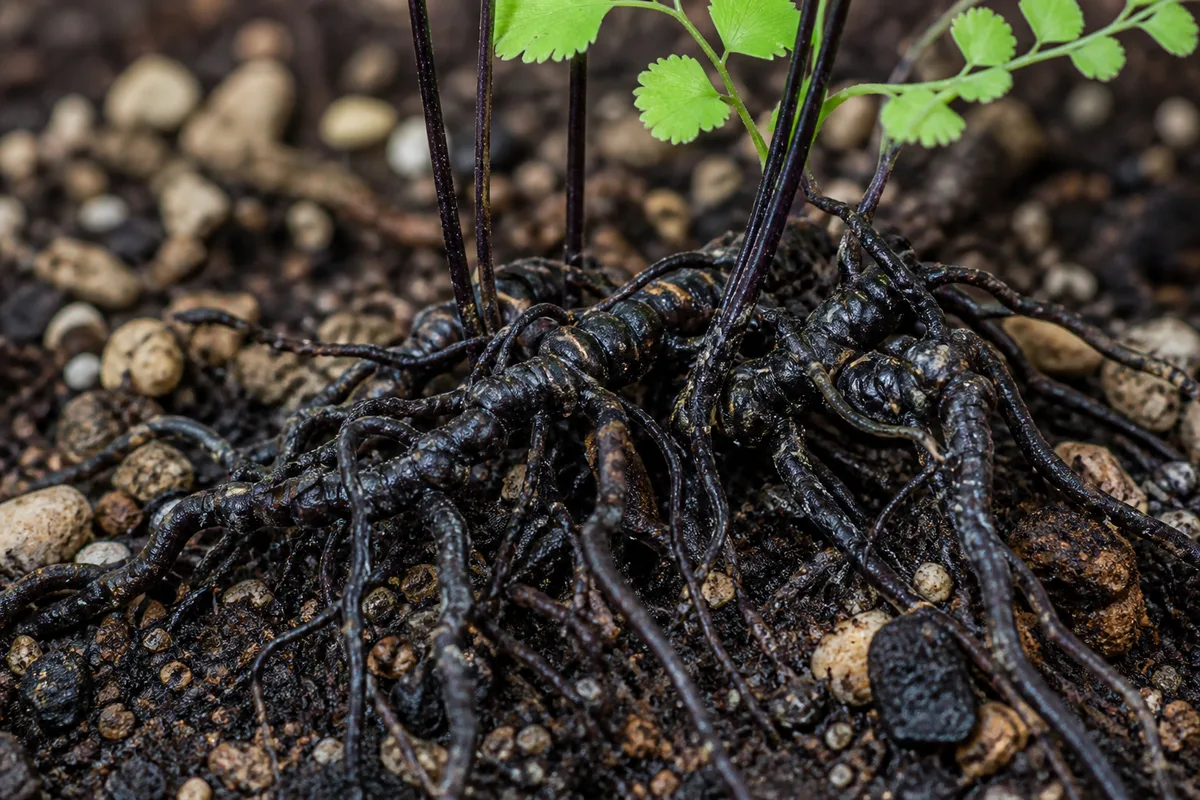
Maidenhair Fern spreads by creeping rhizomes that naturally run just below the surface. Some dark wiry rhizome at the soil line can look alarming but still be healthy. The urgent case is pale or brown fine roots drying in open air, because roots must never be allowed to dry out on this fern.
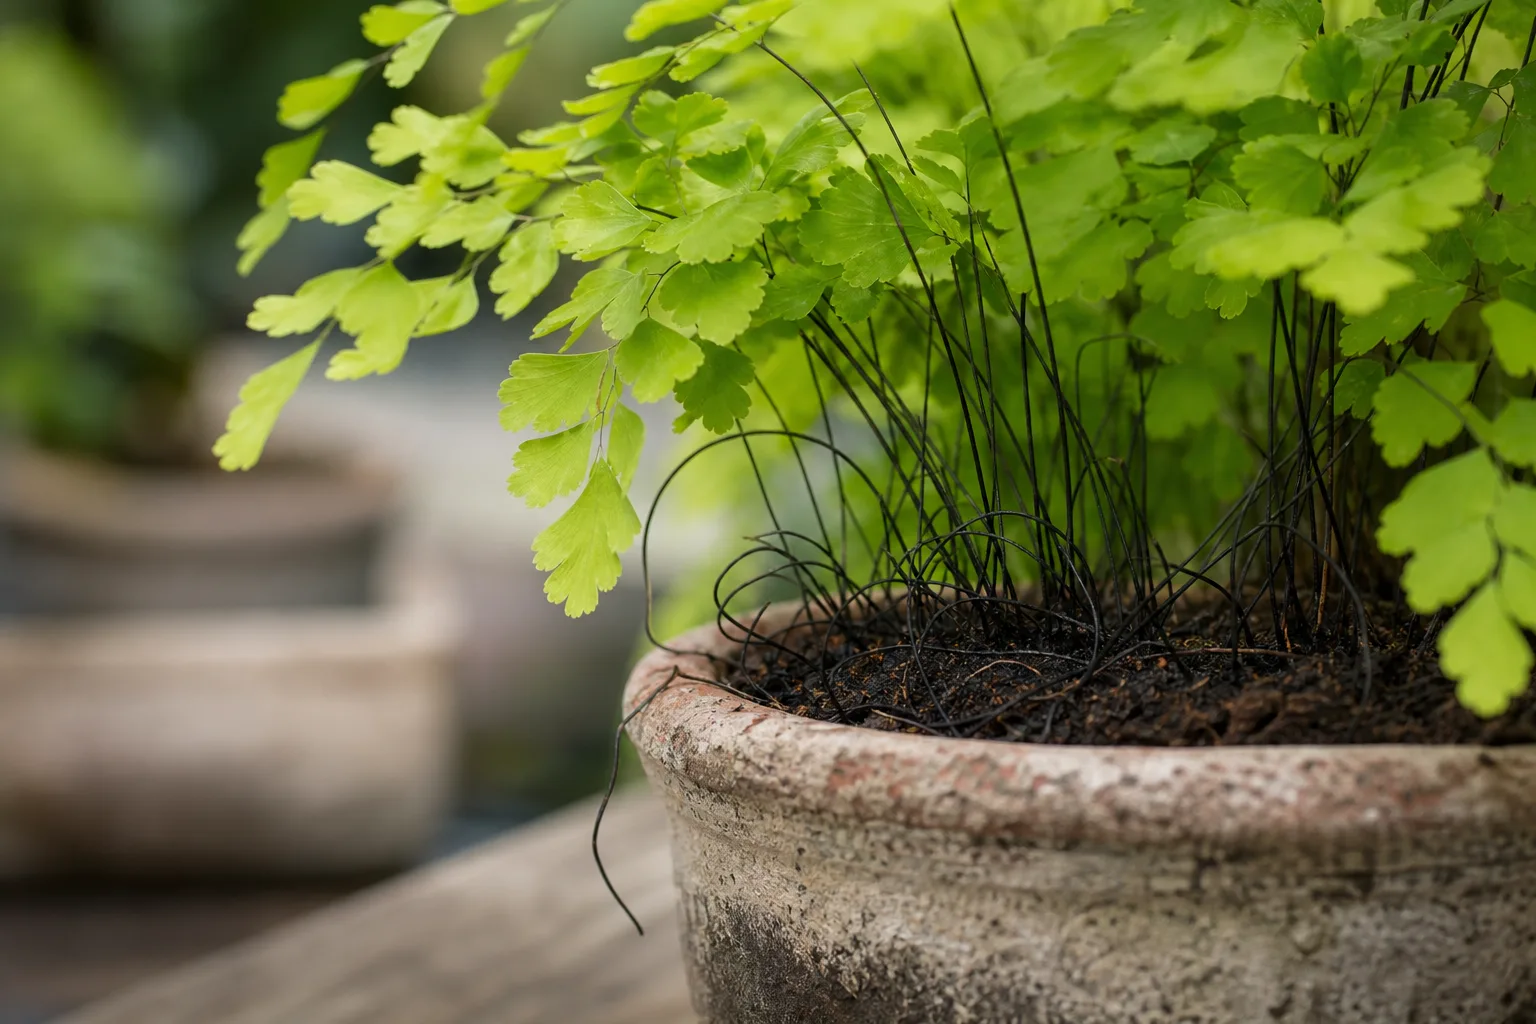
What exposed roots look like on Maidenhair Fern
On this fern, “exposed roots” can mean three different things - and they need different responses.
Exposed Roots symptoms on Maidenhair Fern - compare with healthy tissue on the same plant.
Normal rhizome visibility. You may see dark, wiry rhizome segments at or just above the mix, with healthy fronds attached. Maidenhair Fern grows from a dense rootstock of short, branching rhizomes. A sliver of rhizome showing is not automatically a crisis if tissue is firm and fronds look glossy.
Problem fine-root exposure. Pale, tan, or brown thread-like roots sit on top of dry mix or poke from eroded edges. They feel papery or stiff. Fronds may droop even after you water, because exposed roots desiccate faster than the crown can recover.
Root-bound surface mat. Soil level drops, water runs straight through in seconds, and a tight mat of roots forms a hard cap. Dark roots may appear at the drain holes or across the top. Growth stalls and the pot dries unevenly - very rapid drying on a formerly stable schedule is a common clue on Maidenhair Fern.
Watch for paired warning signs: wobbly crown, sour smell from the drain hole, yellow limp fronds with wet soil, or crisp frond edges with a light pot. Those patterns point past simple top-dressing.
Why Maidenhair Fern gets exposed roots
Watering over the crown. Pouring water directly onto bare rhizomes and the soil surface washes fine mix away. Maidenhair Fern’s shallow root system loses its protective layer quickly, especially in hanging baskets or small pots.
Chronic underwatering on Maidenhair Fern followed by heavy soaking. When the root ball dries hard, mix shrinks and pulls away from the pot wall. The next deep soak can flood the gap and float off the top layer - leaving rhizomes and roots stranded above a sunken soil line.
Root binding without timely repot. Maidenhair Fern often performs best slightly snug, but an overcrowded root ball consumes organic matter. What remains compacts, holds less moisture, and exposes circling roots at the surface and drain holes.
Wrong planting depth after Maidenhair Fern repotting guide. Burying the rhizome too deep can rot the crown; setting it too high leaves roots above grade. Either mistake shows up within weeks as frond loss or visible root tissue.
Low humidity plus fast drying. Even when mix below looks damp, exposed surface roots lose water to dry room air. Maidenhair Fern needs steady humidity; bare roots in a drafty window dry in hours.
Physical disturbance. Pets, curious hands, or aggressive top-layer scraping remove mix around delicate fern roots faster than the plant replaces it.
How to confirm the cause
Work through these checks before repotting:
- Identify what is exposed - dark wiry rhizome with attached fronds versus pale fine roots with no fronds.
- Texture test - Firm rhizome and pliable pale roots suggest cover-and-recover. Mushy black tissue means rot inspection.
- Pot weight and flow - A very light pot with collapsed mix versus a heavy pot that never dries narrows underwatering erosion vs. overwatering on Maidenhair Fern damage.
- Drain-hole view - Circling dark roots exiting holes confirm binding; a few surface roots alone may not.
- Smell - Sour odor from the drain area supports rot or failed mix, not simple erosion.
- Stability - A plant that rocks with little mix around the crown needs repotting, not only top-dress.
If fronds are limp with wet soil and mushy roots, treat that as root rot overlap - unpot and trim before covering anything.
First fix for Maidenhair Fern
Cover exposed fine roots with fresh airy moist mix and change how you water - use the pot rim or bottom watering so you are not washing mix off the crown.
Moisten a batch of coco coir, fine bark, and compost blend - consistently moist but well-drained, like this fern prefers. Add a thin layer around exposed roots until they sit at the same depth as the rest of the root ball. Do not bury green frond bases or pack mix tightly against the crown.
Water gently until a small amount drains, then empty saucers. Raise humidity to 60–80% while surface roots rehydrate. Hold fertilizer until new fronds show steady growth.
Skip full repotting today unless you find mushy roots, a sour smell, or a crown that wobbles with almost no mix left.
Step-by-step recovery
When top-dressing is enough
- Trim only crisp, blackened fine roots - leave firm rhizome intact.
- Add fresh airy mix around exposed areas; keep rhizome at or just above the new surface.
- Water from below or around the inner pot wall for two weeks.
- Mist the room or use a pebble tray - not direct frond soaking that erodes mix again.
- Watch for new pinnae unfurling within 2–4 weeks as the signal that roots are working.
When to repot instead
Repot in early spring if roots circle drain holes, dark roots appear on the surface of the medium, or top-dressing sinks away within days. Slide the plant out, tease circling roots gently, trim decay, and move to a clean pot one size up at most. Plant at the same rhizome depth as before - roots below, rhizome at or slightly above grade.
After repot, water lightly once, keep humidity high, and skip fertilizer for about a month while fine roots re-establish.
Recovery timeline
Minor surface exposure with firm tissue often stabilizes in 1–2 weeks once mix covers roots and humidity stays up. New frond unfurling in 2–4 weeks is the better success marker than instant fullness.
Severe binding or crown rot may take longer or fail if the rhizome softens. Judge by firm crown tissue and fresh green growth, not old damaged fronds - they will not revert.
Lookalike symptoms
- Normal creeping rhizome - Dark, firm, frond-attached segments at the surface without papery fine roots.
- Root rot - Mushy roots, sour smell, yellow wilt with wet soil; needs unpotting, not cover-only.
- Underwatering collapse - Dry pot throughout, crispy fronds, firm white roots still inside the ball but mix pulled away from pot sides.
- Transplant shock - Temporary wilt after repot with intact roots when inspected; exposure appeared only because old mix fell away during the move.
Mistakes to avoid
Do not bury the rhizome deep “to hide” exposure - that suffocates Maidenhair Fern crowns. Do not leave drying fine roots exposed while waiting for spring repot. Avoid blasting the crown with a hard water stream. Do not jump to a much larger pot; excess wet mix around a small root ball invites rot. Do not fertilize stressed exposed roots - salts burn tender surface tissue.
Maidenhair Fern care cross-check
Exposed roots often mean moisture management at the surface, not that the fern wants dry soil. Match watering to pot weight in your light level, refresh mix before the root ball consumes it entirely, and repot on a 1–2 year rhythm when growth is active. A stable bathroom or terrarium setup erodes less than a windy sill where surface mix dries between waterings.
How to prevent exposed roots next time
Water at the rim or from below, refresh the top inch of mix each spring, and repot before roots form a solid mat at the drain holes. Keep Maidenhair Fern light guide so the plant uses water predictably. Maintain 60–80% humidity to protect any shallow rhizome segments that naturally sit near the surface. Choose pots with open drainage and avoid cachepots that hide overflow erosion.
When to worry
Act the same day if the crown feels soft, exposed tissue is mushy and foul-smelling, or fronds blacken from the base while soil stays wet. Schedule repotting soon if top-dressing washes away repeatedly or the plant lists to one side with minimal mix support.
Conclusion
Exposed roots on Maidenhair Fern are usually a surface-soil problem - erosion, binding, or shallow rhizome habit - not a reason to panic-repot. Cover drying fine roots with fresh airy mix, change your watering angle, and repot in spring when binding or rot confirms the mix can no longer support the crown. Recovery shows up as firm rhizome tissue and new fronds, not overnight fullness.
When to use this page vs other Maidenhair Fern guides
- Maidenhair Fern watering guide - Use for routine moisture checks before assuming exposed roots is the main issue.
- Maidenhair Fern problems hub - Browse all 55 common issues on this species.