Spider Mites on Chrysanthemum (Garden Mum): Causes, Checks
Quick answer
Spider mites on Chrysanthemum (*Chrysanthemum morifolium*, garden mum) cause stippled, bronzing leaves in hot dry weather-especially on lower foliage before autumn bloom. First step: isolate the mum and blast leaf undersides with a forceful water spray at least three times before reaching for miticides.
Spider Mites on Chrysanthemum: Causes, Checks & Fixes
This guide covers spider mites on Chrysanthemum. See also the general Spider Mites guide, watering, and light pages for this plant.
Spider Mites on Chrysanthemum: Causes, Checks & Fixes
Quick answer
Spider mites on Chrysanthemum (Chrysanthemum morifolium, garden mum) are sap-feeding arachnids-not insects-that colonize lower leaf undersides during hot, dry weather and build toward dense autumn bud clusters. The usual culprit is the two-spotted spider mite (Tetranychus urticae), which leaves tiny yellow-white stipples on the upper leaf surface, bronzing as damage accumulates, and fine silk webbing when populations surge.
First step: isolate the mum and syringe leaf undersides with a forceful stream of water. Hold outdoor pots at an angle or move greenhouse mums to a rinse station, target the underside of every leaf layer in the dense mum habit, and plan at least three water treatments a few days apart before stacking soap, oil, or miticides. Mites reproduce fast in summer heat-egg to adult can take as few as 10 to 21 days depending on temperature-so one rinse rarely finishes the job.
What spider mites look like on Chrysanthemum
On garden mums, mite damage rarely starts at the showy flower tips. It begins where foliage is oldest, shadiest, and hardest to spray:
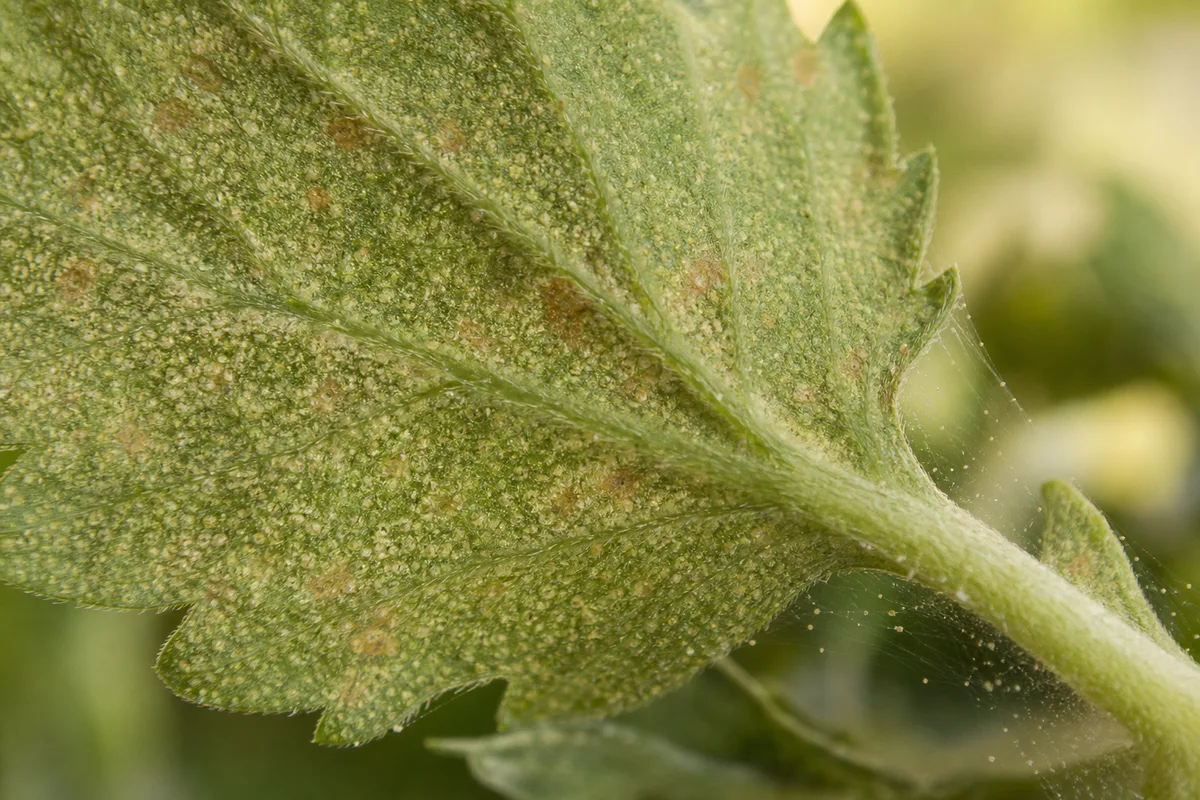
Stippled bronzing and fine silk webbing on a chrysanthemum leaf underside - compare with solid green healthy foliage above.
- Lower and inner leaves along the base and inside the bushy frame
- Undersides of mid-canopy leaves before mites climb toward buds
- Leaf bases and stem joints where webbing anchors first
- Bud clusters and upper stems only after populations explode-this is the bloom-stage emergency
Early damage looks like tiny yellow or white specks (stippling) visible from above while the colony feeds underneath. As feeding continues, stipples merge into bronze or tan patches, leaves feel gritty or dusty, and edges may crisp. Clemson HGIC notes that severe infestations can discolor or wither flowers and produce webbing on buds, between stems, and across leaf undersides.
The mites themselves are nearly invisible without magnification. MSU Extension describes two-spotted spider mites as yellow-brown to dark green with two dark spots on each side of the body-about 1/50 inch long. You need a 10–16× hand lens to confirm them on the leaf surface. Amber eggs, whitish shed skins, and black fecal specks often appear beside live mites on the underside.
A single bronzed lower leaf does not mean the display is lost. By the time webbing covers multiple stems, though, the population has usually been building unnoticed for weeks-mums packed with autumn buds give mites sheltered undersides and slow your spray coverage.
Why garden mums get spider mites
Mums are documented major mite hosts in floriculture-not because the plant is delicate, but because of how garden mums are grown and when they bloom.
Hot, dry summer into autumn bloom season. Two-spotted spider mites are warm-season pests whose populations surge in hot, dry weather. Outdoor garden mums in full July–September sun, greenhouse benches near dry vents, and overwintered pot mums parked beside heating ducts all sit in the temperature band where mite generations stack fastest. Dry air also suppresses fungal pathogens that sometimes knock mite numbers down in humid conditions.
Dense, layered foliage architecture. Mums are pinched repeatedly to build a bushy frame, then push hundreds of buds on a tight canopy. That habit creates stacked leaf layers with undersides you cannot see from above-exactly where Clemson HGIC reports infestations usually begin. Sprays and rinses that hit only the top leaf surface miss the colonies underneath.
Nitrogen-rich soft foliage. Garden mums are fed through spring and early summer to support vegetative growth. NC State Extension notes that nitrogen fertilizer can induce mite outbreaks by making plants more nutritious to feed on. Heavy nitrogen before bud set produces the same lush leaf tissue mites prefer-convenient for growth, ideal for rapid reproduction. See our Chrysanthemum fertilizer guide for balancing feed through the bloom window.
Greenhouse and retail introduction routes. MSU Extension reports two-spotted spider mites on garden mums each summer in crops grown outside or under glass. Mites hitchhike on shipped plugs, shared benches, and tools moved between pots. Skipping quarantine on new autumn mums is a common way they enter a porch collection.
Disrupted natural enemies. Broad-spectrum insecticides-including pyrethroids and some neonicotinoids-kill predatory mites, lady beetles, and lacewings that otherwise suppress mite colonies. NC State Extension warns that disrupting natural enemies with insecticides often causes spider mite outbreaks. If you recently sprayed mums for aphids or thrips and mites appeared two weeks later, suspect a flare-not a new, unrelated pest.
Low-humidity stress on indoor overwintered mums. Mums held indoors through winter near sunny glass or heating vents lose leaf moisture faster, which parallels the dry-edge stress described in our low-humidity guide-but on mums the primary driver in summer is outdoor heat, not generic houseplant culture.
How to confirm the cause
Work through these checks before treating. The goal is to separate mites from lookalikes that share the same plant.
Five-step mum scouting checklist
- Start low - Pull back stems at the base and inspect the undersides of the lowest leaves first. Mites colonize here before climbing.
- Hand lens pass - Scan undersides for moving dots, amber eggs, shed skins, and early webbing. MSU recommends a 10–16× lens for garden mum mite scouting.
- White-paper tap test - Hold white paper under a suspect leaf and tap sharply. Slow-moving specks that crawl outward confirm live mites; dirt and debris do not move.
- Upper-surface stippling map - Note whether yellow specks are uniform across the leaf (mite feeding) or follow winding trails inside the tissue (leafminer).
- Collection-wide sweep - Check every mum, aster-family pot, and neighboring marigold or dahlia on the same bench. Mites walk and drift on air currents in greenhouses.
Symptom lookalike comparison
| What you see | Likely cause | Key differentiator |
|---|---|---|
| Fine stippling on upper leaf surface; webbing on undersides | Two-spotted spider mites | Moving specks on tap test; damage external |
| Pale winding tunnels inside leaves; black specks in trails | Chrysanthemum leafminer (Chromatomyia syngenesiae) | Trails are inside tissue; no webbing (Clemson HGIC) |
| Sticky honeydew on buds and terminal shoots | Chrysanthemum aphids | Pear-shaped clustered insects; not stippling (aphids guide) |
| Uniform edge crisping on all leaves; no specks or webbing | Drought or salt stress | Soil dry and light; no mites on tap test (watering guide) |
| Silvery scarring on petals; fast slender insects | Thrips | No webbing; flower damage dominant |
If you find firm buds, clean upper leaves, and no movement on the tap test, you may be past an active infestation or misreading old bronzing from heat stress alone.
First fix for Chrysanthemum
Isolate the mum and syringe leaf undersides with forceful water.
Move the plant away from others-on a patio, greenhouse aisle, or sink for small pots. Use a hose nozzle, pressure sprayer, or shower on firm pressure, angling from below so water drives mites off the underside of each leaf layer. Support brittle bud-heavy stems so they do not snap. Clemson HGIC recommends spraying plants forcefully with water and applying at least three treatments for effective mite suppression on chrysanthemums.
Space sessions every two to three days for at least three rounds. Morning rinses let foliage dry in sun, which suits outdoor mums better than soaking buds overnight in cool, humid shade. After each session, tap-test a lower leaf to see whether live mite counts are dropping.
Do not apply soap or oil the same day as the first heavy syringing unless your climate will dry residues quickly-saturated tissue plus contact sprays burns more easily on sun-stressed mums. Wait until leaves are dry and mites still show on the tap test.
Step-by-step recovery
Once isolation and syringing are underway, continue in this order based on severity:
- Prune heavily infested leaves - Bag and discard lower leaves coated in webbing rather than composting active colonies. Clemson HGIC advises removing and destroying severely infested plant parts when populations are high.
- Insecticidal soap or horticultural oil - If live mites remain after the water series, spray all leaf surfaces until runoff, emphasizing undersides and stem joints the mum habit hides. These are contact killers-they only affect mites the spray touches. MSU notes treatments on garden mums require good underside coverage and repeat applications three to five days apart in warm weather.
- Timing and open flowers - Apply in early morning or evening so residues dry before strong midday sun hits open blooms. Avoid soaking flower petals with oil if a show or display is within days-test one stem first or rinse buds after treatment per label directions.
- Hold nitrogen - Skip fertilizer boosts until new growth looks clean for two weeks. Feeding during an active infestation produces more nutritious foliage for the next mite generation.
- Collection-wide monitoring - Inspect every mum weekly until two weeks pass with zero live mites on tap tests across the isolated plant and its neighbors.
Chrysanthemum repotting guide does not address foliage mites. If mites return immediately after treating a mum that shares a crowded bench with infested neighbors, the problem is reinfestation-not soil.
Recovery timeline
After first syringing: many mites wash off immediately; stippling stops spreading within days if colonies are knocked down.
One to two weeks: with three water rounds or soap/oil cycles, tap tests should show few or no moving specks. Look for clean new leaves emerging from growing tips and buds swelling normally.
Two to four weeks: bronzed leaves present before treatment stay bronzed-trim them for appearance once the plant is stable. Minor stippling on lower foliage rarely affects the flower display if buds were protected early.
Bloom-stage note: mites on open flowers or tight bud clusters can cause discolored or withered blooms per Clemson HGIC. Secondary buds on well-pinched mums sometimes compensate, but do not count on recovery if webbing covers the terminal bud cluster within ten days of expected color.
Worsening signs: webbing climbing toward the top despite rinsing, widespread leaf drop, or mites on every mum in a display row mean escalation-not another week of water alone.
What not to do
Do not reach for generic insecticides labeled for aphids or beetles-mites are arachnids, not insects, and most insecticides miss them. NC State Extension emphasizes that most insecticides do not control spider mites.
Avoid pyrethroid sprays (bifenthrin, permethrin, cyfluthrin) as a first response on mums with active mite damage. They are harsh on lady beetles, lacewings, and predatory mites-and NC State notes that disrupting natural enemies often triggers mite resurgence. If you already sprayed pyrethroids for another pest and mites exploded afterward, switch to miticides or contact oils labeled for mites rather than repeating the same class.
Do not treat only the visible upper leaf surface. Mums’ layered habit hides colonies underneath-half-covered sprays select for survivors.
Do not return an isolated mum to the display until tap tests show no live mites for at least two weeks after the last treatment cycle.
Do not assume one soap pass finishes the job-warm weather shortens the mite life cycle, so nymphs hatch continuously from eggs you missed.
When handling heavily infested mums, wear gloves and wash hands afterward. Chrysanthemum is toxic to cats, dogs, and horses; keep treated plants away from pets until sprays have dried, and store products out of reach.
How to prevent spider mites on Chrysanthemum
Scout lower leaves weekly from late spring through pre-bloom heat-NC State recommends checking susceptible plants weekly because populations can outbreak very quickly. On outdoor mums, start before July heat; on greenhouse benches, watch vents and door edges where MSU notes mites thrive in dry zones.
Quarantine new mums for two weeks before placing them beside existing pots. Inspect lower leaf undersides at purchase-retail autumn mums often arrive with early stippling hidden in the dense base.
Balance nitrogen through the growing season. Mums need feed during vegetative growth, but excess nitrogen before bud set produces foliage mites prefer. Shift toward phosphorus and potassium as buds form, matching normal chrysanthemum flowering rhythm in our fertilizer guide.
Rinse dust off foliage during dry spells on outdoor mums-dusty leaves in hot rows mimic the stressful edge habitat mites favor.
Space plants for airflow in Chrysanthemum light guide. Crowded porch lines trap heat and reduce predator access between pots.
Avoid unnecessary broad-spectrum sprays on garden mums that share space with beneficial insects. If aphids need treatment, favor water syringing and insecticidal soap before pyrethroids that can flare mites.
When to escalate - miticides and extension help
Move beyond soap and oil when webbing covers bud clusters within two weeks of bloom, leaf drop is widespread despite three water rounds, or multiple mums in one area show bronzing moving upward at the same time.
Miticide options: Clemson HGIC lists miticides labeled for spider mites on chrysanthemum-including tau-fluvalinate and bifenthrin-with two or more applications at 5- to 7-day intervals usually required. Commercial growers use additional products noted by MSU Extension for floriculture mums; home gardeners should choose products whose labels explicitly list spider mites and chrysanthemum or ornamental plants. Always follow label directions-the label is the legal authority for rates, intervals, and pre-harvest or display timing.
Biological control in greenhouses may include predatory mites such as Phytoseiulus persimilis, but home gardeners usually achieve control faster with cultural syringing plus contact sprays when an autumn display deadline looms.
Extension referral: If miticides fail after two labeled cycles, populations rebound within days, or you are managing a greenhouse bench of production mums, contact your county extension office or state floriculture specialist. Mites develop resistance quickly when the same chemical class is overused.
When to remove the plant: If webbing coats every stem, most leaves have dropped, and buds are brown and aborting across the pot, salvage may cost more than replacing the mum-especially for a single-season display plant. Bag and discard severely infested stock rather than returning it to a mixed collection.
Conclusion
Spider mites on Chrysanthemum follow the plant’s calendar-lower leaves in summer heat, then upward toward dense autumn buds. Confirm them with underside scouting, a hand lens, and the white-paper tap test-not by bronzing alone. Isolate, syringe undersides at least three times, then use contact sprays only where mites survive. Prevention is weekly lower-leaf checks from late spring through pre-bloom weeks and restrained nitrogen before buds set. For broader mum culture context, see our Chrysanthemum overview.
When to use this page vs other Chrysanthemum guides
- Chrysanthemum watering guide - Use for routine moisture checks before assuming spider mites is the main issue.
- Chrysanthemum problems hub - Browse all 16 common issues on this species.
- Low Humidity on Chrysanthemum - Different entry point when symptoms overlap with spider mites.
- Slow Growth on Chrysanthemum - Different entry point when symptoms overlap with spider mites.