How to Propagate Christmas Cactus: Stem Cuttings
How to Propagate Christmas Cactus: Stem Cuttings
How to Propagate Christmas Cactus: Stem Cuttings
Christmas cactus (Schlumbergera x buckleyi and related holiday cactus hybrids) is one of the most forgiving houseplants to multiply at home - if you use the method the plant actually supports. The reliable approach is stem segment cuttings: twist off a short chain of two to four jointed segments from healthy growth, let the base callus, then root in soil or water. That is fundamentally different from propagating desert succulents by plucking a single leaf and laying it on dry soil. Treat a Christmas cactus like a succulent leaf-cutting project and you will get rot, shriveled tissue, or a piece that never develops into a full plant.
This guide walks through the full process: how the plant’s segmented stems work, when to take cuttings, the twist-off technique, callusing, soil and water rooting setups, what success looks like over three to eight weeks, and how to care for new plants through their vulnerable first month. If you follow one rule above all others, make it this: propagate by twisting off multi-segment stem cuttings, not by breaking off individual “leaves.”
Why Stem Segment Cuttings - Not Leaf Cuttings
Holiday cacti are epiphytic plants from Brazilian rain forests. They do not grow from a single fat leaf the way Echeveria or Crassula do. What most people call leaf segments on a Christmas cactus are actually cladodes - flattened, photosynthetic stem sections connected at narrow joints. Each joint is a potential branching point. Roots and new shoots emerge from the basal end of a cutting: the face that was attached to the segment below it on the parent plant.
A single detached cladode can sometimes root, but it is a weak propagation unit. Part of the segment usually ends up buried to anchor the cutting, leaving almost nothing above the soil line to photosynthesize or push new growth. Worse, beginners often break off only part of a segment - a corner or a torn piece without the full joint surface - mimicking how they pull succulent leaves. Partial tissue lacks the organized wound surface and stored energy needed for reliable rooting.
Multi-segment stem cuttings solve those problems. Two to four connected segments give you enough above-ground tissue to stay upright, enough stored water to survive the rooting wait, and a clean basal wound at the lowest joint where roots initiate. The method is fast, free, and works with prunings you would otherwise discard after shaping a leggy plant or removing a damaged branch.
Christmas Cactus Anatomy for Propagation
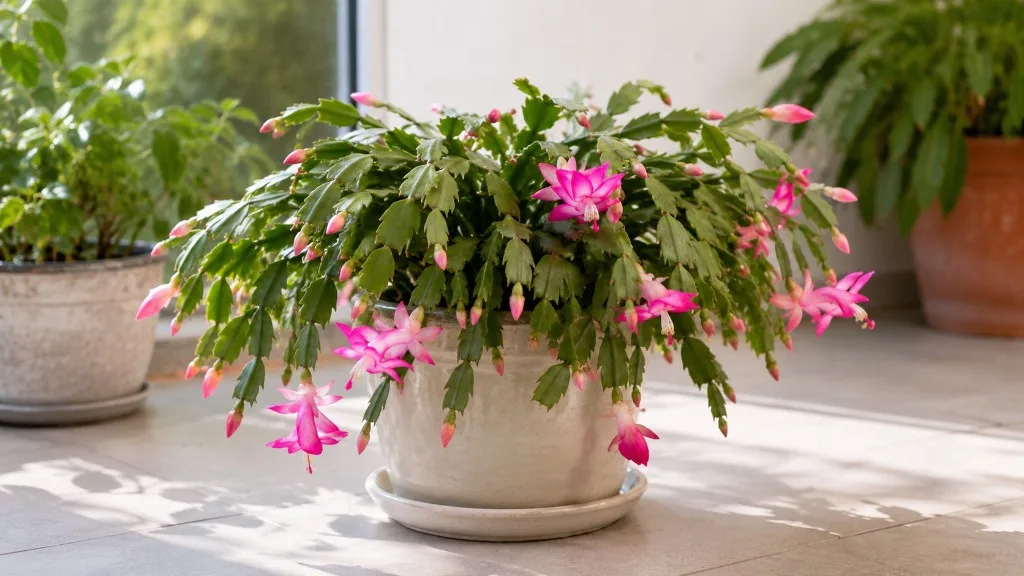
Before you twist anything off, spend thirty seconds reading the stem in front of you. A mature Christmas cactus branch is a chain of flat, scalloped segments linked at slight constrictions. New growth appears as soft, brighter green segments at the branch tips. Older segments lower on the chain are firmer and slightly darker. Flowers form from areoles at segment tips and notches - another clue that these are stems, not foliage.
The plant’s growth habit is pendent or arching in most pots, which matters when you pot cuttings. A long, heavy chain of six or seven segments is hard to keep upright in loose propagation mix. Short cuttings with two to four segments balance stability and rooting speed.
Cladodes, Joints, and Growth Points
Each cladode is one flattened stem unit. The joint between two cladodes is where they separate cleanly when twisted. That separation point is not random; the plant evolved to shed or branch at these constrictions. When you twist at the joint, you expose the correct basal surface - the same surface that would have stayed attached to the segment below.
Growth points for new branches sit at the notched margins and tips of segments. Roots, however, come from the bottom of the cutting: the callused face of the lowest segment. Burying the cutting too deep smothers those emerging roots and invites rot in the lowest segments. Burying too shallow leaves the cutting wobbly and dries the basal tissue. The practical target is burying the lowest one or two segments while leaving at least one full segment - ideally two - fully above the mix.
Do not confuse cladodes with true leaves. Christmas cactus does not propagate like a jade plant or snake plant leaf slice. If a tutorial shows plucking one flat pad and sticking it in soil with no joint chain attached, it is borrowing the wrong playbook.
Soil Propagation vs. Water Propagation
Both soil rooting and water rooting work for Christmas cactus stem cuttings. Neither is magic; both depend on healthy material, a proper callus, and Christmas Cactus light guide.
Soil propagation is the method most experienced growers default to. You plant the callused cutting directly into a airy, well-draining mix, keep the medium lightly moist, and let roots form in place. The advantage is continuity: there is no transplant step where fragile new roots can tear. Soil also buffers moisture better than a small water jar, which reduces the risk of basal rot if you get impatient and overfills the glass.
Water propagation appeals because you can see roots forming. Submerge only the very bottom of the callused cutting - typically the lowest quarter-inch of the basal segment - in fresh water, refresh weekly, and wait. Roots often appear in two to four weeks. The trade-off is the soil transition: water-grown roots are adapted to a wet environment and can struggle or break when you pot up. If you choose water, transplant promptly once roots reach roughly one inch long, use a moist (not soggy) mix, and keep humidity slightly elevated for the first week after potting.
If you are new to propagation, start with soil. If you already have a Christmas cactus thriving in your home and want to run a side-by-side experiment, take two matched cuttings from the same branch and try one of each. You will learn more from the comparison than from any single online debate about which method is “best.”
When to Propagate Christmas Cactus
Timing is less about a calendar date and more about whether the parent plant is in active growth. The best window is late spring through early summer, when days are longer, temperatures are moderate, and the plant is pushing soft new segments at the branch tips - Clemson HGIC lists April through September as the active growing season. Rooting enzymes and cell division run faster in that phase, and you will often see new tip growth on rooted cuttings within a few weeks of planting.
A second practical window is after the bloom cycle, typically in late winter or spring depending on your cultivar and growing conditions. Many growers prune or shape plants once flowering finishes and root the removed sections. That works well as long as the plant is not stressed - not drought-shocked, not heat-blasted on a south window, and not fighting root rot on Christmas Cactus.
Avoid propagation during pre-flowering dormancy or when the plant is clearly struggling. If segments are wrinkled from underwatering on Christmas Cactus, if the base is soft, or if you are still stabilizing the parent after a repot or pest treatment, fix that first. Propagation is a copy operation: weak source material produces weak offspring.
For most homes, March through July is the sweet spot. If you propagate in winter, add patience - cooler rooms and shorter days can stretch rooting past eight weeks without indicating failure.
Supplies for Stem Segment Propagation
You need less equipment than almost any other houseplant project. Gather these before you twist off cuttings so you are not leaving segments to dry on a counter while you hunt for a pot.
Containers with drainage holes are non-negotiable for soil rooting. A 3- to 4-inch plastic pot or a shallow nursery tray works for several cuttings at once. For water rooting, a small glass or jar with a narrow opening helps support the cutting without submerging half the stem.
Potting medium should be light and fast-draining. A commercial cactus and succulent mix blended with 20–30% perlite or orchid bark matches how epiphytic Schlumbergera roots behave in nature - lots of air, quick drainage, modest moisture retention. Heavy peat mixes that stay wet for a week will rot cuttings.
Optional tools include clean scissors for trimming a damaged parent branch (not for separating segments), rooting hormone powder (helpful but not required for Christmas cactus), a clear plastic bag or dome for humidity, and a spray bottle for light misting. Label cuttings if you are running soil-vs-water trials; they look identical until you pot them up.
The parent plant is the most important supply. Choose a well-hydrated, pest-free Christmas cactus with firm green segments. The best cuttings come from younger, softer growth near the tips rather than woody, brownish segments low on old wood.
Taking Cuttings with the Twist-Off Method
This is the core skill. Hold the segment chain you want to remove with one hand. With the other hand, grip the segment below the lowest joint of your intended cutting. Twist gently in opposite directions at the joint until the sections separate. You should hear or feel a clean snap. The basal end of your cutting will show a smooth, rounded wound face; the stub on the parent plant should look equally clean, not torn or shredded.
Take several more cuttings than you need. Not every segment roots. Losing one or two to rot is normal even when you do everything right. Three to five prepared cuttings for every one plant you want is a sensible ratio.
Work over a table, not above carpet - segments are brittle and easy to drop. If a cutting falls and cracks mid-segment rather than at a joint, set it aside for compost unless the break left a full intact basal face.
Why Twist Instead of Snip
Scissors and pruning shears can work, but only if you cut exactly at the joint with a sharp, clean blade. A cut that slices through the middle of a segment creates a ragged wound that calluses unevenly and rots more easily. Twisting at the natural joint preserves the geometry the plant expects.
Shears make sense when you are removing a long damaged branch and will trim it into shorter cuttings afterward. Even then, separate each final propagation unit by twisting sub-sections apart at their joints rather than chopping straight through segment centers. Disinfect blades with rubbing alcohol if you are cutting diseased tissue on the parent.
Fingers are the best tool for healthy material. They give you tactile feedback at the joint and almost never crush the fleshy stem the way dull scissors can.
Using Two to Four Segments per Cutting
Aim for two to four segments per cutting as the standard range. Two segments is the minimum that still gives you one segment above soil after planting the lowest one. Four segments provides extra water reserves and stability for beginners who tend to underwater during the rooting wait. Five or six segments can work but are often top-heavy and slow to root because the cutting prioritizes supporting a large photosynthetic mass before investing in roots.
Single-segment cuttings are possible and sometimes used by experienced growers, but they fail more often for beginners. With only one segment, you bury the bottom half to anchor the cutting and leave almost nothing exposed to light. If you must use a single segment, plant it shallow, support it with a stake or leaning edge, and accept a longer timeline.
Match segment count to cutting purpose. For filling out a sparse pot, two-segment cuttings planted in a ring around the parent root ball integrate quickly. For gifting a small standalone plant, three- or four-segment cuttings look more substantial sooner.
Callusing the Cut End Before Planting
Fresh succulent tissue bleeds water from a raw wound. Plant it immediately in moist soil or water and that open face becomes an entry point for fungal and bacterial rot. Callusing - letting the basal wound dry and seal - is the step impatient growers skip, and it is the step most correlated with mushy failures.
Lay cuttings on a dry paper towel, plate, or tray in a warm, shaded spot away from direct sun. Room temperature around 65–75°F (18–24°C) is ideal. Leave them for one to two days, up to three if your home is humid or the cut surface is large. The wound should look dry, slightly contracted, and lighter in color - a thin corky layer, not wet or glossy.
Do not callus in a closed plastic box; stagnant humidity prevents sealing. Do not blow a fan directly on cuttings for hours; excessive desiccation can shrivel soft tip segments before you plant. A balanced dry rest is the goal.
Once callused, plant the same day if possible. Cuttings can sit callused for several days without harm, but very long delays eventually dehydrate the segments.
Rooting Cuttings in Well-Draining Soil
Fill your pot with premoistened mix - damp like a wrung-out sponge, not dripping. Use a pencil or chopstick to poke a hole one-half to one inch deep depending on cutting length. Insert the callused end so the lowest one or two segments are buried and at least one segment sits fully above the surface. Firm the mix lightly around the base so the cutting stands without wobbling. Multiple cuttings can share one pot if spaced at least one inch apart.
First watering: moisten the soil lightly around the cutting. Some growers water immediately; others wait two to three days. Both approaches work if the mix is barely moist, not saturated. The critical rule for the first two weeks is do not keep the medium wet. Soggy soil around an unrooted cutting is the fastest route to basal rot.
Place the pot in bright, indirect light - an east-facing windowsill or a foot or two back from a south or west window. Avoid direct midday sun on fresh cuttings; it can scorch soft tissue and dry the mix too fast.
Optional humidity boost: tent the pot with a clear plastic bag propped on stakes so plastic does not touch the cutting, or cover with a clear dome. Vent daily to prevent mold. Humidity helps slow water loss while roots form, especially in dry homes, but is not mandatory if you chose plump cuttings and water discipline.
Check progress with a gentle tug test after three to four weeks. Slight resistance usually means roots have anchored. No resistance is not automatic failure - some cuttings root quietly for six weeks. Combine the tug test with visible new growth at the tip before you celebrate.
Expect soil rooting in roughly three to eight weeks depending on temperature, light, and segment count - NC State Extension lists stem cuttings as the recommended propagation strategy. Warmer rooms toward the faster end; cool winter windowsills toward the slower.
Rooting Cuttings in Water
Water propagation is straightforward but unforgiving of sloppy submersion depth. Fill a small glass with room-temperature water. Rest the callused cutting so only the bottom tip of the lowest segment contacts the water - about one-quarter inch submerged. The rest of the cutting must stay in air.
Set the glass in the same bright, indirect light location you would use for soil cuttings. Change the water every three to seven days to limit bacterial film and oxygen depletion. Cloudy water with a sour smell means swap it immediately and rinse the basal segment gently.
Roots typically emerge from the submerged tip in two to four weeks. Wait until they are roughly one inch long before potting. Transfer to moist (not wet) cactus mix, bury the rooted portion to the same depth you would use for a fresh soil-planted cutting, and keep humidity slightly elevated for the first week while soil roots develop. Water-rooted cuttings can wilt briefly after transplant; shade them slightly and avoid fertilizing until new growth firms up.
If the basal segment softens in water, remove it, recut at the next joint up if tissue is still healthy, callus again, and retry in soil instead. Water propagation punishes over-submersion.
Light, Humidity, and Temperature During Rooting
Christmas cactus cuttings root fastest in conditions that mimic a bright forest understory: filtered light, moderate warmth, and stable humidity without waterlogged surroundings.
Light: Bright indirect exposure for most of the day. Too little light slows rooting and encourages etiolated, pale new growth. Too much direct sun scorches segments and overheats small pots. If you use a humidity tent, ensure the tent does not magnify sun into a mini greenhouse burn.
Temperature: 65–75°F (18–24°C) is the comfort zone. Bottom heat from a propagation mat can shave time off rooting in cool homes, but it is optional. Avoid placing cuttings on cold windowsills in winter; the glass chill stalls root initiation even when the room feels warm.
Humidity: Target 50–60% if you can - normal indoor range for many homes. Very dry air below 30% may cause tip segments to wrinkle slightly; a humidity dome or grouping cuttings together mitigates that. Do not mist cuttings so heavily that water pools in segment notches; standing water in crevices invites rot on unrooted tissue.
Signs Your Cutting Has Rooted Successfully
Rooting is partly invisible, so use a cluster of signs rather than one dramatic moment.
Resistance on a gentle tug after three to six weeks is the classic check. Hold the pot and pull the cutting lightly upward with two fingers. If it shifts easily with no grab, roots are still forming or absent.
New growth at the tip - a slightly brighter, tiny segment nub or fresh notch swelling - is the most reliable positive signal. Roots usually precede visible tip growth by a few days to two weeks, but the combination confirms success.
Firm basal segments that are not mushy and not paper-thin mean tissue is healthy while roots develop. Slight limpness in the first week after planting is normal; the cutting has no roots yet to pull water. Progressive shriveling from tip to base is a warning.
No mold on the soil surface and no sour smell from the pot suggest your moisture level is appropriate. White fuzzy mycelium on the mix surface is usually harmless; black slime on the buried segment is not.
Transplanting and Potting Rooted Cuttings
If you rooted several cuttings in one community pot, move them to individual containers once roots are established and new tip growth is visible. Choose pots only one size larger than the root mass - Schlumbergera prefers snug quarters. A 4-inch pot suits a young rooted cutting for its first year.
Use the same well-draining cactus mix with perlite or orchid bark you used for rooting. Gently lift each cutting, trying not to tear the fine new roots. Plant at the same depth as before, water lightly to settle the mix, and return the plant to bright indirect light.
If you rooted in water, pot up promptly at one-inch root length rather than letting roots grow into a tangled mass that is hard to insert into soil without breakage. Trim only clearly dead root tips; do not shave healthy white roots out of impatience.
Aftercare for the First Month
Newly rooted Christmas cactus plants are tougher than cuttings but still sensitive to swings in water and light. Treat the first four weeks as a stabilization phase.
Watering: Shift from “barely moist while rooting” to a normal Christmas cactus rhythm - water when the top 2–3 cm of mix is dry, usually every seven to ten days in active growth for a small pot. Never let the pot sit in a saucer of runoff.
Fertilizer: Hold off on feed for four to six weeks after confirmed rooting. Fresh roots burn easily on full-strength synthetic fertilizer. When you do feed, use a half-strength balanced liquid fertilizer during active growth only.
Light: Maintain bright indirect light. Gradually acclimate to slightly brighter spots if you want bushier growth, but do not jump from a shaded rooting corner to harsh afternoon sun in one day.
Pruning: Do not remove tip growth to “encourage bushiness” immediately. Let the plant strengthen. Future shaping can take additional segment cuttings once the new plant is clearly established.
Flowering: A cutting rooted in spring may need a full season or more before it blooms. Bloom initiation depends on cool nights and consistent dark periods in autumn - normal adult care, not something you force in month one.
Common Propagation Mistakes
Propagating single “leaves” like a succulent. One detached cladode without a segment chain above soil rarely makes a good plant. Use two to four connected segments.
Breaking partial segments. Tearing off only part of a pad leaves an irregular wound that rots. Twist at the joint until the full segment separates.
Skipping the callus. Planting wet-fresh cuts into moist soil is the top cause of mushy bases. Wait one to two days.
overwatering on Christmas Cactus unrooted cuttings. Wet mix + no roots = rot. When in doubt, stay on the dry side for the first two weeks.
Burying the whole cutting. Deep planting smothers the basal wound. Bury the lowest one or two segments only.
Taking cuttings from a stressed parent. Yellowing, wrinkled, pest-infested, or recently repotted plants yield weak cuttings. Stabilize the mother plant first.
Discarding cuttings that look limp on day three. Mild limpness without shrivel is normal before roots form. Overcorrecting with heavy water causes rot.
Using heavy, peat-only potting soil. Epiphyte roots need air. Add perlite or orchid bark.
Troubleshooting Rot, Shrivel, and No Roots
Mushy basal segment means rot has started. Remove the cutting, slice back to firm green tissue if any remains, callus the new base, and retry in fresh dry mix. If rot reached the center, discard and take a new cutting from healthy parent growth.
Shriveling from tip downward signals dehydration or failed rooting. Check that humidity is not extremely low and that you are not keeping the mix bone-dry in a hot window. If the segment is thin and crispy, discard it.
No roots after eight weeks in cool conditions may still be normal. If the cutting remains firm and green, wait another two weeks. If it is unchanged in a warm bright spot after ten weeks, gently remove it, inspect for tiny roots, recut and callus if tissue is healthy, and replant.
Black spots on segments during rooting suggest fungal infection or sun scorch. Move out of direct sun, reduce moisture on leaf surfaces, and isolate from other plants.
Parent plant oozing or collapsing at the twist site is rare with clean joint separation but can happen if you ripped tissue. Let the parent stub dry, avoid watering the parent heavily for a few days, and monitor. Do not take more cuttings from a compromised branch until it firms up.
Thanksgiving cactus (Schlumbergera truncata) and Easter cactus (Schlumbergera gaertneri) propagate the same way: twist off two to four segments, callus, root. Segment shape differs - Thanksgiving cactus has sharper teeth and more asymmetric segments - but the joint twist technique and aftercare are identical.
Conclusion
Propagating Christmas cactus is less about exotic tools and more about respecting how the plant is built. Twist off short chains of two to four stem segments at the joints, let the basal wound callus for one to two days, then root in well-draining soil or shallow water under bright, indirect light. Keep moisture controlled while roots form, take more cuttings than you think you need, and judge success by firm tissue plus new tip growth - not by how perky the cutting looks in its first week.
Soil rooting skips the transplant shock of water propagation; water rooting satisfies curiosity if you pot up promptly. Either path beats treating cladodes like succulent leaves. Once rooted, give new plants the same steady rhythm mature Christmas cacti expect: quick-draining mix, water when the top of the soil dries, and patience through the first growing season. Do that, and one healthy parent becomes several compact, arching plants ready for windowsills - or for passing along as gifts rooted from your own hand.
When to use this page vs other Christmas Cactus guides
- Christmas Cactus overview - Start here for whole-plant context before deep-diving this topic.
- Christmas Cactus problems hub - Jump to symptom-specific fix guides when this care topic does not resolve the issue.