Christmas Cactus Repotting: When, How, and Mistakes to Avoid
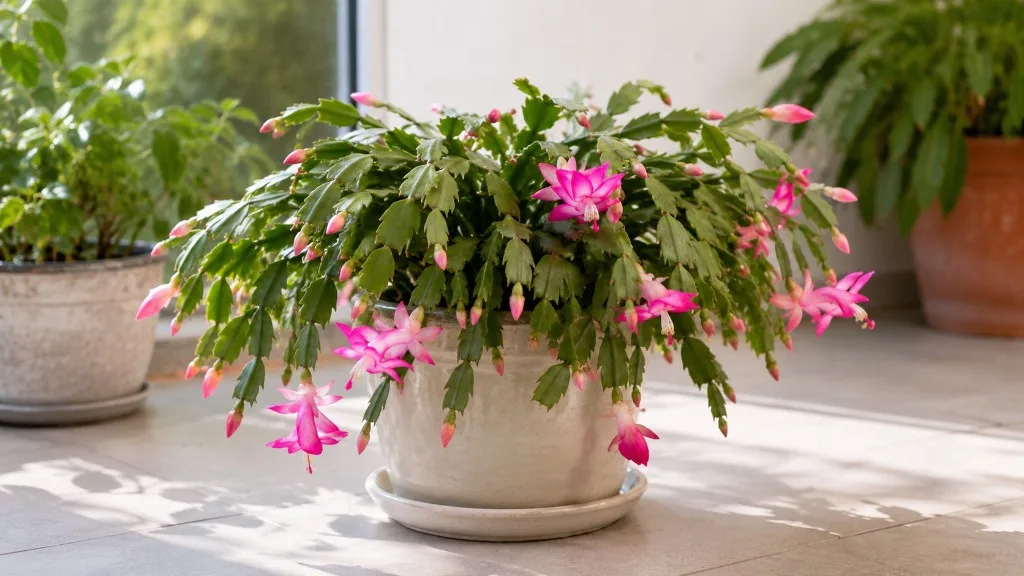
Christmas Cactus Repotting: When, How, and Mistakes to Avoid
Christmas Cactus Repotting: When, How, and Mistakes to Avoid
A Christmas cactus that drops its buds, wilts for weeks after a pot change, or refuses to bloom the following winter is usually not a difficult plant. It is a plant that was repotted at the wrong moment, in the wrong soil, or into a container that held too much wet mix around a small root system. Schlumbergera species are epiphytic jungle cacti, not desert succulents. They want airy, moisture-retentive but fast-draining soil, a snug pot, and a repotting window that respects their bloom cycle. Get those four variables right and the same plant that looked stressed after transplant will push new segments within a month and set buds on schedule the next autumn.
This guide covers every decision that matters: when repotting is actually necessary, the late-winter timing that protects flowers, how to choose a pot one size up (or refresh soil in the same pot), the soil blend that mimics a rainforest branch, the step-by-step procedure that keeps segmented stems intact, and the post-repot care that determines whether the plant recovers cleanly. Guidance is grounded in botanical references and university extension literature including the Missouri Botanical Garden, Clemson HGIC, and NC State Extension.
Why Christmas Cactus Repotting Is Different From Desert Cacti
Most people reach for a bag labeled “cactus mix” and assume all cacti want the same thing: bone-dry soil and a pot big enough to “let it grow.” Christmas cactus breaks both assumptions. In the wild, Schlumbergera x buckleyi and its close relatives grow on tree branches and rock ledges in the humid coastal mountains of southeastern Brazil, where their roots cling to decaying leaf litter and moss rather than sitting in deep desert sand. The Missouri Botanical Garden classifies these plants as epiphytic succulents that need more moisture retention than arid-habitat cacti, but still require excellent drainage and airflow around the roots.
That biology changes every repotting decision. You are not trying to recreate a desert. You are trying to recreate a thin, airy root zone on a tree limb: enough organic matter to hold moisture between waterings, enough coarse material to let excess water drain immediately, and a container small enough that the roots stay concentrated rather than swimming in unused wet soil.
Schlumbergera as an Epiphytic Rainforest Plant
Epiphytic plants do not parasitize their host trees. They use them as scaffolding. Christmas cactus roots in nature are shallow, fibrous, and constantly exposed to moving air. Rain arrives, soaks the moss and bark debris for a few hours, then the canopy dries. The roots breathe again. Indoors, the closest analogue is a well-structured potting mix in a container with drainage holes, not a deep bed of heavy peat that stays saturated for days.
The segmented stems-botanically called phylloclades-store water, which is why Christmas cactus can tolerate brief droughts even though it is not a desert plant. But those same stems are also why overwatering on Christmas Cactus after repotting is so dangerous: the visible plant looks fine while the roots below are suffocating in soggy mix. Repotting is your chance to reset that root environment before rot becomes the bigger problem.
Why Slightly Root-Bound Conditions Encourage Blooming
Here is the counterintuitive part that separates Christmas cactus care from most other houseplants: these plants often bloom better when their roots are somewhat snug in the pot. The RHS notes that Christmas cacti like to be snug in a small pot, and that they do not have an extensive root system - preferring a modest container rather than frequent upsizing.
That does not mean you should never repot. It means you should repot less often, into only slightly larger pots, and with a clear reason-not because the calendar says so. Jumping two sizes up because you want the plant to “grow faster” usually backfires: the extra soil holds moisture the small root mass cannot use, establishment slows, and bud formation the following autumn may stall. Many experienced growers refresh the soil in the same pot every few years, trimming circling roots lightly, rather than sizing up at all.
When to Repot Christmas Cactus: Signs You Actually Need It
Christmas cactus is patient. It can look healthy on top while the soil below has quietly degraded for years. The signs below are worth checking every spring, especially if your plant has not been repotted in three or more years.
Roots emerging from drainage holes in significant numbers. A single white root tip exploring the hole is normal. Several thick roots curling out of multiple holes, or a mat of roots visible when you lift the plant, means the container is full.
Water runs straight through the pot within seconds. When the root mass displaces most of the soil volume, irrigation has nowhere to linger. The plant may wilt between waterings even though you are watering on schedule.
The mix dries out within one to two days of a thorough soak. Same underlying problem viewed from the other direction: too little functioning soil for the root mass you have.
Growth has stalled during spring and summer. If segments are not lengthening, new joints are not forming, and the plant has good light and reasonable temperatures, depleted or compacted soil may be the limit.
The soil has broken down. Pull back the top layer. If the mix smells sour, looks like fine mud, or has collapsed into a dense brick that repels water, it is time for fresh substrate regardless of how the stems look.
Salt crust or chronic leaf-tip burn despite conservative feeding. Mineral buildup in old mix is a legitimate reason to repot, not just to add more fertilizer on top.
The pot has no drainage holes, or is clearly oversized. Clemson HGIC treats these as urgent conditions: a sealed container or a pot with more than an inch of empty space between the root ball and the wall keeps the mix waterlogged and invites root rot on Christmas Cactus.
Roots, Soil, and Growth Signals That Mean It Is Time
Two signs deserve a closer look because beginners misread them. A wobbly plant is not always root-bound. Schlumbergera stems are top-heavy relative to their shallow roots, and a tall, old specimen can lean even in fresh soil. Lift the pot. If it feels unusually light right after watering, the soil volume has likely shrunk from decomposition. If it feels normally heavy, the wobble may be a staking issue, not a pot-size issue.
Fewer flowers than last year can indicate depleted soil, but it can also mean too much light, interrupted dark periods in autumn, or a recent move. Do not repot solely because blooming was disappointing unless you also see soil or root problems. Repotting itself can delay flowering for up to a year while the plant re-establishes - so using bloom failure as the only trigger can create a cycle where you never let the plant settle enough to set buds.
When an Emergency Repot Cannot Wait for the Ideal Window
The ideal window is late winter through early spring after flowering finishes. Two situations override that schedule.
Active root rot. Soft, mushy stem segments at the soil line, a sour smell from the mix, or black, slimy roots when you probe the surface mean you need to unpot immediately, trim damaged tissue, and repot into fresh, dry mix-regardless of season. Delaying lets rot climb the stem.
A pot with no drainage or severe overpotting. If the plant sits in a sealed decorative container or a vessel so large that the mix never dries, treat it as an emergency. The seasonal ideal matters less than stopping chronic waterlogging.
Emergency repots in autumn or winter carry more risk because the plant is not in its active growth phase and the soil stays wet longer in cooler rooms. If you must repot off-season, use the smallest appropriate container, the grittiest mix you can manage, wait at least five to seven days before the first watering, and keep temperatures in the 65–75°F range with Christmas Cactus light guide.
Best Time of Year and How Often to Repot
The single most important timing rule for Christmas cactus: never repot while the plant is in bud or bloom. All energy is directed toward flowers. Disturbing the roots during that phase commonly causes bud and flower drop, and you may lose the display you waited all year to see. NC State Extension and Clemson HGIC both emphasize waiting until flowering is completely finished.
The best window opens in late winter through early spring-roughly February through April in the Northern Hemisphere-after blooms have faded and before the main spring growth flush. Michigan State University Extension describes this as the interval after flowering when new growth resumes, giving the plant months to rebuild roots before bud initiation begins again in late summer.
There is a hard deadline on the other end. Schlumbergera sets flower buds in response to shortening days and cooler nights, typically beginning in late September or October. Clemson HGIC recommends finishing any transplant well before autumn bud initiation - by late July or early August at the latest - so the plant is not recovering when bud formation should begin. Miss that cutoff and you risk a bloomless winter even if the repot itself went fine.
Frequency: most healthy Christmas cactus plants need repotting every two to four years, not annually. Missouri Botanical Garden notes container plants benefit from periodic refresh rather than annual upsizing. The spread reflects how root-bound you are willing to let the plant stay for blooming performance. A plant that is thriving, blooming well, and showing spring growth can wait. A plant with degraded soil or roots circling the pot cannot.
Choosing the Right Pot: Size, Material, and Drainage
Three decisions define the container: diameter, material, and whether water can leave the bottom. The last one is not negotiable. Every credible source, from university extensions to specialty houseplant educators, requires a drainage hole for Schlumbergera. A beautiful pot without one is a long-term rot trap.
The One-Size-Up Rule and When to Stay in the Same Pot
When the plant has genuinely outgrown its container, move up only one pot size-about one to two inches (2.5–5 cm) wider in diameter than the current pot. NC State Extension converges on this rule because Christmas cactus roots are modest. A jump from a 6-inch pot to a 10-inch pot surrounds a small root ball with a reservoir of wet soil it cannot colonize quickly.
Often the better move is same pot, fresh mix. NC State Extension notes that many growers prefer to trim circling roots lightly and repot into the same container rather than sizing up. That refreshes nutrients and soil structure without sacrificing the slightly root-bound conditions that support blooming. Choose size-up only when roots clearly fill the current pot and you see the drainage-hole and fast-dry symptoms described earlier.
Depth matters less than width for Christmas Cactus overview. Schlumbergera roots are shallow. A deep pot full of unused mix at the bottom is another version of the overpotting problem.
Terracotta, Plastic, and the Non-Negotiable Drainage Hole
Unglazed terracotta is an excellent default indoors because porous clay wicks moisture through the walls, helping the epiphytic root zone dry evenly. That extra evaporation is forgiving if you tend to water generously.
Plastic works well and is lighter for hanging baskets or large specimens. It dries more slowly, so pair it with a chunkier mix and a lighter hand on the watering can.
Glazed ceramic is acceptable with a drainage hole but behaves like plastic: less airflow through the walls, longer dry-down times.
Whatever material you choose, verify the drainage hole is open-not plugged by a factory sticker or a layer of gravel. And skip the myth that gravel at the bottom “improves drainage.” It creates a perched water table that keeps the root zone wetter, not drier.
The Best Soil Mix for Christmas Cactus Repotting
Soil is the variable that determines whether repotting succeeds or triggers rot within weeks. The target is a mix that holds moisture for several days-epiphytes do not want to go bone dry-but drains fast enough that the roots never sit in stagnant water.
Why Heavy Potting Soil Sets Up Root Rot
Standard indoor potting soil is engineered for moisture retention. Fine peat particles and water-holding polymers keep typical foliage plants happy, but they are a poor match for Schlumbergera roots that evolved on airy tree bark. In an unchanged peat-heavy mix, water lingers around the stem base, oxygen drops, and fungal rot follows. The Missouri Botanical Garden recommends amending or replacing standard potting soil with a well-drained blend rather than using heavy peat straight.
Commercial cactus and succulent mixes are closer but often still too lean for Christmas cactus. They drain well but may dry too quickly in heated indoor air. The fix is usually to add organic matter back in-peat or coco coir-while keeping the coarse fraction high.
A Beginner-Friendly DIY Soil Blend
A reliable starting blend used by many experienced growers, including the mix described by the Missouri Botanical Garden, combines equal parts of three components:
- 1 part peat-free potting soil or coco coir - supplies organic matter and slow moisture release
- 1 part perlite or vermiculite - creates pore space and prevents compaction
- 1 part orchid bark or composted bark fines - mimics the epiphytic substrate and improves drainage
For a slightly faster-draining version in plastic pots or humid climates, shift the ratio toward 40% potting soil, 30% perlite, 30% orchid bark. For terracotta in dry indoor air, 50% potting soil, 25% perlite, 25% bark retains a little more moisture without going soggy.
If you buy a pre-made cactus mix, stir in extra perlite and a handful of orchid bark per quart. The goal is a mix that feels chunky when you squeeze it, not like uniform mud. pH in the 6.0–7.0 range suits Schlumbergera and matches what most peat-based blends already provide.
Step-by-Step: How to Repot Christmas Cactus
The procedure is straightforward once soil, pot, and timing are settled. The highest-risk moments are pulling on fragile stem segments, burying the plant too deep, and watering too soon afterward.
Preparing the Plant and Removing It Safely
Water lightly one to two days before repotting, not the morning of the job. You want the root ball cohesive enough to hold together, but not saturated. Soggy soil smears onto roots and makes the plant heavier and harder to handle.
Gather a clean workspace, fresh mix, the new pot, and sterilized scissors. If the plant is large and cascading, have a second empty pot nearby to rest the plant in while you work-this prevents stem segments from snapping under their own weight.
Turn the pot on its side and slide the plant out by supporting the root ball, not yanking stems. If the pot is stuck, squeeze flexible plastic sides or run a dull knife around the inner edge. Never pull on individual segments; they break cleanly at the joint and open wounds that rot easily.
Root Inspection, Trimming, and Proper Planting Depth
Once out, brush away loose old soil from the sides and bottom. Healthy Christmas cactus roots are white to light tan and firm. Trim black, mushy, or foul-smelling roots with clean scissors. If the root ball is a dense circle at the bottom, gently tease the outer layer apart with your fingers-no aggressive washing unless you are treating rot.
Add an inch or two of fresh mix to the new pot. Set the plant so the base of the stem segments sits at the same depth as before. Burying the stem lower than it originally grew invites basal rot. There should be roughly half an inch to an inch of space between the soil surface and the pot rim for watering room, as NC State Extension recommends.
Fill around the sides with mix, using a chopstick or pencil to settle soil into gaps without compacting the center. Firm the surface lightly with fingertips and stop. The plant may wobble slightly until new roots anchor; that is normal.
Post-Repotting Recovery: Watering, Light, and Feeding
The two weeks after repotting determine whether your work sticks. Christmas cactus forgives a lot, but it does not forgive wet soil on torn roots or harsh sun on a recovering plant.
Water lightly once to settle the fresh mix, then let the top inch dry before the next soak - the approach Missouri Botanical Garden and NC State-aligned guidance use after repotting. Fine root hairs damaged during repotting are vulnerable to soggy mix; the stems store enough water to sustain the plant through a brief dry-down.
When you resume, water thoroughly until excess runs from the drainage hole, then let the top inch of mix dry before soaking again. During recovery, err slightly dry rather than wet. Overcompensating with extra water is one of the most common post-repot errors and shows up as limp, translucent segments within days.
Light: keep the plant in bright, indirect light for the first one to two weeks. A north- or east-facing window, or a few feet back from a south window, is ideal. Direct sun on a stressed root system accelerates water loss faster than the roots can replace it, and sunburn on segments is permanent.
Temperature and humidity: aim for 65–75°F and avoid cold drafts or hot heating vents. Average indoor humidity is acceptable; these are rainforest plants but they adapt to typical homes when watering is disciplined.
Fertilizer: hold all feeding for at least four weeks, and many growers wait six weeks. Fresh mix contains residual nutrients, and salts on healing roots cause tip burn. Resume a diluted balanced fertilizer only after you see new segment growth.
Bloom expectations: if you repotted in the correct late-winter window, bud set the following autumn should proceed normally. If you repotted late or disturbed a mature plant heavily, accept that flowering may be sparse for one season. That is not failure; it is the plant prioritizing roots over buds.
Common Repotting Mistakes and How to Fix Transplant Shock
Most post-repot problems trace back to a short list of avoidable errors.
Repotting during bud formation or bloom. Buds and flowers drop, and you lose the winter display. Wait until flowers finish.
Choosing a pot two or more sizes larger. Excess wet soil around a small root mass causes slow rot and stalled growth. Go one size up, or refresh soil in the same pot.
Using unamended potting soil. Heavy peat mixes stay wet too long. Add perlite and orchid bark, or use the DIY blend above.
Watering heavily immediately after repotting. Torn roots plus soggy soil equals fungal infection. Water lightly once to settle mix, then wait until the top inch dries.
Burying the stem deeper than it grew before. Basal segments rot where they touch soggy mix. Match the original planting depth exactly.
Pulling stems instead of supporting the root ball. Broken segments are open wounds. Always unpot from the container side.
Fertilizing in the first month. Salt burn on healing roots sets growth back further than no feed at all.
Placing the plant in direct sun right away. Segments desiccate and blush purple-red with sun stress. Recover in indirect light first.
Mild transplant shock-slight limpness, dull color, or a brief pause in growth for one to two weeks-is normal and usually self-corrects if you keep conditions stable and avoid overwatering. Severe wilting with mushy segments after repotting suggests rot. Unpot, trim all soft tissue back to firm stem and healthy root, let the plant dry on a paper towel for a day, and repot into fresh, barely moist mix. Restart the no-water waiting period.
If segments drop but the remaining stem is firm and the soil is appropriately dry, the plant is often reallocating resources rather than dying. Maintain the recovery routine and watch for new growth at segment tips within three to six weeks.
Conclusion
Christmas cactus repotting is less about giving the plant room to explode in size and more about refreshing the root zone on a schedule the plant actually tolerates. Repot every two to four years, or sooner only when roots crowd the pot, the mix has collapsed, or drainage has failed. Do the work in late winter or early spring after flowers finish, never while buds are forming, and finish by midsummer at the latest so autumn bud initiation stays on track.
Use a container one size up with a drainage hole-or the same pot with new mix if blooming performance matters more than spread. Fill it with a chunky, epiphytic-style blend of potting soil, perlite, and orchid bark, not straight peat and not desert-only grit. Handle the root ball gently, keep the stem at the same depth, water lightly once after repotting, then resume normal watering when the top inch dries, and hold fertilizer for a month. Keep the plant in bright indirect light while it settles.
Follow that sequence and repotting becomes routine maintenance instead of a gamble with next winter’s flowers. The segments will firm up, new joints will appear by late spring, and the plant will do what it was bred to do: grow quietly all summer and surprise you with color when the days shorten again.
When to use this page vs other Christmas Cactus guides
- Christmas Cactus overview - Start here for whole-plant context before deep-diving this topic.
- Christmas Cactus problems hub - Jump to symptom-specific fix guides when this care topic does not resolve the issue.
- Root Rot on Christmas Cactus - Escalate here when repotting adjustments are not enough.