Root Rot on Alocasia Amazonica: Causes, Checks & Fixes
Quick answer
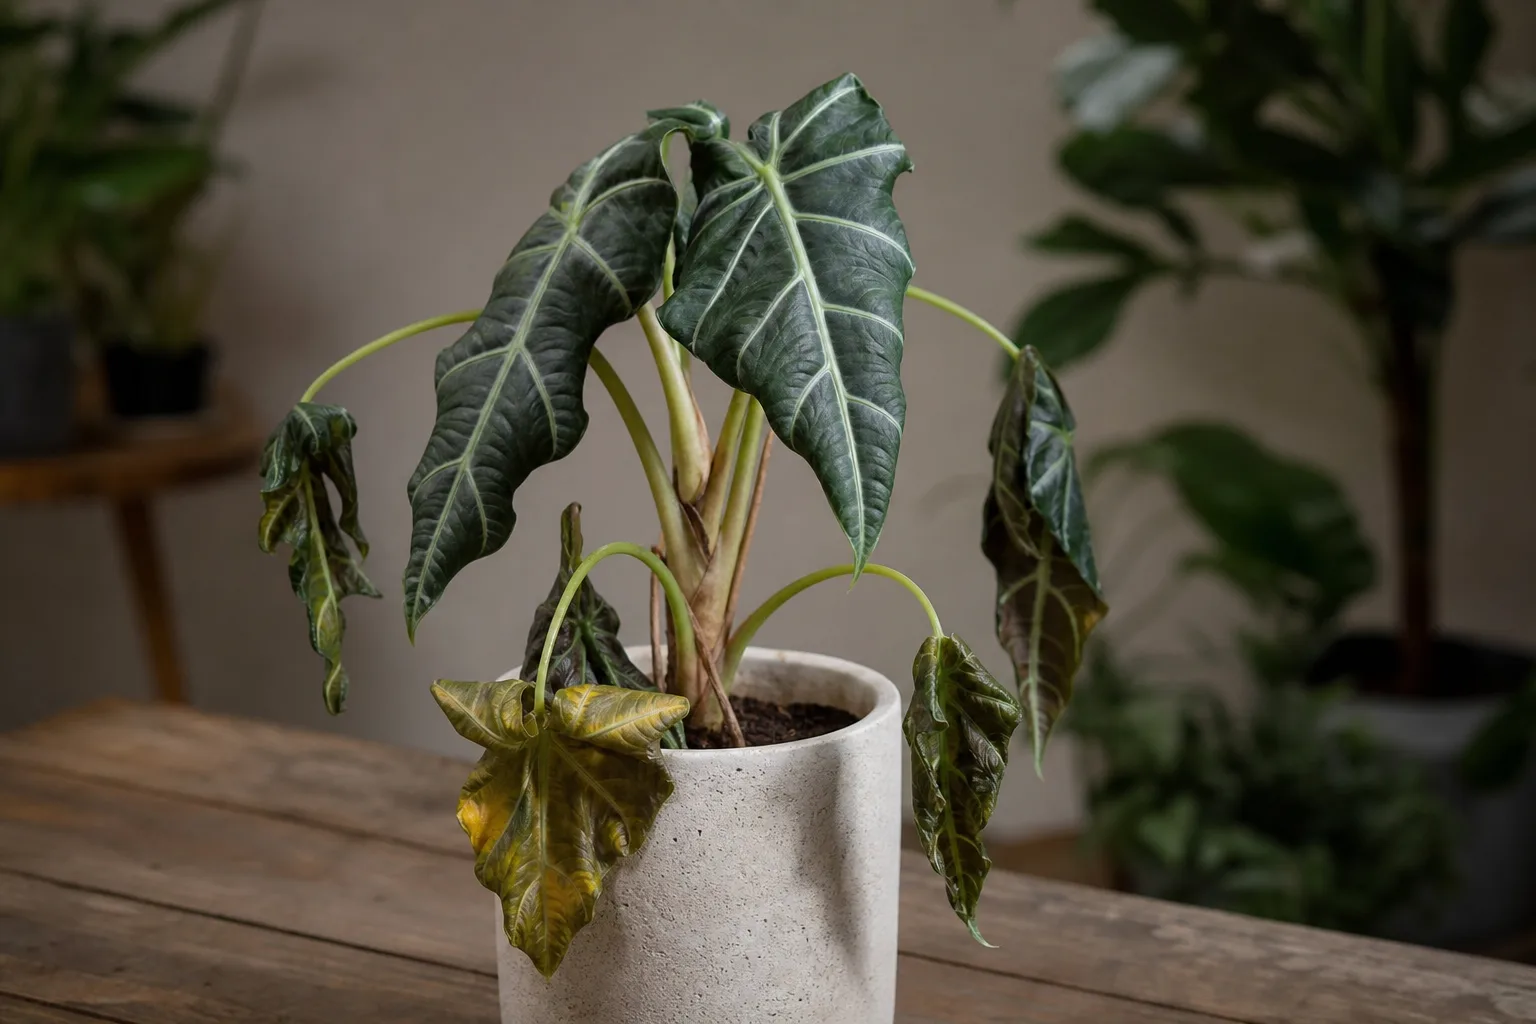
Root rot on Alocasia Amazonica starts when the corm sits in saturated mix too long-limp leaves on wet soil are the classic trap. First step: stop watering, unpot, and squeeze the corm at the soil line; firm tissue means salvage is likely, mushy tissue means trim rotten roots today.
Root Rot on Alocasia Amazonica: Causes, Checks & Fixes
This guide covers root rot on Alocasia Amazonica. See also the general Root Rot guide, watering, and light pages for this plant.
Root Rot on Alocasia Amazonica: Causes, Checks & Fixes
Quick answer
Root rot on Alocasia Amazonica-the dark-veined African Mask plant sold as Alocasia × amazonica or cultivars like ‘Polly’-is a corm and root-zone failure, not a leaf disease you can spray away. This corm-based aroid stores water and starch underground; when mix stays saturated, fine roots suffocate and opportunistic pathogens like Pythium and Phytophthora colonize weakened tissue. The signature trap: limp arrow-shaped leaves on wet, heavy soil.
First step: stop watering immediately. Lift the pot. If mix clings wet at 1–2 inches depth and leaves are soft-not crispy-do not add water. Brush soil from the stem base and squeeze the corm: firm and potato-like means salvage is possible; soft, sunken, or sour-smelling means unpot and inspect roots today.
For wet-soil decline before roots have failed, see overwatering on Alocasia Amazonica. For seasonal watering rhythm and dormancy dry-down, see the watering guide.
Root rot vs. other Alocasia Amazonica problems
The wilt-on-wet-soil paradox separates confirmed root rot from thirst, dormancy, and early overwatering better than any single leaf symptom.
| Pattern | Pot weight | Soil at 1–2 in | Leaf feel | Corm at soil line | What it usually means |
|---|---|---|---|---|---|
| Root rot | Heavy | Wet, cool, clings to finger | Soft, limp; multiple yellow lower leaves | Soft, discolored, or foul | Failed roots; corm under attack |
| Overwatering without advanced rot | Heavy | Wet for days | Limp but corm still firm | Firm tan tissue | Saturated mix-dry-down may be enough |
| Underwatering | Light | Dry, crumbly | Limp with crispy brown edges | Firm; may shrivel if drought is severe | True thirst-see underwatering |
| Winter dormancy | Medium | Lightly moist; slow dry-down | Older leaves yellow and drop | Firm corm; growth paused | Normal rest-reduce water, do not repot |
| Low light + slow evaporation | Medium-heavy | Stays damp 5+ days | Gradual limpness | Firm until rot sets in | Overwatering risk-see light guide |
The wet-wilt rule: If soil is wet and leaves are limp, adding water makes root rot worse. Wilting with moist soil often means roots cannot absorb water because they are decaying-not because the plant is thirsty.
What root rot looks like on Alocasia Amazonica
On this upright corm aroid, rot often progresses underground while upper leaves still look acceptable. Dense dark foliage slows how fast you notice soil staying wet too long.
Root Rot symptoms on Alocasia Amazonica - compare with healthy tissue on the same plant.
Early signs
- Yellow lower leaves while mix remains damp-not the single aging leaf Amazonica naturally sheds
- Limp, soft arrow-shaped leaves on wet soil that do not firm up after you water
- Sour or rotten smell when you lift the pot or press the surface
- Fungus gnats hovering over persistently wet surface soil
- Stalled or smaller new leaves unfurling from the central growth point
- Edema-water-soaked blisters on leaf undersides from dysfunctional roots
Advanced signs
- Mushy petiole bases or soft tissue at the soil line where leaves meet the corm
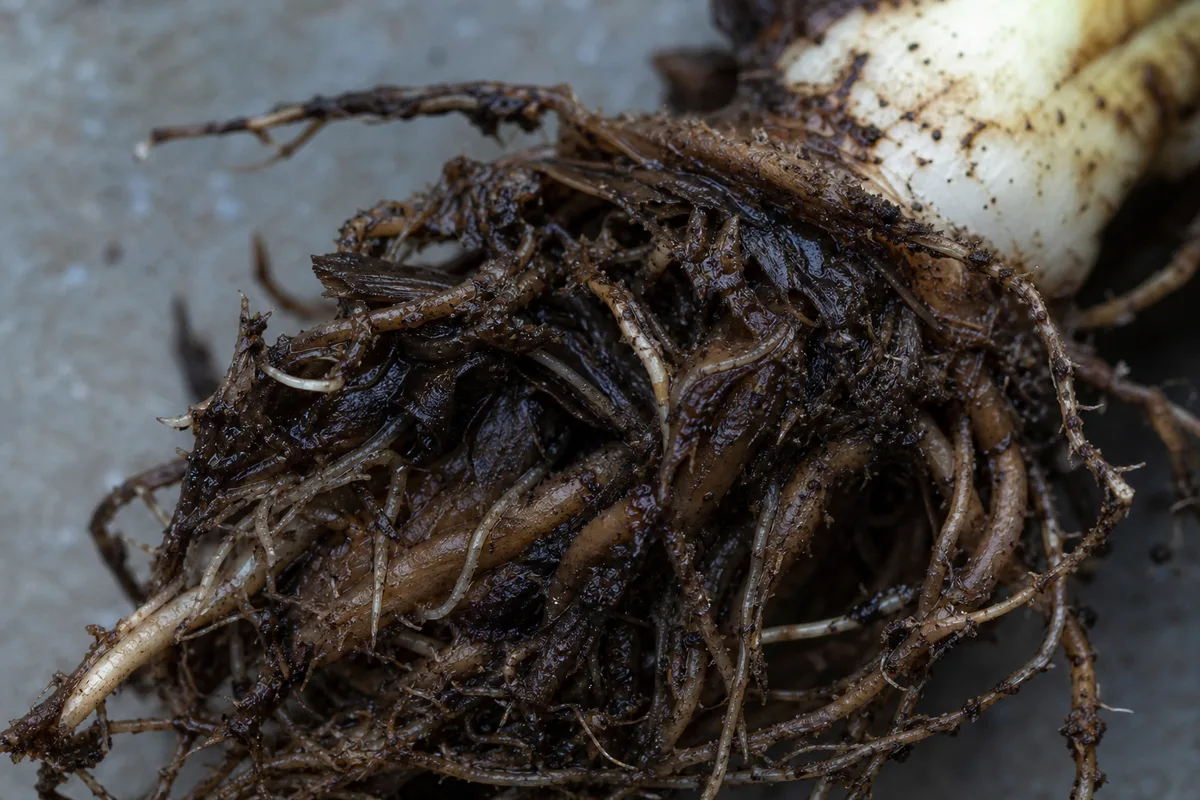
- Brown, slimy roots that slip off when touched-healthy roots are pale tan to white and firm
- Corm going soft, sunken, or foul-smelling-survival depends on how much firm tissue remains
- Multiple leaves yellowing or collapsing at once with no firm new growth
- White feeder roots absent after a rinse-only brown jelly remains
Compare with underwatering: a light dry pot, crispy leaf margins, and leaves that perk after one thorough soak point away from rot. Compare with gradual wilting: slow petiole sag over weeks without sour soil or mushy corm.
Why Alocasia Amazonica gets root rot
The corm is the kill zone
Alocasia Amazonica is a leaf-and-corm system, not just leaves and roots. The corm stores water and energy for the next leaf. When soil stays saturated, water displaces oxygen from pore spaces, fine roots die, and pathogens move from feeder roots into the corm itself. Underwatering is often recoverable because the corm holds reserves. Root rot is dangerous because anaerobic soil attacks the storage organ directly.
Common indoor triggers
- Calendar watering instead of checking dryness-the RHS Alocasia guide recommends watering April–October only when the top 5 cm (2 in) of compost is dry
- Winter dormancy overwatering-the RHS warns overwatering while dormant can rot roots; cool rooms slow evaporation while the corm uses little water
- Dense peat-heavy nursery mix in small pots that stays saturated at the bottom while the surface looks dry
- Oversized pots, blocked drainage holes, cachepots holding runoff, or saucers left full after bottom-watering
- Low light and cool rooms where the same summer watering schedule leaves mix wet for weeks
- Reusing contaminated mix or unsterilized pots after a previous rot event
NC State Extension notes root rot and leaf spots can occur from overwatering on Amazonica-type Alocasias-usually after culture failure, not as a random infection from dry air.
How to confirm the cause
Work through these checks in order before you repot. Each step narrows the diagnosis without stacking unnecessary treatments.
Check 1: Pot weight and surface moisture
Lift the pot. Heavy and wet with limp soft leaves is the root-rot signature. Push your finger 1–2 inches (2.5–5 cm) into the mix near the pot edge. Wet clinging soil after days without watering strongly suggests chronic saturation. A light dry pot with limp crispy-edged leaves points to underwatering instead.
Check 2: Drainage and standing water
Confirm drainage holes are open-not sealed by roots, pebbles, or a glued-in liner. Pour a small amount of water and watch it exit within seconds. Check whether the inner pot sits in standing water inside a cachepot or saucer.
Check 3: Corm firmness test
Brush soil from the base of the petioles. A firm, tan, potato-like corm means the storage organ is still viable even if leaves wilt and roots are partly damaged. Soft, sunken, or foul-smelling corm means advancing rot-unpot today. This check matters more on Alocasia than on most houseplants because the corm, not just roots, determines salvage.
Check 4: Root rinse inspection
Gently unpot and rinse roots under lukewarm water. Healthy roots are firm, pale tan to white, and hold their shape when pressed. Rotted roots are brown to black, soft, slimy, or hollow-and they smell sour. If most roots are jelly but the corm is still firm, trim and repot; if the corm is mushy throughout, recovery is unlikely.
Check 5: Smell and season
Sour or rotten odor from the pot confirms anaerobic breakdown. In late fall through winter, leaf drop on lightly moist soil with a firm corm may be dormancy-not rot. Do not repot a resting plant unless the corm softens or soil smells foul.
First fix for Alocasia Amazonica
Make one clear first move: stop watering and move the pot to bright indirect light with good airflow-not a darker corner, which slows evaporation without fixing oxygen-starved roots. Do not fertilize.
Once you have wet mix plus failing roots or a softening corm, escalate to the numbered rescue workflow below. Do not repot on day one if the corm is still firm and soil simply stayed wet too long-a careful dry-down may be enough; see overwatering for that path.
Step-by-step recovery
Wear gloves when trimming-Alocasia contains insoluble calcium oxalate crystals that irritate skin and are toxic to cats and dogs if chewed. Keep pets and children away from trimmed tissue and sap; contact your veterinarian or ASPCA Poison Control at (888) 426-4435 if ingestion is suspected.
This ladder assumes some firm corm tissue remains. If the corm is mushy throughout, salvage any firm offsets per the propagation guide instead.
-
Stop watering and unpot. Tip the pot on its side, loosen the root ball gently, and rinse old soil away so you can see roots and corm clearly.
-
Inspect roots and corm. Healthy roots are pale tan to white and firm. Rotted roots are brown, slimy, and may smell sour. The corm should feel like a firm potato. Carve out small soft spots with a sterile blade until you reach firm flesh.
-
Trim damaged tissue. With sterile scissors, cut every brown, mushy, or foul-smelling root back to firm white tissue. Dust cut surfaces with ground cinnamon. Air-dry on a paper towel 30–60 minutes in shade-not direct sun.
-
Repot into fresh airy mix. Use a chunky aroid blend-see the soil guide for ratios. Scrub reused pots with dilute bleach and rinse. Plant the corm shallowly-top at or just below the soil surface, not buried deep in wet mix. Details in the repotting guide.
-
Hold water for 5–7 days. Cut roots need oxygen to heal. Resist soaking to “help recovery.” After the hold, one light watering when the top inch is dry.
-
Provide warmth and humidity. Target 65–80 °F (18–27 °C) with humidity around the plant. Bright indirect light supports root regeneration.
-
Hold fertilizer until at least one new leaf fully unfurls-salts stress healing roots.
Recovery timeline
Recovery is judged by new leaves from the central growth point and firm corm tissue, not by old yellow leaves re-greening. Damaged leaves rarely recover their color; they may drop while the plant stabilizes.
| Severity | What to expect |
|---|---|
| Mild rot; firm corm; mostly white roots | Stabilization within one to two weeks after dry-down or light trim; first new leaf in two to four weeks |
| Moderate rot; heavy root trim; firm corm | Four to six weeks before consistent new growth; expect some leaf loss |
| Severe root loss; firm corm | New roots and first leaf in four to eight weeks in warm bright conditions |
| Soft corm throughout | Often fatal on the main plant-salvage firm offsets or corm divisions if any remain |
Signs of improvement: firm corm at the soil line, a new arrow-shaped leaf unfurling from the center, roots holding firm pale tips when you gently check after a month, and soil that dries down between waterings.
Signs the problem is worsening: spreading mush at petiole bases, wet-wilt after repot, sour smell returning within days, or no new growth after six weeks in good light.
What not to do
- Do not water because leaves look wilted when soil is already wet-that deepens root failure.
- Do not fertilize until new growth resumes; stressed roots cannot use nutrients safely.
- Do not repot into garden soil, a much larger pot, or a container without drainage hoping it will dry faster.
- Do not leave the plant in the same sour mix without trimming damaged roots-the anaerobic conditions remain.
- Do not bury the corm deep in wet mix after surgery-shallow planting keeps the storage organ from re-suffocating.
- Do not handle rotted tissue bare-handed around pets or sensitive skin-oxalate crystals irritate on contact.
How to prevent root rot next time
Prevention on Alocasia Amazonica is mostly rhythm and mix, not luck:
- Water when the top 1–2 inches of mix feel dry in active growth-not on a fixed calendar. In winter dormancy, reduce to a minimum and let the top 50–70% of mix dry between sparse drinks.
- Use chunky, well-drained aroid mix and a pot matched to the root ball-not the foliage spread.
- Empty saucers within 15–30 minutes of every watering. Lift cachepots to drain.
- Match watering to light and season-dim winter corners need far longer dry-down intervals than bright summer windows.
- Repot before mix collapses into a hydrophobic wet bottom layer, but avoid jumping to an oversized pot.
The watering guide is the best long-term companion to this page-it covers finger tests, pot weight, dormancy shifts, and the full corm-first rescue FAQ.
When to worry / propagation salvage
Escalate immediately when:
- The corm collapses when squeezed or smells foul after trimming
- Mush climbs petiole bases above the soil line on multiple leaves
- No firm root tissue remains after rinse and trim
If the main corm is lost but firm offsets or small daughter corms remain around the base, separate them with a sterile knife per the propagation guide and pot individually in gritty mix. Division in spring is the RHS-recommended propagation method for Alocasia.
When most of the plant is mushy, replacing with a healthy nursery specimen is sometimes more practical than weeks of ICU care-but a firm corm with no roots can still regrow if you follow the trim-and-hold-water protocol above.
Related Alocasia Amazonica guides
- Watering - corm-first rhythm, dormancy dry-down, and root-rot FAQ depth
- Overwatering - wet soil before roots have failed
- Wilting - dry-pot vs wet-pot first checks
- Yellow leaves - lower-leaf yellowing patterns
- Fungus gnats - wet-soil co-symptom
- Soil and repotting - mix and pot sizing for recovery
- Propagation - offset salvage when the main corm is lost