New Plant Quarantine Planner
A new plant should not move straight from a shop bench, delivery box, porch swap, or nursery sleeve into the middle of your indoor collection. The risky part is not the plant itself. The risky part is the hidden time gap between “looks clean” and “the pest population is finally visible.” A plant can carry eggs, crawlers, larvae, adult insects, mites, contaminated potting mix, or early disease symptoms while still looking good enough to buy.
The New Plant Quarantine Planner turns that vague caution into a practical schedule. It helps you decide where to isolate the plant, how long to hold it, what to inspect, when to water, when to repot, when to treat, and when it is reasonable to merge the plant with the rest of your collection. Use it before a new plant joins a shelf of pothos, philodendrons, dracaenas, calatheas, orchids, succulents, or any high-value plant you would hate to risk.
The planner is strict by design because quarantine only works when it breaks contact. Clemson HGIC recommends checking plants before bringing them indoors and isolating new plants from existing houseplants for six weeks to reduce the chance that pests spread through the home collection isolate new plants. Colorado State University Extension gives a shorter baseline, advising new plants be kept in a separate household area for at least three weeks before a careful end inspection at least three weeks. The planner uses that range as a decision window, not a magic number.
What the planner actually does
The tool builds a quarantine routine from the information you already know: plant type, purchase source, current condition, pest history, collection size, available isolation space, season, and how often you can inspect. A low-risk pothos from a trusted nursery may need a different plan from a clearance calathea with leaf damage, a plant swap cutting, a plant that spent summer outdoors, or a rare specimen arriving in damp moss after shipping.
It does not diagnose every pest with certainty, and it does not replace a plant pathologist, pest lab, veterinarian, pesticide label, or local extension office. Its job is narrower and more useful: create a repeatable checklist that keeps a possible problem contained while you observe the plant under calmer conditions. That matters because pests spread through contact, shared tools, water splashes, hands, sleeves, nearby leaves, and pots touching on crowded shelves.
The result should read like a quarantine work order. It gives you a hold period, a location rule, an inspection cadence, a watering approach, a treatment caution, and a release checkpoint. If your result feels more cautious than your normal routine, that is usually the point. A quarantine planner is not trying to make every new plant look perfect on day one. It is trying to keep one uncertain plant from becoming a collection-wide problem.
Why quarantine belongs before styling
Most people want to style a new plant immediately. That is understandable: the pot looks good, the shelf has an empty spot, and the plant may have been bought for that exact corner. Quarantine asks you to delay the satisfying part until the risk is clearer. For anyone with more than a few houseplants, that delay is usually cheaper than treating an entire room later.
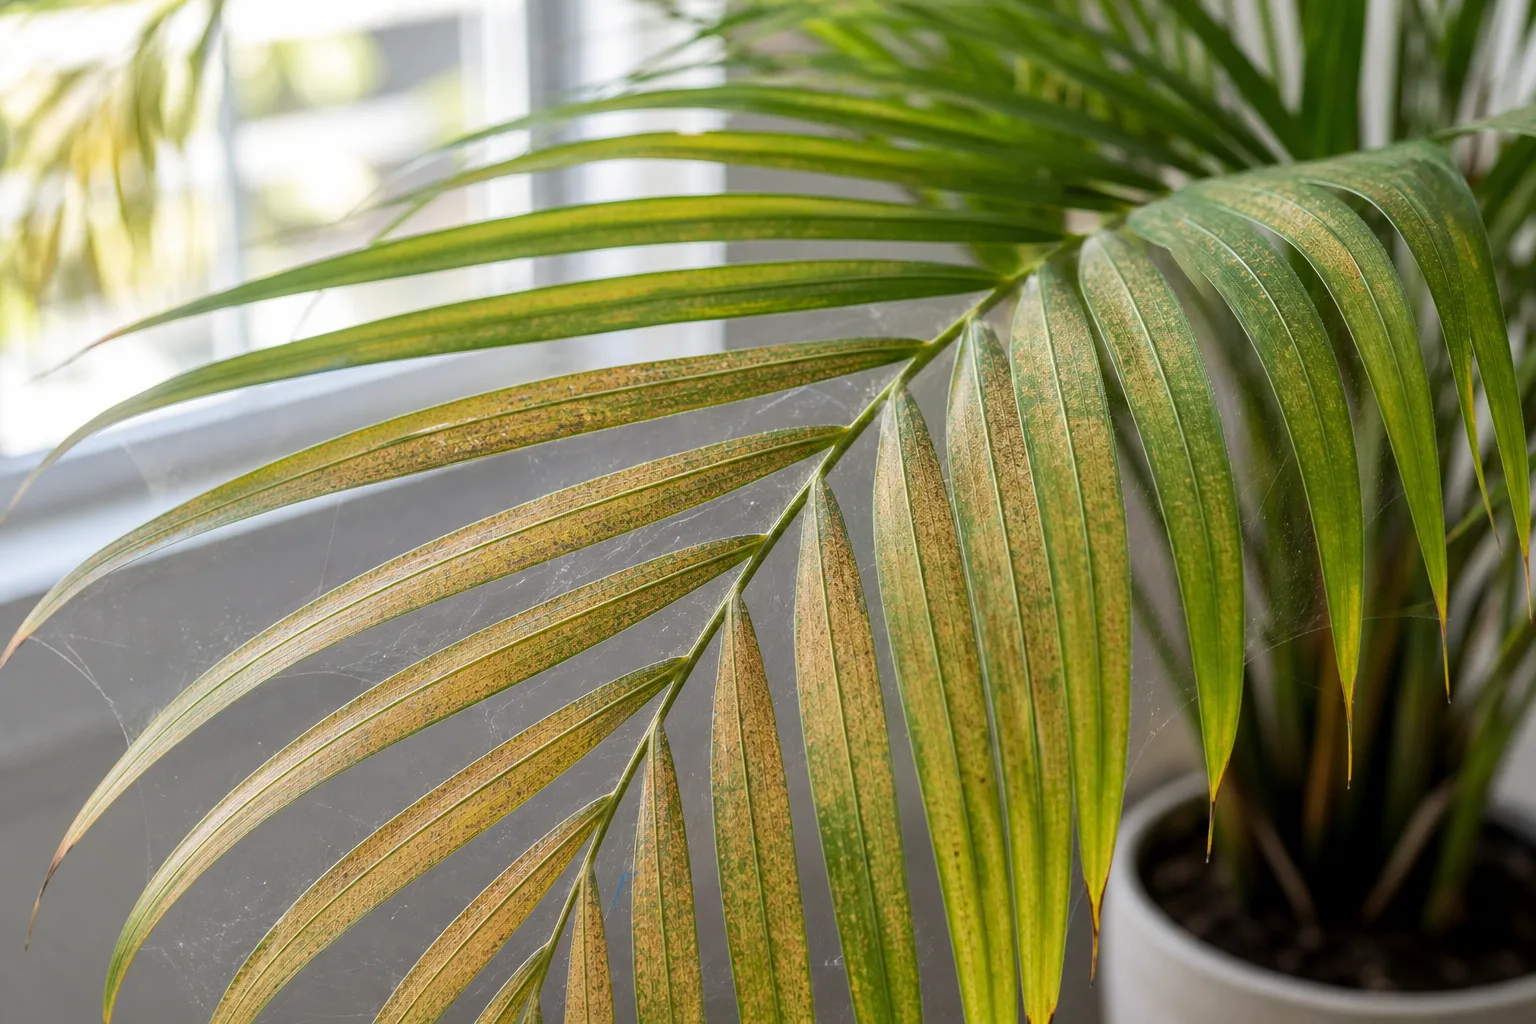
Many common houseplant pests hide where a casual look misses them. Clemson HGIC notes that pests are often found on the undersides of leaves and that a 10X magnifying lens helps reveal small pests and immature stages undersides of leaves. Mealybugs can sit in crowns, branch crotches, stems near the soil, pots, and stakes, while signs may include cottony egg masses, wax, sticky honeydew, sooty mold, or ants feeding on honeydew protected areas. Spider mites are even easier to underestimate because early damage can look like dullness, dust, stippling, or general decline before webbing becomes obvious.
Quarantine also gives the plant time to show shipping stress separately from pest stress. A plant that drops a few older leaves after a dark shipping box may only need acclimation. A plant that develops stippling, webbing, sticky residue, leaf mines, crawling specks, or soft lesions during isolation needs a different response. Without quarantine, those two stories blend together in the middle of your plant shelf.
The quarantine length that makes sense
The planner treats three to six weeks as the practical range for most indoor plant quarantine plans. Three weeks is a reasonable minimum when the plant is low risk, the source is reliable, you have inspected carefully, and you can keep it genuinely separate. Six weeks is more conservative and aligns with Clemson HGIC’s advice for isolating new plants from established houseplants six weeks.
The right length depends on what you are trying to catch. Mealybugs on houseplants lay eggs in white waxy sacs, and the nymphs move around the plant before settling to feed eggs in a compact. Colorado State University Extension notes that most female mealybugs produce cottony material for hundreds of eggs, that eggs hatch within a few days, and that mealybugs mature in about two months mature in approximately. A short quarantine may catch exposed adults but miss the next visible wave.
Spider mites can move quickly under favorable conditions. Missouri Botanical Garden describes spider mites as very small pests that can multiply rapidly, with eggs hatching in five to seven days and development from egg to mature adult in less than two weeks less than two weeks. That does not mean every quarantined plant needs months of isolation. It does mean a single clean inspection on arrival is not enough.
How the planner scores risk
Think of the planner as a risk sorter. It weighs the chance that the plant brought something in against the damage that spread would cause. A plant headed into a room with one other hardy plant is a smaller risk than a plant headed into a dense collection where leaves overlap and watering tools move from pot to pot.
The highest-risk inputs are usually source, symptoms, and contact. A plant from a clearance rack, outdoor market, plant swap, curbside pickup, mixed greenhouse, or friend’s infested room deserves a longer hold than a clean plant from a trusted source. A plant with webbing, sticky residue, distorted new growth, stippling, scale bumps, white cottony deposits, leaf spots, sour soil, or flying gnats should not be treated as a normal arrival. A plant that must sit near the rest of your collection because space is tight also needs stricter tool hygiene and more frequent checks.
The planner also accounts for plant sensitivity. Ferns, calatheas, orchids, begonias, hoyas, thin-leaved aroids, and stressed shipped plants may react badly to aggressive preventive sprays, sudden repotting, low humidity, or direct sun during isolation. Succulents and cacti may tolerate drier quarantine conditions but can hide mealybugs in ribs, areoles, crowns, and root zones. The best quarantine plan reduces spread without creating a second problem from overhandling.
Set up the isolation space first
Choose the quarantine location before you unbox or unwrap the plant. The best space is a separate room with a door, washable surface, adequate light, and no other plants. An unused bathroom, spare bedroom, bright laundry room, or separate office can work if the plant receives suitable light and temperature. The point is not beauty. The point is a controlled zone where any pest is inconvenient but contained.
If you cannot spare a separate room, create distance and barriers. Put the plant on a separate hard surface, away from leaves that could touch other plants. Do not place it above another plant where pests, water, debris, or old potting mix can fall down. Avoid grouping the new plant with “just one” established plant for company; quarantine is weakest when you make exceptions because the plant looks lonely.
Keep a small quarantine kit nearby: a bright flashlight, 10X hand lens, disposable gloves if you use them, paper towels, rubbing alcohol for tool cleaning, yellow sticky card, clean saucer, pruning snips, and a notebook or phone note. Do not share the same cloth, scissors, watering can spout, moss pole ties, or soil scoop with the main collection unless you clean them between uses. UC IPM recommends washing hands after touching infested houseplants as an added precaution washing hands.
First-day intake checklist
Start with observation, not panic treatment. Photograph the plant from all sides, then inspect leaf tops, leaf undersides, petioles, nodes, stem joints, crowns, sheaths, soil surface, drainage holes, pot rim, cachepot, stake, and nursery sleeve. Look for moving specks, webbing, stippling, sticky shine, black sooty patches, cottony deposits, raised scale-like bumps, distorted new growth, silver streaking, dark lesions, mushy tissue, fungus gnat adults, and fine debris that does not look like normal potting mix.
Then check the root-zone clues without tearing the plant apart unnecessarily. If the nursery pot is flexible, gently slide it off only if the plant is stable enough. Clemson HGIC points out that plants kept outdoors can have pests enter through drainage holes and recommends examining the soil because many pests may be found around the rootball exterior examine the soil. If the plant is freshly shipped, wilted, brittle, cold-damaged, or already stressed, a full root inspection may be too much on day one.
Record the baseline. A quarantine log should include arrival date, source, plant name if known, pot size, visible symptoms, moisture level, whether you saw pests, and which tool or treatment touched the plant. This is not busywork. It prevents the common mistake of thinking a mark is new when it was already there, or missing a slow increase in sticky residue, stippling, or gnat activity.
What to inspect each week
A weekly inspection should be systematic enough that you do not keep checking the same easy leaves while missing the protected spaces. Rotate the pot. Lift hanging stems. Check the newest growth first because soft tissue often reveals sap-feeding pests early. Then check the oldest leaves, undersides, leaf axils, stem joints, pot rim, saucer, soil surface, drainage holes, and nearby shelf surface.
Use a white paper tap test for suspicious mites. Clemson HGIC recommends tapping leaves over white paper and looking for moving dots when scouting spider mites tap the leaf. Missouri Botanical Garden gives the same practical clue: when a leaf or branch is tapped over white paper, tiny specks that look like dust or pepper may move white sheet of paper. If the paper test shows movement, keep the plant isolated and identify the pest before choosing treatment.
Use sticky cards as monitors, not proof that the plant is clean. UC IPM says yellow sticky traps can trap adult fungus gnats and that raw potato chunks can help monitor larvae in pots yellow sticky traps. Sticky cards are useful because they catch activity you may not see during a two-minute inspection. They do not tell you whether eggs, larvae, or hidden crawlers are gone.
Watering during quarantine
Quarantine is not a reason to abandon normal plant care. A stressed plant is often more vulnerable, and poor watering can mimic or worsen pest symptoms. Keep the plant in the right light range, avoid temperature extremes, and water according to root-zone moisture rather than a fixed calendar. The planner should make your inspection schedule stricter, not make your watering random.
Fungus gnats are the main reason the watering part matters. UC IPM advises checking pots for excessively moist conditions and organic debris where fungus gnat larvae feed excessively moist conditions. Mississippi State University Extension states that allowing soil to dry properly between watering reduces fungus gnat problems and identifies Bacillus thuringiensis israelensis as an effective potting-soil drench for fungus gnats when the product is labeled for that use dry properly.
Do not overcorrect by droughting a tropical plant until it collapses. The better quarantine rule is controlled moisture: water thoroughly when the plant’s root zone needs it, empty the saucer, keep the soil surface from staying constantly wet, and use a potting mix appropriate for the species. If the plant is already in dense, sour, or waterlogged mix, the planner may recommend a careful repot during quarantine. If the plant is stable and the mix is acceptable, waiting can avoid stacking shipping stress, isolation stress, and root disturbance in the same week.
Repot now, later, or not at all
Repotting is one of the hardest quarantine decisions because it can solve one problem and create another. Repotting lets you remove poor nursery mix, inspect the rootball, discard contaminated debris, and start with a cleaner baseline. It also damages fine roots, changes moisture behavior, and can make a newly shipped plant look worse before it looks better.
Repot immediately when the current setup is clearly unsafe: sour smell, mushy roots, collapsed soil, pests crawling in the potting medium, a pot with no drainage, heavy compaction, or a rootball so dry and hydrophobic that normal watering cannot rewet it. Repot later when the plant is visibly stressed but not in dangerous mix. Do not repot just because a decorative pot is waiting.
When repotting during quarantine, use commercially prepared potting mix rather than garden soil. Clemson HGIC recommends commercially prepared potting soil because outdoor soil can be a source of pests commercially prepared. Clean the work surface afterward, discard old mix in a sealed bag if pests are suspected, and do not reuse the nursery pot for another plant without washing it.
Preventive treatment without overdoing it
The planner may suggest preventive cleaning, but it should not push automatic pesticide use as if every new plant needs the same spray. A smooth-leaved plant can often be rinsed or wiped, especially if dust, residue, or a few exposed insects are present. Clemson HGIC notes that washing smooth-leaved plants every two to three weeks can discourage pest infestations and improve foliage appearance washing smooth-leaved. That kind of physical cleaning is often lower risk than layering multiple sprays on an already stressed plant.
Use pesticides only when the plant, pest, location, and label line up. The U.S. EPA’s label guidance is blunt that the label is the law label is the law. This is especially important indoors, around children, pets, aquariums, food-prep areas, and sensitive plants.
If you do treat, target the pest you actually have. Mealybugs may respond to hand removal or alcohol dabs on individual insects, but UC IPM advises testing alcohol on a small plant area first because leaf burn can occur test on a small. Spider mites require coverage of leaf undersides and repeated follow-up; Mississippi State University Extension notes that horticultural oil, neem oil, or insecticidal soap can help homeowners control spider mites, but thorough underside coverage and repeated treatments at short intervals are important undersides of leaves. Do not pour neem, soap, alcohol, or houseplant pesticide into aquarium or terrarium water.
Worked example: low-risk nursery pothos
Imagine you bring home a clean-looking pothos in a four-inch nursery pot from a shop where plants are spaced well and foliage looks healthy. You have a separate bathroom with bright indirect light, no other plants, and a habit of checking plants twice a week. The planner would likely choose a shorter quarantine within the normal range, but it should still require separation, a baseline inspection, a sticky card or visual gnat check, and at least one final inspection before release.
The first week is about confirming the plant stays stable. You inspect leaf undersides and nodes, check the pot rim and drainage holes, water only when the mix needs it, and record any marks. If no insects, webbing, sticky residue, or new leaf damage appears, the second and third weeks confirm the pattern. At release, you clean the pot exterior, remove the sticky card, inspect one last time under bright light, and place the plant where leaves will not immediately touch other plants.
This example is simple because the inputs are favorable. The value of the planner is that it prevents you from skipping the boring parts. A low-risk plant still gets a clean intake, a hold period, and an end check. That small routine is what makes quarantine sustainable instead of dramatic.
Worked example: high-risk calathea from a clearance rack
Now imagine a calathea from a crowded clearance table. It has curled edges, a few stippled leaves, damp soil, and a cachepot with old water marks. You own several other prayer plants, and your only isolation spot is a desk six feet away from the main shelf. The planner should treat this as high risk because the source, symptoms, moisture, and collection value all raise the cost of being wrong.
The plan would extend the quarantine, increase inspection frequency, and delay decorative placement. You would inspect with a hand lens, run a white paper tap test, isolate tools, keep a sticky card near the soil, and avoid placing the plant downwind of or above other plants. If spider mites are confirmed, the release date resets around treatment follow-up rather than the original purchase date. If fungus gnats are present, the plan focuses on moisture correction, adult monitoring, and a labeled larval control only if needed.
This is also a case where doing less can be wiser than doing everything at once. Calatheas dislike rough handling, dry air, and chemical stress. A reckless routine of repotting, spraying, pruning, fertilizing, and moving the plant repeatedly can make the plant decline even if pest pressure is low. A good quarantine plan separates the necessary actions from the satisfying but unnecessary ones.
Small-space quarantine rules
Not everyone has a spare room. If you live in an apartment, dorm, studio, or shared house, the planner should still give you a workable option. The goal is to reduce contact pathways: no touching leaves, no shared saucers, no shared tools, no runoff into other pots, and no placing the new plant where debris falls into the collection.
A clear plastic storage bin can work as a temporary barrier for small plants if it does not overheat, trap excess humidity, or cut off airflow for a plant that resents stale conditions. A separate windowsill can work if no other plants share it and the light is appropriate. A bathroom can work if it is not too dark or cold. A kitchen counter is usually a poor choice because pesticide use, food prep, pets, and water splashes do not mix well.
If separation is weak, the schedule should become stricter. Inspect more often, avoid preventive sprays that drift, wash hands after handling, and keep the plant from sharing a watering route with the main collection. If you cannot separate a visibly infested plant at all, the planner should push a harder decision: return it, discard it, or hold it somewhere outside the plant room until you know what you are dealing with.
When quarantine resets
Quarantine is not a countdown that continues no matter what happens. It resets when new evidence appears. Finding live pests, fresh webbing, new sticky residue, spreading stippling, active fungus gnats, new lesions, or soft rot means the plant is no longer in observation-only mode. It is now in treatment or diagnosis mode.
The release clock should also reset after major interventions. Repotting into fresh mix, pruning heavily, applying a pesticide, washing off mites, or removing mealybugs changes what you can observe. You need enough clean follow-up time to know whether the intervention worked. For pests with quick life cycles or hidden stages, one clean day after treatment is not evidence of control.
Be especially cautious with plants that sit near valuable specimens. If you keep rare aroids, mature hoyas, orchids in bloom, bonsai, edible herbs, terrariums, or plants near pets, the cost of an outbreak is higher. Use the longer end of the quarantine range and release only after repeated clean inspections.
Quarantine works best when it connects to the rest of your care routine. If the plant is also showing moisture stress, compare its quarantine plan with the Watering Schedule Calculator before changing watering frequency. If the potting mix looks wrong or the rootball is staying wet, use the Soil Mix Calculator or Pot Size Calculator to sanity-check the next setup.
If you are unsure whether the marks are pest damage or care stress, symptom pages can help you separate patterns. Start with yellow leaves, brown tips, drooping leaves, or root rot depending on what you see. A pest inspection is still required, but symptom matching helps you avoid treating a watering problem as an insect problem.
Plant-specific hubs also matter. A quarantine plan for Monstera deliciosa is not the same as a plan for Aloe vera or ZZ plant. Thick succulent leaves, thin tropical foliage, rhizomes, canes, tubers, and epiphytes respond differently to moisture, wiping, repotting, and sprays. The planner gives the checklist; the plant page helps you adjust it to the species.
Common mistakes that break quarantine
The most common mistake is “quarantining” the plant three inches away from the main shelf. Distance is not perfect protection, but contact matters. If leaves touch, pots share a tray, or the same tool moves between plants, the quarantine boundary is mostly symbolic.
The second mistake is treating before identifying. A general spray may suppress one pest while missing another, injuring sensitive foliage, or giving you false confidence. Thrips, mites, scale, mealybugs, aphids, whiteflies, fungus gnats, springtails, and disease symptoms do not all respond to the same action. Even when a product is appropriate, coverage and timing matter.
The third mistake is releasing the plant because it “looks happier.” New growth, perkier leaves, or better hydration do not prove the plant is pest-free. Release should be based on clean inspections, no new symptoms, no live pests, no concerning sticky-card trend, and no reason to suspect the rootball or pot hardware is hiding a problem.
Accuracy limits and safety notes
The planner is conservative, but it cannot see the plant. It cannot identify an insect under a lens, smell rotten roots, know whether a pesticide label permits indoor use, or test whether a leaf spot is bacterial, fungal, viral, or mechanical damage. Treat the output as a structured routine, then adjust based on what you actually observe.
Do not use home pesticide recipes as a substitute for label directions. Avoid mixing products unless the labels explicitly allow it. Keep treatments away from aquariums, terrariums, pets, children, food surfaces, and poorly ventilated rooms. If a plant is valuable, a pest is spreading, or symptoms look diseased rather than insect-related, contact a local cooperative extension office, plant clinic, or reputable nursery for identification before escalating.
The safest quarantine plan is usually boring: isolate, inspect, clean when appropriate, water correctly, treat only when justified, and wait long enough for hidden problems to reveal themselves. That routine will not make every new plant survive. It will make each new plant less likely to endanger the plants you already have.
Conclusion
The New Plant Quarantine Planner helps you make a disciplined decision at the exact moment when plant owners are most tempted to improvise. It turns a new arrival into a clear sequence: isolate first, inspect closely, control moisture, avoid shared tools, choose treatment only when the evidence supports it, and release the plant only after repeated clean checks.
Use the shorter end of the plan for clean, low-risk plants you can truly separate and inspect well. Use the longer end for clearance plants, shipped plants, swap cuttings, outdoor returnees, symptomatic plants, weak isolation spaces, and collections where one outbreak would be expensive or exhausting. A good quarantine is not punishment for the new plant. It is basic collection hygiene, and it is much easier to follow before pests have the whole room to work with.