Black Spots on Leaves Checker
Black spots on leaves are easy to overreact to because they look serious even when the cause is minor. A few old scars on a lower leaf can be cosmetic. A cluster of new, expanding spots on several leaves can mean the plant is sitting in conditions that favor disease. A black coating that wipes away may not be a leaf infection at all. The Black Spots on Leaves Checker is built for that exact problem: it helps you sort the visual pattern, recent care history, and spread rate before you cut, spray, repot, or discard a plant.
Use the tool as a structured second look, not as a lab diagnosis. The best answer comes from the details you can verify: whether the spots are dry or water-soaked, whether the plant has sticky residue, whether the potting mix is staying wet, whether the undersides of leaves show pests, and whether the damage is spreading to new growth. That pattern usually tells you more than the color alone.
What the checker does
The checker turns your observations into a ranked shortlist of likely causes: fungal leaf spot, bacterial leaf spot, root stress from overwatering, pest-related spotting, sooty mold, cold injury, sun or water-spot damage, and physical injury. It gives you a practical direction, then points you toward closer inspection before you act.
That distinction matters. “Black spots” is not one disease. University of Maryland Extension notes that fungal leaf spots on houseplants can appear as tan, reddish-brown, or black lesions, often roughly circular and sometimes merging into larger damaged areas (fungal leaf spots). Bacterial problems can also create black to brown, watery lesions and soft tissue collapse (bacterial leaf spots). Pests can leave stippling or sticky residue. Root rot can show up above the soil as wilting, yellowing, browning, and dieback. The checker helps you compare those branches instead of treating every dark mark as the same problem.
The tool cannot culture a pathogen, inspect roots through the pot, identify a mite under magnification, or prove that one species-specific disease is present. Some symptoms overlap too much for certainty from a photo or questionnaire alone. A fungal spot, a bacterial spot, and an old splash scar can all look dark after tissue dies.
Treat the result as a triage answer. It can tell you what to inspect first and what action is least risky. It cannot promise that a fungicide will work, that a plant is disease-free, or that a badly infected plant will recover. If the plant is valuable, rare, part of a commercial collection, or declining quickly across multiple stems, use the checker to organize your observations before contacting a local Extension office, plant clinic, or experienced grower.
Start with the pattern, not the color
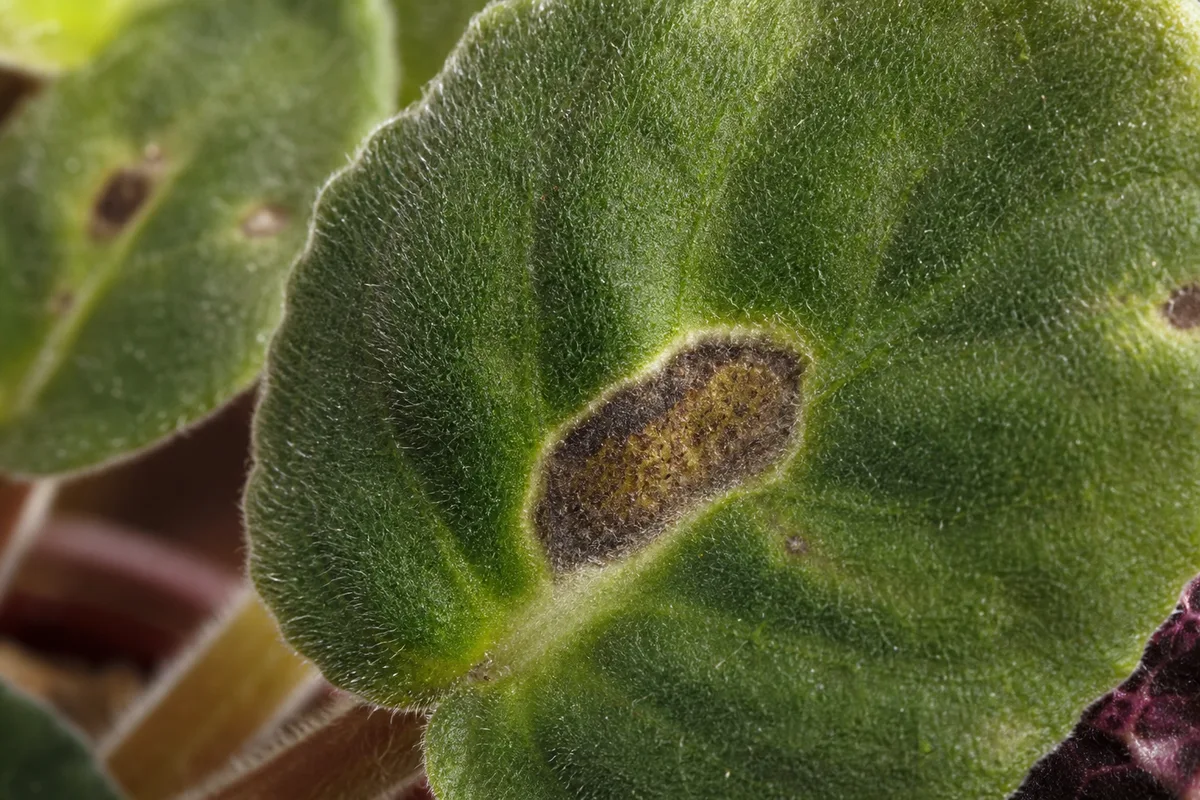
Before entering answers, look at the entire plant in good light. Check both sides of leaves. Separate old leaves from new leaves. Note whether the spots are round, angular, greasy, sunken, raised, powdery, crusty, or wipeable. Also notice whether there is a yellow halo, a water-soaked edge, a tan center, a ragged margin, or blackening near the crown.
Color alone is a weak clue because dead tissue often darkens. Pattern is stronger. Round to irregular spots that slowly enlarge during damp conditions point toward leaf-spot disease. Angular spots held between veins can raise suspicion for bacterial infection. A broad black film on leaf surfaces points more toward sooty mold than internal leaf damage. Fine pale stippling plus webbing moves mites higher on the list. Mushy black tissue near the base of a succulent or a soft crown points toward rot rather than a surface leaf spot.
The checker works best when you answer the symptom questions from direct observation. Choose the closest match for spot texture, location, spread rate, soil wetness, watering method, airflow, pest clues, and plant type. If you are unsure, pick the more cautious answer and then inspect the plant again before taking the recommended action.
For texture, ask whether the spot is dry and papery, soft and wet, or simply darkened. For location, ask whether damage begins on older lower leaves, new growth, leaf margins, the crown, or the side facing a window. For spread, ask whether one old leaf has been stable for weeks or whether new spots appear every few days. For care history, include recent repotting, shipping, a cold draft, a move outdoors, overhead watering, a humidity dome, or a period when the pot stayed wet.
The quick diagnostic sequence
Run the tool after a two-minute inspection. First, wipe one dark area gently with a damp white cloth. If the black material smears off, you may be dealing with sooty mold, dust, or residue rather than dead tissue. Second, look under leaves and along stems for scale, mealybugs, aphids, thrips, mites, webbing, cast skins, or sticky honeydew. Third, feel the potting mix below the surface and compare pot weight with the plant’s normal dry weight. Fourth, check whether the newest leaves are still clean.
Those checks keep you from treating the wrong layer of the problem. A leaf can be black because tissue is infected, because pests fed on it, because honeydew supported mold growth, because roots stopped working, or because cold or sun damaged cells. The checker uses your answers to rank those possibilities, but the physical inspection is what makes the ranking useful.
Fungal leaf spot clues
Fungal leaf spot becomes more likely when you see multiple discrete spots, spots that enlarge in humid or stagnant air, or damage that worsens after leaves stay wet. Maryland Extension’s indoor plant guidance says lowering humidity, decreasing leaf wetness, increasing air circulation, removing spotted leaves, and watering early enough for leaf surfaces to dry can reduce fungal leaf spot problems (decrease leaf wetness).
On houseplants, fungal spotting is often encouraged by a cluster of conditions rather than one mistake: crowded foliage, decorative cachepots that trap humidity, misting that wets leaves repeatedly, poor air movement, and dead leaves left on the soil. The checker weighs those conditions because they change the odds. A single dry spot on one old leaf after a shipping rub is different from dozens of expanding lesions on leaves that are wet every morning.
If the fungal branch ranks high, the first step is usually sanitation and environment correction. Remove badly spotted leaves if the plant can spare them, keep leaves dry, open space around the plant, and avoid splashing potting mix onto foliage. A labeled fungicide may protect uninfected tissue in some situations, but it will not make dead spots green again.
Bacterial leaf spot clues
Bacterial leaf spot rises on the list when lesions look water-soaked, greasy, soft, angular, or contained between veins. Maryland Extension describes bacterial symptoms on houseplants as black to brown, often watery lesions that can progress to tissue collapse, with some lesions appearing angular or V-shaped where veins limit spread (watery leaf spots).
That is why the checker asks about wetness and texture. A black spot with a dry tan center is not the same as a dark, translucent patch that feels soft. Bacterial problems also become more concerning when they move quickly, affect new growth, or appear after cuttings, pruning, crowded propagation trays, or repeated leaf wetting.
Be conservative if this result ranks high. Remove affected leaves only with clean tools, avoid touching healthy tissue after handling damaged tissue, reduce leaf wetness, and isolate the plant while you watch new growth. If the plant shows soft collapse through stems or crown tissue, the issue may be beyond leaf cleanup.
Overwatering, root rot, and blackened tissue
Black spots are not always a leaf-surface problem. If the potting mix stays wet, the plant wilts despite wet soil, lower leaves yellow and drop, or the crown turns brown or black, root-zone stress should move up the list. University of Maryland Extension describes root and crown rot symptoms as yellowing, browning, dieback, browning or blackening of the crown or roots, poor growth, and wilting (root rots). University of Minnesota Extension also warns that overwatering and poor drainage can cause root rot and encourage pest issues in indoor plants (poor drainage).
The checker treats wet soil plus dark mushy patches as a different problem from dry speckling on the leaf surface. This is especially important for succulents, peperomias, hoyas, snake plants, ZZ plants, and other plants that store water or resent prolonged saturation. In those plants, blackened soft areas can spread quickly once tissue begins to rot.
If the root-stress branch ranks high, do not start by spraying leaves. Slide the plant out of the pot if it is safe to do so, smell the root ball, and look for firm pale roots versus brown, black, mushy, or hollow roots. Correct drainage, remove dead roots if repotting is appropriate, and reduce watering frequency until the plant is using water normally again.
Pests can create dark symptoms in several ways. Spider mites cause stippling because they feed from leaf cells, and UC IPM advises checking undersides of leaves when leaves are stippled or webbing is present (spider mites). Thrips can leave pale scars and dark fecal specks. Scale and mealybugs can weaken plants and produce sticky honeydew. Aphids, scale, and mealybugs can also set up the conditions for sooty mold.
The checker asks about stippling, webbing, sticky residue, white cottony clusters, shell-like bumps, and insects on undersides because those clues can prevent the wrong treatment. Fungicide will not fix mites. Repotting will not remove scale from leaf veins. Wiping a black coating may improve appearance, but if honeydew-producing insects remain, the coating can return.
Use a hand lens if you have one. Check the undersides of older leaves, new growth tips, leaf axils, petioles, and the line where stems meet the potting mix. If pests are present, isolate the plant and choose a control method labeled for indoor use and for that plant type.
Sooty mold versus true leaf spots
Sooty mold is one of the easiest black-spot lookalikes to misread. It often appears as a black, gray, or brown surface coating on leaves or stems. University of Minnesota Extension explains that sooty mold grows on honeydew from sap-sucking insects and does not infect living plant tissue (sooty mold). University of Maryland Extension notes that scale insects on indoor plants can produce honeydew that supports sooty mold growth (scale insects).
The wipe test matters here. If the dark layer smears off and the leaf underneath is mostly intact, the priority is pest identification, not disease treatment. Look above the affected leaves too; honeydew can drip from insects feeding on stems or upper leaves and create black deposits on lower foliage.
For light cases, wiping leaves improves appearance and photosynthesis, but it is not the real fix. The real fix is reducing the honeydew source. That may mean removing scale by hand, washing aphids off, using insecticidal soap or horticultural oil when labeled for the plant, or discarding a plant that is heavily infested and likely to spread pests.
Cold, sun, and water-spot lookalikes
Some black spots are abiotic, meaning they are not caused by a living pathogen or pest. Cold injury can darken leaves after a plant sits near a drafty window, cold glass, an exterior door, or a chilly shipping box. University of Maryland Extension’s indoor plant diagnostic guide lists leaf or shoot blackening as a cold-injury clue and notes that symptoms can continue after exposure (cold injury).
Sunburn can also create dead patches, especially after a low-light plant is moved into direct sun or outdoors without acclimation. Water droplets, mineral residue, or splash marks can create spots that look alarming on fuzzy or sensitive leaves. African violets and other hairy-leaved plants are especially prone to spotting when water sits on foliage; Maryland’s indoor plant diagnostic guide specifically warns against splashing water onto fuzzy leaves and recommends removing spotted leaves and improving air circulation for leaf spot problems (leaf spots and blotches).
The checker uses recent change questions to catch these cases. If the spots appeared after a cold night, a sunny windowsill move, a shower rinse, or overhead watering, the right answer may be environmental correction rather than pest or disease treatment.
How to use the result without overcorrecting
After the checker returns a likely cause, take the smallest action that matches the risk. For stable cosmetic damage, that may mean pruning one leaf and watching new growth. For fungal risk, it may mean improving airflow and keeping foliage dry. For bacterial risk, it may mean isolating the plant and removing badly affected tissue. For root rot risk, it may mean checking roots before watering again. For pests, it may mean confirming the insect before applying any product.
Avoid stacking five interventions at once. If you prune, repot, spray, fertilize, move the plant, and change watering on the same day, you may not know what helped or what caused new stress. A weaker plant can decline from the treatment load even if one treatment was correct.
The best exception is containment. If you see active pests, fast-spreading soft lesions, or a plant collapsing from the crown, isolate first. Isolation is low-risk and protects nearby plants while you confirm the cause.
Worked example: dry spots after wet leaves
Imagine a prayer plant with ten round brown-black spots on older leaves. The spots have dry centers, faint yellow edges, and appeared after two weeks of daily misting in a crowded plant shelf. The soil is not soggy, there is no sticky residue, and the undersides of leaves do not show webbing or insects.
In the checker, you would select multiple spots, dry lesions, recent leaf wetness, high humidity, and no obvious pests. Fungal leaf spot should rank higher than root rot or sooty mold. A reasonable next step is to remove the worst leaves if the plant has enough foliage, stop wetting leaves, increase spacing, and water at the soil line. You would not expect existing spots to disappear; success is no new spots on fresh leaves.
If the same plant had wet, translucent lesions spreading through new growth, the bacterial branch would deserve more weight. If the pot also smelled sour and roots were brown and mushy, root stress would move higher even if leaf spots are visible.
Worked example: black film and sticky leaves
Now imagine a ficus with a black coating on several lower leaves. The coating wipes off on a damp cloth. The leaves feel sticky, and small brown bumps line the midrib on the underside of nearby leaves. The plant is otherwise holding leaves, but the floor below it feels tacky.
Those answers should push the checker toward sooty mold linked to scale or another honeydew-producing insect. The next step is not a fungicide for leaf spot. It is pest confirmation and scale management: isolate the plant, physically remove what you can, clean honeydew and sooty mold from leaves, and use only products labeled for indoor houseplants and the specific plant if chemical control is needed.
This example also shows why “black” is not enough. The black layer is fungal growth, but it is not the same as a fungus invading the leaf. Treating the mold surface while leaving the scale population in place misses the cause.
Worked example: succulent with mushy black patches
A jade plant has black, soft areas near the base of several leaves. The pot has no drainage hole, the mix is heavy, and the plant was watered twice in one week. The spots are not powdery, not wipeable, and not limited to one old leaf.
The checker should rank overwatering and rot risk high. The practical response is to stop watering, inspect the base and roots, remove any collapsed tissue, and consider propagating firm healthy stems if the crown is compromised. Spraying the leaves would not address the saturated root zone.
This is also where timing matters. Succulent rot can move faster than cosmetic spotting. If tissue is black and mushy, treat it as a structural plant-health problem rather than a surface blemish.
When to remove leaves
Remove a spotted leaf when it is heavily damaged, soft, spreading, pest-covered, or blocking airflow inside a dense plant. Removing individual spotted leaves is a common management step for both fungal and bacterial leaf spots on indoor plants, and extension guidance pairs it with lowering leaf wetness and improving air circulation (spotted leaves).
Do not strip a weak plant bare just to make it look clean. Leaves still produce energy if enough healthy green tissue remains. If only one or two leaves are affected and the spots are stable, it is reasonable to mark the date, photograph the leaf, and watch whether new spots appear before pruning more.
Clean tools between cuts when disease is possible. Keep removed leaves out of the pot and do not compost suspect diseased material indoors. Dead foliage on the soil surface can hold moisture around the crown and make inspection harder.
When to use a spray
Use sprays only after you know what you are targeting. A fungicide is not a universal black-spot eraser. Insecticidal soap is not a root-rot treatment. Neem, oil, soap, copper, and other products can injure sensitive plants when misused, and indoor use requires special caution around people, pets, surfaces, and ventilation.
The label is the controlling source. EPA explains that pesticide labels give legally enforceable directions for safe and legal use, and that using a product inconsistently with its labeling violates federal law (pesticide labels). Before applying anything, confirm that the product is labeled for the pest or disease, the plant type, and the indoor setting. Test a small area on sensitive plants when the label permits, and avoid spraying drought-stressed or heat-stressed plants.
In many houseplant cases, non-chemical steps come first: isolation, pruning, wiping leaves, improving airflow, reducing leaf wetness, correcting drainage, and physically removing pests. Sprays are more useful when the target is confirmed and cultural fixes alone are unlikely to stop spread.
How this connects to other LeafyPixels guides
The checker is the front door for a symptom, but plant-specific context still matters. A black spot on African violet may mean something different from a black patch on snake plant, pothos, monstera, jade plant, or maidenhair fern. Leaf texture, water storage, humidity preference, and sensitivity to wet foliage all change the likely cause.
Use the checker alongside related symptom pages when the pattern overlaps. If dark spots come with yellowing, compare the result with yellow leaves. If the plant is limp, check drooping leaves. If the leaf edges are dry, compare brown tips. If you see insects, use the pest-specific guides before choosing a treatment. If the issue looks mostly water-related, pair this page with tools that help you reason through watering, pot size, and drainage rather than chasing leaf symptoms alone.
When to get outside help
Ask for expert help when the plant is valuable, the problem spreads despite basic corrections, the same symptom appears across several unrelated plants, or you suspect a systemic bacterial or viral issue. Also ask for help before using stronger pesticides indoors or when the plant is edible, accessible to pets or children, or part of a large collection where spread would be costly.
Photos help, but samples and context help more. Record when the spots appeared, what changed before they appeared, how often the plant was watered, what the roots looked like if inspected, whether the black material wiped off, and whether pests were found. The checker can help you organize that information so a plant clinic or Extension responder does not have to start from scratch.
If you cannot identify the issue and the plant is declining fast, choose containment over experimentation. Isolate it, stop overhead watering, keep foliage dry, and avoid sharing tools between plants until you know more.
Conclusion
The Black Spots on Leaves Checker is most useful when you treat it as a disciplined observation tool. Black marks can come from fungal leaf spots, bacterial lesions, rot, pests, sooty mold, cold injury, sun damage, water spotting, or plain physical scars. The right response depends on the pattern.
Start with what you can verify: texture, spread rate, soil moisture, leaf wetness, pest signs, and recent changes. Then use the checker to rank the likely causes and choose the least risky next step. If the result points to disease, reduce leaf wetness and remove badly affected tissue. If it points to pests, confirm the pest before treating. If it points to root stress, inspect the pot and roots before watering again. The goal is not to make every old spot disappear. The goal is to stop new damage, protect nearby plants, and make the next decision with better evidence.