Tradescantia Nanouk Pruning: When, How, and Mistakes
Tradescantia Nanouk Pruning: When, How, and Mistakes to Avoid
Tradescantia Nanouk Pruning: When, How, and Mistakes to Avoid
First, inspect the crown where stems meet the soil and cut away any blackened, mushy, or wet-rotted stem bases with clean sharp scissors - work when foliage is dry so water does not sit in the cut crown. Tradescantia Nanouk (Tradescantia albiflora ‘Nanouk’) marks easily when moisture pools in dense foliage, and crown rot spreads faster than legginess makes the plant look tired.
Quick Answer
Prune Tradescantia Nanouk for density and color from spring through early autumn, whenever the plant is actively growing. For routine shaping, pinch or snip stem tips 6–10 mm (about ¼ inch) above a visible node - the slightly swollen joint where a leaf attaches. Remove bare middle sections that have lost leaves entirely rather than hoping they refoliate. Nanouk is a fast-renewing inch plant: fresh tip cuttings root in days to weeks, and restarting from cuttings is often more reliable than keeping old leggy stems attractive forever. Prune when foliage is dry, water the mix only after trimming, and keep the crown as open as possible. Pruning redirects growth at nodes but cannot replace Tradescantia Nanouk light guide - legginess returns quickly in a dim corner even after a hard trim.
What Pruning Does for Tradescantia Nanouk
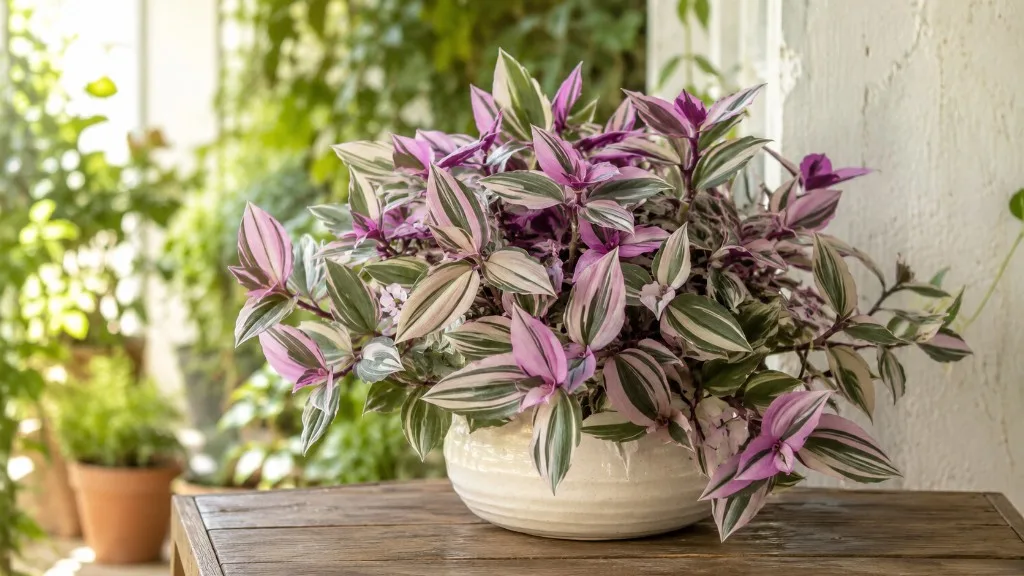
Nanouk is a Dutch-bred cultivar of the inch plant, selected for chunky pastel leaves in pink, cream, and green on a relatively compact trailing habit. U.S. Plant Patent PP29,711 documents that it was stabilized through repeated terminal stem cuttings - which tells you something important about how the plant is meant to be maintained indoors. Like other Commelinaceae trailing tradescantias, it grows fast, roots easily at nodes, and responds to tip removal by pushing new shoots from buds below the cut.
Without intervention, each stem follows apical dominance - the growing tip suppresses side branches, internodes stretch, and lower leaves age out. Indoors, insufficient light accelerates this pattern because the plant reaches toward the brightest available source. Nanouk was bred for denser growth than many inch plants, but it still goes bare near the pot when light is weak or pinching is skipped for months.
Pruning serves four practical jobs on Nanouk:
- Redirects growth by removing the dominant tip and waking buds at nodes below
- Removes failing tissue - bare stems, blackened crown bases, and leaves that no longer photosynthesize
- Supplies propagation material - node-bearing cuttings root in water or moist mix within one to three weeks during active growth
- Refreshes color - new growth from pinches opens with stronger pink and cream tones when light is adequate
Pruning does not fix chronic under-lighting. If new growth after a trim still shows long gaps between leaves, improve placement to bright indirect light with some morning sun before expecting compact regrowth.
When to Prune Nanouk
Nanouk tolerates light pinching year-round indoors, but timing changes speed, not survival. Structural cuts and renewal sessions during active growth produce faster branching, stronger variegation on new leaves, and shorter internodes. The same cuts in late autumn or winter may sit visually unchanged for weeks when light and temperatures are low.
Best season for shaping and pinching
Spring through early autumn is the ideal window for reshaping in most homes. By then daylight is increasing, the pot dries on a predictable rhythm, and new leaves are already unfurling. NC State Extension notes that pinching back stems encourages new growth and prevents leggy stems on tradescantias - work that is fastest when the plant is actively using water and light. RHS guidance on inch plants recommends pinching growing tips to encourage bushiness during active growth.
For maintenance, pinch soft growing tips every few weeks during warm months - before internodes lengthen and stems go bare. You do not need a calendar reminder if you inspect the basket weekly and snip any stem whose leaf spacing has opened noticeably.
Cuts that cannot wait
Some trimming should not wait for spring:
- Blackened, mushy, or rotting stem bases at the crown - cut back into firm green tissue; sterilize blades between cuts on diseased material
- Stems with heavy active pest infestation - remove the worst sections once you have a treatment plan for the rest
- Fully brown, dry leaves - snip at the petiole base any time; they no longer photosynthesize
- Bare runners with no leaves along the middle - remove at the soil line when the tip alone cannot support a full-looking basket
When to delay pruning
Hold off on major reshaping when:
- The plant is recently repotted or stressed - let roots stabilize before removing large foliage mass
- Winter light is very low - light tip pinching is fine, but hard renewal may stall for weeks
- Foliage is wet from overhead watering - dry the plant first; Nanouk leaves mark and crown tissue rots more easily when cuts stay damp
What to Check Before Cutting
Spend two minutes assessing the whole plant before you snip anything for shape:
- Crown condition - lift trailing stems and look where they emerge from the soil. Soft, black, or slimy tissue needs removal before cosmetic pinching.
- Bare vs. leafy stems - identify runners with empty middle sections versus tips that still carry colorful foliage.
- Node spacing - on healthy active growth, leaves sit close together. Stretched internodes signal light stress; note this before expecting pinching alone to fix the silhouette.
- Variegation quality - muted green-dominant new leaves often mean the plant needs brighter placement, not just shorter stems.
- Pest signs - stippling, webbing, or sticky residue on stem joints. Remove the worst infested sections and treat the remainder before a full shaping session.
The First Cut to Make
After crown sanitation, your next decision is whether you are doing maintenance pinching or renewal pruning.
For maintenance, pinch the longest soft tip on the most visible bare stem - just above a node where you want a branch to split. That single cut tests how the plant responds without stripping the whole basket.
For renewal, when bare stems dominate and few colorful tips remain, plan to remove bare middles entirely and root fresh tips rather than shortening tired vines in place. Nanouk recovers faster from rooted cuttings than from old wood that has already dropped its lower leaves.
Where to Cut on Nanouk Stems
A node is the slightly swollen joint on a fleshy Nanouk stem where a leaf attaches and dormant buds wait to activate. New shoots and adventitious roots both originate from node tissue - not from smooth internode sections alone.
Pinching above a node for bushiness
To keep a stem on the mother plant and encourage branching, cut just above a node, leaving the node and its attached leaf on the plant. The cut removes the dominant tip; buds at the node or the next joint down typically break within one to two weeks during active growth. RHS recommends pinching growing tips on tradescantias to maintain bushiness - the same node logic applies to Nanouk.
Use clean bypass scissors or pinch with fingernails on soft new growth. On older semi-woody stems, scissors give a cleaner wound that heals faster.
Cutting below a node for propagation
To harvest a cutting, snip just below a node so the node sits on the piece you remove. Strip leaves from the lower half that would sit underwater or below the soil line, leaving at least one node exposed to moisture. NC State Extension notes that tradescantias root easily at stem nodes - Nanouk follows that pattern reliably when warmth and bright indirect light are present.
How to Prune Tradescantia Nanouk Step by Step
- Sanitize the crown. With dry foliage, remove blackened or mushy stem bases at the soil line. Wipe scissors with alcohol between cuts if rot is present.
- Remove dead and failing leaves. Snip fully brown leaves at the petiole base.
- Identify bare stems. Trace each runner from soil to tip. Mark sections with no leaves along the middle.
- Harvest colorful tips. Cut 10–15 cm (4–6 inch) tip sections just below a node for propagation. Choose stems with tight leaf spacing and strong pink-cream color.
- Remove bare middles. Cut bare stem sections out entirely at the crown or at the last node that still carries a healthy leaf.
- Pinch remaining tips for shape. On stems you are keeping, snip 6–10 mm above a node where you want the plant to branch.
- Root cuttings. Place node-bearing sections in clean water or lightly moist perlite-amended mix in bright indirect light. Roots typically appear within one to three weeks during active growth per patent propagation data.
- Replant grouped cuttings. Once roots reach 2.5–5 cm (1–2 inches), plant several cuttings together in the original pot for a dense restart.
- Water the mix only - not the foliage - and keep the crown open to airflow.
How Much You Can Safely Remove
For routine maintenance pinching, avoid removing more than one-quarter of total foliage in a single session when the plant is otherwise healthy. That limit keeps photosynthesis steady while new branches fill in.
Nanouk tolerates heavier renewal when you replace removed mass with rooted cuttings. Removing all leggy bare stems and replanting five to eight fresh tips in the same pot is a valid full refresh - you are not asking the old wood to refoliate; you are restarting from young tissue the cultivar was bred to produce.
If the plant is stressed from overwatering, recent Tradescantia Nanouk repotting guide, or pest damage, take a lighter pass and repeat in three to four weeks rather than stripping the pot in one session.
What Not to Cut
- Every leaf on a still-healthy stem - leave enough foliage to fuel recovery unless you are replacing the stem with a rooted cutting
- Smooth internode sections alone - cuts without nodes rarely produce new shoots
- Newly unfurling soft leaves - they tear easily and add little structural benefit to remove
- The only remaining green growth on a weak plant - lighten the load gradually on stressed specimens
Using Pruning Cuttings to Fill the Pot
Nanouk trimmings are not waste - they are the preferred renewal method. NC State Extension describes tradescantias as easy to propagate from stem cuttings, and Nanouk’s patent history confirms terminal cuttings as the standard propagation type.
Water method: Submerge one node in a clear jar; change water every three to five days; transplant when roots reach 2.5–5 cm (1–2 inches).
Soil method: Bury the lowest node in lightly moist, well-draining mix; keep bright indirect light; tug gently after two weeks to check resistance.
Plant three to six rooted cuttings together in the original pot rather than one lone stem - grouped starts produce the dense pastel mound Nanouk is grown for.
Aftercare After Pruning
- Water the soil, not the leaves - overhead watering after pruning invites crown marks and rot on cut tissue
- Bright indirect light with some morning sun - new growth keeps stronger pink and cream variegation in adequate light; hot afternoon sun can bleach soft leaves after a hard trim
- Average humidity (40–60%) - no misting required; focus on airflow around the crown
- Hold fertilizer for two weeks after major renewal - resume light feeding only when new growth is visibly active
- Wear gloves when handling cut material - tradescantia sap can irritate skin, and ASPCA lists Nanouk as toxic to cats and dogs
Recovery Timeline and Signs Pruning Worked
During active growth, new shoots from pinched nodes usually appear within one to two weeks. Rooted cuttings establish in two to four weeks and begin filling the pot visibly by four to six weeks when light and watering are steady.
Signs pruning worked:
- Shorter internodes on new growth below pinch points
- Two shoots emerging from a single pinched node
- Pink and cream color returning on fresh leaves in bright placement
- Firm green stems at the crown with no new blackening
Signs to adjust your approach:
- Continued stretching on new tips - light, not shears, is the bottleneck
- Mushy cut ends - crown stayed too wet; improve airflow and watering technique
- Cuttings rotting in water - change water more often, reduce submerged leaf surface, or switch to moist mix
Mistakes to Avoid
- Letting Nanouk run without pinching until only tip leaves remain - bare middles rarely refoliate attractively
- Overhead watering into a freshly pruned crown - the fastest way to turn a shaping session into crown rot
- Keeping only old bare stems because they still have a few leaves at the end - restart from rooted tips instead
- Hard pruning without improving light - the plant grows back leggy and muted within weeks
- Moving immediately into hot direct sun after a major refresh - soft new leaves bleach easily
- Discarding all trimmings - you are throwing away the easiest path to a full basket
Bottom Line
Tradescantia Nanouk pruning is frequent tip pinching and honest stem renewal - not nursing bare vines indefinitely. Inspect the crown first, pinch above nodes for bushiness, remove bare middles, and root colorful tips back into the same pot. Treat Nanouk as the fast-renewing color plant it was bred to be, keep the crown dry, and pair every shaping session with adequate bright light so new growth stays compact and pastel.
When to use this page vs other Tradescantia Nanouk guides
- Tradescantia Nanouk overview - Start here for whole-plant context before deep-diving this topic.
- Tradescantia Nanouk problems hub - Jump to symptom-specific fix guides when this care topic does not resolve the issue.
- Leggy Growth on Tradescantia Nanouk - Escalate here when pruning adjustments are not enough.
- Brown Tips on Tradescantia Nanouk - Escalate here when pruning adjustments are not enough.