Tradescantia Nanouk Propagation: Stem Cuttings
Tradescantia Nanouk Propagation: Stem Cuttings
Tradescantia Nanouk Propagation: Stem Cuttings
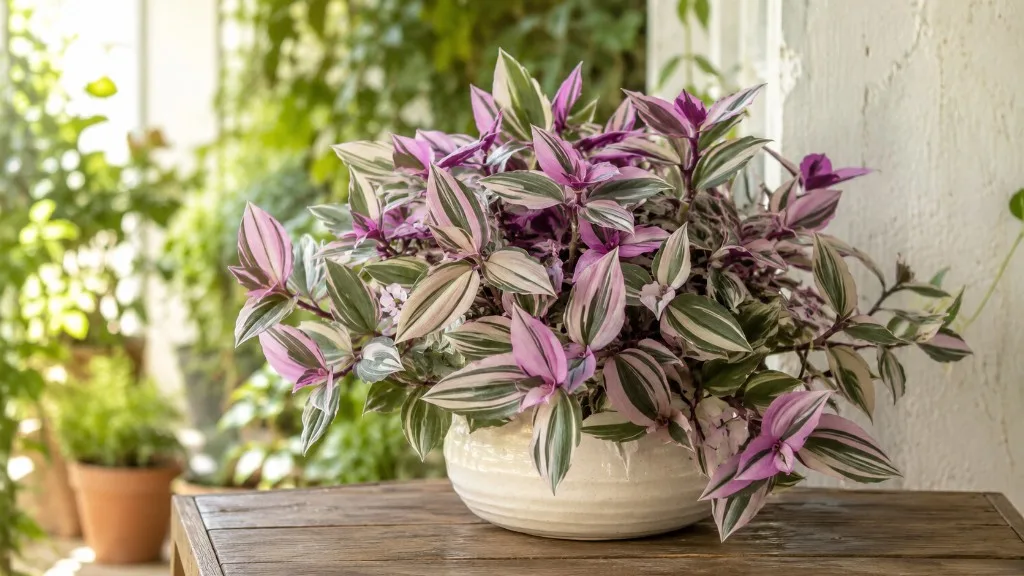
Tradescantia Nanouk propagation is one of the most approachable projects in houseplant care because the plant is engineered - literally bred - to restart from stem tissue. Tradescantia albiflora ‘Nanouk’, the Dutch-cultivated inch plant with chunky pink, cream, and green leaves, roots from terminal stem cuttings in water or soil with minimal fuss when you respect one non-negotiable rule: every viable cutting needs at least one node submerged or buried. Miss the node and you may see roots form on a leafless stem that never produces new shoots - a frustrating dead end that makes beginners think they lack a green thumb when the biology was simply wrong from the start.
The practical choice most growers face is not whether Nanouk can be propagated - it can, reliably - but whether to root in a clear jar where you watch white roots emerge, or directly in lightly moist potting mix where you skip the water-to-soil transition. Both methods work. What changes is visibility, rot risk, and how quickly the new plant settles into normal growth. A third variable matters just as much as medium: variegation on offspring may vary even when cuttings are genetically identical to the parent, because pink and cream sectors contain less chlorophyll and express more vividly under bright light than in the dim corner where a cutting rooted quietly for three weeks.
This guide covers the full workflow - timing, cutting selection, water and soil protocols, transplant timing, aftercare, variegation expectations, and the mistakes that turn an easy propagator into a jar of mushy stem.
If symptoms persist, see the Brown Tips on Tradescantia Nanouk guide.
Why Nanouk Is One of the Easiest Tradescantias to Propagate
Nanouk belongs to the Commelinaceae family alongside other trailing inch plants, and it inherits their signature talent for adventitious rooting. Where many houseplants demand division, air layering, or precise hormone protocols, Tradescantia species restart from severed stems as a normal survival strategy. A broken branch that contacts moist substrate can anchor, push new leaves from dormant buds at nodes, and become an independent plant within weeks. Your indoor propagation session is a controlled version of that restart.
The cultivar was selected and stabilized through repeated asexual reproduction by terminal cuttings in Sappemeer, The Netherlands, before receiving U.S. Plant Patent PP29,711 in 2017. Patent documentation notes that roots initiate in roughly one week at about 21°C in summer propagation trials, with a rooted young plant forming in about three weeks - timelines that align with what home growers report when light and warmth are adequate. That is fast by houseplant standards, which is why Nanouk propagation tutorials dominate social feeds and why the plant became a gift-exchange favorite.
Ease does not mean careless. Nanouk still rots in stagnant water, still fails when cuttings lack nodes, and still transfers spider mites from a stressed parent. The method is forgiving; the setup details are not optional if you want a high success rate and attractive offspring rather than a rooted stick with one pale leaf.
How Inch Plants Root From Stem Nodes
A node is the slightly swollen joint on a Tradescantia stem where a leaf attaches and where dormant buds sit ready to activate. Illinois Extension notes that roots form at nodes - the bumpy areas where leaves emerge - and each stem cutting should include a minimum of two nodes. Roots and shoots both originate from node tissue - not from leaf blades alone. When you place a node in contact with moisture and oxygen, epidermal cells differentiate into root initials that push into water or soil. Once roots sustain the cutting, buds at the same node or the adjacent internode break and produce the first new leaves on your baby plant.
Terminal cuttings - tips with active growth - are the patent-specified propagation type for Nanouk and the type most home growers take. They combine a visible growing point, one or more nodes, and enough leaf surface to photosynthesize while roots develop. Internode cuttings without a tip also root when they include nodes, but they look slower to resume upward growth because the apical bud is missing. For filling out a sparse pot or restarting a leggy basket, tip cuttings give you the fastest cosmetic payoff.
Tradescantia roots are shallow and fibrous, branching freely once established. That habit explains why cuttings succeed in small jars and tiny pots without deep planting - you are not trying to anchor a taproot, you are encouraging a network of fine white roots near the node zone. NC State Extension notes that inch plants root at nodes and are easily propagated by stem cuttings. Heavy, waterlogged mix suffocates those roots before they spread, which is why drainage matters as much for a two-week-old cutting as for a mature hanging basket.
Tradescantia zebrina propagates by the same stem-cutting mechanics, but Nanouk cuttings carry different post-rooting priorities. Zebrina’s silver stripes are relatively stable in moderate light; Nanouk’s pink, cream, and green pattern is light-hungry because pale sectors contain less chlorophyll. A cutting rooted in a dim corner often opens with greener, less vivid new leaves until you move it brighter. Nanouk also tends toward a denser, more upright-stacked habit, so batching three or four short tip cuttings around a pot rim produces a fuller crown faster than single long trailers. One legal note: Nanouk is a patented cultivar (U.S. Plant Patent PP29,711), and unauthorized commercial propagation for sale is restricted - home multiplication for personal use is a different context than nursery-scale production.
The Node Rule: What Every Cutting Must Include
If you remember one rule from this entire guide, make it this: every Nanouk cutting must include at least one node that will sit in water or soil. The node is where roots form and where new shoots emerge. A beautiful leaf on a bare stem is not a propagation unit; it is decoration that may root without ever becoming a plant.
Most successful cuttings carry two or three nodes - one submerged, one or two above the water or soil line to supply leaves for photosynthesis and backup bud sites if the lowest node struggles. A single-node tip cutting works when the tip is healthy and light is bright; single-node mid-stem sections work too but resume top growth more slowly. Zero nodes is a hard stop. Do not let social media “leaf propagation” experiments mislead you; Tradescantia is not a succulent that regenerates entire plants from detached foliage.
The node rule also governs water level. Submerge at least one node fully. Keep all leaves above the water surface. Leaves sitting in water decay quickly, inoculating the jar with bacteria that colonize the stem base. If your cutting is short, use a smaller jar or prop the stem so the node contacts water while leaves rest on the rim - geometry matters as much as chemistry.
How to Find Nodes on a Nanouk Stem
Nodes on Nanouk look like slight thickenings along the stem, often with a faint line or scar where a leaf petiole attached. Follow any leaf back to its connection point - that junction is the node. The smooth stem section between two leaves is the internode; internodes do not root reliably on their own. On a typical actively growing tip, nodes are spaced 1–3 cm apart, closer when light is strong and the plant is pushing tight new growth, farther apart when the plant has stretched in dim conditions.
Run your finger along the stem: the node feels marginally firmer or wider than the internode. If leaves were recently removed, you will see a small nub or healed scar marking the node even when bare. For water propagation, aim to submerge one or two nodes while keeping 2–4 leaves above the surface on a standard 10–15 cm cutting. For soil, bury the lowest node 2–3 cm deep with the same leaf count above grade.
When taking cuttings from a leggy parent, lower nodes may be bare - leafless but still viable. Those nodes root well; new leaves will sprout after rooting even if the segment looks sparse at first. Avoid confusing a bare node zone with a dead stem: healthy tissue is firm and green inside when you nick it lightly with a fingernail; brown or hollow stems belong in the compost, not the propagation shelf.
Detached Nanouk leaves sometimes produce tiny root nubs in water, which creates the illusion that leaf propagation works. Roots without a node rarely pair with shoot growth - you end up with a rooted leaf that yellows and dies. The same failure appears when beginners take a stem section with no nodes - pure internode - because they misjudged where to cut. Always verify node presence before you commit a cutting to a jar; Nanouk forgives slightly longer cuttings more than node-free ones.
When to Propagate Tradescantia Nanouk
Timing influences speed more than ultimate success with Nanouk, because indoor conditions can keep the plant in semi-active growth year-round. Still, active growth phases produce faster roots, stronger variegation on new leaves, and lower rot risk than propagation during stress. Align your session with a healthy parent, adequate light, and stable room temperatures when you can - the calendar is secondary to plant condition.
Avoid propagating immediately after purchase while the plant acclimates from greenhouse humidity to your home, or while you are fighting active root rot, severe mealybug infestation, or drought-shocked wilting. Stabilize the parent first, then harvest from clean new growth. Propagation is multiplication, not rescue - though a healthy tip cutting from an otherwise declining plant can still be worth attempting if the tissue is firm and pest-free.
Best Season for Fast Rooting
Spring through early autumn is the best window for Nanouk propagation in most homes without supplemental grow lights. Warmth in the 18–27°C (65–80°F) range supports cell division at nodes, and longer daylight hours fuel the cutting while roots develop. Patent data cites roughly one week to root initiation at 21°C in summer versus about two weeks at 18°C in winter - a meaningful difference you feel as a home grower watching jars on a windowsill.
Winter propagation is possible near bright glass or under lights, but expect slower root emergence and higher rot risk if humidity is high and airflow is poor. Cut back watering frequency in soil batches started in cool months; a mix that dries in four days in July may linger damp for ten days in January. If you propagate in winter, use smaller pots, change water more diligently in jars, and accept a three-to-five-week timeline instead of one to two.
Pinching and propagation pair naturally in late spring: trim leggy tips for cuttings, root them, and let the parent bush out from lower nodes you left behind. That rhythm keeps variegation bright - pinching during active growth redirects energy into tighter new tips - and supplies fresh cutting material without stripping the plant bare.
Signs Your Parent Plant Is Ready
A propagation-ready Nanouk shows firm stems, evenly colored leaves without widespread browning at the base, and visible new tips pushing at the crown or along side branches. Check the soil moisture rhythm: if the mix dries within a few days after watering and the plant is not wilting, roots on the parent are functioning. That matters because cuttings inherit the parent’s current health - stressed tissue rots instead of roots.
Pests disqualify material until treated. Spider mites and mealybugs hide along stem joints and ride cuttings into clean jars. Inspect both leaf undersides and node crevices under good light. If you see stippling, webbing, or cottony clusters, treat the parent and wait two weeks before taking cuttings from regrowth.
Consider aesthetics before you cut heavily. Removing every long trailer at once can leave a sparse pot until side shoots fill in. A balanced approach: take one-third to one-half of viable tips per session, root them, and pinch the parent lightly to encourage branching from remaining nodes. Two propagation rounds two weeks apart often yields more plants and a fuller parent than one aggressive harvest.
How to Take Nanouk Stem Cuttings
Taking the cutting is a two-minute job that deserves two minutes of attention. Sterile tools, correct node placement, and appropriate cutting length set up everything downstream - water changes, soil moisture, transplant timing, and variegation quality on new growth.
Gather sharp pruning shears or scissors, 70% isopropyl alcohol for blade sterilization, a clean work surface, and small labels if you are running water and soil trials side by side. Nanouk sap can irritate skin and is toxic to pets - wash hands after handling or wear thin gloves if you react to sap from pothos or dumb cane.
Choosing the Right Stem Material
Select stems 10–15 cm (4–6 inches) long with at least two nodes and two to four healthy leaves on the upper portion. Shorter tip cuttings with one node work in bright conditions; longer 20 cm sections root but may flop in small jars until roots anchor. Prioritize actively growing tips with compact internode spacing - that material roots fastest and produces the pinkest new leaves when light is adequate.
Avoid cuttings with brown mushy bases, blackened node tissue, sun-bleached crispy leaves covering most of the segment, or mechanical damage from tight shipping sleeves. Mid-stem sections from leggy plants are fine when nodes are firm; tip cuttings are ideal when you want immediate bushiness. If the parent is mostly green from low light, cuttings will still root - expect offspring to look greener until you provide brighter conditions after transplant.
For maximum impact in a hanging basket, batch three to five cuttings of similar size and root them together in one small pot. Nanouk fills out faster as a group than as lonely singles. You can also root singles in jars and combine later - just match root development before merging so one cutting does not dominate moisture at the others’ expense.
Making Clean Cuts Below a Node
Cut just below a node - typically 3–5 mm beneath the joint - so the lowest node on your cutting remains intact and can contact water or soil. Cut directly below a leaf node, Illinois Extension advises, using sharp pruners on a healthy shoot. Use one decisive snip; crushing the stem with dull scissors damages vascular tissue and slows rooting. Sterilize blades between cuts if you are harvesting multiple stems or trimming prior diseased tissue.
Remove lower leaves that would sit submerged in water or buried in soil. Leave upper leaves intact for photosynthesis. If the lowest node still has a small leaf, strip it - node contact with medium matters more than that one blade. For especially long cuttings, you may remove a middle leaf to reduce transpiration while roots are absent, but keep enough foliage that the cutting does not desiccate in bright light.
Place cuttings in water or moist soil within an hour when possible. Tradescantia tolerates brief bench time, but wilting begins if leaves lose turgor in hot dry air. If you must pause, rest cuttings in a shaded spot with a damp paper towel over the leaves - not over the cut end - while you prepare jars and pots.
Water Propagation Step by Step
Water propagation is the most visible Nanouk method and the one beginners gravitate toward for good reason: you see white roots emerge day by day, which builds confidence and helps you time transplant correctly. Success requires clean water, correct submersion depth, and Tradescantia Nanouk light guide - not a dark shelf where algae and rot compete with root growth.
Step 1 - Prepare the jar. Use a clear glass tall enough that leaves rest above the rim while nodes submerge.
Step 2 - Add water. Room-temperature tap or filtered water is fine. Fill so at least one node is fully submerged while no leaves touch the water.
Step 3 - Place in light. Bright indirect light - an east window or several feet back from south glass. Direct midday sun heats water and damages stems.
Step 4 - Maintain water quality. Change water every three to five days, or sooner if it clouds. Cloudy water is a bacterial warning - replace immediately.
Step 5 - Watch for roots. Visible roots typically appear in one to three weeks under warm bright conditions. Patent trials cite about one week to initiation at 21°C; cool dim homes may need four weeks before you discard a firm cutting.
Step 6 - Transplant. Move to soil when roots reach 2.5–5 cm (1–2 inches). Longer water roots become brittle and snap; shorter roots fail in dry mix. Plant the lowest node just below the surface in perlite-amended mix and keep it lightly moist for two weeks.
Soil Propagation Step by Step
Soil propagation skips the jar phase and produces roots acclimated to mix from day one, which many experienced growers prefer for faster top growth after rooting. You trade away the visual drama of watching roots for a pot that looks unchanged for two weeks - then suddenly pushes new leaves when roots catch up.
Step 1 - Choose a small pot. A 7–10 cm (3–4 inch) nursery pot with drainage holes suits one to three cuttings.
Step 2 - Prepare moist mix. Use lightly damp, well-draining potting soil with 20–30% perlite - details below.
Step 3 - Insert the cutting. Bury the lowest node while keeping all leaves above the soil surface. Multiple cuttings can share one pot spaced 3–5 cm apart.
Step 4 - Water lightly. If mix was pre-moistened, skip immediate watering. Otherwise water the soil edge so moisture reaches the node without wetting foliage.
Step 5 - Light and warmth. Bright indirect light at 18–27°C. An optional humidity dome for five to seven days helps in dry homes - vent daily.
Step 6 - Test for roots. After two to three weeks, check for gentle tug resistance or new leaf unfurling. Increase watering slightly once growth is active.
Best Potting Mix for Direct Soil Rooting
Nanouk wants moisture without waterlogging - the same balance mature plants require, only more sensitive while roots are absent. A standard indoor potting mix amended with 20–30% perlite or pumice is sufficient for most homes. The perlite increases air pockets around the node zone, where suffocation kills more cuttings than drought does.
Avoid straight peat or dense bagged mixes that compact when wet; they stay saturated in small pots and encourage stem rot at the buried node. Cactus-only mix is usually too lean for the first month unless you water very frequently; a hybrid indoor mix plus perlite performs better. Rooting hormone is optional for Nanouk - natural auxin levels in actively growing Tradescantia tissue support high success rates without powder or gel. Use hormone if you are rooting older bare nodes from leggy stems; skip it for fresh spring tips.
Pre-moisten mix until it holds together when squeezed but does not drip. Plant into damp mix, not dry dust or mud soup. That single moisture judgment prevents more failures than any product additive.
Water vs Soil: Which Method Should You Choose?
Neither method is universally superior. Choose water when you want visible rooting progress or are teaching a beginner. Choose soil when you want the shortest path to a settled potted plant and dislike transplanting jars. Water roots appear in one to three weeks in warm bright conditions; soil follows a similar timeline but hides progress until new leaves emerge or a gentle tug meets resistance.
Water roots are thinner than soil roots and prone to snap if you wait until they exceed 5 cm before transplanting. Move at 2.5–5 cm into perlite-amended mix and keep moisture even during the one-to-two-week hardening phase. Soil-rooted cuttings often push new top growth sooner because there is no water-to-soil transition pause. A hybrid approach - water until roots initiate, then move to moist mix before roots become long - works well if you want early visibility without extended jar time.
Variegation on New Plants: What to Expect
Here is the expectation every Nanouk propagation guide should state clearly: offspring are genetically the same as the parent, but variegation intensity on new leaves may vary with light, temperature, and the condition of the cutting at harvest. You are not breeding a new cultivar from seed; you are cloning stem tissue. The pink-and-cream phenotype is stable in the sense that patent documentation reports features reproduced true to type through successive asexual generations - yet the same document notes that phenotype may vary somewhat with environmental conditions such as temperature and light intensity without variance in genotype.
In plain terms: your propagated Nanouk is still Nanouk, but the first leaves after rooting may look less pink than the parent tip you cut if they developed under weaker light. Move the plant brighter and new growth typically regains stronger cream and pink contrast, assuming the stem tissue was variegated to begin with. Completely green revert on Nanouk is less common than on highly unstable variegated cultivars, but low-light greening is normal and reversible with better placement - not a sign you propagated the wrong plant.
Why Pink and Cream Tones Can Look Different on Offspring
Variegated leaves are a photosynthetic trade-off. Pink and cream sectors contain fewer chloroplasts than green tissue, so the plant must balance color display with energy capture. Bright indirect light - often six to eight hours of strong ambient light daily - keeps variegation vivid. Dim light pushes new growth toward greener, larger leaves that photosynthesize more efficiently. A cutting rooted in a mediocre corner may open its first post-root leaves greener; shift it to a brighter window after establishment and watch subsequent leaves pick up pink striping again.
Temperature also nudges expression. Cooler winter growth sometimes appears slightly muted compared with summer leaves on the same plant. That is environmental, not genetic drift. Avoid hot direct sun that bleaches soft Nanouk foliage to pale crispy patches - bleaching is damage, not desirable variegation.
Select cutting material with visible pink or cream on multiple leaves if color matters to you. All-green sections from a reverted parent zone root fine but produce green offspring until brighter light encourages variegated new growth - if buds along that stem still carry the variegation pattern genetically. When in doubt, take tips from the most colorful part of the plant.
After transplant, treat variegation as a light-linked outcome, not a propagation lottery. Match or exceed the parent’s light conditions within a week of rooting confirmation. Many growers report their best-colored Nanouks came from cuttings rooted in bright ambient light and never allowed a dim phase - the first leaves out of the gate set the aesthetic tone for the pot.
Aftercare for Newly Rooted Nanouk Plants
The first four to six weeks after rooting are stabilization. Keep bright indirect light steady - this is when variegation on offspring is won or lost. Water when the top 1–2 cm of mix dries, roughly every 5–10 days. Hold fertilizer until two or three new leaves harden, then use quarter-strength balanced feed monthly. Upsize one pot size at a time; Nanouk tolerates slight crowding better than a huge wet pot around a tiny root ball. Quarantine new plants two weeks if the parent ever had pests, and pinch established tips to encourage the dense habit Nanouk is grown for.
Common Propagation Mistakes and How to Fix Them
Most failures trace to setup, not bad luck. Rotting in water means submerged leaves or stale water - trim to firm tissue and restart with only nodes underwater. No roots after three weeks in cool dim rooms is often slow metabolism; move brighter and warmer before discarding firm cuttings. Node-free cuttings may root without shooting - re-cut from healthy parent material. Transplant shock after water rooting causes temporary wilting; keep mix moist and light filtered. Overwet soil rots buried nodes - use smaller pots and perlite-amended mix. Pale new leaves usually mean low light, not a failed clone - increase brightness and judge the next two leaf sets.
Conclusion
Tradescantia Nanouk propagation is straightforward when you treat it as node-based stem cloning, not leaf magic or passive hope. Take 10–15 cm cuttings with at least one node below the cut, root in clean water with regular changes or in lightly moist perlite-amended soil, and provide bright indirect light throughout. Roots typically appear in one to three weeks in warm active growth; soil-rooted cuttings often push new top growth sooner than water-rooted ones that must transition media.
Variegation on offspring may vary with the light and temperature those new leaves develop under, even though cuttings are genetically identical to the parent. Plan brighter conditions from rooting through the first month if pink and cream tones matter to you. Water propagation offers visibility; soil propagation offers efficiency - pick the path that matches your attention and setup, not a mythical single best method.
If you remember three rules, make them these: never skip the node, never let leaves sit in water, and judge variegation on new growth after light is adequate, not while a cutting still lives in a dim corner. Get those right and Nanouk becomes one of the easiest colorful houseplants to multiply - compact, vivid, and ready to share once roots and the first honest leaves tell you the clone succeeded.
When to use this page vs other Tradescantia Nanouk guides
- Tradescantia Nanouk overview - Start here for whole-plant context before deep-diving this topic.
- Tradescantia Nanouk problems hub - Jump to symptom-specific fix guides when this care topic does not resolve the issue.