Tradescantia Nanouk Repotting: When & How
Tradescantia Nanouk Repotting: When & How
Tradescantia Nanouk Repotting: When & How
By Sai Ananth · Reviewed by LeafyPixels Review Board · Last reviewed 2026-06-15
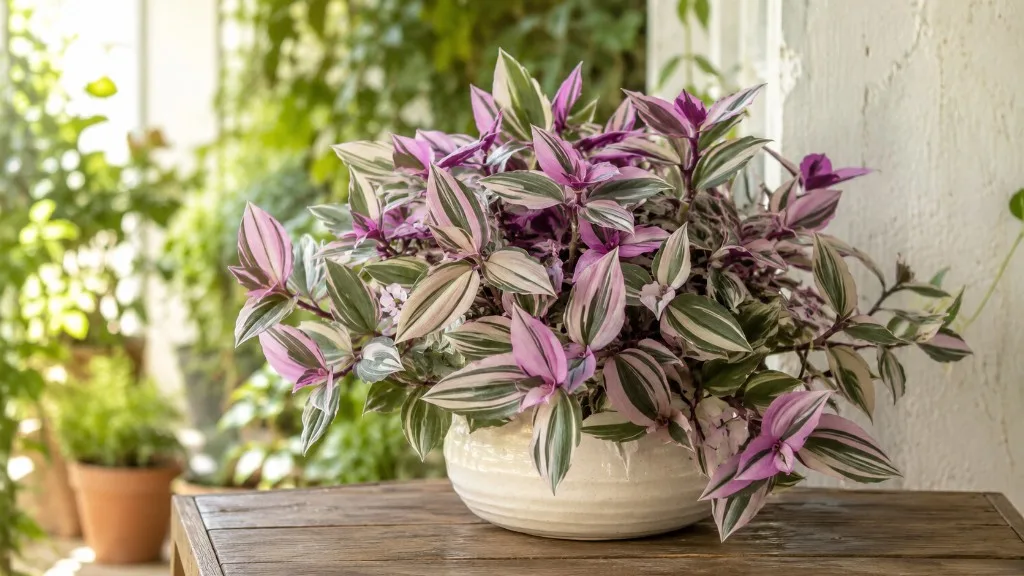
Tradescantia Nanouk - often sold as Fantasy Venice - fills a nursery pot faster than most trailing houseplants, and that speed changes how you should think about repotting. Under bright light and regular watering, a healthy Nanouk can turn fresh mix into a dense root mat in a single growing season. The goal is not to repot on a rigid calendar for its own sake. It is to give shallow, fast-moving roots enough airy soil and drainage before congestion starts stealing water, nutrients, and stability from the plant. Done well, a spring repot resets the root zone without sacrificing the pink-and-green foliage that makes this Dutch-bred cultivar worth keeping.
Retail tags may print Tradescantia albiflora ‘Nanouk’, Tradescantia cerinthoides ‘Nanouk’, or Tradescantia fluminensis ‘Nanouk’ depending on the supplier - taxonomy in Tradescantia moves faster than nursery labels. For repotting, the biology matters more than the binomial: Nanouk behaves like a fast-rooting Tradescantia with shallow, horizontal roots that spread near the soil surface rather than diving deep. That habit drives pot shape, mix choice, and how often you should inspect the root ball.
Illustrative Scenario - 4-Inch Nursery Pot to 5-Inch Wide Bowl
The following walkthrough is an illustrative indoor scenario - a composite of common grower situations, not a photo-documented case study from a single repot session.
Imagine a Nanouk in a 10 cm (4-inch) nursery pot on a bright east windowsill. Stems still push new tips, but watering runs through in under a minute, the mix smells slightly stale, and a spring lift test reveals a dense root cylinder with little visible soil. In mid-April, you choose a routine upgrade repot: slide into a 13 cm (5-inch) wide shallow bowl, refresh with the 2:1:1 peat-perlite-bark blend from our soil guide, tuck two tip cuttings around the rim, and skip fertilizer for four weeks. Mild wilt on day three clears by day six. At week four, new stem segments open with firm turgor and visible pink striping - your clearest signal that roots have reconnected.
If your plant matches only one vague symptom - say, one yellow lower leaf - this scenario does not apply. Check the decision tables below before you unpot.
Quick Answer - When to Repot Nanouk
Repot Tradescantia Nanouk every one to two years, or sooner when roots circle drainage holes, water runs straight through without wetting the center, or growth stalls despite good light and sane watering. Spring through early summer is the safest window because spring is generally the best time to repot as houseplants resume active growth. Choose a pot only 2–5 cm (1–2 inches) wider than the current one - Missouri Botanical Garden advises moving to a pot only about 2 inches wider than the root ball to prevent excess wet soil. Use the 2:1:1 mix from our soil guide, prefer wide and shallow containers, and pause fertilizer for about four weeks after the move.
Why Nanouk Outgrows Pots Faster Than Most Trailing Houseplants
Nanouk is not a slow-spreading pothos that can sit comfortably in the same pot for three years. It is a patented Dutch cultivar developed in Sappemeer, The Netherlands, and described in U.S. Plant Patent PP29,711 as a compact, vigorous selection with strong leaf color and good interiorscape performance. Breeders selected for visible growth and dense foliage - traits that translate indoors into rapid stem extension, frequent node rooting, and root balls that expand horizontally within months under bright conditions.
Dutch-Bred Fast Growth and Shallow Root Habit
The Spruce notes that Tradescantias have shallow roots that prefer moist but well-draining soil, and that Nanouk signals it has outgrown its container when roots grow from drainage holes or growth stops. That shallow architecture means Nanouk exhausts the upper and middle soil zones first. A pot that looked adequate in October can behave like a root plug by the following June even if the trailing stems still look lush. Hanging baskets hide the problem especially well - long vines cascade over the rim while the core mix has already compacted.
Repotting solves three practical problems at once for this cultivar. Fresh soil restores air pockets that old peat loses as it breaks down. A modestly larger container gives spreading roots room to branch instead of circling. And the inspection during repot lets you catch mushy roots, salt crust, or a top-heavy basket before stems snap or leaves yellow in ways that mimic a watering mistake.
Shallow Roots, Crowded Pots, and Water Channeling
Nanouk’s root system is relatively shallow compared with many upright houseplants. In a crowded pot, roots dominate the upper and middle zones, leaving little material to hold moisture evenly. Water can shoot down the gap between the root ball and pot wall - the classic “runs straight through” symptom - while the center stays oddly dry or, if you keep watering to compensate, stays wet too long in the lower third. Either pattern stresses foliage: tips brown, lower leaves yellow, and new growth comes in smaller or greener when variegation fades under stress.
Crowding also limits oxygen. Fine root hairs need air as much as moisture. When a root mat gets dense, the mix compacts with each watering cycle, and roots begin circling the bottom and sides. A slightly root-bound Tradescantia is not an emergency - The Spruce notes these plants prefer to be slightly root-bound - but severe congestion is different. At that point you are not training the plant; you are asking it to live in a container that behaves more like a root plug than a soil system. When channeling starts, link symptoms to the root zone before chasing fertilizer or light changes alone.
When to Repot vs Top-Dress
Not every spring soil refresh requires lifting the entire plant. Top-dressing - scraping the top 2–3 cm of depleted mix and replacing it with fresh perlite-amended soil - works when roots are healthy, drainage is still acceptable, and the pot size remains appropriate. Choose full repot when two or more root-bound signals appear together, the mix smells sour, water channels through a hydrophobic mat without wetting the center, or the entire root ball is involved rather than only the surface crust.
Top-Dress vs Full Repot Decision Table
| Situation | Top-dress | Full repot |
|---|---|---|
| Roots white, not circling heavily | Yes | Optional |
| Roots through drainage holes | No | Yes |
| Water runs through in seconds | No | Yes |
| Mix smells sour or musty | No | Yes - may be root rot |
| Only surface salt crust or compaction | Yes | Optional |
| Want to add cuttings for fullness | No | Yes - best done during full repot |
| Plant in same pot less than 10 months | Usually wait | Only if urgent |
Spring, with early summer as a backup, is the safest full-repot window indoors. The Royal Horticultural Society notes that spring, as plants start into growth, is generally the best time to repot and tease spiralling roots for that reason. Aim for March through June when you see consistent new tips forming. Winter repotting is a last resort unless roots are mushy, soil is sour, or the pot cannot dry at all - then treat it as rescue work with cautious watering and no fertilizer until spring growth returns.
Signs Your Nanouk Is Root-Bound - The Lift Test
Root-bound means the container is filled with roots to the point that soil function suffers. Nanouk shows it in predictable ways if you know what to check.
Roots emerging from drainage holes are the most obvious sign. A few pale tips peeking out may be early warning; a mat plugging the hole means the upgrade is overdue. When you lift the plant from the pot, a solid root cylinder with little visible mix - roots circling the bottom and sides in a tight pattern - confirms congestion. The RHS advises teasing or lightly trimming spiralling roots before repotting into a larger container.
Water that runs through instantly, sometimes without fully wetting the root ball, often means the interior is dense and channeling has started. Conversely, water that sits on top or drains slower than it used to can mean compaction - also a repot cue. Stalled growth despite good light and sane watering is the subtle sign many growers miss. Nanouk should produce regular new segments in spring and summer. If stems look tired, leaves shrink, and variegation dulls while pests are absent, inspect roots before you change fertilizer or light.
The lift test is the quickest routine check during the growing season. Water the day before, tilt the pot, and slide the root ball out. If the plant releases as one hard plug with roots thicker than soil, plan a repot. If soil crumbles away and roots are white and scattered, you likely have time. Two signs together - roots at the hole plus water that races through in seconds - are stronger evidence than any single symptom. Nanouk can look slightly tired from low winter light without being root-bound, so always confirm underground before you upsize.
How Often Fast Growers Need Upgrades
There is no single interval that fits every home. Nanouk in a bright kitchen with consistent watering can outgrow a 15 cm pot in one season. The same cultivar in moderate light may take two years to reach the same congestion. Think in terms of growth rate plus root inspection, not a sticker on the calendar.
In favorable conditions, Nanouk behaves like the fast grower it was bred to be. Stems lengthen, nodes root easily when they touch soil, and the root ball expands outward and upward. Retailers often pot young plants in mix that is already well rooted; your first repot sometimes comes six to twelve months after purchase, not years later. Missouri Botanical Garden lists roots escaping drainage holes or stalled growth among environmental stress signs tied to container problems - use those cues rather than a fixed annual date.
Treat annual spring inspection as the baseline rhythm, and expect to actually repot in many of those years if the plant is thriving. If you propagate often and keep restarting from cuttings, you will repot small groups more frequently than a single large mother plant. Hanging baskets deserve the same schedule as table pots - sometimes more often, because exposed sides dry faster and roots chase moisture along the pot wall. Do not assume a basket is fine just because stems look long and lush.
Pot Choice - Wide, Shallow, and One Size Up
Pot choice is where good intentions cause bad outcomes. Nanouk wants drainage and surface room more than it wants a deep bunker of soil. The upgrade should feel like a slight loosening of the belt, not a move into a mansion.
Go one pot size up - about 2 to 5 cm (1 to 2 inches) wider in diameter than the current pot. The Spruce recommends a container only two inches larger in diameter when potting or repotting Nanouk, and notes the container does not need to be deep but must have adequate drainage holes. Depth matters less than width for this trailing species. Always choose drainage holes - NC State Extension notes related inch plants prefer moist, well-drained potting mix and root rot follows when drainage fails indoors.
Worked Example - 4-Inch to 5-Inch Wide Bowl
Start with a Nanouk in a 10 cm (4-inch) nursery pot whose root ball measures roughly 8 cm across when you lift it. The upgrade target is a 13 cm (5-inch) wide shallow bowl - one inch wider in diameter, not a jump to 15 cm or 18 cm. Fill the new pot with fresh 2:1:1 mix so the crown sits at the same depth as before. After repotting, the wet-soil volume increases modestly - enough for one season of root spread, not so much that unused mix stays saturated for weeks. If you only have a deep 13 cm pot, add mix to the bottom so the effective root zone stays shallow rather than burying stems to fill height.
Nanouk’s display value is lateral - stems arch, branch, and spill from hanging baskets or wide bowls. Roots follow that habit. A wide, shallow pot gives spreading roots a natural shape and reduces the column of wet mix sitting under a small root disk. Plastic nursery pots inside decorative covers work if you empty runoff and never let the plant sit in standing water. Terra cotta dries faster, which can help heavy-handed waterers after repotting.
Soil Mix for Repotting Day
Repotting is the wrong time to reuse tired mix or invent a new recipe from memory. Nanouk wants a well-draining peat-perlite blend with structural bark - not dense bagged soil alone and not straight cactus mix. Our Tradescantia Nanouk soil guide specifies the full 2:1:1 ratio: two parts peat-based houseplant mix, one part coarse perlite, and one part orchid bark or coco chips by volume. That blend holds moisture for shallow roots, drains within minutes after a full watering, and stays airy enough to prevent crown stress.
Do not duplicate the entire recipe here - follow the soil page for mixing, testing drainage, and adjusting toward more perlite if you tend to overwater. At repot time, replace all old mix unless you are doing a minimal rescue on a rot-free plant and the interior still smells clean. The mix should smell earthy, not sour. When you squeeze a handful, it should crumble rather than form a wet ball that stays clumped. Never substitute garden soil or heavy outdoor mixes - they compact quickly indoors and hold water against Nanouk’s shallow roots.
Step-by-Step - Repot Tradescantia Nanouk
Repotting Nanouk is straightforward if you protect roots, keep the crown at the same depth, and resist fertilizing or flooding the plant immediately. Gather a new pot, fresh mix, clean scissors, a chopstick or pencil, and a watering can before you lift the plant.
- Water lightly the day before so the root ball holds together but is not soggy.
- Slide the plant out while supporting the base of stems with one hand. If stuck, squeeze a flexible pot or run a knife around the edge - never yank by the stems.
- Brush away loose old mix from the sides and bottom. White, firm roots are healthy; brown or black mushy roots should be trimmed back to solid tissue.
- Tease circling roots outward with your fingers or make a few shallow vertical scores on the outer mat - the RHS recommends teasing spiralling roots before upsizing.
- Add fresh mix to the new pot so the crown will sit at the same depth as before - burying stems deeper can encourage rot on soft tissue.
- Center the root ball and fill around the sides, tapping the pot and using a chopstick to settle mix without compacting it into concrete.
- Water thoroughly once, until excess drains freely, then let the plant rest in bright indirect light - avoid harsh direct sun for the first week.
- Hold fertilizer for about four weeks so you do not burn tender new roots with salts. Resume your normal schedule only after new growth looks typical.
For the first two weeks, check moisture more often than usual using the top-inch-dry rule from our watering guide. Light wilting on day two or three can be normal shock; wilting that worsens for ten days is a red flag for overwatering, oversize pot, or hidden rot - see root rot if wet soil and decline persist.
Add Cuttings for a Fuller Pot
This is also the best moment to trim leggy stems and tuck fresh cuttings if you want a denser pot. Nanouk roots readily at nodes. Planting two or three tip cuttings around the parent after repotting can restore the nursery look faster than repotting alone, as long as you do not crowd the surface so much that air cannot move. Follow our propagation guide for cutting length and rooting tips. Cuttings may wilt individually while establishing - remove any that go mushy, but leave firm ones alone.
Common Repotting Mistakes
Most failed repots are not about clumsy hands. They are about oversized pots, bad timing, and too much enthusiasm right after the move.
Overpotting is the number one mistake. Extra soil holds extra water; Nanouk’s root system cannot drink it fast enough, especially in cool or low-light rooms. Missouri Botanical Garden notes oversized pots keep soil wet too long and can cause root rot because unpenetrated soil does not dry between waterings. If you already bought too large a pot, use a smaller plastic insert inside rather than a gravel “drainage layer” - Wisconsin Extension confirms gravel layers do not improve drainage and can keep the root zone wetter.
Bare-rooting, aggressive root shaving, or leaving the plant in full sun right after repotting all extend downtime. So does immediate heavy fertilizing or repotting a plant that was already drought-stressed or pest-infested without fixing the underlying issue first. Winter repotting without urgency adds weeks of idle wilting. Pots without holes and decorative cachepots that hold standing water remain hard nos for this species. If you repotted during active spider mite or mealybug treatment, isolate the plant and expect slower recovery until the pest cycle clears.
Aftercare and Recovery Timeline
Mild transplant shock - slight droop, one or two older leaves yellowing - often clears within one to two weeks when light and moisture are appropriate. Full root re-establishment typically takes four to six weeks in spring - practical home-climate heuristics, not laboratory measurements tied to Nanouk specifically. Cooler rooms, winter repots, and oversize pots extend those windows; warmer bright conditions shorten them.
New stem tips with firm turgor and fresh pink striping are the recovery signal that matters. Old damaged leaves will not magically revert to pink; new growth tells you the repot worked. Keep the crown as dry as practical when watering - Nanouk’s soft foliage marks easily if water sits in the leaf axils. Maintain your normal bright indirect light once the plant stabilizes.
When recovery exceeds three weeks with ongoing decline, separate root problems from environmental ones. Pull the plant gently and sniff the mix. If roots are brown and slimy, you are fighting rot, not shock - trim, repot into appropriately sized fresh mix, and adjust watering. If roots look good but the plant is pale and stretchy, light - not another repot - is usually the answer. Same-day wilt recovery after watering (dry soil) points to thirst; wilt on wet soil points to root failure - the split described in our wilting guide.
Skip liquid fertilizer for about four weeks after repotting. Resume diluted balanced feeding only after healthy new growth appears. Fresh mix already provides a clean baseline without salt buildup.
Pet Safety and Sap Irritation
Tradescantia sap can irritate skin, and related inch plants are listed as toxic to cats and dogs by the ASPCA. Chewing can cause oral irritation, drooling, and vomiting. Wash hands after root work, bag trimmed roots and fallen leaves during cleanup, and keep Nanouk out of reach in hanging baskets or on high shelves. Contact your veterinarian or ASPCA Animal Poison Control at (888) 426-4435 if your pet ingests any part of the plant - do not wait for symptoms to worsen before seeking professional advice.
Conclusion
Tradescantia Nanouk repotting comes down to repeatable decisions: inspect in spring, upgrade when root-bound signs outweigh the stress of moving, and go one size up with the 2:1:1 mix from our soil guide. Fast growth makes annual repots common, but your eyes beat the calendar - roots out of holes, water channeling, and a tight root cylinder matter more than guessing dates. Match pot width to how Nanouk actually grows, keep drainage honest, pause fertilizer for a month, tuck cuttings if you want fullness, and let new pink-striped stems confirm recovery. Get those pieces right and repotting stops feeling like a gamble and starts feeling like routine maintenance.
Related guides: Nanouk overview · Soil mix · Watering · Light · Propagation · Root rot · Overwatering · Wilting
When to use this page vs other Tradescantia Nanouk guides
- Tradescantia Nanouk overview - Start here for whole-plant context before deep-diving this topic.
- Tradescantia Nanouk problems hub - Jump to symptom-specific fix guides when this care topic does not resolve the issue.