Rosemary Repotting: When, How, and Mistakes to Avoid
Rosemary Repotting: When, How, and Mistakes to Avoid
Rosemary Repotting: When, How, and Mistakes to Avoid
Rosemary (Salvia rosmarinus, formerly classified as Rosmarinus officinalis) is one of the most forgiving herbs to grow until you disturb its roots carelessly. The Royal Horticultural Society notes that rosemary must never sit in waterlogged compost - a constraint that shapes every repot decision from pot material to mix composition to how much you water in the week after the move. Unlike fast-growing annual herbs that outgrow a nursery pot in weeks, rosemary is a woody Mediterranean perennial that tolerates - and even prefers - being slightly root-bound. That tolerance makes gardeners complacent until the plant suddenly wilts, sheds needles, or stops producing the aromatic new growth you grow it for.
Repotting rosemary is a targeted intervention every two to three years - or when the root zone clearly outgrows its container. Done correctly, the move refreshes tired compost and resets a Rosemary watering guide that stale mix disrupts. Done incorrectly - oversized pot, heavy soil, or mid-winter timing - the same job triggers transplant shock or root rot on Rosemary. The sections below cover when to repot, what container and soil to use, how to handle woody roots, and the special cases that trip up experienced growers.
Why Rosemary Repotting Follows Different Rules Than Most Houseplants
Repotting rosemary is not the same as repotting a tropical foliage plant. Rosemary evolved on rocky, fast-draining Mediterranean slopes where lean soil and sharp drainage are the norm. In a container, jumping three pot sizes creates a soggy ring of unused soil that oxygen-starved roots cannot colonize before rot sets in.
The RHS describes this as overpotting: fresh compost stays wet too long because the root system is too small to use it, and roots rot in the saturated zone around the old ball. Symptoms - yellowing, wilting, branch dieback - look like underwatering on Rosemary, so gardeners often water more and make it worse. Rosemary also differs from soft-stemmed herbs: woody stems above ground mean a tougher, less flexible root system below. Fine root hairs strip away easily if you bare-root the plant or rinse all soil from the ball.
How Rosemary Roots Behave in Containers Over Time
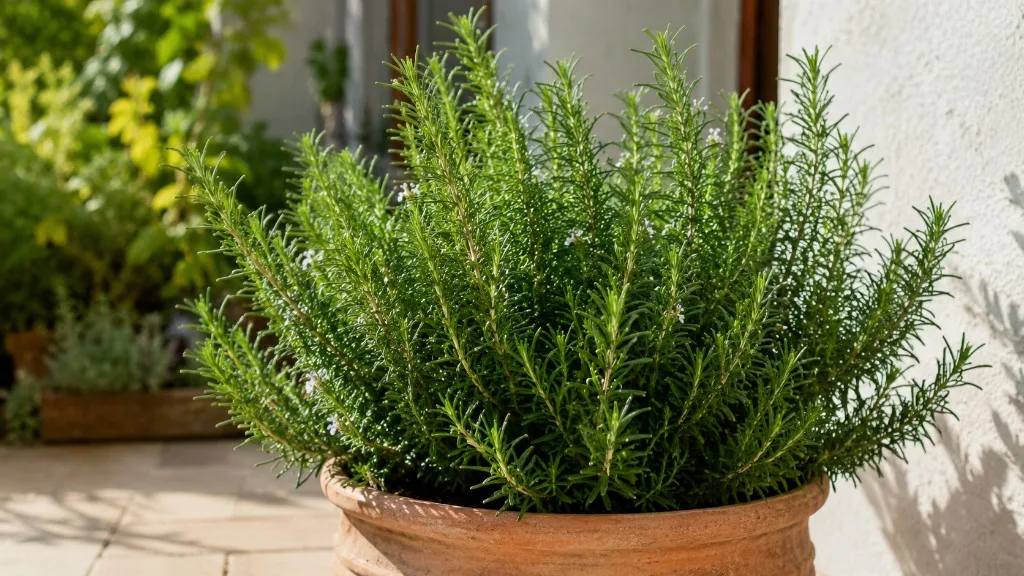
In an appropriately sized pot with sharp drainage, rosemary roots grow steadily but not explosively. For the first year or two after potting, the root ball fills the container evenly, and the plant produces the stiff, aromatic needle-like leaves that define healthy growth. The RHS recommends a minimum container of 30 cm (12 inches) in width and depth for established rosemary because the species develops a deep root system; anything smaller dries out too fast in summer sun and forces the plant into chronic drought stress.
As roots reach the pot walls, they begin circling. Mild circling is normal and even tolerated - rosemary does not mind being slightly root-bound the way a fiddle-leaf fig does. Problems begin when the root mass becomes so dense that water cannot penetrate the center of the ball, nutrients cannot reach fine root hairs, and the plant wilts within hours of watering because moisture never reaches where it is needed. At that stage, growth slows despite good light, lower needles brown and drop, and the stem base may look slightly shriveled even when the surface soil feels damp.
Compost also degrades over time. Organic matter breaks down, air spaces collapse, and mineral salts from tap water and occasional fertilizer accumulate at the root zone. After two to three years in the same pot, even a rosemary that is not yet circling heavily benefits from fresh mix. A same-pot refresh - removing the plant, trimming up to one-quarter of the outermost circling roots, and replanting in the same container with new gritty compost - can solve declining drainage without forcing the plant to adapt to a larger soil volume.
When to Repot Rosemary: Signs, Seasons, and Exceptions
The right time to repot rosemary is when the plant shows it has outgrown its container or the compost has broken down - not when a calendar reminder pings. Many outdoor gardeners in warm climates (USDA zones 8 and above) plant rosemary directly in the ground and never repot at all. Indoors, on a balcony, or in any container longer than a single season, repotting becomes periodic maintenance tied to root health rather than above-ground size alone.
Plan the move during active growth whenever you can. Rosemary recovers fastest when days are lengthening, temperatures are moderate, and the plant is already pushing soft new growth at the stem tips. A healthy plant repotted in late spring usually shows visible new shoots within two to four weeks. A stressed plant repotted in cold, short-day winter can survive, but expect a slower bounce-back and accept that some needle drop is normal while roots re-establish.
Observable Signs of a Root-Bound Plant
Root-bound rosemary gives off clear signals if you know what to watch for. The most obvious is roots emerging from drainage holes at the bottom of the pot. Less obvious but equally telling: water runs straight through the container seconds after you pour, because the root mass has become so dense that fresh water channels down the sides without soaking the center. You may also notice the plant wilts quickly after watering even though the surface looks moist, because roots cannot access water trapped in the middle of a tight mat.
Stunted growth is another sign. If rosemary has adequate light - six or more hours of direct sun daily - and you are watering appropriately, yet new shoots stay short and internodes remain tight without the soft lime-green tips that indicate active growth, gently slide the plant from its pot. A solid cylinder of roots with little visible soil, especially roots spiraling tightly at the bottom, means it is time to pot up or refresh the mix. Needle yellowing combined with a pot that dries out unevenly can also point to a root system that has outgrown its space, though always rule out overwatering on Rosemary first by checking whether the top 2–3 cm of compost is completely dry before you water.
Other triggers for repotting include sour-smelling compost, visible salt crust on the soil surface, or a plant that dries so fast you cannot keep up with watering despite an otherwise appropriate schedule. Each of these points to a root-zone problem that fresh, well-structured mix and slightly more room - or a same-pot refresh - can address more effectively than adjusting light or fertilizer.
Seasonal Timing That Speeds Recovery
Late spring is the safest window for routine rosemary repotting, once the risk of hard frost has passed and the plant faces a long warm season ahead to re-establish. May is ideal in many temperate climates; early summer works as a backup if spring passed before you noticed root-bound signs. Warm soil, increasing daylight, and active shoot growth give disturbed roots the best chance to colonize fresh compost before winter stress arrives.
Early autumn repotting is possible in mild climates where rosemary will remain outdoors or on a sheltered patio through winter. The goal is allowing six to eight weeks of root growth before cold slows metabolism. Avoid autumn repotting in regions where container roots freeze in the pot; a freshly repotted plant with disturbed roots is more vulnerable to winter kill than an established one left undisturbed until spring.
Winter repotting should be reserved for emergencies: confirmed root rot from waterlogged compost, a pot that will not drain, or a plant clearly failing because the root ball has no usable soil left. If the plant is merely slow because of short days and indoor light, wait until late winter or early spring. Repot in the morning, keep the plant in bright but not scorching light afterward, and avoid placing it near cold drafts or heating vents that desiccate foliage while roots are still recovering.
Choosing Pots, Depth, and Drainage for Rosemary
The right pot for rosemary balances root space with drainage and breathability. Rosemary does not benefit from a huge container “so it has room to grow.” Excess soil holds excess water, and a small root system cannot use that water fast enough in a large pot. The result is soggy compost, reduced oxygen around roots, and the root rot that looks like mysterious wilting from above. Every rosemary container needs drainage holes - the RHS treats this as non-negotiable. Saucers are fine as long as you empty them after watering so the pot never sits in standing water.
The One-Size-Up Rule Explained
Follow the one-size-up rule: choose a new pot only 2.5 to 5 cm (1 to 2 inches) wider in diameter than the current one, and avoid increasing depth dramatically unless the plant is clearly top-heavy and unstable. A rosemary in a 20 cm pot moves to a 25 cm pot, not a 35 cm bowl. The RHS overpotting guidance specifically warns that moving to a container more than 5 cm wider than the previous one creates the wet compost ring that causes root rot before roots can grow into the new space.
For young plants started in small nursery pots, the progression might look like: 10 cm starter pot → 15 cm → 20 cm → 25 cm → 30 cm finishing pot for a mature upright cultivar like ‘Tuscan Blue.’ Each step happens when roots fill the current container, not on a fixed schedule. Skipping from a tiny supermarket pot straight to a 30 cm terracotta bowl is one of the most common ways beginners stall rosemary for months or kill it outright.
Depth matters for rosemary because the species develops a substantial taproot-style anchor in open ground. In containers, a pot at least as deep as it is wide supports stability and gives roots vertical room without encouraging the overpotting trap of excess unused soil volume. When repotting only to refresh compost - not to upsize - return the plant to the same pot after trimming no more than one-quarter of the outermost circling roots, washing the container, and adding fresh gritty mix. Replant at the same depth; burying the woody stem base invites rot.
Terracotta, Plastic, and Decorative Cover Pots
Terracotta is widely considered the best material for rosemary because porous walls allow soil to breathe and dry evenly between waterings. That breathability protects against the overwatering that kills more container rosemary than any pest. Unglazed clay also keeps root zones cooler in blazing summer sun on a south-facing patio. The trade-off is faster drying: in air-conditioned indoor rooms or under intense grow lights, terracotta may require more frequent moisture checks than plastic.
Plastic pots retain moisture longer - useful on hot balconies, but risky if you water on schedule rather than checking dryness. Decorative cover pots without drainage holes should hold rosemary only as outer sleeves, with a draining inner pot and an air gap at the bottom. After repotting, place rosemary where it receives at least six hours of direct sun daily, and harden off indoor plants moved outdoors over seven to ten days.
The Best Soil Mix for Repotting Rosemary
Rosemary needs a well-draining, gritty potting mix that dries quickly and stays open enough for oxygen to reach roots. Heavy garden soil pulled from a yard bed is a poor choice for containers: it compacts, drains poorly, and can introduce pests or pathogens. The RHS recommends a peat-free soil-based compost amended with up to 25 percent horticultural grit by volume for container rosemary. In practice, most home growers use a leaner blend because standard multipurpose compost alone retains too much moisture for Rosemary overview.
A reliable baseline blend for repotting:
- 40% quality peat-free potting mix or soil-based compost
- 40% coarse sand, perlite, or horticultural grit
- 20% fine gravel or additional grit for structure
Another proven ratio used by container herb growers is 60% potting soil to 40% grit, perlite, or coarse sand. The mix should feel loose in your hand and crumble rather than form a tight ball when squeezed. When you water, excess should drain within seconds. If water pools on the surface for more than a few seconds, the mix is too dense - add grit before repotting, not after the plant is already struggling.
Rosemary tolerates alkaline conditions and a pH range roughly between 6.0 and 8.0, reflecting its native calcareous soils. You do not need to chase acidity the way you might for blueberries or azaleas. Avoid mixes heavy on fine peat or coconut coir alone unless you amend them substantially with coarse material; moisture-retaining “indoor plant” blends marketed for tropical foliage are actively harmful for rosemary roots.
DIY Gritty Blend vs Commercial Potting Mix
Commercial cactus and succulent mixes work well as a base for rosemary repotting because they are already structured for fast drainage. Read the label and add extra grit or coarse sand if the product feels fine or spongy. John Innes No. 2 or No. 3 mixed with grit at roughly three parts compost to one part grit gives the mineral content and weight that top-heavy rosemary stems appreciate in windy outdoor locations.
DIY blending helps in humid climates where store mixes stay wet too long. Avoid excess compost or worm castings, and never reuse old potting soil without refreshing - spent mix loses structure and may carry salt buildup that shows as brown needle tips after repotting.
How to Repot Rosemary Without Shock
Repotting rosemary is straightforward when you prepare materials first and disturb roots only as much as necessary. Rushing the process - yanking the plant by woody stems, bare-rooting it aggressively, or fertilizing the same day - turns a fifteen-minute job into a month-long recovery. Transplant shock happens when a plant struggles to adjust after root disturbance and environmental change. Rosemary typically shows new tip growth within two to four weeks when handled correctly in warm, bright conditions; woody specimens with heavy root pruning may take longer.
What to Gather Before You Start
One day before repotting, water the rosemary thoroughly so the root ball holds together and slides out of the old pot cleanly. Hydrated roots are flexible and less brittle than dry ones, which reduces breakage when you tease circling roots apart. Gather your supplies: the new pot (one size up, with drainage holes), fresh gritty mix, a hand trowel, clean sharp scissors or secateurs, a chopstick or pencil for settling soil, and a watering can with a narrow rose. Wash reused pots with hot soapy water to remove old salt deposits and algae.
Add a layer of fresh mix to the bottom so the plant sits at the same soil line on the woody stem as before. Pre-moisten the mix so it is damp but not soggy, and soak new terracotta briefly so it does not wick moisture from the root ball.
Removing the Plant and Working the Root Ball
Turn the potted rosemary on its side and gently slide it out. For plastic nursery pots, squeeze the sides to loosen. Never yank the plant by the stem alone - older rosemary stems are woody and can snap, and the root crown is the plant’s structural anchor. If the root ball does not release, run a knife around the inside edge of the pot or cut vertically through one side of a severely deformed nursery pot rather than forcing the plant.
Examine the root ball. If roots are lightly circling at the bottom, use your fingers to tease the lowest roots outward - think of loosening the edge, not shredding the center. If the plant is severely root-bound, make two or three shallow vertical cuts along the sides of the root mass with clean scissors, then loosen the bottom spiral. Some growers gently score the bottom quarter-inch of the ball to interrupt circling; keep cuts shallow to avoid damaging the main anchor roots.
Trim away any brown, mushy roots with sterile scissors. Healthy tissue after trimming should look white or cream-colored and feel firm. Remove dead or clearly desiccated lower branches if they are brittle and brown, but keep as much healthy foliage as possible - needles photosynthesize and supply energy during recovery. Set the plant in the new pot and backfill with fresh mix, working soil gently between roots with a chopstick. Firm the mix lightly with your fingers so the plant stands upright, but do not pack it tightly. Compressed soil suffocates roots the same way an oversized wet pot does.
Watering, Light, and Aftercare in the First Month
Water thoroughly immediately after repotting until excess drains from the bottom. This settles the mix around roots and eliminates large dry voids. For the first two weeks, let the top 2–3 cm of compost dry completely before watering again - the same drought-tolerant rhythm rosemary prefers normally, but pay closer attention because disturbed roots absorb water less efficiently at first. Never let the pot sit in a full saucer.
Hold off on fertilizer for three to four weeks after repotting. Fresh mix provides adequate baseline nutrition for short-term growth, and feeding too soon can burn regrowing root tips. Resume a light liquid feed at half strength only after you see soft new growth at the branch tips. Rosemary is not a heavy feeder; over-fertilizing after repotting produces soft, leggy growth that is more vulnerable to stress than the stiff aromatic shoots you want.
Expect mild transplant shock: slight wilting, a pause in growth, or some lower needle drop in the first one to two weeks. That is normal if the woody stems stay firm and soil moisture follows the dry-top rule. Place the plant in bright light with protection from scorching midday sun for three to five days after repotting if it was previously in full outdoor sun, then return it gradually to its normal exposure. Avoid heavy harvesting for two weeks so the plant can redirect energy to roots. Full recovery - new shoots at normal size, steady growth, stable wilting rhythm - typically takes two to four weeks in warm conditions. Deep root establishment may take four to six weeks, but you do not need to wait that long to resume light harvesting once new tips appear.
Repotting Store-Bought Rosemary and Same-Pot Refreshes
Not every rosemary repot looks like moving one established plant from a 20 cm pot to a 25 cm pot. Two situations come up constantly for home growers, and each has a slightly different playbook.
Store-bought rosemary from supermarkets and garden centers often arrives in a pot sized for short-term display, not long-term growing. The compost is frequently peat-heavy and stays wet too long on a kitchen windowsill. Upsize within the first month of purchase - into a slightly larger pot with gritty mix and a sunny location - prevents the slow decline that makes shoppers think they “kill every rosemary.” Water lightly the day before, slide the root ball out intact, tease any circling bottom roots, and pot up one size. If the nursery mix is visibly soggy or smells sour, shake off the outer third gently and replace with fresh gritty compost rather than transplanting the problem into a new container.
Same-pot refresh makes sense when the container size is still appropriate but compost has broken down after two or three years. Remove the plant, trim up to one-quarter of the outermost circling roots, wash the pot, add fresh gritty mix, and replant at the same depth. This solves salt buildup and compaction without triggering the overpotting stress of a too-large new home. Top-dressing - scraping away the top 3–4 cm of old compost and replacing it with gritty mix in spring - extends time between full repots but does not substitute when roots are clearly circling the bottom.
Upsizing a Nursery Pot Within the First Season
Young rosemary from a 10 cm nursery pot can usually move directly to a 15 cm container with gritty mix if roots are visible at the drainage holes or the plant dries out within a day of watering. Do not jump to a 30 cm pot because you want a large specimen quickly - the intermediate step matters. Place the upgraded plant in the sunniest spot available: rosemary that survives in a dim kitchen after repotting is surviving despite the location, not because the repot fixed underlying problems.
If you purchased rosemary in winter, resist repotting immediately unless the current compost is waterlogged. Instead, improve light if possible, water only when the top of the soil is dry, and schedule the proper repot for late spring. A winter upgrade into fresh mix helps only if the plant has adequate light and temperatures above roughly 10°C (50°F); otherwise the disturbed roots sit idle in cool, damp compost - the exact combination that precedes root rot.
Outdoor Container Rosemary and Winter Protection After Repotting
Outdoor container rosemary faces wind desiccation, rapid terracotta temperature swings, and root exposure that ground-planted specimens never experience. Repot outdoor specimens in late spring for the longest establishment window. After repotting, group containers near a sheltered wall, mulch the surface lightly with grit rather than moisture-retaining bark, and move pots to a greenhouse or porch before hard frost in cold climates - freshly repotted roots are less cold-hardy than established ones. Time the job for mild, overcast weather, and resist watering before the top of the compost dries even if you see slight wilting.
Common Rosemary Repotting Mistakes and Fixes
Even experienced gardeners repot rosemary badly once in a while. The mistakes below cause most post-repot wilting, rot, and branch dieback. Each is avoidable with a smaller pot, gentler hands, or a bit more patience.
Jumping multiple pot sizes is the most damaging error. A rosemary moved from a 15 cm pot into a 35 cm bowl sits in a large volume of wet soil its roots cannot explore. Oxygen drops, roots rot, and the visible symptom is a plant that wilts whether you water or not. One size up, every time. If you already made this mistake, the RHS overpotting recovery path applies: water extremely sparingly - only when the outer compost is clearly dry - and consider downsizing into a pot just larger than the inner root ball if symptoms persist after two weeks.
Bare-rooting or washing all soil away strips fine root hairs that do most of the water absorption. Tease circling roots; do not rinse the ball clean unless you are treating confirmed root rot and are prepared for a longer recovery measured in months rather than weeks. Using moisture-retaining potting mix without grit creates the same outcome as overpotting: wet roots in a container that never dries fast enough for rosemary’s metabolism.
Repotting during winter dormancy or immediately before a cold night adds environmental stress on top of root disturbance. Choose late spring when possible. Fertilizing right after repotting burns tender regrowing root tips - wait until new shoots confirm the plant has restarted growth. Overwatering in the first month is the silent killer: disturbed roots take up water slowly, so the gardener who waters on the old schedule keeps compost soggy while needles drop. Follow the dry-top rule strictly. Planting too deep buries the woody stem in moist mix and invites crown rot. Match the previous soil line exactly.
Conclusion
Rosemary repotting is less about following a calendar and more about reading the root ball and respecting the plant’s Mediterranean drainage requirements. When water runs through without soaking in, roots circle the pot bottom, or growth stalls despite six hours of direct sun, move the plant up one pot size - roughly 2.5 to 5 cm wider - into fresh gritty mix, ideally in late spring when the plant is actively growing. Water the day before, handle woody roots gently, plant at the same depth, skip fertilizer for three to four weeks, and let the top of the compost dry between waterings.
Store-bought rosemary upgrades and same-pot refreshes follow the same core rules with appropriate pot sizing and timing. Terracotta, sharp drainage, and incremental upsizing matter more for rosemary than for almost any other herb on your windowsill. Avoid the oversized pot, the bare-root rinse, the heavy peat mix, and the post-repot feed - those four mistakes account for most failures. Get the basics right and rosemary forgives a lot; the clearest sign of success is soft new growth at the branch tips within two to four weeks of the move.
When to use this page vs other Rosemary guides
- Rosemary overview - Start here for whole-plant context before deep-diving this topic.
- Rosemary problems hub - Jump to symptom-specific fix guides when this care topic does not resolve the issue.
- Root Rot on Rosemary - Escalate here when repotting adjustments are not enough.